
Possum Pie Dessert is a delightful treat that has captured the hearts of many with its unique blend of flavors and textures. Originating from the southern United States, this dessert is not made from the furry marsupial but rather features a rich combination of chocolate, cream cheese, and whipped topping, creating a luscious experience that is both indulgent and satisfying. I remember the first time I tried Possum Pie Dessert; the creamy filling paired with a crunchy crust was simply irresistible!
People love this dish not only for its delicious taste but also for its convenience. Its a no-bake dessert that can be prepared in advance, making it perfect for gatherings or family dinners. The playful name often sparks curiosity, and once you take a bite, youll understand why Possum Pie Dessert has become a beloved staple in many households. Join me as we explore this delightful recipe that is sure to impress your friends and family!

Ingredients:
- 1 pre-baked pie crust (9-inch)
- 1 cup granulated sugar
- 1 cup packed brown sugar
- 1 cup corn syrup
- 1/2 cup unsalted butter, melted
- 4 large eggs
- 1 teaspoon vanilla extract
- 1/2 teaspoon salt
- 1 cup chopped pecans
- 1 cup mini marshmallows
- 1/2 cup chocolate chips (optional)
- Whipped cream for serving (optional)
Preparing the Filling
Now that we have our ingredients ready, lets dive into the preparation of the filling for our Possum Pie. This is where the magic happens!
- In a large mixing bowl, combine the granulated sugar and brown sugar. Use a whisk to mix them together until they are well combined. This will ensure that the sugars blend seamlessly into the filling.
- Next, add the corn syrup to the sugar mixture. Pour it in slowly while continuing to whisk. The corn syrup adds a lovely sweetness and helps bind the filling together.
- Now, lets incorporate the melted butter. Make sure the butter is not too hot; we dont want to cook the eggs in the next step! Stir the melted butter into the mixture until its fully combined.
- Crack the eggs into a separate bowl and beat them lightly. Then, add the beaten eggs to the sugar and syrup mixture. Whisk everything together until its smooth and creamy.
- Next, add the vanilla extract and salt. The vanilla will enhance the flavor of the pie, while the salt will balance the sweetness. Mix until everything is well incorporated.
- Finally, fold in the chopped pecans and mini marshmallows. If youre feeling indulgent, you can also add the chocolate chips at this stage. Gently stir until the nuts and marshmallows are evenly distributed throughout the filling.
Preparing the Pie Crust
While the filling is coming together, lets make sure our pie crust is ready to go. If youre using a store-bought crust, you can skip to the next section. If youre making your own, heres a quick guide:
- Preheat your oven to 350°F (175°C).
- If youre making a homemade pie crust, combine 1 1/4 cups all-purpose flour, 1/2 teaspoon salt, and 1/2 cup unsalted butter (cold and cubed) in a mixing bowl. Use a pastry cutter or your fingers to mix until the mixture resembles coarse crumbs.
- Add 3-4 tablespoons of ice water, one tablespoon at a time, mixing until the dough comes together. Be careful not to overwork the dough.
- Roll out the dough on a floured surface to fit your 9-inch pie pan. Transfer the dough to the pan and trim any excess. Crimp the edges for a decorative touch.
- To pre-bake the crust, prick the bottom with a fork to prevent bubbling. Place a piece of parchment paper over the crust and fill it with pie weights or dried beans. Bake for 10-15 minutes until lightly golden. Remove from the oven and let it cool slightly.
Assembling the Pie
Now that we have our filling and crust ready, its time to assemble the Possum Pie!
- Pour the prepared filling into the pre-baked pie crust. Use a spatula to spread it evenly, ensuring that the pecans and marshmallows are well distributed.
- Carefully place the pie in the preheated oven. Bake for 45-50 minutes, or until the filling is set and the top is golden brown. You may want to check it around the 30-minute mark to ensure its not browning too quickly. If it is, cover the edges with aluminum foil.
- Once baked, remove the pie from the oven and let it cool on a wire rack for at least 2 hours. This cooling time is crucial as it allows the filling to set properly.
- Total Time: 80 minutes
- Yield: 1 pie (serves 8) 1x
- 1 pre-baked pie crust (9-inch)
- 1 cup granulated sugar
- 1 cup packed brown sugar
- 1 cup corn syrup
- 1/2 cup unsalted butter, melted
- 4 large eggs
- 1 teaspoon vanilla extract
- 1/2 teaspoon salt
- 1 cup chopped pecans
- 1 cup mini marshmallows
- 1/2 cup chocolate chips (optional)
- Whipped cream for serving (optional)
- In a large mixing bowl, combine the granulated sugar and brown sugar. Whisk until well combined.
- Slowly add the corn syrup to the sugar mixture while whisking continuously.
- Stir in the melted butter, ensuring its not too hot to avoid cooking the eggs.
- In a separate bowl, lightly beat the eggs, then add them to the sugar and syrup mixture. Whisk until smooth and creamy.
- Add the vanilla extract and salt, mixing until well incorporated.
- Fold in the chopped pecans and mini marshmallows. Optionally, add chocolate chips and gently stir until evenly distributed.
- Preheat your oven to 350°F (175°C).
- If making a homemade pie crust, combine 1 1/4 cups all-purpose flour, 1/2 teaspoon salt, and 1/2 cup cold, cubed unsalted butter in a mixing bowl. Mix until it resembles coarse crumbs.
- Gradually add 3-4 tablespoons of ice water, mixing until the dough comes together without overworking it.
- Roll out the dough on a floured surface to fit your 9-inch pie pan. Transfer to the pan, trim excess, and crimp the edges.
- Prick the bottom of the crust with a fork, cover with parchment paper, and fill with pie weights or dried beans. Bake for 10-15 minutes until lightly golden. Let cool slightly.
- Pour the prepared filling into the pre-baked pie crust, spreading it evenly.
- Bake in the preheated oven for 45-50 minutes, or until the filling is set and the top is golden brown. Check at 30 minutes; cover edges with aluminum foil if browning too quickly.
- Remove from the oven and let cool on a wire rack for at least 2 hours to allow the filling to set properly.
- For a richer flavor, consider using dark corn syrup.
- Serve with whipped cream for an extra touch of sweetness.
- Store leftovers in the refrigerator for up to 3 days.
- Prep Time: 20 minutes
- Cook Time: 60 minutes
Conclusion:
In summary, this Possum Pie Dessert is an absolute must-try for anyone looking to impress their friends and family with a unique and delicious treat. The combination of creamy layers, rich flavors, and a delightful crust makes it a standout dessert that will have everyone coming back for seconds. Whether you choose to serve it chilled or at room temperature, this pie is sure to be a hit at any gathering. For a fun twist, consider adding a layer of fresh fruit or a drizzle of chocolate sauce on top before serving. You could also experiment with different types of nuts in the crust for added texture and flavor. The possibilities are endless, and I encourage you to get creative with your own variations! I can’t wait for you to try this Possum Pie Dessert and share your experience with me. Whether youre a seasoned baker or a novice in the kitchen, I promise youll find joy in making and enjoying this delightful pie. Dont forget to snap a picture and share it on social medialets spread the love for this incredible dessert! Happy baking! Print
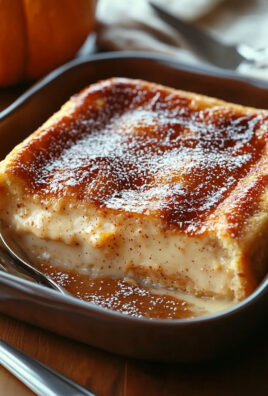
Possum Pie Dessert: A Deliciously Unique Treat You Must Try
Description
Enjoy the sweet and nutty goodness of Possum Pie, featuring a luscious filling of pecans, mini marshmallows, and optional chocolate chips, all nestled in a flaky crust. This delightful dessert is perfect for gatherings and will surely be a hit with family and friends!


Leave a Comment