
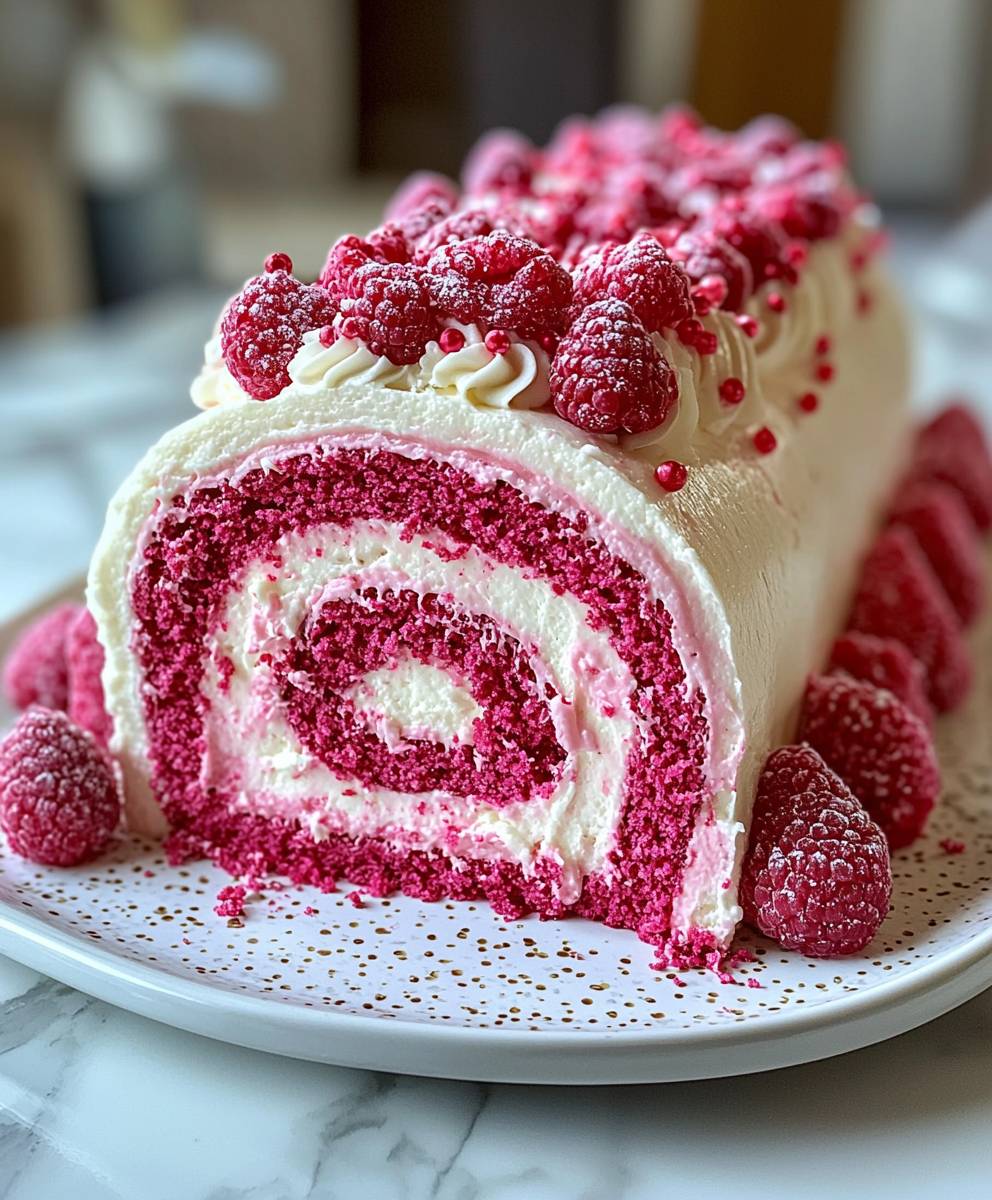
Pink Velvet Roll Cake: Prepare to be enchanted! Imagine a dessert that’s as visually stunning as it is delicious. A swirl of vibrant pink cake embracing a cloud of creamy, sweet filling that’s precisely what we’re creating today. This isn’t just a cake; it’s a statement, a centerpiece, and a guaranteed crowd-pleaser.
While not steeped in centuries of tradition like some classic desserts, the Pink Velvet Roll Cake draws inspiration from the beloved red velvet family. Red velvet, with its subtle cocoa notes and tangy buttermilk undertones, has a rich history in American baking, evolving from naturally colored beet-infused cakes to the vibrant red we know today thanks to the magic of food coloring. Our pink variation offers a playful, modern twist on this classic, perfect for birthdays, holidays, or any occasion that calls for a touch of whimsy.
What makes this Pink Velvet Roll Cake so irresistible? It’s the delightful combination of textures and flavors. The light, airy sponge cake practically melts in your mouth, while the creamy filling provides a luscious counterpoint. The subtle tang from the cream cheese in the filling balances the sweetness perfectly, preventing it from becoming cloying. Plus, let’s be honest, the vibrant pink hue is simply captivating! It’s a dessert that’s as fun to make as it is to eat, and the rolled presentation adds an extra touch of elegance. Get ready to impress your friends and family with this show-stopping treat!

Ingredients:
- For the Cake:
- 1 ½ cups all-purpose flour
- 1 teaspoon baking powder
- ½ teaspoon baking soda
- ½ teaspoon salt
- ½ cup (1 stick) unsalted butter, softened
- 1 ½ cups granulated sugar
- 2 large eggs
- 1 teaspoon vanilla extract
- 1 teaspoon white vinegar
- 1 cup buttermilk
- 1-2 tablespoons pink gel food coloring (adjust to desired shade)
- For the Cream Cheese Filling:
- 8 ounces cream cheese, softened
- ½ cup (1 stick) unsalted butter, softened
- 3 cups powdered sugar
- 1 teaspoon vanilla extract
- Pinch of salt
- For Dusting:
- Powdered sugar, for dusting the cake and towel
Preparing the Pink Velvet Cake
- Preheat and Prepare: First things first, let’s get our oven ready! Preheat your oven to 350°F (175°C). Grease a 10×15 inch jelly roll pan really well. Then, line it with parchment paper, leaving an overhang on the sides. This overhang will be super helpful later when we need to lift the cake out. Grease the parchment paper as well. Trust me, you don’t want this cake sticking!
- Combine Dry Ingredients: In a medium bowl, whisk together the flour, baking powder, baking soda, and salt. Whisking is key here to make sure everything is evenly distributed. This will help our cake rise beautifully and have a nice, even texture.
- Cream Butter and Sugar: In a large bowl (or the bowl of your stand mixer), cream together the softened butter and granulated sugar until light and fluffy. This usually takes about 3-5 minutes. You want the mixture to be pale and airy. This step is crucial for incorporating air into the batter, which will make the cake tender.
- Add Eggs and Vanilla: Beat in the eggs one at a time, making sure each egg is fully incorporated before adding the next. Then, stir in the vanilla extract. Vanilla extract adds a lovely depth of flavor to the cake.
- Combine Vinegar and Buttermilk: In a small bowl, combine the white vinegar and buttermilk. Don’t worry, it might look a little curdled that’s perfectly normal! The vinegar reacts with the buttermilk to create a tender crumb.
- Alternate Wet and Dry Ingredients: Gradually add the dry ingredients to the wet ingredients, alternating with the buttermilk mixture. Begin and end with the dry ingredients. So, add about a third of the dry ingredients, then half of the buttermilk mixture, then another third of the dry ingredients, then the remaining buttermilk mixture, and finally the last of the dry ingredients. Mix until just combined. Be careful not to overmix! Overmixing can develop the gluten in the flour, resulting in a tough cake.
- Add Food Coloring: Stir in the pink gel food coloring until you reach your desired shade of pink. Remember, a little goes a long way with gel food coloring, so start with a small amount and add more until you’re happy with the color. I usually start with 1 tablespoon and then add more in ½ teaspoon increments.
- Pour into Pan: Pour the batter into the prepared jelly roll pan and spread it evenly. Make sure the batter reaches all the corners of the pan.
- Bake: Bake for 12-15 minutes, or until a toothpick inserted into the center comes out clean. Keep a close eye on it, as it can overbake easily. An overbaked cake will be dry and more likely to crack when you roll it.
Rolling the Cake
- Prepare a Towel: While the cake is baking, prepare a clean kitchen towel by dusting it generously with powdered sugar. This will prevent the cake from sticking to the towel.
- Invert and Roll: As soon as the cake comes out of the oven, immediately invert it onto the prepared towel. Carefully peel off the parchment paper.
- Roll the Cake: Starting from one of the short ends, roll the cake up tightly in the towel. This is important to train the cake to hold its rolled shape.
- Cool Completely: Let the rolled cake cool completely on a wire rack. This usually takes about an hour or two. Don’t be tempted to unroll it before it’s completely cool, or it might crack.
Preparing the Cream Cheese Filling
- Cream Cheese and Butter: In a large bowl (or the bowl of your stand mixer), cream together the softened cream cheese and butter until smooth and creamy. Make sure both the cream cheese and butter are at room temperature for the best results. This will prevent lumps in your filling.
- Add Powdered Sugar: Gradually add the powdered sugar, one cup at a time, beating well after each addition. This will prevent the powdered sugar from flying everywhere.
- Add Vanilla and Salt: Stir in the vanilla extract and a pinch of salt. The salt helps to balance the sweetness of the filling.
- Whip Until Fluffy: Beat the filling until it is light and fluffy. This usually takes about 2-3 minutes.
Assembling the Pink Velvet Roll Cake
- Unroll the Cake: Once the cake is completely cool, carefully unroll it. Be gentle, as it might crack slightly.
- Spread the Filling: Spread the cream cheese filling evenly over the surface of the cake, leaving about ½ inch border along one of the long edges. This will prevent the filling from squeezing out when you roll it up.
- Reroll the Cake: Starting from the edge with the filling, carefully reroll the cake tightly.
- Wrap and Chill: Wrap the rolled cake tightly in plastic wrap and chill in the refrigerator for at least 2 hours, or preferably overnight. This will allow the filling to set and the cake to hold its shape.
- Dust and Serve: Before serving, dust the roll cake with powdered sugar. Trim the ends of the cake to create a clean, even look. Slice the cake into 1-inch thick slices and serve. Enjoy!
Conclusion:
This Pink Velvet Roll Cake isn’t just a dessert; it’s an experience. From the vibrant hue that instantly brightens any table to the delicate, melt-in-your-mouth texture, it’s a showstopper that’s surprisingly simple to create. I know, I know, roll cakes can seem intimidating, but trust me, this recipe breaks it down into manageable steps, ensuring a beautiful and delicious result every time. The subtle tang of the buttermilk combined with the sweetness of the cream cheese frosting creates a flavor profile that’s both comforting and sophisticated. Its a delightful treat that will impress your friends and family, and leave them begging for the recipe! But why is this particular Pink Velvet Roll Cake a must-try? It’s the perfect balance of visual appeal and delectable taste. It’s not overly sweet, making it a wonderful accompaniment to a cup of coffee or tea. Plus, it’s incredibly versatile! Serving Suggestions and Variations: Think beyond just slicing and serving. This Pink Velvet Roll Cake is fantastic with a dollop of fresh whipped cream and a scattering of fresh berries. Imagine a summer picnic with slices of this cake alongside strawberries and blueberries pure bliss! For a more decadent experience, try drizzling it with melted white chocolate or a raspberry coulis. Feeling adventurous? Here are a few variations to spark your creativity: * Chocolate Chip Delight: Add mini chocolate chips to the cake batter for a hint of chocolatey goodness. * Nutty Indulgence: Sprinkle chopped pecans or walnuts over the frosting for added texture and flavor. * Citrus Zest: Incorporate lemon or orange zest into the cake batter for a bright and zesty twist. * Coffee Infusion: Add a tablespoon of strong coffee to the cake batter for a mocha-inspired flavor. * Seasonal Flair: Adjust the frosting to match the season. In the fall, try a maple cream cheese frosting. In the winter, a peppermint-infused frosting would be festive and delicious. Don’t be afraid to experiment and make this Pink Velvet Roll Cake your own! The possibilities are endless. I truly believe that this recipe is a winner. It’s a guaranteed crowd-pleaser, perfect for birthdays, holidays, or simply a special treat for yourself. The satisfaction of creating such a beautiful and delicious dessert from scratch is incredibly rewarding. So, what are you waiting for? Gather your ingredients, preheat your oven, and get ready to bake! I’m confident that you’ll love this Pink Velvet Roll Cake as much as I do. And most importantly, I want to hear about your experience! Did you try the recipe? Did you make any variations? What did your friends and family think? Please share your photos and comments below. I’m eager to see your creations and learn from your baking adventures. Happy baking, and enjoy every delicious bite of your homemade Pink Velvet Roll Cake! I can’t wait to see your beautiful creations! Print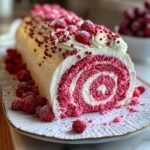
Pink Velvet Roll Cake: A Delicious & Easy Recipe
- Total Time: 165 minutes
- Yield: 10–12 slices 1x
Description
Stunning Pink Velvet Roll Cake with tangy cream cheese filling. Delicate and surprisingly easy to make, perfect for special occasions!
Ingredients
- 1 ½ cups all-purpose flour
- 1 teaspoon baking powder
- ½ teaspoon baking soda
- ½ teaspoon salt
- ½ cup (1 stick) unsalted butter, softened
- 1 ½ cups granulated sugar
- 2 large eggs
- 1 teaspoon vanilla extract
- 1 teaspoon white vinegar
- 1 cup buttermilk
- 1–2 tablespoons pink gel food coloring (adjust to desired shade)
- 8 ounces cream cheese, softened
- ½ cup (1 stick) unsalted butter, softened
- 3 cups powdered sugar
- 1 teaspoon vanilla extract
- Pinch of salt
- Powdered sugar, for dusting the cake and towel
Instructions
- Preheat your oven to 350°F (175°C). Grease a 10×15 inch jelly roll pan really well. Then, line it with parchment paper, leaving an overhang on the sides. Grease the parchment paper as well.
- In a medium bowl, whisk together the flour, baking powder, baking soda, and salt.
- In a large bowl (or the bowl of your stand mixer), cream together the softened butter and granulated sugar until light and fluffy (3-5 minutes).
- Beat in the eggs one at a time, making sure each egg is fully incorporated before adding the next. Then, stir in the vanilla extract.
- In a small bowl, combine the white vinegar and buttermilk.
- Gradually add the dry ingredients to the wet ingredients, alternating with the buttermilk mixture. Begin and end with the dry ingredients. Mix until just combined. Be careful not to overmix!
- Stir in the pink gel food coloring until you reach your desired shade of pink. Start with a small amount and add more until you’re happy with the color.
- Pour the batter into the prepared jelly roll pan and spread it evenly.
- Bake for 12-15 minutes, or until a toothpick inserted into the center comes out clean. Keep a close eye on it, as it can overbake easily.
- While the cake is baking, prepare a clean kitchen towel by dusting it generously with powdered sugar.
- As soon as the cake comes out of the oven, immediately invert it onto the prepared towel. Carefully peel off the parchment paper.
- Starting from one of the short ends, roll the cake up tightly in the towel.
- Let the rolled cake cool completely on a wire rack (1-2 hours).
- In a large bowl (or the bowl of your stand mixer), cream together the softened cream cheese and butter until smooth and creamy.
- Gradually add the powdered sugar, one cup at a time, beating well after each addition.
- Stir in the vanilla extract and a pinch of salt.
- Beat the filling until it is light and fluffy (2-3 minutes).
- Once the cake is completely cool, carefully unroll it. Be gentle, as it might crack slightly.
- Spread the cream cheese filling evenly over the surface of the cake, leaving about ½ inch border along one of the long edges.
- Starting from the edge with the filling, carefully reroll the cake tightly.
- Wrap the rolled cake tightly in plastic wrap and chill in the refrigerator for at least 2 hours, or preferably overnight.
- Before serving, dust the roll cake with powdered sugar. Trim the ends of the cake to create a clean, even look. Slice the cake into 1-inch thick slices and serve. Enjoy!
Notes
- Make sure all ingredients are at room temperature for best results, especially the butter and cream cheese.
- Don’t overmix the cake batter, as this can result in a tough cake.
- Be gentle when rolling and unrolling the cake to prevent cracking.
- Chilling the cake is essential for the filling to set and the cake to hold its shape.
- Adjust the amount of food coloring to achieve your desired shade of pink.
- Prep Time: 30 minutes
- Cook Time: 15 minutes


Leave a Comment