
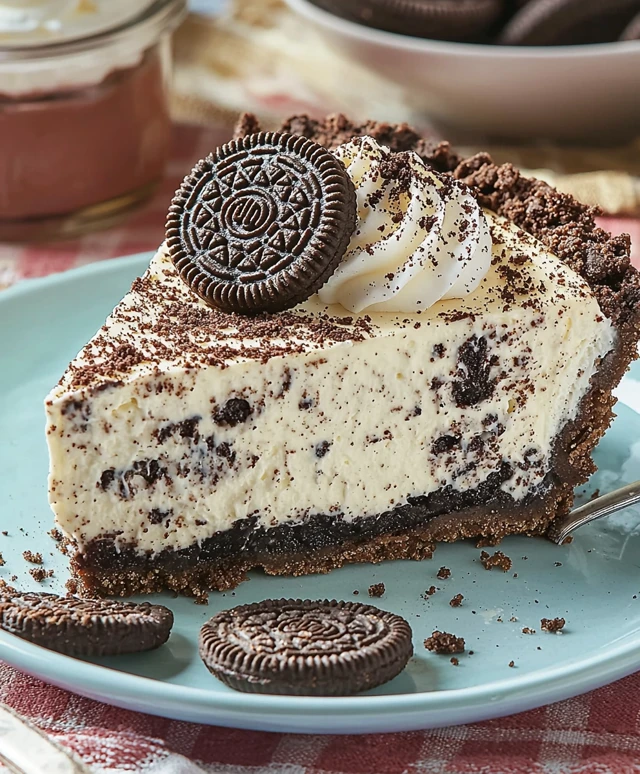
Oreo Pie Dessert is a delightful treat that has captured the hearts of dessert lovers everywhere. With its rich, creamy filling and a crunchy Oreo crust, this dessert is not just a feast for the eyes but also a celebration of flavors that dance on your palate. Originating from the classic Oreo cookie, which has been a beloved snack since its debut in 1912, this pie takes the iconic taste to a whole new level.
People adore Oreo Pie Dessert for its perfect balance of texturesthe smooth, velvety filling contrasts beautifully with the crumbly crust, making each bite a heavenly experience. Additionally, its incredibly convenient to prepare, requiring minimal ingredients and effort, which is perfect for both novice bakers and seasoned chefs alike. Whether youre hosting a gathering or simply indulging in a sweet craving, Oreo Pie Dessert is sure to impress and satisfy. Join me as we dive into this delicious recipe that brings joy to any occasion!

Ingredients:
- 24 Oreo cookies (plus extra for garnish)
- 1/4 cup unsalted butter, melted
- 1 (8 oz) package cream cheese, softened
- 1/2 cup granulated sugar
- 1 teaspoon vanilla extract
- 1 (8 oz) container whipped topping (like Cool Whip)
- 1/2 cup mini chocolate chips (optional)
- Chocolate syrup (for drizzling, optional)
Preparing the Crust
- Start by preheating your oven to 350°F (175°C). This will ensure that your crust bakes evenly and becomes nice and crispy.
- In a food processor, add the 24 Oreo cookies. Pulse them until they turn into fine crumbs. If you dont have a food processor, you can place the cookies in a zip-top bag and crush them with a rolling pin.
- Once you have your fine crumbs, transfer them to a mixing bowl. Pour in the melted butter and mix until the crumbs are well coated and resemble wet sand.
- Next, press the mixture firmly into the bottom and up the sides of a 9-inch pie dish. Make sure to pack it tightly to create a sturdy crust. You can use the bottom of a measuring cup to help with this step.
- Bake the crust in the preheated oven for about 10 minutes. This will help set the crust and give it a nice crunch. Once done, remove it from the oven and let it cool completely.
Preparing the Filling
- While the crust is cooling, lets prepare the filling. In a large mixing bowl, add the softened cream cheese. Using an electric mixer, beat the cream cheese until its smooth and creamy, about 2-3 minutes.
- Next, add the granulated sugar and vanilla extract to the cream cheese. Continue to beat the mixture until everything is well combined and there are no lumps.
- Now, gently fold in the whipped topping using a spatula. Be careful not to deflate the whipped topping; you want to keep the filling light and airy.
- If youre using mini chocolate chips, fold them in at this stage. They add a delightful texture and extra chocolate flavor to the filling.
Assembling the Pie
- Once the crust has cooled completely, its time to fill it. Spoon the cream cheese filling into the cooled Oreo crust, spreading it evenly with a spatula.
- After the filling is spread out, you can add some crushed Oreo cookies on top for garnish. This not only looks great but also adds a bit of crunch to each slice.
- Cover the pie with plastic wrap or aluminum foil and place it in the refrigerator. Let it chill for at least 4 hours, or overnight if you have the time. This allows the flavors to meld and the filling to set properly.
Serving the Pie
- When youre ready to serve, remove the pie from the refrigerator. If youve covered it, take off the plastic wrap or foil.
- Using a sharp knife, slice the pie into wedges. I find that dipping the knife in warm water before cutting helps create clean slices.
- For an extra touch, drizzle some chocolate syrup over the top of each slice before serving. It adds a beautiful presentation and enhances the chocolate flavor.
- Serve the pie chilled, and enjoy the delightful combination of creamy filling and crunchy Oreo crust!
Storage Tips
- If you have any leftovers (which is rare, but it happens!), cover the pie with plastic wrap and store it in the refrigerator. It will keep well for up to 3 days.
- For longer storage, you can freeze the pie. Just make sure to wrap it tightly in plastic wrap and then in aluminum foil. It can be frozen for up to 2 months. When youre ready to enjoy it, let it thaw in the refrigerator overnight.
Variations and Add-Ins
- If you want to switch things up, consider adding a
Conclusion:
In summary, this Oreo Pie Dessert is an absolute must-try for anyone who loves a rich, creamy, and indulgent treat. The combination of the crunchy Oreo crust, the velvety filling, and the delightful whipped topping creates a dessert that is not only visually stunning but also incredibly satisfying to the taste buds. Whether you’re hosting a gathering, celebrating a special occasion, or simply craving something sweet, this pie is sure to impress your family and friends. For serving suggestions, consider adding a drizzle of chocolate sauce or a sprinkle of crushed Oreos on top for an extra touch of flair. You can also experiment with variations by incorporating different flavors of pudding or even adding layers of your favorite candies for a fun twist. The possibilities are endless, and I encourage you to get creative! I genuinely hope you give this Oreo Pie Dessert a try. It’s a recipe that brings joy and smiles to the table, and I would love to hear about your experience. Dont forget to share your thoughts and any variations you come up with! Happy baking, and enjoy every delicious bite of this delightful Oreo Pie Dessert! Print
Oreo Pie Dessert: A Deliciously Easy Recipe to Satisfy Your Sweet Tooth
- Total Time: 270 minutes
- Yield: 8 servings 1x
Description
Enjoy a delightful No-Bake Oreo Cream Cheese Pie with a crunchy Oreo crust and a light, fluffy filling. This easy-to-make dessert is perfect for any occasion and is sure to impress your guests!
Ingredients
- 24 Oreo cookies (plus extra for garnish)
- 1/4 cup unsalted butter, melted
- 1 (8 oz) package cream cheese, softened
- 1/2 cup granulated sugar
- 1 teaspoon vanilla extract
- 1 (8 oz) container whipped topping (like Cool Whip)
- 1/2 cup mini chocolate chips (optional)
- Chocolate syrup (for drizzling, optional)
Instructions
- Preheat your oven to 350°F (175°C).
- In a food processor, pulse the 24 Oreo cookies until they turn into fine crumbs. Alternatively, crush them in a zip-top bag with a rolling pin.
- Transfer the crumbs to a mixing bowl, pour in the melted butter, and mix until well coated and resembling wet sand.
- Press the mixture firmly into the bottom and up the sides of a 9-inch pie dish, using the bottom of a measuring cup to pack it tightly.
- Bake the crust for about 10 minutes, then remove it from the oven and let it cool completely.
- In a large mixing bowl, beat the softened cream cheese with an electric mixer until smooth and creamy, about 2-3 minutes.
- Add the granulated sugar and vanilla extract, continuing to beat until well combined and smooth.
- Gently fold in the whipped topping using a spatula, being careful not to deflate it.
- If desired, fold in the mini chocolate chips for added texture and flavor.
- Once the crust has cooled, spoon the cream cheese filling into the crust, spreading it evenly with a spatula.
- Garnish with crushed Oreo cookies on top for added crunch and visual appeal.
- Cover the pie with plastic wrap or aluminum foil and refrigerate for at least 4 hours, or overnight for best results.
- When ready to serve, remove the pie from the refrigerator and uncover it.
- Slice the pie into wedges using a sharp knife (dipping it in warm water can help create clean slices).
- Drizzle chocolate syrup over each slice before serving, if desired.
- Serve chilled and enjoy!
Notes
- Leftovers can be covered with plastic wrap and stored in the refrigerator for up to 3 days.
- For longer storage, wrap the pie tightly in plastic wrap and then in aluminum foil, freezing for up to 2 months. Thaw in the refrigerator overnight before serving.
- Consider adding a layer of peanut butter or caramel sauce to the filling for a different flavor profile.
- You can also mix in crushed candy bars or nuts for added texture.
- Prep Time: 20 minutes
- Cook Time: 10 minutes


Leave a Comment