
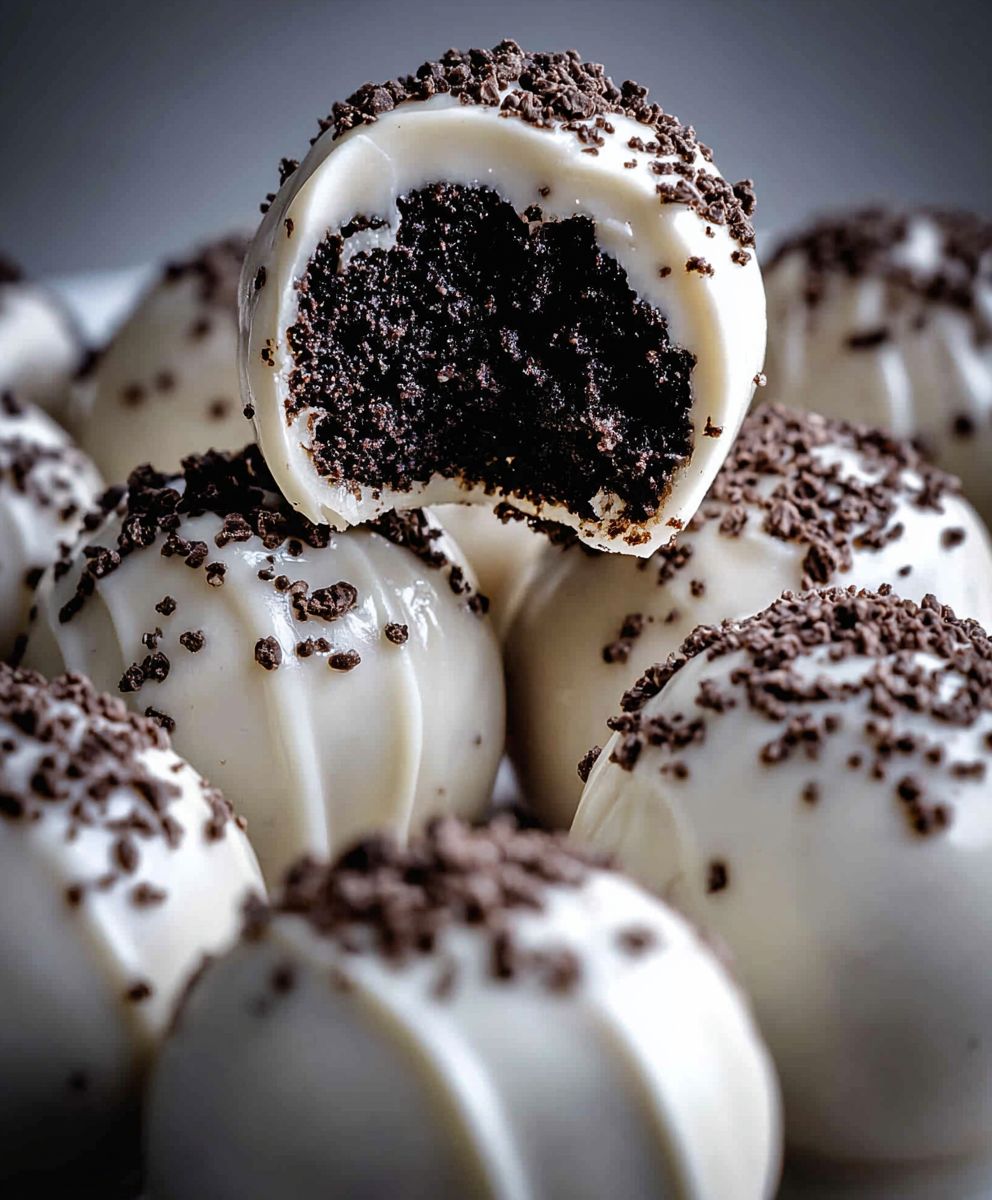
Oreo Cake Balls: Prepare to enter a realm of pure, unadulterated dessert bliss! Imagine biting into a perfectly round sphere of moist, decadent chocolate cake, infused with the iconic crunch of Oreo cookies, all enveloped in a smooth, rich coating. Sounds heavenly, right? These delightful treats are not only incredibly delicious but also surprisingly easy to make, making them the perfect indulgence for any occasion.
While the exact origins of cake balls are somewhat debated, their popularity exploded in the late 2000s, largely thanks to the rise of food blogs and the desire for bite-sized, portable desserts. The beauty of Oreo cake balls lies in their simplicity and adaptability. They’re a fantastic way to use up leftover cake, and the addition of Oreos elevates them to a whole new level of irresistible goodness.
People adore these little gems for several reasons. First, the combination of textures is simply divine the soft, crumbly cake, the crunchy Oreo pieces, and the smooth, melt-in-your-mouth coating create a symphony of sensations in every bite. Second, they’re incredibly convenient. Perfect for parties, potlucks, or a simple afternoon treat, Oreo cake balls are easy to transport and require no utensils. Finally, let’s be honest, who can resist the allure of Oreos? Their distinct flavor and satisfying crunch make them a universally loved ingredient, and when combined with cake, the result is pure magic. So, let’s get baking and create some Oreo Cake Ball magic together!

Ingredients:
- 1 package (14.3 ounces) Oreo cookies, regular flavor
- 8 ounces cream cheese, softened
- 12 ounces semi-sweet chocolate chips
- 1 tablespoon vegetable shortening (optional, for smoother chocolate)
- Sprinkles or other decorations (optional)
Preparing the Oreo Crumbs:
Okay, let’s get started! The first thing we need to do is turn those delicious Oreos into crumbs. Don’t worry, it’s easier than you think!
- Separate the Oreos: Carefully twist apart each Oreo cookie. We want to separate the creamy filling from the chocolate wafers. Try to keep the wafers as intact as possible, but don’t stress if they break a little.
- Scrape out the filling: Using a knife or spoon, scrape the cream filling from the wafers. Place the filling in a separate bowl. We’ll use this later!
-
Crush the wafers: Now for the fun part! You have a few options here. You can use a food processor, a blender, or even a good old-fashioned zip-top bag and rolling pin.
- Food Processor/Blender: If you’re using a food processor or blender, simply add the wafers in batches and pulse until they are finely ground into crumbs. Be careful not to over-process them into a paste!
- Zip-Top Bag and Rolling Pin: If you’re going the manual route, place the wafers in a large zip-top bag. Seal the bag tightly, removing as much air as possible. Then, using a rolling pin, crush the cookies until they are finely ground. You can also use a meat mallet or even the bottom of a heavy pan if you don’t have a rolling pin.
- Check the crumbs: Once you’ve crushed all the wafers, make sure the crumbs are fine and even. There shouldn’t be any large chunks of Oreo remaining. If you find any, give them another whirl in the food processor or a few more whacks with the rolling pin.
Mixing the Oreo Crumbs and Cream Cheese:
Now that we have our Oreo crumbs, it’s time to bind them together with the cream cheese. This is what will give our cake balls their signature texture.
- Combine the crumbs and cream cheese: In a large bowl, combine the Oreo crumbs and the softened cream cheese. Make sure your cream cheese is truly softened, or it will be difficult to mix evenly. You can leave it out at room temperature for an hour or two, or microwave it in short bursts (5-10 seconds at a time) until it’s soft but not melted.
- Mix thoroughly: Using a spoon or your hands (my preferred method!), mix the crumbs and cream cheese until they are completely combined. The mixture should be moist and hold together easily when you squeeze it. If it seems too dry, you can add a tablespoon or two of milk or cream. If it seems too wet, add a little more Oreo crumbs.
- Add the reserved Oreo filling: Remember that Oreo filling we scraped out earlier? Now’s the time to add it back in! This will add extra flavor and sweetness to the cake balls. Mix it in gently until it’s evenly distributed.
Forming the Cake Balls:
This is where the magic happens! Get ready to roll those Oreo crumbs into perfect little spheres.
- Prepare a baking sheet: Line a baking sheet with parchment paper or wax paper. This will prevent the cake balls from sticking.
- Scoop the mixture: Using a small cookie scoop or a spoon, scoop out portions of the Oreo mixture. I usually aim for about 1 tablespoon per cake ball.
- Roll into balls: Gently roll each portion of the mixture between your palms to form a smooth, round ball. Don’t press too hard, or you’ll flatten them.
- Place on the baking sheet: Place each cake ball on the prepared baking sheet, leaving a little space between them.
- Chill the cake balls: Once you’ve rolled all the cake balls, place the baking sheet in the refrigerator for at least 30 minutes, or even better, an hour. This will help them firm up and make them easier to dip in chocolate.
Melting the Chocolate and Dipping:
Time to get those cake balls coated in a luscious layer of chocolate! This is where you can really get creative with decorations.
-
Melt the chocolate: There are a couple of ways to melt chocolate:
- Double Boiler: This is the most foolproof method. Fill a saucepan with a couple of inches of water and bring it to a simmer. Place a heatproof bowl on top of the saucepan, making sure the bottom of the bowl doesn’t touch the water. Add the chocolate chips to the bowl and stir occasionally until they are completely melted and smooth.
- Microwave: This is the quicker method, but you need to be careful not to burn the chocolate. Place the chocolate chips in a microwave-safe bowl. Microwave in 30-second intervals, stirring after each interval, until the chocolate is melted and smooth.
- Add shortening (optional): If you want your chocolate to be extra smooth and shiny, stir in the vegetable shortening after the chocolate is melted.
- Prepare your dipping station: Set up your dipping station with the melted chocolate, the chilled cake balls, and any decorations you want to use (sprinkles, chopped nuts, etc.).
- Dip the cake balls: Using a fork or dipping tools, carefully dip each cake ball into the melted chocolate, making sure it’s completely coated.
- Remove excess chocolate: Gently tap the fork or dipping tool against the edge of the bowl to remove any excess chocolate.
- Decorate (optional): Immediately sprinkle the dipped cake ball with sprinkles or other decorations before the chocolate sets.
- Place on parchment paper: Place the dipped and decorated cake ball back on the parchment-lined baking sheet.
- Chill again: Once you’ve dipped all the cake balls, place the baking sheet back in the refrigerator for at least 15-20 minutes, or until the chocolate is set.
Serving and Storing:
Congratulations, you’ve made Oreo cake balls! Now it’s time to enjoy them (and maybe share a few!).
- Serve chilled: Oreo cake balls are best served chilled.
- Store properly: Store leftover cake balls in an airtight container in the refrigerator for up to a week.
Conclusion:
So, there you have it! These Oreo cake balls are truly irresistible, and I genuinely believe they’re a must-try for anyone with a sweet tooth. They’re incredibly easy to make, require minimal baking skills, and are always a crowd-pleaser. Seriously, who can resist the combination of crushed Oreos, cream cheese, and a decadent chocolate coating? But why are these little bites of heaven so special? Well, beyond the sheer deliciousness, they’re incredibly versatile. They’re perfect for parties, potlucks, holiday gatherings, or even just a fun weekend baking project with the kids. Plus, they’re a fantastic make-ahead dessert you can prepare them a day or two in advance and store them in the refrigerator until you’re ready to serve. This makes them ideal for busy hosts who want to impress without spending hours in the kitchen on the day of the event.Serving Suggestions and Variations:
Now, let’s talk about serving suggestions and variations because the possibilities are endless! For a classic presentation, simply arrange the Oreo cake balls on a pretty platter or in a decorative bowl. You can also insert lollipop sticks into each ball before dipping them in chocolate for an easy-to-eat treat. But don’t stop there! Get creative with your coatings and toppings. Instead of milk chocolate, try using white chocolate, dark chocolate, or even flavored candy melts. Sprinkle them with crushed Oreos, sprinkles, chopped nuts, shredded coconut, or a drizzle of contrasting chocolate. For a festive touch, use holiday-themed sprinkles or edible glitter. Another fun variation is to experiment with different Oreo flavors. Use Golden Oreos for a vanilla twist, or try one of the many limited-edition flavors that are constantly being released. You could even add a touch of flavor extract to the cream cheese mixture, such as vanilla, peppermint, or almond. If you’re feeling adventurous, you can even incorporate other ingredients into the cake ball mixture. Try adding a tablespoon or two of peanut butter, Nutella, or even a splash of coffee liqueur for an extra layer of flavor.Don’t Be Afraid to Experiment!
The beauty of this recipe is that it’s incredibly forgiving, so don’t be afraid to experiment and put your own spin on it. The most important thing is to have fun and enjoy the process! I truly hope you’ll give these Oreo cake balls a try. I’m confident that you’ll love them as much as I do. They’re the perfect combination of simplicity and indulgence, and they’re guaranteed to be a hit with everyone who tries them. So, grab your ingredients, preheat your oven (just kidding, no baking required!), and get ready to create some delicious memories. And when you do, please don’t forget to share your experience with me! I’d love to hear what variations you tried, what toppings you used, and how much everyone enjoyed them. You can leave a comment below, tag me on social media, or even send me an email. I can’t wait to see your creations! Happy baking (or rather, no-baking)! Let me know what you think of this easy Oreo cake balls recipe! Print
Oreo Cake Balls: Easy Recipe & Tips for Perfect Treats
- Total Time: 45
- Yield: 30–35 cake balls 1x
Description
Easy no-bake Oreo Cake Balls made with crushed Oreos, cream cheese, and dipped in melted chocolate. Perfect for parties or a sweet snack!
Ingredients
- 1 package (14.3 ounces) Oreo cookies, regular flavor
- 8 ounces cream cheese, softened
- 12 ounces semi-sweet chocolate chips
- 1 tablespoon vegetable shortening (optional, for smoother chocolate)
- Sprinkles or other decorations (optional)
Instructions
- Prepare the Oreo Crumbs: Twist apart each Oreo cookie, separating the filling from the wafers. Scrape the filling into a separate bowl. Crush the wafers into fine crumbs using a food processor, blender, or zip-top bag and rolling pin.
- Mix the Oreo Crumbs and Cream Cheese: In a large bowl, combine the Oreo crumbs and softened cream cheese. Mix thoroughly until well combined. Add the reserved Oreo filling and mix gently until evenly distributed.
- Form the Cake Balls: Line a baking sheet with parchment paper. Scoop out portions of the Oreo mixture (about 1 tablespoon each) and roll into smooth, round balls. Place on the prepared baking sheet.
- Chill the Cake Balls: Place the baking sheet in the refrigerator for at least 30 minutes to an hour to firm up.
- Melt the Chocolate and Dip: Melt the chocolate chips using a double boiler or microwave (in 30-second intervals, stirring in between). Stir in vegetable shortening (optional) for smoother chocolate.
- Dip the Cake Balls: Using a fork or dipping tools, carefully dip each chilled cake ball into the melted chocolate, ensuring it’s fully coated. Remove excess chocolate.
- Decorate (Optional): Immediately sprinkle with sprinkles or other decorations before the chocolate sets.
- Chill Again: Place the dipped and decorated cake balls back on the parchment-lined baking sheet and refrigerate for 15-20 minutes, or until the chocolate is set.
- Serve and Store: Serve chilled. Store leftover cake balls in an airtight container in the refrigerator for up to a week.
Notes
- Make sure your cream cheese is fully softened for easy mixing.
- If the Oreo mixture seems too dry, add a tablespoon or two of milk or cream. If it seems too wet, add a little more Oreo crumbs.
- For smoother chocolate, add 1 tablespoon of vegetable shortening after melting.
- Get creative with your decorations! Use different colored sprinkles, chopped nuts, or even a drizzle of white chocolate.
- Prep Time: 30 minutes
- Cook Time: 15 minutes

Leave a Comment