
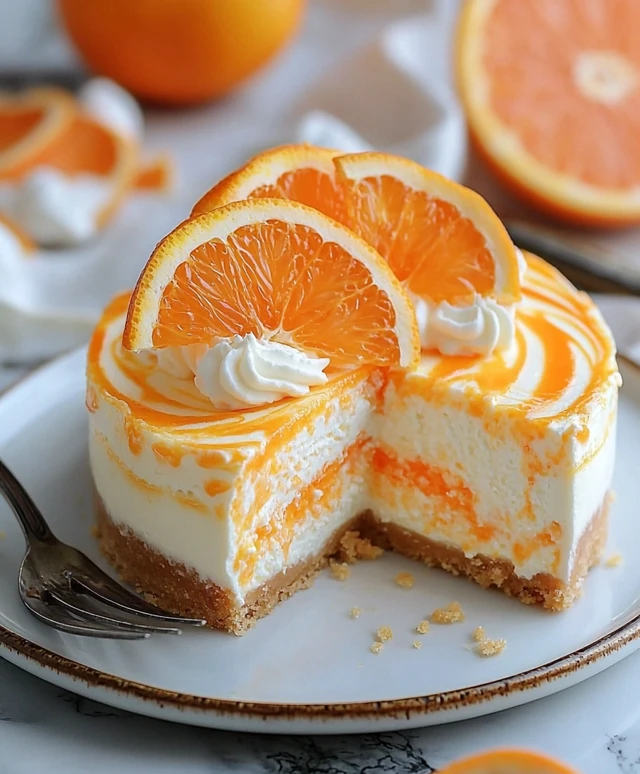
No-Bake Orange Creamsicle Cheesecake is a delightful dessert that brings back fond memories of summer days spent enjoying the classic frozen treat. This recipe captures the essence of the beloved creamsicle, combining the refreshing taste of orange with the creamy richness of cheesecake, all without the need for an oven. As someone who cherishes the nostalgia of childhood flavors, I find that this cheesecake not only satisfies my sweet tooth but also evokes a sense of joy and warmth.
The history of the creamsicle dates back to the early 20th century, and it has since become a beloved treat across generations. People adore this No-Bake Orange Creamsicle Cheesecake for its light and airy texture, which perfectly balances the zesty orange flavor with the smoothness of cream cheese. Plus, the convenience of a no-bake recipe means you can whip it up in no time, making it an ideal choice for gatherings or a simple family dessert. Join me in creating this delightful treat that is sure to impress and satisfy everyones cravings!

Ingredients:
- For the crust:
- 1 ½ cups graham cracker crumbs
- ½ cup unsalted butter, melted
- ¼ cup granulated sugar
- 1 teaspoon vanilla extract
- For the cheesecake filling:
- 16 oz cream cheese, softened
- 1 cup powdered sugar
- 1 cup heavy whipping cream
- 1 teaspoon vanilla extract
- 1 cup orange juice (freshly squeezed is best)
- 2 tablespoons orange zest
- 1 tablespoon gelatin (optional, for a firmer texture)
- 2 tablespoons cold water (if using gelatin)
- For the topping:
- 1 cup whipped cream (store-bought or homemade)
- Orange slices or zest for garnish
Preparing the Crust
- In a medium mixing bowl, combine the graham cracker crumbs, melted butter, granulated sugar, and vanilla extract. Mix until the crumbs are evenly coated and the mixture resembles wet sand.
- Press the crumb mixture firmly into the bottom of a 9-inch springform pan. Use the back of a measuring cup or your fingers to ensure an even layer. Make sure to pack it tightly to create a sturdy crust.
- Once the crust is pressed down, place the pan in the refrigerator to chill while you prepare the cheesecake filling. This will help the crust set and hold its shape.
Preparing the Cheesecake Filling
- In a large mixing bowl, beat the softened cream cheese with an electric mixer on medium speed until smooth and creamy, about 2-3 minutes. Make sure there are no lumps for a silky texture.
- Add the powdered sugar and continue to beat until fully incorporated. Scrape down the sides of the bowl as needed to ensure everything is well mixed.
- In a separate bowl, whip the heavy cream until stiff peaks form. This usually takes about 3-5 minutes with an electric mixer on high speed. Be careful not to over-whip, as it can turn grainy.
- Gently fold the whipped cream into the cream cheese mixture using a spatula. Start by adding a small amount of whipped cream to lighten the cream cheese mixture, then gradually fold in the rest. This will keep the filling light and airy.
- In a small bowl, if youre using gelatin, sprinkle the gelatin over the cold water and let it sit for about 5 minutes to bloom. Then, heat it gently in the microwave for about 10-15 seconds until its fully dissolved. Allow it to cool slightly before adding it to the filling.
- Add the orange juice and orange zest to the cream cheese mixture, along with the dissolved gelatin (if using). Gently fold everything together until well combined. The orange juice will give the cheesecake its signature creamsicle flavor!
Assembling the Cheesecake
- Once the filling is ready, take the crust out of the refrigerator. Pour the cheesecake filling over the chilled crust, spreading it evenly with a spatula.
- Tap the pan gently on the counter to remove any air bubbles and ensure the filling settles nicely into the crust.
- Cover the cheesecake with plastic wrap or aluminum foil and return it to the refrigerator. Let it chill for at least 4 hours, or preferably overnight, to allow it to set properly.
Preparing the Topping
- When youre ready to serve the cheesecake, remove it from the refrigerator. Carefully run a knife around the edge of the springform pan to loosen the cheesecake before removing the sides.
- Spread the whipped cream evenly over the top of the cheesecake. You can use a spatula or a piping bag for a decorative touch.
- Garnish with fresh orange slices or additional orange zest for a pop of color and flavor. This not only makes it look beautiful but also enhances the orange flavor.
Serving the Cheesecake
Conclusion:
In summary, this No-Bake Orange Creamsicle Cheesecake is an absolute must-try for anyone looking to indulge in a delightful dessert that captures the essence of summer in every bite. The creamy texture combined with the refreshing orange flavor creates a perfect balance that is sure to impress your family and friends. Plus, the fact that its a no-bake recipe means you can whip it up without the hassle of turning on the oven, making it an ideal choice for warm days or when youre short on time. For serving suggestions, consider topping your cheesecake with a dollop of whipped cream and a sprinkle of orange zest for an extra pop of color and flavor. You could also add some crushed graham crackers or a drizzle of chocolate sauce for a fun twist. If youre feeling adventurous, try incorporating other citrus fruits like lemon or lime for a unique variation that will keep your taste buds guessing. I wholeheartedly encourage you to give this No-Bake Orange Creamsicle Cheesecake a try. Its not just a dessert; its a delightful experience that brings a smile to everyones face. Once youve made it, Id love to hear about your experience! Share your thoughts, any variations you tried, or even a picture of your creation. Lets spread the joy of this delicious cheesecake together! Print
No-Bake Orange Creamsicle Cheesecake: A Refreshing Dessert Recipe
- Total Time: 270 minutes
- Yield: 8–10 servings 1x
Description
Enjoy a refreshing No-Bake Orange Creamsicle Cheesecake with a buttery graham cracker crust, creamy orange filling, and a light whipped cream topping. Perfect for warm days and special occasions, this dessert offers a delightful twist on a classic favorite!
Ingredients
- 1 ½ cups graham cracker crumbs
- ½ cup unsalted butter, melted
- ¼ cup granulated sugar
- 1 teaspoon vanilla extract
- 16 oz cream cheese, softened
- 1 cup powdered sugar
- 1 cup heavy whipping cream
- 1 teaspoon vanilla extract
- 1 cup orange juice (freshly squeezed is best)
- 2 tablespoons orange zest
- 1 tablespoon gelatin (optional, for a firmer texture)
- 2 tablespoons cold water (if using gelatin)
- 1 cup whipped cream (store-bought or homemade)
- Orange slices or zest for garnish
Instructions
- In a medium mixing bowl, combine the graham cracker crumbs, melted butter, granulated sugar, and vanilla extract. Mix until the crumbs are evenly coated and the mixture resembles wet sand.
- Press the crumb mixture firmly into the bottom of a 9-inch springform pan. Use the back of a measuring cup or your fingers to ensure an even layer. Make sure to pack it tightly to create a sturdy crust.
- Once the crust is pressed down, place the pan in the refrigerator to chill while you prepare the cheesecake filling.
- In a large mixing bowl, beat the softened cream cheese with an electric mixer on medium speed until smooth and creamy, about 2-3 minutes.
- Add the powdered sugar and continue to beat until fully incorporated. Scrape down the sides of the bowl as needed.
- In a separate bowl, whip the heavy cream until stiff peaks form, about 3-5 minutes.
- Gently fold the whipped cream into the cream cheese mixture using a spatula.
- If using gelatin, sprinkle it over the cold water and let it sit for about 5 minutes to bloom. Heat gently in the microwave until fully dissolved, then allow to cool slightly.
- Add the orange juice and orange zest to the cream cheese mixture, along with the dissolved gelatin (if using). Gently fold until well combined.
- Pour the cheesecake filling over the chilled crust, spreading it evenly with a spatula.
- Tap the pan gently on the counter to remove any air bubbles.
- Cover the cheesecake and return it to the refrigerator. Let it chill for at least 4 hours, or preferably overnight.
- When ready to serve, remove the cheesecake from the refrigerator and run a knife around the edge of the springform pan to loosen it.
- Spread the whipped cream evenly over the top of the cheesecake.
- Garnish with fresh orange slices or additional orange zest.
Notes
- For a firmer cheesecake, use the gelatin. If you prefer a softer texture, you can omit it.
- Make sure to use fresh orange juice for the best flavor.
- This cheesecake can be made a day in advance, making it perfect for gatherings.
- Prep Time: 30 minutes
- Cook Time: 0 minutes


Leave a Comment