
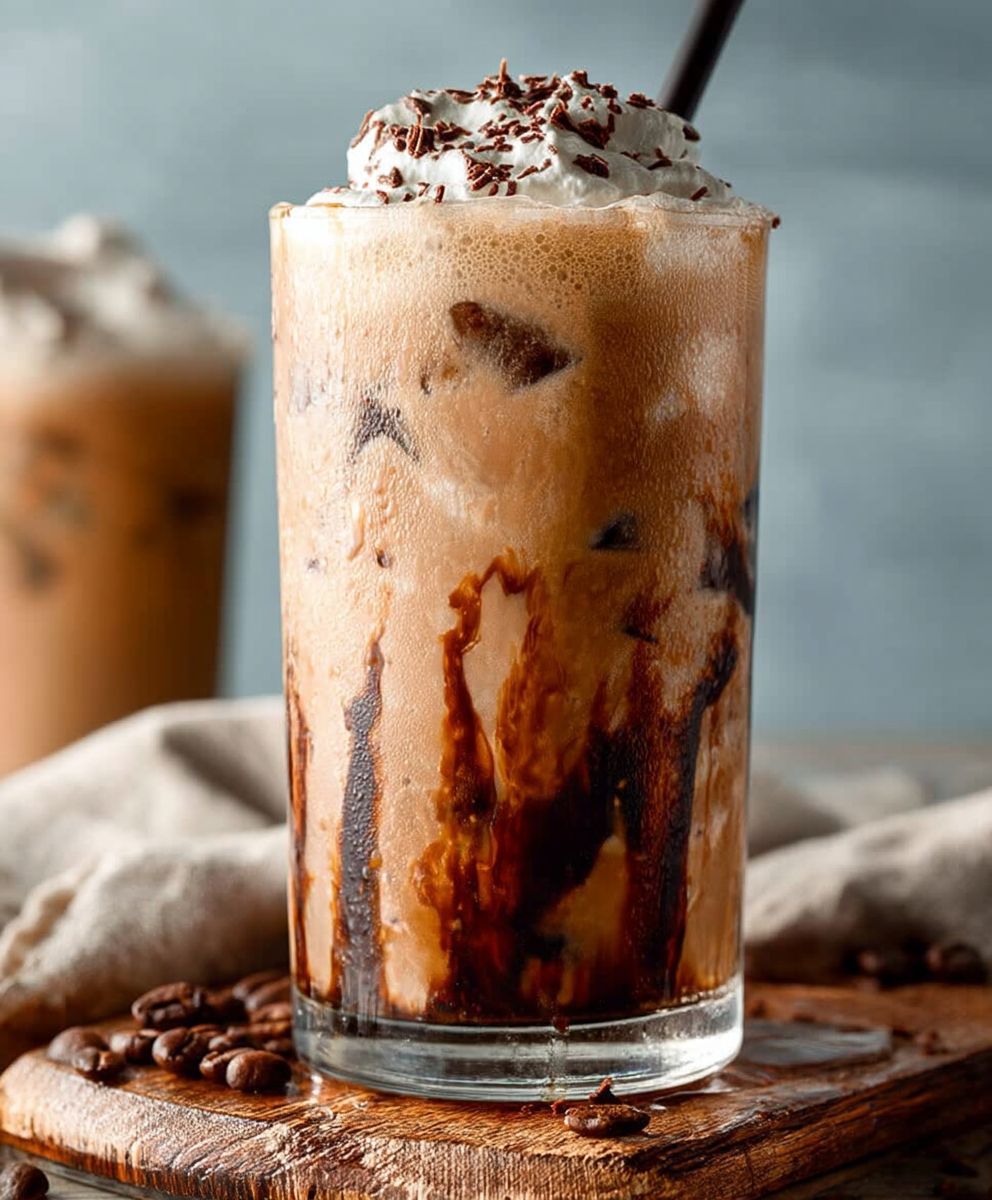
Mocha Iced Coffee: the ultimate summer indulgence that will awaken your senses and tantalize your taste buds! Forget those expensive coffee shop runs; with this recipe, you can create a decadent, refreshing treat right in your own kitchen. Imagine the rich, dark allure of chocolate swirling together with the bold, invigorating kick of coffee, all served over a bed of ice. It’s pure bliss in a glass!
The combination of coffee and chocolate has a long and fascinating history, dating back to ancient Mesoamerica where cacao beans were prized for their stimulating properties. Over time, this powerful pairing made its way across continents, evolving into the beloved mocha we know and adore today. While the exact origins of the mocha iced coffee are a bit hazy, its popularity is undeniable.
People absolutely love this drink for its perfect balance of flavors. The bitterness of the coffee is beautifully complemented by the sweetness of the chocolate, creating a harmonious symphony on your palate. Plus, it’s incredibly convenient! Whether you need a quick pick-me-up on a hot afternoon or a sophisticated dessert beverage to impress your guests, this mocha iced coffee recipe is your answer. The creamy texture, the icy chill, and the irresistible flavor combination make it a guaranteed crowd-pleaser. So, are you ready to ditch the lines and become your own barista? Let’s get started!

Ingredients:
- 1 cup strong brewed coffee, cooled
- 1 cup milk (dairy or non-dairy)
- 2 tablespoons chocolate syrup
- 1 tablespoon granulated sugar (or to taste)
- 1/2 teaspoon cocoa powder
- 1/4 teaspoon vanilla extract
- 1/4 cup heavy cream (optional, for topping)
- Ice cubes
- Chocolate shavings or cocoa powder (for garnish, optional)
Preparing the Mocha Base:
Okay, let’s get started! The first step is creating that rich, chocolatey coffee base that makes this mocha iced coffee so irresistible. Don’t worry, it’s super easy!
- Brew Your Coffee: The foundation of any good coffee drink is, well, good coffee! Brew one cup of strong coffee. I usually use a dark roast for a deeper flavor, but feel free to use your favorite. Let it cool completely. You can even brew it ahead of time and keep it in the fridge for an even quicker process later. Trust me, using cooled coffee is crucial; otherwise, your ice will melt too quickly, and you’ll end up with a watery drink.
- Combine the Chocolate Goodness: In a shaker or a large glass, combine the cooled coffee, chocolate syrup, sugar, cocoa powder, and vanilla extract. The cocoa powder adds a nice depth of chocolate flavor, so don’t skip it!
- Mix it Up: Now, this is where the magic happens. If you’re using a shaker, put the lid on tightly and shake vigorously for about 20-30 seconds. This will ensure that the sugar and cocoa powder dissolve completely and everything is well combined. If you don’t have a shaker, you can use a whisk or a fork to mix everything together in a glass. Just make sure you really get in there and break up any clumps of cocoa powder. Nobody wants a mouthful of cocoa powder!
Assembling Your Iced Mocha:
Now for the fun part putting it all together! This is where you get to customize your drink to your liking.
- Fill Your Glass with Ice: Grab your favorite glass and fill it with ice cubes. I like to use a tall glass for a more impressive presentation, but any glass will do. The amount of ice you use is up to you, but I recommend filling the glass about two-thirds full.
- Pour in the Mocha Mixture: Carefully pour the mocha mixture over the ice. Watch as the cold coffee swirls around the ice so satisfying!
- Add the Milk: Now, gently pour in the milk. You can use any kind of milk you like dairy or non-dairy. I personally love using oat milk for its creamy texture and slightly sweet flavor, but almond milk, soy milk, or regular milk all work great. Adjust the amount of milk to your liking, depending on how strong you want your coffee to be. I usually aim for about a 1:1 ratio of coffee to milk.
- Stir it All Together: Give everything a good stir to combine all the ingredients. Make sure the milk and coffee are well mixed for a consistent flavor throughout the drink.
Optional Toppings and Finishing Touches:
This is where you can really get creative and make your mocha iced coffee extra special! These toppings are totally optional, but they add a touch of indulgence that I just can’t resist.
- Whipped Cream (Optional): If you’re feeling fancy, top your mocha iced coffee with a dollop of whipped cream. I like to use homemade whipped cream for the best flavor, but store-bought is perfectly fine too.
- Chocolate Shavings or Cocoa Powder (Optional): Sprinkle some chocolate shavings or cocoa powder over the whipped cream (or directly onto the drink if you’re skipping the whipped cream) for a beautiful and delicious garnish.
- Drizzle with Chocolate Syrup (Optional): For an extra dose of chocolatey goodness, drizzle a little more chocolate syrup over the top.
- Add a Straw: Pop in a straw and enjoy your delicious, homemade mocha iced coffee!
Tips and Variations:
Want to customize your mocha iced coffee even further? Here are a few tips and variations to try:
- Make it Vegan: To make this recipe vegan, simply use non-dairy milk and ensure your chocolate syrup is vegan-friendly. Many chocolate syrups are naturally vegan, but it’s always a good idea to check the label.
- Adjust the Sweetness: If you prefer a sweeter drink, add more sugar or chocolate syrup. If you prefer a less sweet drink, reduce the amount of sugar or chocolate syrup. You can also use a sugar substitute like stevia or erythritol.
- Add a Shot of Espresso: For an extra caffeine kick, add a shot of espresso to your mocha iced coffee. This will make it even stronger and more flavorful.
- Use Different Flavored Syrups: Experiment with different flavored syrups, such as caramel, hazelnut, or vanilla, to create your own unique mocha iced coffee variations.
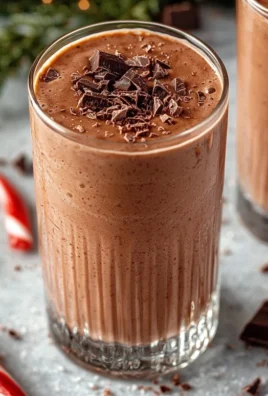
- Make it a Frozen Mocha: For a super refreshing treat, blend all the ingredients together with ice in a blender until smooth. This will create a frozen mocha that’s perfect for hot summer days.
- Spice it Up: Add a pinch of cinnamon or nutmeg to the mocha mixture for a warm and cozy flavor.
- Peppermint Mocha: Add a few drops of peppermint extract to the mocha mixture for a festive peppermint mocha.
- Salted Caramel Mocha: Drizzle caramel sauce and a pinch of sea salt over the whipped cream for a decadent salted caramel mocha.
- Make a Large Batch: If you’re making mocha iced coffee for a crowd, you can easily scale up the recipe. Just multiply all the ingredients by the number of servings you need.
- Store Leftovers: If you have any leftover mocha iced coffee, you can store it in the refrigerator for up to 24 hours. Just be aware that the ice will melt and the drink may become slightly diluted.
Troubleshooting:
Sometimes things don’t go exactly as planned. Here are a few common problems and how to fix them:
- My mocha iced coffee is too weak: Use stronger coffee or add a shot of espresso. You can also reduce the amount of milk you use.
- My mocha iced coffee is too sweet: Reduce the amount of sugar or chocolate syrup. You can also add a pinch of salt to balance out the sweetness.
- My mocha iced coffee is too bitter: Use a milder coffee or add more milk and sugar.
- My cocoa powder is clumping: Make sure to whisk the cocoa powder thoroughly with the other ingredients before adding the milk. You can also sift the cocoa powder before adding it to the mixture.
- My ice is melting too quickly: Use cooled coffee and plenty of ice. You can also use ice cubes made from coffee to prevent the drink from becoming diluted.
Health Benefits (or at least, reasons to feel good about it!):
Okay, let’s be real, this is a treat! But here’s how you can spin it to feel a *little* better:
- Antioxidants: Coffee and cocoa are both rich in antioxidants, which can help protect your body against damage from free radicals.
- Energy Boost: The caffeine in coffee can give you a much-needed energy boost, especially in the morning or afternoon.
- Mood Booster: Chocolate can release endorphins in the brain, which can improve your mood and make you feel happier.
- Customizable: You can control the amount of sugar and milk you add, making it a healthier option than many store-bought iced mochas.
Serving Suggestions:
Mocha iced coffee is perfect for:
- A morning pick-me-up: Start your day off right with a delicious and energizing mocha iced coffee.
- An afternoon treat: Beat the afternoon slump with a refreshing and satisfying mocha iced coffee.
- A dessert alternative: Satisfy your sweet tooth with a guilt-free mocha iced coffee.
- A party drink: Impress your guests with a homemade mocha iced coffee bar.
- A special occasion: Celebrate a birthday, holiday, or other special occasion with a decadent mocha iced coffee.
Equipment You Might Need:
- Coffee maker
- Shaker or large glass
- Whisk or fork
- Measuring spoons and cups
- Ice cube trays
- Glass for serving
- Straw
Nutritional Information (Approximate):
Please note that the nutritional information is approximate and will vary depending on the specific ingredients you use.
- 1 cup strong brewed coffee, cooled
- 1 cup milk (dairy or non-dairy)
- 2 tablespoons chocolate syrup
- 1 tablespoon granulated sugar (or to taste)
- 1/2 teaspoon cocoa powder
- 1/4 teaspoon vanilla extract
- 1/4 cup heavy cream (optional, for topping)
- Ice cubes
- Chocolate shavings or cocoa powder (for garnish, optional)
- Brew Your Coffee: Brew one cup of strong coffee and let it cool completely.
- Combine the Chocolate Goodness: In a shaker or large glass, combine the cooled coffee, chocolate syrup, sugar, cocoa powder, and vanilla extract.
- Mix it Up: Shake vigorously for 20-30 seconds (or whisk) until sugar and cocoa powder are dissolved.
- Fill Your Glass with Ice: Fill your glass with ice cubes.
- Pour in the Mocha Mixture: Carefully pour the mocha mixture over the ice.
- Add the Milk: Gently pour in the milk. Adjust the amount to your liking.
- Stir it All Together: Give everything a good stir to combine.
- (Optional) Whipped Cream: Top with whipped cream.
- (Optional) Chocolate Shavings/Cocoa Powder: Sprinkle with chocolate shavings or cocoa powder.
- (Optional) Chocolate Syrup Drizzle: Drizzle with chocolate syrup.
- Add a Straw: Pop in a straw and enjoy!
- For a vegan version, use non-dairy milk and vegan-friendly chocolate syrup.
- Adjust sweetness by adding more or less sugar/chocolate syrup.
- Add a shot of espresso for an extra caffeine kick.
- Experiment with different flavored syrups.
- Blend with ice for a frozen mocha.
- Add a pinch of cinnamon or nutmeg for a warm flavor.
- Store leftovers in the refrigerator for up to 24 hours.
Conclusion:
So, there you have it! My take on the ultimate Mocha Iced Coffee. I truly believe this recipe is a must-try for anyone who loves a refreshing, caffeinated treat with a hint of chocolatey goodness. Its quick, easy, and infinitely customizable to your personal preferences. Forget those expensive coffee shop runs; you can create a barista-worthy beverage right in your own kitchen, and honestly, I think it tastes even better!
Why is this recipe a must-try? Well, first and foremost, the flavor is incredible. The rich, dark chocolate perfectly complements the bold coffee, creating a harmonious blend that will tantalize your taste buds. It’s not overly sweet, allowing the coffee’s natural flavors to shine through, while the chocolate adds a decadent touch. Secondly, it’s incredibly versatile. You can adjust the sweetness, the coffee strength, and even the type of milk to create your perfect cup. And finally, it’s a fantastic way to beat the heat on a warm day. There’s nothing quite like a frosty glass of Mocha Iced Coffee to cool you down and give you a much-needed energy boost.
Now, let’s talk serving suggestions and variations! For a truly indulgent experience, top your Mocha Iced Coffee with a generous dollop of whipped cream and a sprinkle of chocolate shavings. You could even drizzle a little extra chocolate syrup on top for an extra layer of sweetness. If you’re feeling adventurous, try adding a pinch of cinnamon or a dash of nutmeg to the coffee grounds before brewing for a warm, spicy twist. For a vegan option, simply substitute the milk with your favorite plant-based alternative, such as almond milk, soy milk, or oat milk. Coconut milk also works beautifully, adding a subtle tropical flavor. You can also experiment with different types of chocolate. Dark chocolate will give you a richer, more intense flavor, while milk chocolate will create a sweeter, more classic mocha taste. White chocolate is another fun option for a unique and creamy variation.
Another great variation is to add a shot of your favorite liqueur. A splash of Irish cream liqueur or coffee liqueur would be absolutely divine. Just remember to drink responsibly! You can also play around with the coffee itself. Try using a different roast, such as a dark roast for a bolder flavor or a light roast for a brighter, more acidic taste. Cold brew coffee is also an excellent choice for Mocha Iced Coffee, as it’s naturally less acidic and has a smoother, richer flavor. If you’re short on time, you can even use instant coffee, but I highly recommend using freshly brewed coffee for the best possible taste.
I’m so excited for you to try this recipe! I truly believe you’ll love it as much as I do. It’s the perfect pick-me-up for any occasion, whether you’re starting your day, need an afternoon boost, or simply want a delicious and refreshing treat. So, go ahead, gather your ingredients, and get ready to whip up a batch of the best Mocha Iced Coffee you’ve ever tasted.
And finally, I’d love to hear about your experience! Once you’ve tried the recipe, please come back and leave a comment below. Let me know what you thought, what variations you tried, and any tips or tricks you discovered along the way. Your feedback is invaluable, and I’m always eager to learn from my readers. Happy brewing!
Mocha Iced Coffee: The Ultimate Guide to Making It at Home
A refreshing and easy-to-make mocha iced coffee, perfect for a morning pick-me-up or an afternoon treat. Customize it with your favorite toppings and milk!

Leave a Comment