
Mint Chocolate Chip Ice Cream is a delightful treat that brings a refreshing twist to the classic dessert we all know and love. As the warm weather approaches, there’s nothing quite like indulging in a scoop (or two) of this creamy concoction, with its vibrant green hue and speckled chocolate chips that dance on your taste buds. This beloved flavor has a rich history, dating back to the 1970s when it became a staple in ice cream parlors across the United States.
People adore Mint Chocolate Chip Ice Cream not only for its unique combination of cool mint and rich chocolate but also for its delightful texture that melts in your mouth. Whether enjoyed in a cone, a sundae, or straight from the tub, this ice cream is a convenient and satisfying way to beat the heat. Join me as we explore the simple yet delicious recipe for Mint Chocolate Chip Ice Cream that you can easily make at home, ensuring that every scoop is a moment of pure joy!

Ingredients:
- 2 cups heavy cream
- 1 cup whole milk
- 3/4 cup granulated sugar
- 1 teaspoon pure vanilla extract
- 1 teaspoon peppermint extract
- Green food coloring (optional, to achieve desired color)
- 1 cup semi-sweet chocolate chips
- Pinch of salt
Preparing the Base
1. **Combine the Dairy**: In a large mixing bowl, pour in 2 cups of heavy cream and 1 cup of whole milk. I love using whole milk for that extra creaminess, but you can use low-fat milk if you prefer a lighter version. 2. **Add Sugar**: Gradually add 3/4 cup of granulated sugar to the milk and cream mixture. Using a whisk, stir until the sugar is completely dissolved. This step is crucial as it ensures that your ice cream is sweet and smooth. 3. **Flavor It Up**: Next, add 1 teaspoon of pure vanilla extract and 1 teaspoon of peppermint extract. The peppermint extract is what gives this ice cream its refreshing flavor, so dont skimp on it! If you want a more intense mint flavor, feel free to add a little more. 4. **Color It Green**: If you want your ice cream to have that classic mint chocolate chip look, add a few drops of green food coloring. Stir until you achieve your desired shade. This step is optional, but it definitely adds a fun visual element! 5. **Add a Pinch of Salt**: Finally, add a pinch of salt to balance the sweetness. Its amazing how a little salt can enhance the flavors in your ice cream.Chilling the Mixture
6. **Refrigerate**: Cover the bowl with plastic wrap or a lid and place it in the refrigerator. Let it chill for at least 2 hours, or overnight if you have the time. Chilling the mixture helps to develop the flavors and ensures a smoother texture when churning.Churning the Ice Cream
7. **Prepare Your Ice Cream Maker**: If youre using an ice cream maker, make sure its properly assembled and the bowl is frozen (if required). Follow the manufacturers instructions for your specific model. 8. **Churn the Mixture**: Pour the chilled mixture into the ice cream maker. Turn it on and let it churn according to the manufacturers instructions, usually about 20-25 minutes. Youll know its ready when it thickens and has a soft-serve consistency. 9. **Add Chocolate Chips**: During the last 5 minutes of churning, add 1 cup of semi-sweet chocolate chips. This is where the magic happens! The chocolate chips will get evenly distributed throughout the ice cream, giving you that delightful crunch in every bite.Freezing the Ice Cream
10. **Transfer to a Container**: Once the ice cream has reached the desired consistency, transfer it to an airtight container. I like to use a loaf pan or a quart-sized container for easy storage. 11. **Smooth the Top**: Use a spatula to smooth the top of the ice cream. This helps to minimize air exposure, which can lead to ice crystals forming. 12. **Freeze**: Cover the container with a lid or plastic wrap and place it in the freezer. Let it freeze for at least 4 hours, or until its firm enough to scoop. If you can wait overnight, thats even better!Serving the Ice Cream
13. **Scoop and Serve**: When youre ready to enjoy your homemade mint chocolate chip ice cream, take it out of the freezer and let it sit for a few minutes to soften slightly. This makes scooping much easier! 14. **Garnish (Optional)**: For an extra touch, you can garnish your ice cream with a sprig of fresh mint or a drizzle of chocolate sauce. Its all about presentation, and these little details can make a big difference. 15. **Enjoy**: Serve the ice cream in bowls or cones and enjoy the refreshing minty flavor combined with the rich chocolate chips. Its the perfect treat for a hot day or any time youre craving something sweet!Storing Leftovers
16. **Store Properly**: If you have any leftovers (which is rare in my house!), make sure to store the ice cream in an airtight container. It can last in the freezer for up to 2 weeks, but trust me, its best enjoyed fresh!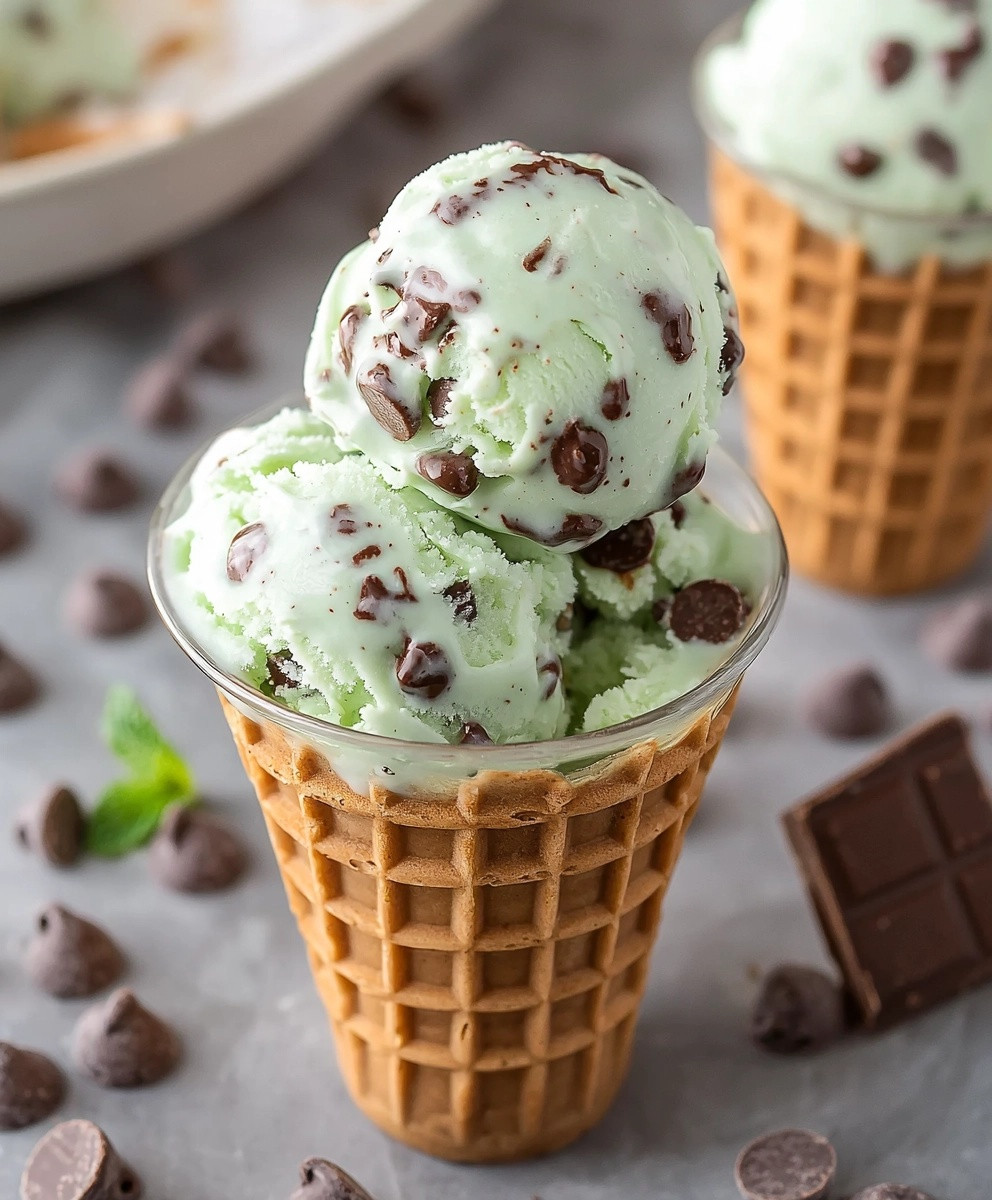
Conclusion:
In summary, this Mint Chocolate Chip Ice Cream recipe is an absolute must-try for anyone who loves a refreshing and indulgent treat. The combination of cool mint and rich chocolate creates a delightful flavor profile that is perfect for warm days or any time you need a sweet pick-me-up. Plus, making it at home allows you to control the ingredients, ensuring that every scoop is as fresh and delicious as possible. For serving suggestions, consider pairing your homemade ice cream with a warm brownie or a slice of chocolate cake for an extra decadent dessert. You can also get creative with variationstry adding crushed Oreos for a cookies-and-cream twist, or swirl in some fudge for an extra layer of richness. The possibilities are endless! I encourage you to give this Mint Chocolate Chip Ice Cream recipe a try and share your experience with friends and family. Whether you enjoy it in a cone, a bowl, or as part of a sundae, Im sure it will become a favorite in your household. Dont forget to let me know how it turns out and any fun variations you come up with! Happy ice cream making! Print
Mint Chocolate Chip Ice Cream: The Ultimate Guide to Making This Refreshing Treat
- Total Time: 280 minutes
- Yield: 1 quart 1x
Description
Enjoy a delightful homemade Mint Chocolate Chip Ice Cream, featuring a creamy blend of refreshing peppermint and rich chocolate chips. Perfect for any occasion, this treat is easy to make and sure to satisfy your sweet cravings!
Ingredients
- 2 cups heavy cream
- 1 cup whole milk
- 3/4 cup granulated sugar
- 1 teaspoon pure vanilla extract
- 1 teaspoon peppermint extract
- Green food coloring (optional, to achieve desired color)
- 1 cup semi-sweet chocolate chips
- Pinch of salt
Instructions
- In a large mixing bowl, pour in 2 cups of heavy cream and 1 cup of whole milk.
- Gradually add 3/4 cup of granulated sugar to the milk and cream mixture. Whisk until the sugar is completely dissolved.
- Add 1 teaspoon of pure vanilla extract and 1 teaspoon of peppermint extract. Adjust the peppermint extract to taste if desired.
- If desired, add a few drops of green food coloring and stir until you achieve your desired shade.
- Add a pinch of salt to balance the sweetness.
- Cover the bowl with plastic wrap or a lid and refrigerate for at least 2 hours, or overnight.
- Assemble your ice cream maker according to the manufacturer’s instructions.
- Pour the chilled mixture into the ice cream maker and churn for about 20-25 minutes until it thickens to a soft-serve consistency.
- During the last 5 minutes of churning, add 1 cup of semi-sweet chocolate chips.
- Once the ice cream is ready, transfer it to an airtight container.
- Use a spatula to smooth the top of the ice cream.
- Cover and freeze for at least 4 hours, or until firm.
- Let the ice cream sit for a few minutes before scooping. Serve in bowls or cones.
- Garnish with a sprig of fresh mint or a drizzle of chocolate sauce if desired.
- Relish the refreshing minty flavor combined with rich chocolate chips!
Notes
- For a lighter version, you can substitute low-fat milk for whole milk.
- Adjust the amount of peppermint extract based on your preference for mint flavor.
- Store any leftovers in an airtight container in the freezer for up to 2 weeks.
- Prep Time: 15 minutes
- Cook Time: 25 minutes


Leave a Comment