
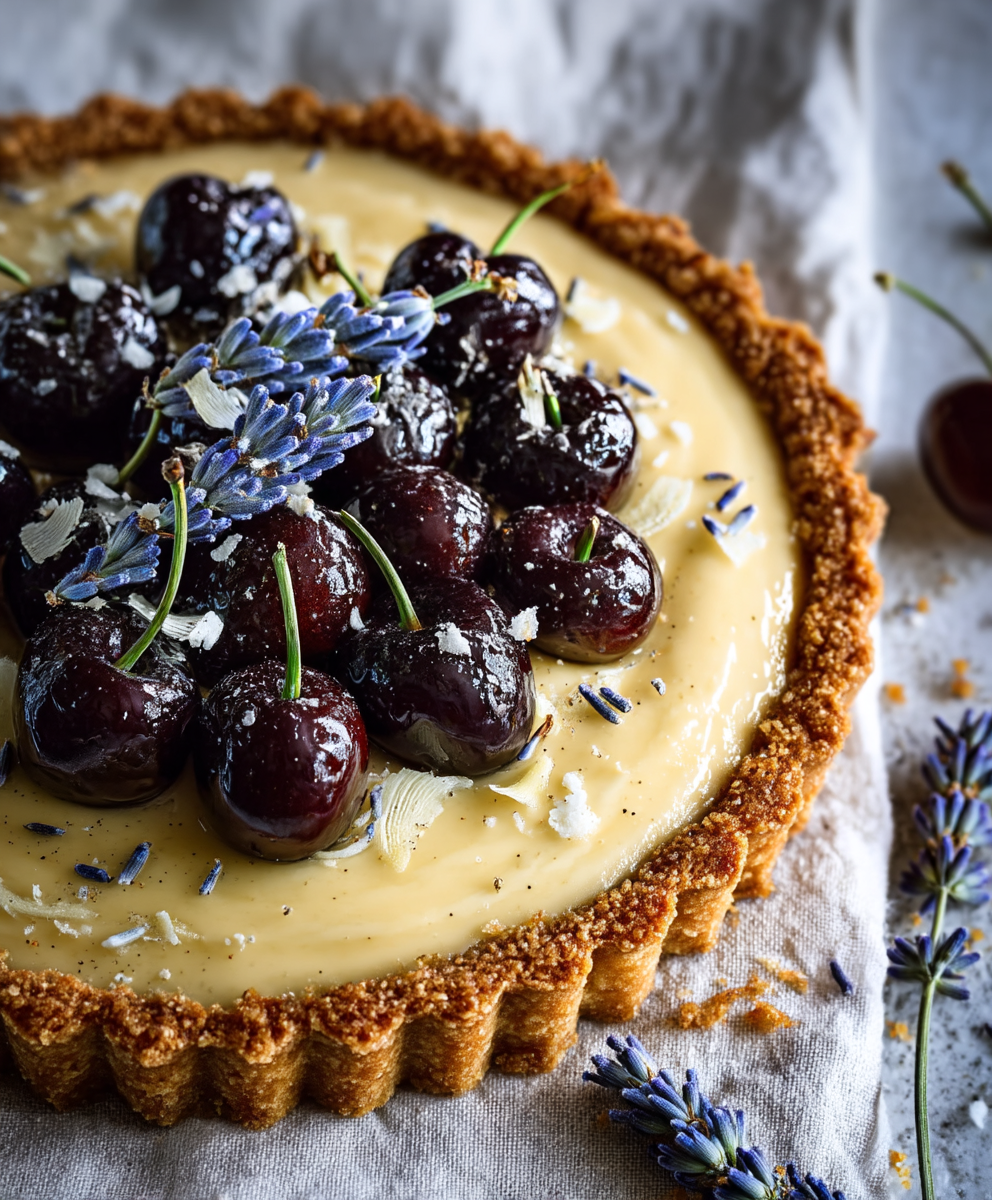
Lavender Vanilla Tart: Prepare to be transported to a sun-drenched lavender field with every single bite of this exquisite dessert! Imagine a buttery, melt-in-your-mouth crust cradling a creamy, fragrant filling infused with the delicate floral notes of lavender and the warm, comforting essence of vanilla. It’s not just a tart; it’s an experience.
While lavender has been used for centuries in perfumes and aromatherapy, its culinary applications are a more recent, yet equally delightful, development. The Victorians, known for their love of floral flavors, were among the first to truly embrace lavender in sweets. This Lavender Vanilla Tart pays homage to that tradition, offering a sophisticated twist on classic dessert flavors.
What makes this tart so irresistible? It’s the perfect balance of sweet and floral, creamy and crumbly. The subtle lavender flavor isn’t overpowering; instead, it complements the vanilla beautifully, creating a harmonious blend that dances on your palate. Plus, while it looks impressive, this tart is surprisingly easy to make, making it perfect for both special occasions and a simple weekend treat. The aroma alone, as it bakes, is enough to brighten any day. So, are you ready to create a little magic in your kitchen?

Ingredients:
- For the Crust:
- 1 ½ cups all-purpose flour
- ½ cup (1 stick) unsalted butter, cold and cubed
- ¼ cup powdered sugar
- ¼ teaspoon salt
- 3-5 tablespoons ice water
- For the Lavender Vanilla Filling:
- 1 ½ cups heavy cream
- ½ cup whole milk
- ½ cup granulated sugar
- 1 vanilla bean, split lengthwise and seeds scraped
- 1 tablespoon dried culinary lavender buds
- 4 large egg yolks
- 1 large egg
- 1 tablespoon cornstarch
- Pinch of salt
- For the Lavender Honey Glaze (Optional):
- 2 tablespoons honey
- 1 teaspoon dried culinary lavender buds
- 1 tablespoon water
- Garnish (Optional):
- Fresh lavender sprigs
- Edible flowers
- Powdered sugar
Preparing the Crust:
- Combine Dry Ingredients: In a large bowl, whisk together the flour, powdered sugar, and salt. This ensures the powdered sugar is evenly distributed, preventing lumps in the crust.
- Cut in the Butter: Add the cold, cubed butter to the dry ingredients. Using a pastry blender or your fingertips, cut the butter into the flour mixture until it resembles coarse crumbs. The key here is to work quickly so the butter stays cold. Cold butter is essential for a flaky crust! If you’re using your fingertips, gently rub the butter between your thumb and fingers, avoiding overworking the dough.
- Add Ice Water: Gradually add the ice water, one tablespoon at a time, mixing gently after each addition. The amount of water needed may vary depending on the humidity. Mix until the dough just comes together. Be careful not to overmix, as this will develop the gluten and result in a tough crust. I usually start with 3 tablespoons and add more if needed, aiming for a slightly shaggy dough.
- Form the Dough: Gently gather the dough into a disc. Wrap it tightly in plastic wrap and refrigerate for at least 30 minutes, or up to 2 hours. This chilling period allows the gluten to relax, making the dough easier to roll out and preventing it from shrinking during baking.
- Roll Out the Dough: On a lightly floured surface, roll out the chilled dough into a 12-inch circle. Make sure your surface and rolling pin are lightly floured to prevent sticking. Roll from the center outwards, rotating the dough occasionally to ensure even thickness.
- Transfer to Tart Pan: Carefully transfer the rolled-out dough to a 9-inch tart pan with a removable bottom. Gently press the dough into the bottom and up the sides of the pan.
- Trim and Crimp the Edges: Trim any excess dough hanging over the edge of the pan. You can use a rolling pin to roll across the top of the pan, or simply trim with a knife. Crimp the edges of the crust to create a decorative border. You can use a fork to press along the edges, or pinch the dough between your fingers to create a more elaborate design.
- Pre-Bake the Crust: Preheat your oven to 375°F (190°C). Line the tart crust with parchment paper and fill it with pie weights or dried beans. This will prevent the crust from puffing up during baking. Bake for 15-20 minutes, or until the edges are lightly golden.
- Remove Weights and Bake Further: Remove the parchment paper and pie weights. Return the crust to the oven and bake for another 5-10 minutes, or until the bottom is golden brown. This ensures the crust is fully cooked and won’t be soggy when you add the filling.
- Cool the Crust: Let the crust cool completely in the tart pan before adding the filling. This prevents the filling from melting the crust and making it soggy.
Preparing the Lavender Vanilla Filling:
- Infuse the Cream: In a medium saucepan, combine the heavy cream, whole milk, granulated sugar, vanilla bean (split and scraped), and dried lavender buds. Heat over medium heat, stirring occasionally, until the mixture just comes to a simmer.
- Remove from Heat and Steep: Remove the saucepan from the heat and let the mixture steep for 30 minutes. This allows the lavender and vanilla flavors to infuse into the cream. The longer you steep, the stronger the flavor will be. I usually steep for at least 30 minutes, but you can steep for up to an hour for a more intense flavor.
- Whisk Egg Yolks and Egg: While the cream is steeping, in a separate bowl, whisk together the egg yolks, whole egg, cornstarch, and salt until smooth. This mixture will help thicken the filling and give it a creamy texture.
- Temper the Egg Mixture: After the cream has steeped, remove the vanilla bean and strain the cream mixture through a fine-mesh sieve to remove the lavender buds. Discard the lavender buds and vanilla bean pod. Slowly pour a small amount of the hot cream mixture into the egg yolk mixture, whisking constantly to temper the eggs. This prevents the eggs from scrambling when you add them to the hot cream.
- Combine and Cook: Gradually pour the tempered egg mixture back into the saucepan with the remaining cream mixture. Cook over medium-low heat, stirring constantly with a spatula, until the mixture thickens enough to coat the back of a spoon. This usually takes about 5-10 minutes. Be patient and continue stirring to prevent the filling from scorching.
- Check for Doneness: To check if the filling is done, dip a spoon into the mixture and run your finger across the back of the spoon. If the line remains clear and doesn’t run back together, the filling is ready.
- Strain Again (Optional): For an extra smooth filling, you can strain the mixture through a fine-mesh sieve one more time. This will remove any small lumps that may have formed during cooking.
Assembling and Baking the Tart:
- Pour Filling into Crust: Pour the warm lavender vanilla filling into the cooled tart crust. Spread the filling evenly to ensure a smooth surface.
- Bake the Tart: Preheat your oven to 325°F (160°C). Bake the tart for 25-35 minutes, or until the filling is set but still slightly wobbly in the center. The filling should jiggle slightly when you gently shake the tart pan.
- Cool Completely: Remove the tart from the oven and let it cool completely on a wire rack. As the tart cools, the filling will continue to set.
- Chill the Tart: Once the tart has cooled to room temperature, cover it loosely with plastic wrap and refrigerate for at least 2 hours, or preferably overnight. Chilling the tart allows the filling to fully set and develop its flavors.
Preparing the Lavender Honey Glaze (Optional):
- Combine Ingredients: In a small saucepan, combine the honey, dried culinary lavender buds, and water.
- Simmer: Heat over low heat, stirring occasionally, until the honey is thinned and the lavender has infused into the glaze. This usually takes about 5-7 minutes.
- Strain: Strain the glaze through a fine-mesh sieve to remove the lavender buds.
- Brush on Tart: Brush the glaze evenly over the top of the chilled tart. This will add a beautiful shine and enhance the lavender flavor.
Garnishing and Serving:
- Remove from Pan: Carefully remove the tart from the tart pan by gently lifting it from the removable bottom.
- Garnish (Optional): Garnish the tart with fresh lavender sprigs, edible flowers, and a dusting of powdered sugar. Get creative with your garnishes to make the tart visually appealing.
- Slice and Serve: Slice the tart into wedges and serve chilled. Enjoy the delicate flavors of lavender and vanilla in this elegant dessert!
Conclusion:
This Lavender Vanilla Tart isn’t just a dessert; it’s an experience. The delicate floral notes of lavender perfectly complement the warm, comforting embrace of vanilla, creating a symphony of flavors that will tantalize your taste buds. The buttery, crumbly crust provides the perfect foundation for the creamy, smooth filling, making each bite a moment of pure bliss. Trust me, once you try this tart, you’ll understand why I’m so passionate about it!
Why is this a must-try? Because it’s surprisingly easy to make, even for novice bakers. The ingredients are readily available, and the steps are straightforward. But more importantly, it’s the unique flavor profile that sets it apart. It’s sophisticated enough to impress guests at a dinner party, yet simple enough to enjoy as a comforting treat on a quiet afternoon. It’s a dessert that speaks of elegance and warmth, all in one delicious package.
And the best part? It’s incredibly versatile! While I adore it as is, there are so many ways to customize this Lavender Vanilla Tart to your liking. For a summery twist, try adding a layer of fresh berries on top raspberries, blueberries, or strawberries would all be divine. A drizzle of honey or a sprinkle of chopped pistachios can also elevate the presentation and add another layer of flavor. If you’re feeling adventurous, you could even infuse the cream with other herbs like rosemary or thyme for a more complex and herbaceous flavor.
Serving suggestions? Oh, the possibilities! A slice of this tart pairs perfectly with a scoop of vanilla bean ice cream or a dollop of whipped cream. It’s also wonderful with a cup of herbal tea or a glass of dessert wine. For a truly decadent experience, try serving it with a chocolate sauce drizzle. And if you’re looking for a lighter option, simply dust it with powdered sugar before serving.
I’ve poured my heart and soul into perfecting this recipe, and I’m so excited to share it with you. I truly believe that everyone deserves to experience the magic of this Lavender Vanilla Tart. It’s a dessert that will not only satisfy your sweet tooth but also uplift your spirits.
So, what are you waiting for? Gather your ingredients, preheat your oven, and get ready to embark on a baking adventure. I promise you won’t regret it! And once you’ve made it, I’d absolutely love to hear about your experience. Did you make any variations? Did you serve it with anything special? What did your friends and family think?
Please, don’t hesitate to share your photos and stories with me. You can tag me on social media using #LavenderVanillaTart or leave a comment below. I’m always eager to see your creations and hear your feedback. Happy baking, and I hope you enjoy every single bite of this delightful tart! I am confident that this recipe will become a staple in your baking repertoire. It’s a guaranteed crowd-pleaser and a wonderful way to impress your loved ones with your baking skills. Remember to have fun and experiment with different flavors and toppings to create your own unique version of this classic dessert.
Lavender Vanilla Tart: A Delicious & Easy Recipe
A delicate and elegant tart featuring a buttery crust filled with a creamy lavender-infused vanilla custard. Optional honey glaze and floral garnish add a touch of sophistication.
Ingredients
- 1 1/2 cups all-purpose flour
- 1/2 cup (1 stick) unsalted butter, cold and cubed
- 1/4 cup powdered sugar
- 1/4 teaspoon salt
- 3-5 tablespoons ice water
- 1 1/2 cups heavy cream
- 1/2 cup whole milk
- 1/2 cup granulated sugar
- 1 vanilla bean, split lengthwise and seeds scraped
- 1 tablespoon dried culinary lavender buds
- 4 large egg yolks
- 1 large egg
- 1 tablespoon cornstarch
- Pinch of salt
- 2 tablespoons honey
- 1 teaspoon dried culinary lavender buds
- 1 tablespoon water
- Fresh lavender sprigs
- Edible flowers
- Powdered sugar
Instructions
- Combine Dry Ingredients: In a large bowl, whisk together the flour, powdered sugar, and salt.
- Cut in the Butter: Add the cold, cubed butter to the dry ingredients. Using a pastry blender or your fingertips, cut the butter into the flour mixture until it resembles coarse crumbs.
- Add Ice Water: Gradually add the ice water, one tablespoon at a time, mixing gently after each addition. Mix until the dough just comes together.
- Form the Dough: Gently gather the dough into a disc. Wrap it tightly in plastic wrap and refrigerate for at least 30 minutes, or up to 2 hours.
- Roll Out the Dough: On a lightly floured surface, roll out the chilled dough into a 12-inch circle.
- Transfer to Tart Pan: Carefully transfer the rolled-out dough to a 9-inch tart pan with a removable bottom. Gently press the dough into the bottom and up the sides of the pan.
- Trim and Crimp the Edges: Trim any excess dough hanging over the edge of the pan. Crimp the edges of the crust to create a decorative border.
- Pre-Bake the Crust: Preheat your oven to 375°F (190°C). Line the tart crust with parchment paper and fill it with pie weights or dried beans. Bake for 15-20 minutes, or until the edges are lightly golden.
- Remove Weights and Bake Further: Remove the parchment paper and pie weights. Return the crust to the oven and bake for another 5-10 minutes, or until the bottom is golden brown.
- Cool the Crust: Let the crust cool completely in the tart pan before adding the filling.
- Infuse the Cream: In a medium saucepan, combine the heavy cream, whole milk, granulated sugar, vanilla bean (split and scraped), and dried lavender buds. Heat over medium heat, stirring occasionally, until the mixture just comes to a simmer.
- Remove from Heat and Steep: Remove the saucepan from the heat and let the mixture steep for 30 minutes.
- Whisk Egg Yolks and Egg: While the cream is steeping, in a separate bowl, whisk together the egg yolks, whole egg, cornstarch, and salt until smooth.
- Temper the Egg Mixture: After the cream has steeped, remove the vanilla bean and strain the cream mixture through a fine-mesh sieve to remove the lavender buds. Discard the lavender buds and vanilla bean pod. Slowly pour a small amount of the hot cream mixture into the egg yolk mixture, whisking constantly to temper the eggs.
- Combine and Cook: Gradually pour the tempered egg mixture back into the saucepan with the remaining cream mixture. Cook over medium-low heat, stirring constantly with a spatula, until the mixture thickens enough to coat the back of a spoon.
- Check for Doneness: To check if the filling is done, dip a spoon into the mixture and run your finger across the back of the spoon. If the line remains clear and doesn’t run back together, the filling is ready.
- Strain Again (Optional): For an extra smooth filling, you can strain the mixture through a fine-mesh sieve one more time.
- Pour Filling into Crust: Pour the warm lavender vanilla filling into the cooled tart crust. Spread the filling evenly to ensure a smooth surface.
- Bake the Tart: Preheat your oven to 325°F (160°C). Bake the tart for 25-35 minutes, or until the filling is set but still slightly wobbly in the center.
- Cool Completely: Remove the tart from the oven and let it cool completely on a wire rack.
- Chill the Tart: Once the tart has cooled to room temperature, cover it loosely with plastic wrap and refrigerate for at least 2 hours, or preferably overnight.
- Combine Ingredients: In a small saucepan, combine the honey, dried culinary lavender buds, and water.
- Simmer: Heat over low heat, stirring occasionally, until the honey is thinned and the lavender has infused into the glaze.
- Strain: Strain the glaze through a fine-mesh sieve to remove the lavender buds.
- Brush on Tart: Brush the glaze evenly over the top of the chilled tart.
- Remove from Pan: Carefully remove the tart from the tart pan by gently lifting it from the removable bottom.
- Garnish (Optional): Garnish the tart with fresh lavender sprigs, edible flowers, and a dusting of powdered sugar.
- Slice and Serve: Slice the tart into wedges and serve chilled.
Notes
- Cold butter is essential for a flaky crust. Work quickly to keep the butter cold.
- Be careful not to overmix the dough, as this will develop the gluten and result in a tough crust.
- Steeping the lavender and vanilla in the cream allows the flavors to infuse. Steep for at least 30 minutes, or up to an hour for a more intense flavor.
- Tempering the eggs prevents them from scrambling when added to the hot cream.
- The filling should be set but still slightly wobbly in the center when removed from the oven. It will continue to set as it cools.
- Chilling the tart allows the filling to fully set and develop its flavors.

Leave a Comment