
Ice Cream Cake: the ultimate dessert mashup that’s guaranteed to be the star of any celebration! Forget choosing between cake and ice cream with this recipe, you get the best of both worlds in one glorious, frozen masterpiece. Have you ever wondered where this delightful dessert originated? While its exact origins are a bit hazy, combining cake and ice cream has been a popular concept for decades, evolving from simple layered treats to the elaborate creations we see today. Its a dessert that speaks to the kid in all of us, evoking memories of birthday parties and summer gatherings.
What makes ice cream cake so irresistible? It’s the perfect combination of textures and temperatures. The creamy, cold ice cream melts in your mouth, contrasting beautifully with the soft, spongy cake layers. Plus, it’s incredibly versatile! You can customize it with your favorite cake flavors, ice cream varieties, and toppings, making it a truly personalized dessert. Whether you’re a seasoned baker or a kitchen novice, this recipe is surprisingly easy to follow, and the results are always impressive. Get ready to wow your friends and family with this show-stopping treat!

Ingredients:
- For the Chocolate Cake Layers:
- 2 cups all-purpose flour
- 2 cups granulated sugar
- ¾ cup unsweetened cocoa powder
- 1 ½ teaspoons baking powder
- 1 ½ teaspoons baking soda
- 1 teaspoon salt
- 1 cup buttermilk
- ½ cup vegetable oil
- 2 large eggs
- 2 teaspoons vanilla extract
- 1 cup boiling water
- For the Vanilla Ice Cream Layer:
- 1 ½ quarts vanilla ice cream, softened
- For the Strawberry Ice Cream Layer:
- 1 ½ quarts strawberry ice cream, softened
- For the Chocolate Ganache:
- 1 cup heavy cream
- 12 ounces semi-sweet chocolate chips
- Optional Decorations:
- Sprinkles
- Chocolate shavings
- Fresh strawberries
Preparing the Chocolate Cake Layers:
- Preheat and Prep: First things first, preheat your oven to 350°F (175°C). Grease and flour two 9-inch round cake pans. This is super important to prevent the cakes from sticking! You can also line the bottoms with parchment paper rounds for extra insurance.
- Combine Dry Ingredients: In a large bowl, whisk together the flour, sugar, cocoa powder, baking powder, baking soda, and salt. Make sure everything is evenly distributed. This ensures a consistent rise and flavor in your cakes.
- Combine Wet Ingredients: In a separate bowl, whisk together the buttermilk, oil, eggs, and vanilla extract. Whisk until everything is well combined and the mixture is smooth.
- Combine Wet and Dry: Gradually add the wet ingredients to the dry ingredients, mixing on low speed until just combined. Be careful not to overmix! Overmixing can lead to a tough cake.
- Add Boiling Water: Slowly pour in the boiling water while mixing on low speed. The batter will be thin, but don’t worry, that’s exactly what we want! The hot water helps to bloom the cocoa powder and creates a moist cake.
- Divide and Bake: Divide the batter evenly between the prepared cake pans. Bake for 30-35 minutes, or until a toothpick inserted into the center comes out clean. Keep a close eye on them, as baking times can vary depending on your oven.
- Cool Completely: Let the cakes cool in the pans for 10 minutes before inverting them onto a wire rack to cool completely. Make sure they are completely cool before assembling the ice cream cake, or the ice cream will melt!
Assembling the Ice Cream Cake:
- Level the Cakes (Optional): If your cakes have a dome, use a serrated knife to level them. This will ensure a flat and even ice cream cake.
- Prepare the First Layer: Place one of the chocolate cake layers on a cake stand or serving plate. If you want to make it easier to serve, you can line the cake stand with parchment paper strips.
- Soften the Ice Cream: Make sure your vanilla ice cream is softened enough to spread easily. If it’s too hard, it will be difficult to work with. But don’t let it melt completely!
- Spread the Vanilla Ice Cream: Spread the softened vanilla ice cream evenly over the first cake layer. Try to create a smooth and even layer.
- Freeze: Place the cake in the freezer for at least 1 hour to allow the vanilla ice cream layer to harden. This is crucial for preventing the layers from mixing together.
- Soften the Strawberry Ice Cream: While the vanilla ice cream layer is freezing, soften the strawberry ice cream. Again, make sure it’s spreadable but not melted.
- Prepare the Second Layer: Remove the cake from the freezer and place the second chocolate cake layer on top of the frozen vanilla ice cream layer.
- Spread the Strawberry Ice Cream: Spread the softened strawberry ice cream evenly over the second cake layer.
- Freeze Again: Return the cake to the freezer for at least 2 hours, or preferably overnight, to allow the strawberry ice cream layer to harden completely. This will ensure a firm and stable ice cream cake.
Making the Chocolate Ganache:
- Heat the Cream: Place the heavy cream in a microwave-safe bowl and heat in the microwave for about 1-2 minutes, or until it is hot but not boiling. You can also heat the cream in a saucepan over medium heat.
- Pour over Chocolate: Pour the hot cream over the chocolate chips in a heat-proof bowl.
- Let it Sit: Let the mixture sit for 1 minute to allow the heat from the cream to melt the chocolate.
- Stir Until Smooth: Gently stir the mixture until the chocolate is completely melted and the ganache is smooth and glossy. If there are any unmelted chocolate pieces, you can microwave the mixture in 15-second intervals, stirring in between, until smooth.
- Cool Slightly: Let the ganache cool slightly before pouring it over the ice cream cake. This will prevent it from melting the ice cream too quickly.
Finishing Touches:
- Remove from Freezer: Remove the ice cream cake from the freezer.
- Pour the Ganache: Pour the slightly cooled chocolate ganache over the top of the ice cream cake, allowing it to drip down the sides. You can use a spatula to spread the ganache evenly.
- Decorate (Optional): Decorate the cake with sprinkles, chocolate shavings, fresh strawberries, or any other toppings you like. Get creative and have fun!
- Freeze Briefly: Return the cake to the freezer for about 15-20 minutes to allow the ganache to set slightly. This will make it easier to slice and serve.
- Slice and Serve: Remove the cake from the freezer about 10-15 minutes before serving to allow it to soften slightly. Use a sharp knife to slice the cake and serve immediately. Enjoy!
Tips and Tricks for the Perfect Ice Cream Cake:
- Softening Ice Cream: The key to a good ice cream cake is properly softened ice cream. Don’t let it melt completely, but make sure it’s soft enough to spread easily. You can let it sit at room temperature for about 15-20 minutes, or microwave it in very short intervals (5-10 seconds) if you’re in a hurry.
- Preventing Ice Crystals: To prevent ice crystals from forming on the ice cream, wrap the cake tightly in plastic wrap before freezing.
- Making Ahead: This ice cream cake can be made several days in advance. Just make sure to wrap it tightly in plastic wrap and store it in the freezer.
- Variations: Feel free to experiment with different flavors of cake and ice cream. You can use chocolate ice cream, cookies and cream ice cream, or even add a layer of crushed cookies or candy bars between the ice cream layers.
- Ganache Consistency: If your ganache is too thick, you can add a tablespoon or two of hot cream to thin it out. If it’s too thin, you can let it sit at room temperature for a few minutes to thicken slightly.
- Serving Tip: Dip your knife in hot water before slicing the cake for clean and easy cuts. Wipe the knife clean between slices.
Conclusion:
This Ice Cream Cake recipe isn’t just dessert; it’s a celebration waiting to happen! From its creamy, dreamy layers to the customizable crunch, it’s a guaranteed crowd-pleaser that’s surprisingly simple to make. Forget complicated baking projects this recipe lets you create a show-stopping treat with minimal effort and maximum impact. It’s the perfect way to impress your friends and family without spending hours in the kitchen.
Why is this a must-try? Because it’s the ultimate customizable dessert! You can tailor it to your exact preferences, making it a truly unique and personal creation. Love chocolate? Load it up with chocolate ice cream, chocolate shavings, and a rich chocolate ganache. Prefer something fruity and refreshing? Opt for strawberry or raspberry ice cream, fresh berries, and a light whipped cream topping. The possibilities are endless!
Beyond the basic recipe, there are so many fun variations you can explore. For a more decadent experience, try adding a layer of fudge sauce or caramel between the ice cream layers. Or, for a playful twist, incorporate crushed cookies, chopped nuts, or even mini marshmallows. If you’re feeling adventurous, you could even experiment with different flavor combinations, like mint chocolate chip and cookies and cream, or peanut butter cup and vanilla.
Serving Suggestions and Variations:
* For a party: Cut the cake into slices and serve with a dollop of whipped cream and a sprinkle of your favorite toppings.
* For a romantic dinner: Serve smaller portions with a drizzle of chocolate sauce and a few fresh berries.
* For a kid-friendly treat: Let the kids decorate their own slices with sprinkles, gummy bears, and other fun candies.
* Variations: Substitute the graham cracker crust with an Oreo cookie crust for a chocolatey twist. Use different types of ice cream, such as gelato or sorbet, to create unique flavor combinations. Add a layer of brownie or cookie dough between the ice cream layers for an extra indulgent treat.
I truly believe that this Ice Cream Cake recipe will become a staple in your dessert repertoire. It’s easy, versatile, and always a hit. It’s the perfect dessert for birthdays, holidays, or any occasion that calls for a little bit of sweetness. Plus, it’s a great way to use up leftover ice cream or experiment with new flavors.
So, what are you waiting for? Gather your ingredients, grab your favorite ice cream, and get ready to create a dessert masterpiece. I’m confident that you’ll love this recipe as much as I do.
And most importantly, I want to hear about your experience! Did you try the recipe? What variations did you make? What did your friends and family think? Share your photos and stories in the comments below. I can’t wait to see your creations and hear about your adventures in Ice Cream Cake making! Happy baking (or rather, freezing)! Let me know if you have any questions, and I’ll do my best to help. Enjoy!
Ice Cream Cake: The Ultimate Guide to Delicious Frozen Desserts
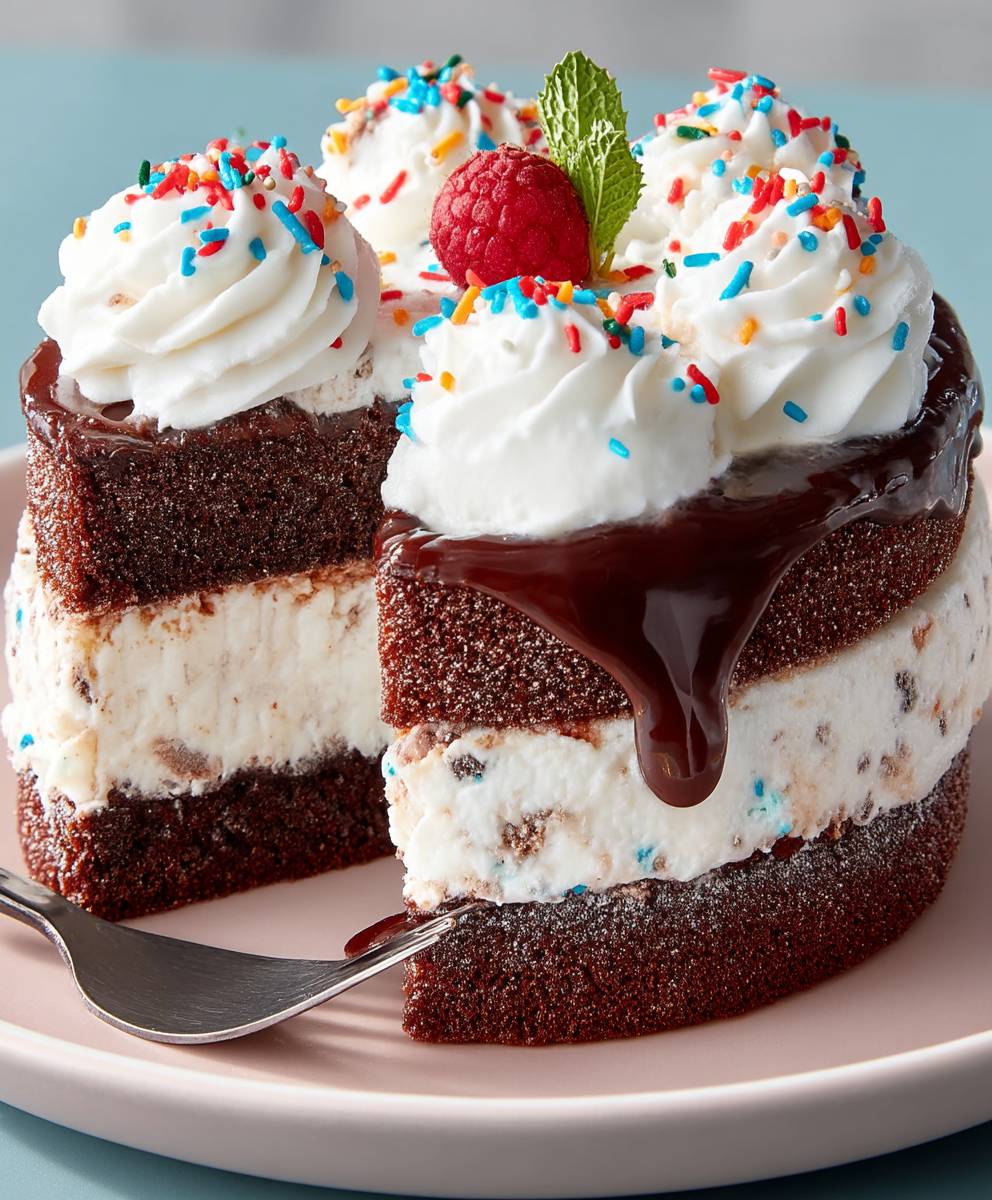
Moist chocolate cake layers with creamy vanilla and strawberry ice cream, finished with a rich chocolate ganache. Perfect for celebrations and can be made ahead!
Ingredients
- 2 cups all-purpose flour
- 2 cups granulated sugar
- ¾ cup unsweetened cocoa powder
- 1 ½ teaspoons baking powder
- 1 ½ teaspoons baking soda
- 1 teaspoon salt
- 1 cup buttermilk
- ½ cup vegetable oil
- 2 large eggs
- 2 teaspoons vanilla extract
- 1 cup boiling water
- 1 ½ quarts vanilla ice cream, softened
- 1 ½ quarts strawberry ice cream, softened
- 1 cup heavy cream
- 12 ounces semi-sweet chocolate chips
- Sprinkles
- Chocolate shavings
- Fresh strawberries
Instructions
- Preheat your oven to 350°F (175°C). Grease and flour two 9-inch round cake pans. Line the bottoms with parchment paper rounds.
- In a large bowl, whisk together the flour, sugar, cocoa powder, baking powder, baking soda, and salt.
- In a separate bowl, whisk together the buttermilk, oil, eggs, and vanilla extract until smooth.
- Gradually add the wet ingredients to the dry ingredients, mixing on low speed until just combined.
- Slowly pour in the boiling water while mixing on low speed. The batter will be thin.
- Divide the batter evenly between the prepared cake pans. Bake for 30-35 minutes, or until a toothpick inserted into the center comes out clean.
- Let the cakes cool in the pans for 10 minutes before inverting them onto a wire rack to cool completely.
- If your cakes have a dome, use a serrated knife to level them.
- Place one of the chocolate cake layers on a cake stand or serving plate. Line the cake stand with parchment paper strips.
- Make sure your vanilla ice cream is softened enough to spread easily.
- Spread the softened vanilla ice cream evenly over the first cake layer.
- Place the cake in the freezer for at least 1 hour to allow the vanilla ice cream layer to harden.
- While the vanilla ice cream layer is freezing, soften the strawberry ice cream.
- Remove the cake from the freezer and place the second chocolate cake layer on top of the frozen vanilla ice cream layer.
- Spread the softened strawberry ice cream evenly over the second cake layer.
- Return the cake to the freezer for at least 2 hours, or preferably overnight, to allow the strawberry ice cream layer to harden completely.
- Place the heavy cream in a microwave-safe bowl and heat in the microwave for about 1-2 minutes, or until it is hot but not boiling. You can also heat the cream in a saucepan over medium heat.
- Pour the hot cream over the chocolate chips in a heat-proof bowl.
- Let the mixture sit for 1 minute to allow the heat from the cream to melt the chocolate.
- Gently stir the mixture until the chocolate is completely melted and the ganache is smooth and glossy. If there are any unmelted chocolate pieces, you can microwave the mixture in 15-second intervals, stirring in between, until smooth.
- Let the ganache cool slightly before pouring it over the ice cream cake.
- Remove the ice cream cake from the freezer.
- Pour the slightly cooled chocolate ganache over the top of the ice cream cake, allowing it to drip down the sides. You can use a spatula to spread the ganache evenly.
- Decorate the cake with sprinkles, chocolate shavings, fresh strawberries, or any other toppings you like.
- Return the cake to the freezer for about 15-20 minutes to allow the ganache to set slightly.
- Remove the cake from the freezer about 10-15 minutes before serving to allow it to soften slightly. Use a sharp knife to slice the cake and serve immediately. Enjoy!
Notes
- Softening Ice Cream: The key to a good ice cream cake is properly softened ice cream. Don’t let it melt completely, but make sure it’s soft enough to spread easily. You can let it sit at room temperature for about 15-20 minutes, or microwave it in very short intervals (5-10 seconds) if you’re in a hurry.
- Preventing Ice Crystals: To prevent ice crystals from forming on the ice cream, wrap the cake tightly in plastic wrap before freezing.
- Making Ahead: This ice cream cake can be made several days in advance. Just make sure to wrap it tightly in plastic wrap and store it in the freezer.
- Variations: Feel free to experiment with different flavors of cake and ice cream. You can use chocolate ice cream, cookies and cream ice cream, or even add a layer of crushed cookies or candy bars between the ice cream layers.
- Ganache Consistency: If your ganache is too thick, you can add a tablespoon or two of hot cream to thin it out. If it’s too thin, you can let it sit at room temperature for a few minutes to thicken slightly.
- Serving Tip: Dip your knife in hot water before slicing the cake for clean and easy cuts. Wipe the knife clean between slices.

Leave a Comment