
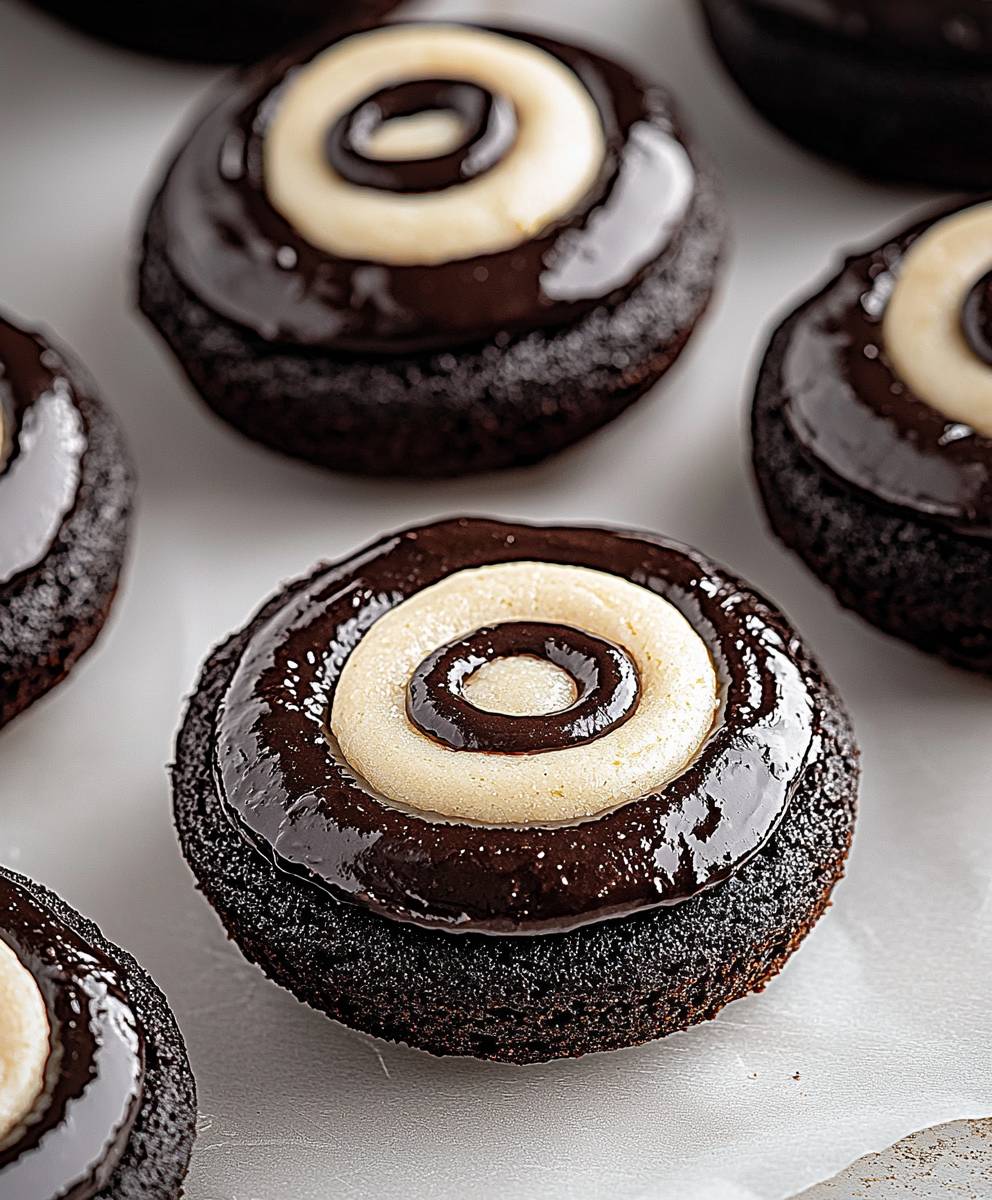
Hostess Cupcake Cookies: Remember the thrill of unwrapping a Hostess Cupcake as a kid? That iconic swirl of white icing, the rich chocolate cake, and that creamy filling? Now, imagine all that nostalgic goodness packed into a soft, chewy cookie! I’ve taken the beloved flavors of the classic Hostess Cupcake and transformed them into a delightful treat that’s perfect for satisfying your sweet tooth.
While the Hostess Cupcake itself doesn’t have a long, storied history like some desserts, its impact on American culture is undeniable. Introduced in 1919, it quickly became a lunchbox staple and a symbol of simple, sweet indulgence. This recipe for Hostess Cupcake Cookies pays homage to that iconic treat, bringing a touch of retro fun to your baking.
People adore the original Hostess Cupcake for its comforting flavors and convenient, single-serving size. These cookies capture that same magic! They offer a delightful combination of textures a soft, slightly fudgy cookie base, a creamy filling reminiscent of the original, and a drizzle of chocolate ganache that mimics the signature swirl. Plus, they’re incredibly easy to make, making them a perfect project for bakers of all skill levels. Get ready to experience a wave of nostalgia with every bite!

Ingredients:
- For the Chocolate Cookies:
- 2 cups all-purpose flour
- ¾ cup unsweetened cocoa powder
- 1 teaspoon baking soda
- ½ teaspoon baking powder
- ½ teaspoon salt
- 1 cup (2 sticks) unsalted butter, softened
- 1 ½ cups granulated sugar
- 2 large eggs
- 2 teaspoons vanilla extract
- ½ cup buttermilk
- ½ cup hot coffee
- For the Cream Filling:
- 1 cup (2 sticks) unsalted butter, softened
- 3 cups powdered sugar
- ¼ cup vegetable shortening
- 2 tablespoons milk
- 1 teaspoon vanilla extract
- Pinch of salt
- For the Chocolate Ganache:
- 1 cup semi-sweet chocolate chips
- ½ cup heavy cream
- 1 tablespoon light corn syrup (optional, for shine)
- For the White Squiggle:
- ½ cup white chocolate chips
- 1 teaspoon vegetable shortening
Preparing the Chocolate Cookies
- Combine Dry Ingredients: In a medium bowl, whisk together the flour, cocoa powder, baking soda, baking powder, and salt. Make sure there are no lumps of cocoa powder remaining. This ensures a smooth and even cookie texture.
- Cream Butter and Sugar: In a large bowl (or the bowl of a stand mixer), cream together the softened butter and granulated sugar until light and fluffy. This usually takes about 3-5 minutes. Scrape down the sides of the bowl occasionally to ensure everything is evenly mixed. The mixture should be noticeably lighter in color and texture.
- Add Eggs and Vanilla: Beat in the eggs one at a time, mixing well after each addition. Then, stir in the vanilla extract. Make sure the eggs are fully incorporated before adding the vanilla.
- Alternate Dry and Wet Ingredients: Gradually add the dry ingredients to the wet ingredients, alternating with the buttermilk, beginning and ending with the dry ingredients. Mix until just combined. Do not overmix! Overmixing will develop the gluten in the flour, resulting in tough cookies. Start by adding about a third of the dry ingredients, then half of the buttermilk, then another third of the dry ingredients, the remaining buttermilk, and finally the last of the dry ingredients.
- Add Hot Coffee: Stir in the hot coffee until the batter is smooth. The hot coffee enhances the chocolate flavor and helps to create a moist cookie. Don’t worry, the coffee flavor won’t be overpowering.
- Chill the Dough: Cover the bowl with plastic wrap and refrigerate the dough for at least 2 hours, or preferably overnight. This is a crucial step! Chilling the dough prevents the cookies from spreading too much during baking and allows the flavors to meld together. The longer the dough chills, the better the cookies will be.
Baking the Cookies
- Preheat Oven and Prepare Baking Sheets: Preheat your oven to 350°F (175°C). Line baking sheets with parchment paper or silicone baking mats. This will prevent the cookies from sticking and make cleanup easier.
- Scoop and Bake: Scoop rounded tablespoons of dough onto the prepared baking sheets, leaving about 2 inches between each cookie. I like to use a cookie scoop to ensure uniform size.
- Bake: Bake for 9-11 minutes, or until the edges are set and the centers are slightly soft. Don’t overbake! The cookies will continue to firm up as they cool.
- Cool: Let the cookies cool on the baking sheets for a few minutes before transferring them to a wire rack to cool completely.
Making the Cream Filling
- Cream Butter and Shortening: In a large bowl (or the bowl of a stand mixer), cream together the softened butter and vegetable shortening until light and fluffy. The shortening helps to stabilize the filling and gives it that classic Hostess Cupcake texture.
- Add Powdered Sugar: Gradually add the powdered sugar, one cup at a time, mixing well after each addition. Start on low speed to prevent a powdered sugar cloud!
- Add Milk, Vanilla, and Salt: Beat in the milk, vanilla extract, and salt until the filling is smooth and creamy. Adjust the amount of milk as needed to achieve the desired consistency. You want a filling that is pipeable but not too runny.
Assembling the Hostess Cupcake Cookies
- Pipe the Filling: Transfer the cream filling to a piping bag fitted with a large round tip. Alternatively, you can use a zip-top bag with a corner snipped off.
- Sandwich the Cookies: Pipe a generous amount of cream filling onto the flat side of one cookie, then top with another cookie, flat side down. Gently press the cookies together to distribute the filling evenly.
Making the Chocolate Ganache
- Heat the Cream: In a small saucepan, heat the heavy cream over medium heat until it just begins to simmer. Do not boil!
- Pour Over Chocolate: Place the chocolate chips in a heatproof bowl. Pour the hot cream over the chocolate chips and let it sit for 1 minute to soften the chocolate.
- Stir Until Smooth: Gently stir the mixture until the chocolate is completely melted and the ganache is smooth and glossy. If desired, stir in the light corn syrup for extra shine.
Dipping the Cookies
- Dip the Cookies: Dip the top of each assembled cookie into the chocolate ganache, allowing the excess to drip off. You can use a fork or your fingers to help spread the ganache evenly.
- Set on Parchment Paper: Place the dipped cookies on a sheet of parchment paper to allow the ganache to set.
Creating the White Squiggle
- Melt the White Chocolate: In a microwave-safe bowl, melt the white chocolate chips and vegetable shortening in 30-second intervals, stirring in between, until smooth. The shortening helps the white chocolate melt smoothly and prevents it from seizing.
- Transfer to Piping Bag: Transfer the melted white chocolate to a piping bag fitted with a small round tip (or a zip-top bag with a very small corner snipped off).
- Pipe the Squiggle: Pipe the classic Hostess Cupcake squiggle design onto the chocolate-covered cookies. Practice on a piece of parchment paper first to get the hang of it. The squiggle doesn’t have to be perfect; that’s part of its charm!
- Set: Allow the white chocolate squiggle to set completely before serving or storing the cookies.
Tips for Success
- Use High-Quality Ingredients: The better the quality of your ingredients, the better your cookies will taste. Especially important is the cocoa powder and chocolate chips.
- Don’t Overmix the Dough: Overmixing develops the gluten in the flour, resulting in tough cookies. Mix until just combined.
- Chill the Dough: Chilling the dough is crucial for preventing the cookies from spreading too much during baking.
- Don’t Overbake the Cookies: Overbaked cookies will be dry and crumbly. Bake until the edges are set and the centers are slightly soft.
- Adjust Sweetness to Taste: If you prefer a less sweet filling, you can reduce the amount of powdered sugar.
- Storage: Store the finished cookies in an airtight container at room temperature for up to 3 days, or in the refrigerator for up to a week.
Enjoy your homemade Hostess Cupcake Cookies! They’re a delicious and nostalgic treat that’s sure to be a hit with everyone.
Conclusion:
And there you have it! These Hostess Cupcake Cookies are truly a must-try for anyone who loves the classic treat but wants a fun, shareable, and slightly less messy version. I’ve made these for countless parties, potlucks, and even just a cozy night in, and they’re always a hit. The combination of the rich chocolate cookie base, the creamy vanilla filling, and that signature squiggle of chocolate ganache is simply irresistible. It’s like taking a bite of pure nostalgia, but in cookie form!
But why are these cookies so special? It’s more than just the flavor. It’s the ease of preparation. Forget complicated layering or fussy decorating techniques. This recipe is straightforward and uses ingredients you likely already have in your pantry. Plus, the cookies are incredibly versatile. You can easily adapt them to your own preferences and dietary needs.
Looking for serving suggestions? These cookies are fantastic on their own, of course, but they also pair beautifully with a cold glass of milk, a scoop of vanilla ice cream, or even a warm cup of coffee. For a truly decadent experience, try crumbling them over a chocolate milkshake or using them as the base for mini ice cream sandwiches.
And speaking of variations, the possibilities are endless! Want to add a little extra chocolate punch? Stir some chocolate chips into the cookie dough. Prefer a different filling? Try using peanut butter frosting, cream cheese frosting, or even a homemade marshmallow fluff. You could also experiment with different extracts in the cookie dough or filling, such as almond, peppermint, or even a hint of orange. For a festive touch, add sprinkles or edible glitter to the ganache.
Another fun variation is to make mini Hostess Cupcake Cookies. Simply use a smaller cookie scoop and adjust the baking time accordingly. These bite-sized treats are perfect for parties or for satisfying a small sweet craving. You can also get creative with the ganache design. Instead of the classic squiggle, try making swirls, dots, or even writing a message on each cookie.
I’m confident that once you try this recipe, it will become a staple in your baking repertoire. It’s the perfect way to satisfy your sweet tooth, impress your friends and family, and relive those cherished childhood memories. The slightly crunchy edge, the soft and chewy center, and the burst of creamy filling it’s a symphony of textures and flavors that will leave you wanting more.
So, what are you waiting for? Gather your ingredients, preheat your oven, and get ready to bake up a batch of these amazing Hostess Cupcake Cookies. I promise you won’t be disappointed. And most importantly, don’t forget to share your creations! I’d love to see your photos, hear about your variations, and read about your experiences in the comments below. Happy baking! Let me know if you have any questions, and I’ll do my best to help. I can’t wait to see what you create!
Hostess Cupcake Cookies: The Ultimate Guide to Baking Delicious Treats
Soft chocolate cookies sandwiched with creamy filling, dipped in chocolate ganache, and topped with a white squiggle. A nostalgic treat made from scratch!
Ingredients
- 2 cups all-purpose flour
- ¾ cup unsweetened cocoa powder
- 1 teaspoon baking soda
- ½ teaspoon baking powder
- ½ teaspoon salt
- 1 cup (2 sticks) unsalted butter, softened
- 1 ½ cups granulated sugar
- 2 large eggs
- 2 teaspoons vanilla extract
- ½ cup buttermilk
- ½ cup hot coffee
- 1 cup (2 sticks) unsalted butter, softened
- 3 cups powdered sugar
- ¼ cup vegetable shortening
- 2 tablespoons milk
- 1 teaspoon vanilla extract
- Pinch of salt
- 1 cup semi-sweet chocolate chips
- ½ cup heavy cream
- 1 tablespoon light corn syrup (optional, for shine)
- ½ cup white chocolate chips
- 1 teaspoon vegetable shortening
Instructions
- Combine Dry Ingredients: In a medium bowl, whisk together the flour, cocoa powder, baking soda, baking powder, and salt. Make sure there are no lumps of cocoa powder remaining.
- Cream Butter and Sugar: In a large bowl (or the bowl of a stand mixer), cream together the softened butter and granulated sugar until light and fluffy (3-5 minutes). Scrape down the sides of the bowl occasionally.
- Add Eggs and Vanilla: Beat in the eggs one at a time, mixing well after each addition. Then, stir in the vanilla extract.
- Alternate Dry and Wet Ingredients: Gradually add the dry ingredients to the wet ingredients, alternating with the buttermilk, beginning and ending with the dry ingredients. Mix until just combined. Do not overmix!
- Add Hot Coffee: Stir in the hot coffee until the batter is smooth.
- Chill the Dough: Cover the bowl with plastic wrap and refrigerate the dough for at least 2 hours, or preferably overnight.
- Preheat Oven and Prepare Baking Sheets: Preheat your oven to 350°F (175°C). Line baking sheets with parchment paper or silicone baking mats.
- Scoop and Bake: Scoop rounded tablespoons of dough onto the prepared baking sheets, leaving about 2 inches between each cookie.
- Bake: Bake for 9-11 minutes, or until the edges are set and the centers are slightly soft. Don’t overbake!
- Cool: Let the cookies cool on the baking sheets for a few minutes before transferring them to a wire rack to cool completely.
- Cream Butter and Shortening: In a large bowl (or the bowl of a stand mixer), cream together the softened butter and vegetable shortening until light and fluffy.
- Add Powdered Sugar: Gradually add the powdered sugar, one cup at a time, mixing well after each addition. Start on low speed to prevent a powdered sugar cloud!
- Add Milk, Vanilla, and Salt: Beat in the milk, vanilla extract, and salt until the filling is smooth and creamy. Adjust the amount of milk as needed to achieve the desired consistency.
- Pipe the Filling: Transfer the cream filling to a piping bag fitted with a large round tip. Alternatively, you can use a zip-top bag with a corner snipped off.
- Sandwich the Cookies: Pipe a generous amount of cream filling onto the flat side of one cookie, then top with another cookie, flat side down. Gently press the cookies together to distribute the filling evenly.
- Heat the Cream: In a small saucepan, heat the heavy cream over medium heat until it just begins to simmer. Do not boil!
- Pour Over Chocolate: Place the chocolate chips in a heatproof bowl. Pour the hot cream over the chocolate chips and let it sit for 1 minute to soften the chocolate.
- Stir Until Smooth: Gently stir the mixture until the chocolate is completely melted and the ganache is smooth and glossy. If desired, stir in the light corn syrup for extra shine.
- Dip the Cookies: Dip the top of each assembled cookie into the chocolate ganache, allowing the excess to drip off.
- Set on Parchment Paper: Place the dipped cookies on a sheet of parchment paper to allow the ganache to set.
- Melt the White Chocolate: In a microwave-safe bowl, melt the white chocolate chips and vegetable shortening in 30-second intervals, stirring in between, until smooth.
- Transfer to Piping Bag: Transfer the melted white chocolate to a piping bag fitted with a small round tip (or a zip-top bag with a very small corner snipped off).
- Pipe the Squiggle: Pipe the classic Hostess Cupcake squiggle design onto the chocolate-covered cookies. Practice on a piece of parchment paper first to get the hang of it.
- Set: Allow the white chocolate squiggle to set completely before serving or storing the cookies.
Notes
- Use high-quality ingredients for the best flavor, especially cocoa powder and chocolate chips.
- Don’t overmix the cookie dough.
- Chilling the dough is crucial for preventing spreading.
- Don’t overbake the cookies.
- Adjust the sweetness of the filling to your preference.
- Store in an airtight container at room temperature for up to 3 days, or in the refrigerator for up to a week.
Leave a Comment