
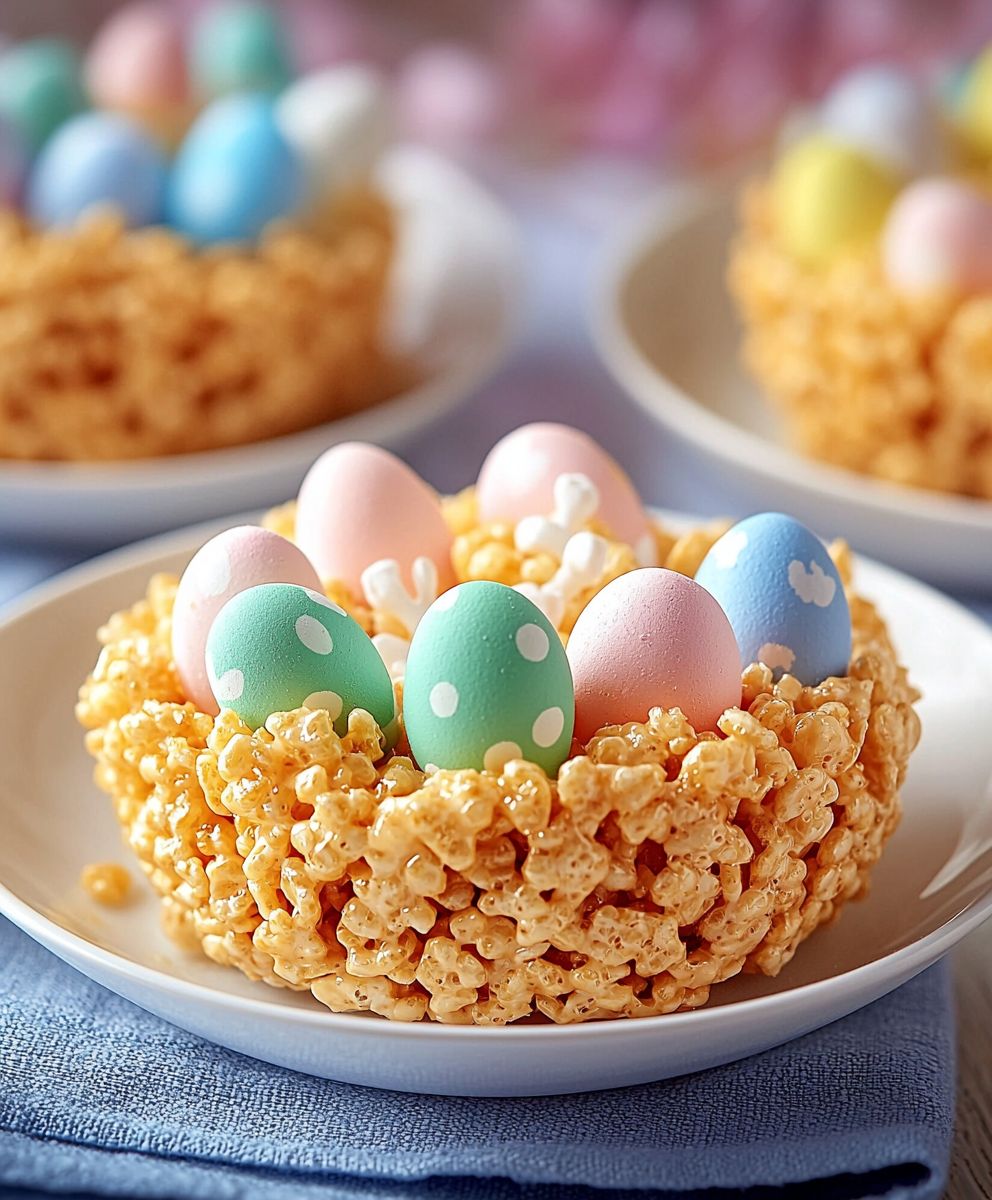
Easter Rice Krispie Nests: The cutest, most delicious, and easiest Easter treat you’ll make all season! Imagine biting into a perfectly sweet and crunchy Rice Krispie treat, shaped like a charming little nest and filled with colorful, candy-coated chocolate eggs. It’s pure Easter magic in every bite!
While Rice Krispie treats themselves are a relatively modern invention, dating back to the 1930s, the concept of edible nests has been around for centuries. They symbolize new beginnings and the promise of spring, making them a perfect fit for Easter celebrations. These delightful nests tap into that tradition with a fun, kid-friendly twist.
What’s not to love about Easter Rice Krispie Nests? They’re incredibly simple to make, requiring minimal ingredients and no baking! The combination of the classic Rice Krispie treat texture that satisfying snap, crackle, and pop with the creamy sweetness of melted marshmallows is simply irresistible. Plus, the colorful candy eggs add a festive touch and a burst of chocolatey goodness. They are perfect for getting the kids involved in the kitchen, and they make a beautiful and delicious addition to any Easter dessert table. Get ready to create some sweet memories with this delightful treat!

Ingredients:
- 1/4 cup (1/2 stick) unsalted butter
- 5 cups miniature marshmallows
- 6 cups Rice Krispies cereal
- 1 teaspoon vanilla extract
- Cadbury Mini Eggs or other small Easter candies
- Green-tinted coconut flakes (optional, for “grass”)
Preparing the Marshmallow Mixture
Okay, let’s get started! The key to perfect Rice Krispie treats, and therefore perfect nests, is a smooth and gooey marshmallow base. Trust me, I’ve made my fair share of rock-hard treats, so I’ve learned a thing or two.
- Melt the Butter: In a large, non-stick saucepan, melt the butter over low heat. Make sure it’s a large saucepan you’ll need plenty of room for all those marshmallows and cereal later! Keep an eye on the butter; you don’t want it to brown or burn. We’re aiming for melted and smooth.
- Add the Marshmallows: Once the butter is melted, add the miniature marshmallows to the saucepan. Stir constantly with a spatula until the marshmallows are completely melted and smooth. This might take a few minutes, so be patient and keep stirring to prevent sticking and burning. Low and slow is the name of the game here.
- Stir in the Vanilla Extract: Remove the saucepan from the heat and stir in the vanilla extract. The vanilla adds a lovely depth of flavor that complements the sweetness of the marshmallows. Don’t skip this step!
Combining the Cereal
Now for the fun part! This is where the magic happens and our gooey marshmallow mixture transforms into the base for our adorable nests.
- Add the Rice Krispies Cereal: Pour the Rice Krispies cereal into the saucepan with the melted marshmallow mixture. Gently fold the cereal into the marshmallow mixture until it’s evenly coated. Be careful not to crush the cereal. You want to keep those little Krispies intact! Use a spatula or a large spoon to gently combine everything.
- Mix Thoroughly: Make sure all the cereal is well coated with the marshmallow mixture. You don’t want any dry patches of cereal. This ensures that the nests will hold their shape properly.
Forming the Nests
This is where we get to be creative and shape our Rice Krispie mixture into cute little nests. Don’t worry if they’re not perfect; each nest is unique!
- Prepare Your Hands: Lightly grease your hands with butter or cooking spray. This will prevent the Rice Krispie mixture from sticking to your hands and making a mess. Trust me, this is a crucial step!
- Scoop and Shape: Scoop about 1/4 cup of the Rice Krispie mixture into your hands. Gently form it into a ball, then press your thumb into the center to create a well. Shape the sides of the ball to form a nest-like shape. You can use your fingers to create a slightly raised edge around the nest.
- Place on Parchment Paper: Place the formed nest onto a sheet of parchment paper or wax paper. This will prevent the nests from sticking to the surface.
- Repeat: Repeat steps 6-8 until all the Rice Krispie mixture has been used. You should be able to make about 12-15 nests, depending on the size you make them.
Decorating the Nests
Now for the best part decorating! This is where you can really let your creativity shine. I love using Cadbury Mini Eggs, but you can use any small Easter candies you like.
- Add the Candy Eggs: While the nests are still slightly warm and pliable, gently press the Cadbury Mini Eggs or other Easter candies into the center of each nest. Arrange them in a way that looks appealing. I usually put 3-5 eggs in each nest, but you can add more or less depending on your preference.
- Add Green-Tinted Coconut (Optional): If you want to add a touch of “grass” to your nests, sprinkle some green-tinted coconut flakes around the base of each nest. This adds a fun and festive touch. To tint the coconut, simply place some shredded coconut in a resealable bag, add a few drops of green food coloring, and shake until the coconut is evenly colored.
Setting and Storing
Almost there! Now we just need to let the nests set and then we can enjoy our delicious and adorable Easter treats.
- Let the Nests Set: Allow the nests to set completely at room temperature. This will take about 30 minutes to an hour. This allows the marshmallow mixture to firm up and the nests to hold their shape.
- Storing the Nests: Once the nests are set, store them in an airtight container at room temperature. They will stay fresh for up to 2-3 days. If you live in a warm climate, you may want to store them in the refrigerator to prevent the marshmallows from becoming too soft.
Tips and Tricks for Perfect Nests
Here are a few extra tips and tricks to ensure your Easter Rice Krispie Nests are a success:
- Use Fresh Marshmallows: Fresh marshmallows melt more smoothly and evenly than older marshmallows.
- Don’t Overcook the Marshmallows: Overcooked marshmallows will result in hard and chewy treats. Cook them over low heat and stir constantly until they are just melted.
- Grease Your Hands Well: This will prevent the Rice Krispie mixture from sticking to your hands and making a mess.
- Work Quickly: The Rice Krispie mixture will start to harden as it cools, so it’s important to work quickly when forming the nests.
- Get Creative with Decorations: Don’t be afraid to experiment with different types of candies and decorations. You can use jelly beans, sprinkles, or even edible glitter to make your nests extra special.
- Make Them Ahead of Time: These nests can be made a day or two in advance, making them perfect for Easter gatherings.
- Variations: Try adding a tablespoon of peanut butter to the melted marshmallow mixture for a peanut butter flavor. You can also add chocolate chips or chopped nuts to the Rice Krispie mixture.
Troubleshooting
Sometimes things don’t go exactly as planned. Here are a few common problems and how to fix them:
- Nests are too hard: You may have overcooked the marshmallows. Next time, cook them over low heat and stir constantly until they are just melted.
- Nests are too sticky: You may have used too much marshmallow. Next time, use slightly less marshmallow.
- Nests are falling apart: You may not have mixed the cereal and marshmallow mixture thoroughly enough. Make sure all the cereal is well coated with the marshmallow mixture.
Enjoy!
And that’s it! You’ve successfully made adorable and delicious Easter Rice Krispie Nests. I hope you enjoy them as much as I do. Happy Easter!
Conclusion:
So there you have it! These Easter Rice Krispie Nests are truly a must-try recipe, and I’m not just saying that because I wrote it! They’re incredibly simple to make, requiring minimal ingredients and effort, making them perfect for a quick and fun Easter treat. The combination of the classic Rice Krispie treat base with the adorable nest shape and colorful candy eggs is guaranteed to be a hit with both kids and adults alike. They’re visually appealing, deliciously sweet, and offer a delightful textural contrast that will leave everyone wanting more.
But beyond the ease and deliciousness, these nests offer a fantastic opportunity to get creative in the kitchen. Think of them as a blank canvas for your Easter-themed confectionery artistry!
Serving Suggestions and Variations:
While these nests are perfect as is, there are countless ways to customize them to your liking. For a richer flavor, try using brown butter in your Rice Krispie mixture. The nutty notes will add a sophisticated touch to this classic treat. You could also incorporate different extracts, such as vanilla, almond, or even lemon, to enhance the flavor profile.
When it comes to the “eggs,” the possibilities are endless! Use pastel-colored M&Ms, jelly beans, Cadbury Mini Eggs, or even homemade chocolate eggs. For a healthier option, consider using dried cranberries, blueberries, or chopped nuts to fill the nests.
Presentation is key! Arrange the nests on a pretty platter lined with pastel-colored tissue paper or edible Easter grass. You could even create a mini Easter scene with chocolate bunnies and other festive decorations. These nests also make wonderful additions to Easter baskets or party favors. Wrap them individually in cellophane bags tied with colorful ribbons for a charming and personalized touch.
For a fun variation, try adding a layer of melted chocolate to the bottom of each nest before adding the eggs. This will create a delicious chocolate base and help to hold the eggs in place. You could also drizzle melted white chocolate over the finished nests for an extra touch of elegance.
If you’re feeling adventurous, consider making mini versions of these nests using a smaller cookie cutter or even just shaping them by hand. These bite-sized treats are perfect for parties or for satisfying a small sweet craving.
Ultimately, the beauty of this Easter Rice Krispie Nests recipe lies in its versatility. Don’t be afraid to experiment with different flavors, colors, and decorations to create your own unique masterpiece. The most important thing is to have fun and enjoy the process!
I truly believe that these Easter Rice Krispie Nests will become a beloved tradition in your home. They’re a simple, delicious, and visually appealing treat that everyone will enjoy. So, what are you waiting for? Gather your ingredients, put on some festive music, and get ready to create some Easter magic in your kitchen!
I’m so excited for you to try this recipe! Once you do, please come back and share your experience in the comments below. I’d love to hear about your variations, your successes, and any tips or tricks you discover along the way. Happy Easter baking!
Easter Rice Krispie Nests: Easy Recipe & Fun Easter Treat
Adorable and delicious Rice Krispie nests perfect for Easter! These easy-to-make treats are a fun activity for kids and adults alike.
Ingredients
- 1/4 cup (1/2 stick) unsalted butter
- 5 cups miniature marshmallows
- 6 cups Rice Krispies cereal
- 1 teaspoon vanilla extract
- Cadbury Mini Eggs or other small Easter candies
- Green-tinted coconut flakes (optional, for “grass”)
Instructions
- Melt the Butter: In a large, non-stick saucepan, melt the butter over low heat until smooth.
- Add the Marshmallows: Add the miniature marshmallows to the saucepan. Stir constantly with a spatula until the marshmallows are completely melted and smooth.
- Stir in the Vanilla Extract: Remove the saucepan from the heat and stir in the vanilla extract.
- Add the Rice Krispies Cereal: Pour the Rice Krispies cereal into the saucepan with the melted marshmallow mixture. Gently fold the cereal into the marshmallow mixture until it’s evenly coated.
- Mix Thoroughly: Make sure all the cereal is well coated with the marshmallow mixture.
- Prepare Your Hands: Lightly grease your hands with butter or cooking spray.
- Scoop and Shape: Scoop about 1/4 cup of the Rice Krispie mixture into your hands. Gently form it into a ball, then press your thumb into the center to create a well. Shape the sides of the ball to form a nest-like shape.
- Place on Parchment Paper: Place the formed nest onto a sheet of parchment paper or wax paper.
- Repeat: Repeat steps 6-8 until all the Rice Krispie mixture has been used. You should be able to make about 12-15 nests, depending on the size you make them.
- Add the Candy Eggs: While the nests are still slightly warm and pliable, gently press the Cadbury Mini Eggs or other Easter candies into the center of each nest.
- Add Green-Tinted Coconut (Optional): If you want to add a touch of “grass” to your nests, sprinkle some green-tinted coconut flakes around the base of each nest.
- Let the Nests Set: Allow the nests to set completely at room temperature. This will take about 30 minutes to an hour.
- Storing the Nests: Once the nests are set, store them in an airtight container at room temperature. They will stay fresh for up to 2-3 days. If you live in a warm climate, you may want to store them in the refrigerator to prevent the marshmallows from becoming too soft.
Notes
- Use fresh marshmallows for the best results.
- Don’t overcook the marshmallows, or the treats will be hard.
- Grease your hands well to prevent sticking.
- Work quickly, as the mixture will harden as it cools.
- Get creative with decorations!
- These can be made a day or two in advance.
- For a peanut butter flavor, add a tablespoon of peanut butter to the melted marshmallow mixture.
- You can also add chocolate chips or chopped nuts to the Rice Krispie mixture.

Leave a Comment