
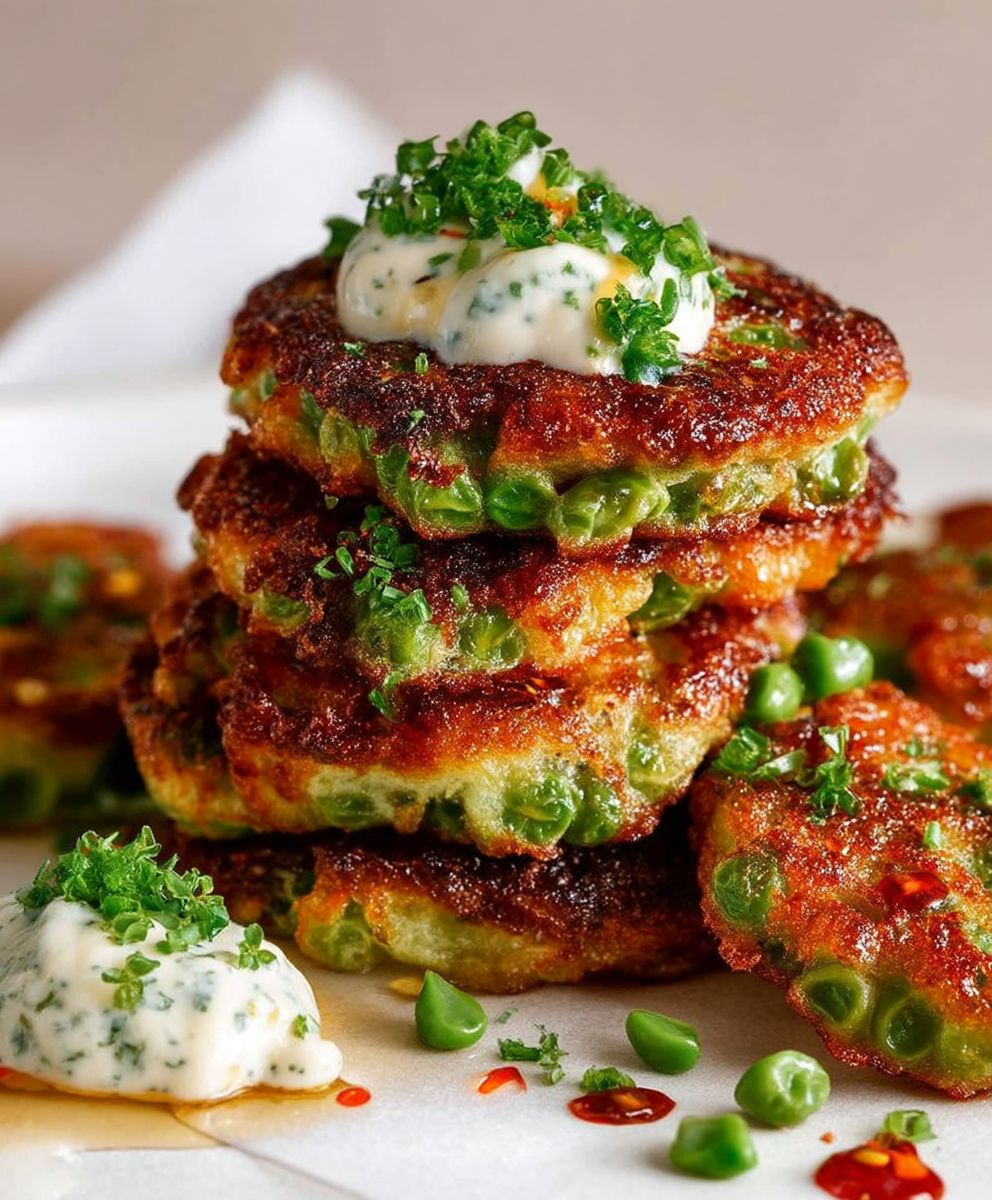
Crispy pea fritters, a delightful and surprisingly versatile dish, are about to become your new favorite snack, appetizer, or even light meal! Imagine sinking your teeth into a golden-brown, perfectly crisp exterior, giving way to a soft, subtly sweet, and savory interior bursting with fresh pea flavor. Are you intrigued yet?
While the exact origins of pea fritters are difficult to pinpoint, similar fried vegetable preparations have existed in various cultures for centuries. From Indian pakoras to Italian frittelle, the concept of transforming humble vegetables into crispy, flavorful bites is a culinary tradition celebrated worldwide. These crispy pea fritters, in particular, offer a modern twist on this classic idea, showcasing the delicate sweetness of peas in a truly irresistible way.
What makes these fritters so universally loved? It’s the perfect combination of textures and flavors. The crispy exterior provides a satisfying crunch, while the tender pea filling offers a delightful contrast. They are incredibly easy to make, requiring minimal ingredients and effort, making them perfect for a quick weeknight snack or an impressive addition to your next gathering. Plus, they are naturally vegetarian and can easily be made vegan, catering to a wide range of dietary needs. Get ready to experience the joy of these little green gems you won’t be disappointed!

Ingredients:
- 1 cup frozen peas, thawed
- 1/2 cup all-purpose flour
- 1/4 cup finely chopped red onion
- 1/4 cup chopped fresh mint
- 1/4 cup chopped fresh parsley
- 1 large egg, lightly beaten
- 1 tablespoon lemon juice
- 1 teaspoon baking powder
- 1/2 teaspoon salt
- 1/4 teaspoon black pepper
- Vegetable oil, for frying
- Optional: Lemon wedges, for serving
- Optional: Greek yogurt or sour cream, for serving
Preparing the Pea Fritter Batter
Alright, let’s get started on these delicious crispy pea fritters! The first step is creating the perfect batter, which is surprisingly easy. Trust me, you’ll be amazed at how simple it is to whip up something so tasty.
- Pulse the Peas: In a food processor, add the thawed peas. Pulse them a few times until they are coarsely chopped but not completely pureed. You want some texture! If you don’t have a food processor, you can roughly chop them with a knife, but the food processor makes it much easier and faster.
- Combine Dry Ingredients: In a medium-sized bowl, whisk together the flour, baking powder, salt, and pepper. This ensures that the baking powder is evenly distributed, which is crucial for light and fluffy fritters.
- Add the Wet Ingredients: In a separate, smaller bowl, whisk together the beaten egg and lemon juice. The lemon juice adds a lovely brightness to the fritters that complements the sweetness of the peas.
- Combine Everything: Pour the wet ingredients into the bowl with the dry ingredients. Gently stir until just combined. Be careful not to overmix, as this can lead to tough fritters. A few lumps are perfectly fine!
- Incorporate the Peas and Aromatics: Add the pulsed peas, chopped red onion, mint, and parsley to the batter. Gently fold everything together until evenly distributed. The red onion adds a nice bite, while the mint and parsley bring a fresh, herbaceous flavor. Don’t skip these! They really elevate the fritters.
- Rest the Batter: Cover the bowl with plastic wrap and let the batter rest in the refrigerator for at least 15 minutes. This allows the flour to fully absorb the liquid, resulting in a more cohesive batter and prevents the fritters from spreading too much during frying. You can even let it rest for up to an hour if you have the time.
Frying the Pea Fritters
Now comes the fun part frying! This is where the magic happens and the fritters transform from a simple batter into golden, crispy delights. Make sure you have everything ready before you start, as the frying process goes relatively quickly.
- Prepare Your Frying Station: Pour about 1 inch of vegetable oil into a large, heavy-bottomed skillet or pot. The amount of oil will depend on the size of your pan. You want enough oil to allow the fritters to float freely.
- Heat the Oil: Heat the oil over medium heat until it reaches a temperature of 350°F (175°C). If you don’t have a thermometer, you can test the oil by dropping a small piece of batter into it. If the batter sizzles and turns golden brown in about 30 seconds, the oil is ready. Be careful not to overheat the oil, as this can cause the fritters to burn on the outside before they are cooked through on the inside.
- Scoop and Drop: Using a tablespoon or a small cookie scoop, carefully drop spoonfuls of the batter into the hot oil. Don’t overcrowd the pan! Fry the fritters in batches, leaving enough space between them so they don’t stick together and the oil temperature doesn’t drop too much. I usually fry about 4-5 fritters at a time, depending on the size of my pan.
- Fry Until Golden Brown: Fry the fritters for about 2-3 minutes per side, or until they are golden brown and crispy. Use a slotted spoon or spatula to carefully flip them over halfway through the cooking time. Keep a close eye on them, as they can brown quickly.
- Remove and Drain: Once the fritters are golden brown and cooked through, remove them from the oil with a slotted spoon and place them on a wire rack lined with paper towels to drain off any excess oil. This helps them stay crispy.
- Repeat: Repeat the frying process with the remaining batter, making sure to maintain the oil temperature. If the oil gets too cool, the fritters will absorb more oil and become greasy. If the oil gets too hot, they will burn on the outside before they are cooked through on the inside.
Serving and Enjoying Your Crispy Pea Fritters
Congratulations! You’ve made your own crispy pea fritters. Now it’s time to enjoy the fruits (or rather, vegetables) of your labor. Here are some serving suggestions to make them even more delicious.
- Serve Immediately: These fritters are best served immediately while they are still hot and crispy. They tend to lose their crispness as they cool down.
- Lemon Wedges: Serve the fritters with lemon wedges for squeezing over the top. The lemon juice adds a bright, zesty flavor that complements the richness of the fritters.
- Dipping Sauce: A dollop of Greek yogurt or sour cream makes a wonderful dipping sauce. You can also add a pinch of salt, pepper, and a squeeze of lemon juice to the yogurt or sour cream for extra flavor. Another great option is a simple aioli or a spicy sriracha mayo.
- Garnish: Garnish the fritters with a sprinkle of fresh herbs, such as chopped mint or parsley, for a pop of color and flavor.
- As an Appetizer: These fritters make a fantastic appetizer for parties or gatherings. They are easy to eat and always a crowd-pleaser.
- As a Side Dish: Serve them as a side dish with grilled chicken, fish, or vegetables for a complete and satisfying meal.
- Make it a Meal: Add a side salad and some crusty bread for a light and flavorful lunch.
Tips for Perfect Pea Fritters
Here are a few extra tips to ensure your pea fritters are perfect every time:
- Don’t Overmix: Overmixing the batter will develop the gluten in the flour, resulting in tough fritters. Mix just until the ingredients are combined.
- Control the Oil Temperature: Maintaining the correct oil temperature is crucial for crispy fritters. Use a thermometer to ensure the oil is at 350°F (175°C).
- Don’t Overcrowd the Pan: Frying the fritters in batches prevents the oil temperature from dropping too much, which can result in greasy fritters.
- Drain Well: Drain the fritters on a wire rack lined with paper towels to remove any excess oil.
- Experiment with Flavors: Feel free to experiment with different herbs and spices to customize the flavor of your fritters. Try adding a pinch of chili flakes for a little heat, or some grated Parmesan cheese for a savory twist.
- Make Ahead: You can prepare the batter ahead of time and store it in the refrigerator for up to 24 hours. Just give it a good stir before frying.
Variations
Want to mix things up a bit? Here are some variations you can try:
- Spicy Pea Fritters: Add a pinch of chili flakes or a dash of hot sauce to the batter for a spicy kick.
- Cheesy Pea Fritters: Add 1/4 cup of grated Parmesan cheese or cheddar cheese to the batter for a cheesy flavor.
- Minty Pea Fritters: Increase the amount of fresh mint in the batter for a more pronounced minty flavor.
- Sweet Pea Fritters: Add a tablespoon of sugar to the batter for a slightly sweet flavor. These are great served with a dollop of whipped cream or a drizzle of honey.
- Vegan Pea Fritters: Substitute the egg with 1 tablespoon of flaxseed meal mixed with 3 tablespoons of water. Let it sit for 5 minutes to thicken before adding it to the batter.
Troubleshooting
Sometimes things don’t go exactly as planned. Here are some common problems and how to fix them:
- Fritters are too greasy: This is usually caused by frying the fritters in oil that is not
Conclusion:
And there you have it! These crispy pea fritters are truly a revelation, transforming humble peas into a delightful and addictive snack or side dish. I genuinely believe this recipe is a must-try for anyone looking to add a touch of freshness and fun to their meals. The combination of the sweet peas, the savory herbs, and that satisfying crunch is simply irresistible.
But why is this recipe so special? It’s more than just a tasty treat; it’s incredibly versatile. It’s quick and easy to make, perfect for those busy weeknights when you crave something delicious but don’t have hours to spend in the kitchen. Plus, it’s a fantastic way to sneak some extra veggies into your diet, especially for those picky eaters in your life! The vibrant green color alone is enough to brighten up any plate.
Beyond the ease and health benefits, the flavor profile is what truly sets these fritters apart. The sweetness of the peas is perfectly balanced by the savory herbs and spices, creating a symphony of flavors that will tantalize your taste buds. And that crispy exterior? Pure perfection!
Now, let’s talk serving suggestions. These fritters are incredibly adaptable. Serve them as a delightful appetizer with a dollop of creamy Greek yogurt or a tangy lemon aioli. They also make a fantastic side dish alongside grilled chicken, fish, or even a juicy burger. For a vegetarian meal, try pairing them with a fresh salad and some crusty bread.
Looking for variations? The possibilities are endless! Feel free to experiment with different herbs and spices. A pinch of chili flakes will add a touch of heat, while a sprinkle of Parmesan cheese will enhance the savory flavor. You could even add some finely chopped vegetables like carrots or zucchini for extra texture and nutrients. For a vegan option, simply substitute the egg with a flax egg (1 tablespoon of ground flaxseed mixed with 3 tablespoons of water).
Don’t be afraid to get creative and make this recipe your own! That’s the beauty of cooking, after all.
I’m confident that once you try these crispy pea fritters, they’ll become a staple in your kitchen. They’re the perfect snack, side dish, or even a light meal. They’re easy to make, incredibly delicious, and surprisingly versatile. What more could you ask for?
So, what are you waiting for? Gather your ingredients, put on your apron, and get ready to experience the joy of making these amazing fritters. I promise you won’t be disappointed.
And most importantly, I’d love to hear about your experience! Did you try the recipe? Did you make any variations? What did you serve them with? Share your thoughts and photos in the comments below. Your feedback is invaluable, and I can’t wait to see what culinary creations you come up with. Happy cooking! I hope you enjoy these as much as I do.
Crispy Pea Fritters: The Ultimate Guide to Making Them
Crispy and flavorful pea fritters made with fresh herbs and a hint of lemon. Perfect as an appetizer, side dish, or light lunch!
Ingredients
- 1 cup frozen peas, thawed
- 1/2 cup all-purpose flour
- 1/4 cup finely chopped red onion
- 1/4 cup chopped fresh mint
- 1/4 cup chopped fresh parsley
- 1 large egg, lightly beaten
- 1 tablespoon lemon juice
- 1 teaspoon baking powder
- 1/2 teaspoon salt
- 1/4 teaspoon black pepper
- Vegetable oil, for frying
- Optional: Lemon wedges, for serving
- Optional: Greek yogurt or sour cream, for serving
Instructions
- Pulse the Peas: In a food processor, pulse the thawed peas a few times until coarsely chopped. Alternatively, roughly chop with a knife.
- Combine Dry Ingredients: In a medium bowl, whisk together the flour, baking powder, salt, and pepper.
- Add Wet Ingredients: In a separate bowl, whisk together the beaten egg and lemon juice.
- Combine Everything: Pour the wet ingredients into the dry ingredients and gently stir until just combined. Do not overmix.
- Incorporate Peas and Aromatics: Add the pulsed peas, chopped red onion, mint, and parsley to the batter. Gently fold until evenly distributed.
- Rest the Batter: Cover the bowl and refrigerate for at least 15 minutes (up to 1 hour).
- Prepare Frying Station: Pour about 1 inch of vegetable oil into a large, heavy-bottomed skillet or pot.
- Heat the Oil: Heat the oil over medium heat to 350°F (175°C). Test with a small piece of batter it should sizzle and turn golden brown in about 30 seconds.
- Scoop and Drop: Using a tablespoon or small cookie scoop, carefully drop spoonfuls of batter into the hot oil. Do not overcrowd the pan.
- Fry Until Golden Brown: Fry for about 2-3 minutes per side, or until golden brown and crispy. Flip halfway through.
- Remove and Drain: Remove the fritters with a slotted spoon and place them on a wire rack lined with paper towels to drain excess oil.
- Repeat: Repeat the frying process with the remaining batter, maintaining the oil temperature.
- Serve Immediately: Serve hot and crispy with lemon wedges and a dollop of Greek yogurt or sour cream. Garnish with fresh herbs.
Notes
- Don’t overmix the batter to avoid tough fritters.
- Maintain the correct oil temperature for crispy fritters.
- Don’t overcrowd the pan to prevent greasy fritters.
- Drain the fritters well on a wire rack.
- Experiment with different herbs and spices for customized flavors.
- The batter can be prepared ahead of time and stored in the refrigerator for up to 24 hours.

Leave a Comment