
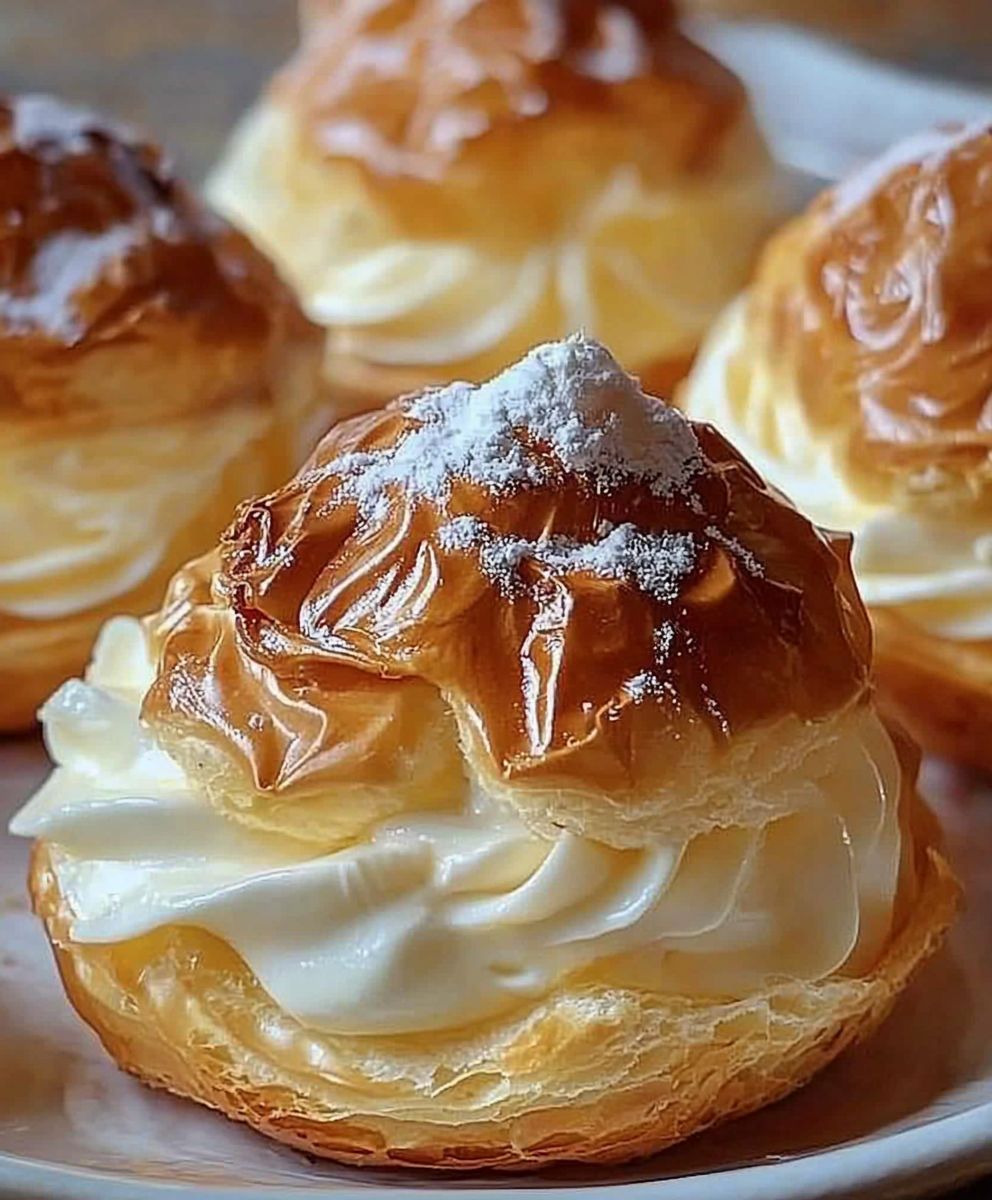
Cream Puffs: those delicate, airy pastries filled with luscious cream, are a dessert that whispers elegance and indulgence. Have you ever bitten into one and felt transported to a Parisian patisserie? I certainly have! These delightful treats, also known as choux à la crème, are more than just a dessert; they’re a testament to the artistry of French baking.
The history of the cream puff dates back to the 16th century, attributed to Catherine de Medici’s Italian pastry chef, Panterelli, who created the pâte à choux, the base for these ethereal delights. Over time, the recipe evolved, eventually leading to the light and airy cream puffs we know and love today.
But what makes them so irresistible? It’s the perfect combination of textures: the slightly crisp, hollow shell gives way to a cloud of sweet, creamy filling. Whether you prefer a classic vanilla cream, a rich chocolate pastry cream, or even a fruity twist, the possibilities are endless. Plus, they’re surprisingly versatile! Serve them as an elegant dessert at a dinner party, a delightful afternoon treat, or even a fun baking project with the family. Get ready to embark on a culinary adventure as we unlock the secrets to creating perfect cream puffs in your own kitchen!

Ingredients:
- For the Choux Pastry:
- 1 cup (240ml) water
- 1/2 cup (113g) unsalted butter, cut into cubes
- 1/4 teaspoon salt
- 1 cup (120g) all-purpose flour
- 4 large eggs, at room temperature
- For the Pastry Cream Filling:
- 2 cups (480ml) whole milk
- 1 vanilla bean, split lengthwise and seeds scraped (or 1 teaspoon vanilla extract)
- 6 large egg yolks
- 3/4 cup (150g) granulated sugar
- 1/4 cup (30g) cornstarch
- 2 tablespoons (28g) unsalted butter, cut into cubes
- Pinch of salt
- For the Chocolate Ganache (Optional):
- 4 ounces (113g) semi-sweet chocolate, finely chopped
- 1/2 cup (120ml) heavy cream
- For Dusting:
- Powdered sugar (optional)
Preparing the Choux Pastry:
- Combine Water, Butter, and Salt: In a medium saucepan, combine the water, butter, and salt. Place the saucepan over medium heat and bring the mixture to a rolling boil. Make sure the butter is completely melted before the water boils. This is crucial for the pastry to rise properly.
- Add Flour and Cook: Once the mixture is boiling, remove the saucepan from the heat and immediately add all of the flour at once. Using a wooden spoon or a sturdy spatula, vigorously stir the flour into the liquid until a smooth dough forms and pulls away from the sides of the pan. This step requires some elbow grease! Continue to cook the dough over low heat, stirring constantly, for about 1-2 minutes. This helps to dry out the dough slightly, which is essential for creating a light and airy pastry. You’ll notice a thin film forming on the bottom of the pan.
- Cool the Dough Slightly: Transfer the dough to the bowl of a stand mixer fitted with the paddle attachment (or use a large bowl and an electric hand mixer). Let the dough cool for about 5-10 minutes. This is important because you don’t want to cook the eggs when you add them. The dough should be warm, not hot.
- Add Eggs One at a Time: With the mixer on medium speed, add the eggs one at a time, mixing well after each addition. It’s important to incorporate each egg fully before adding the next. After adding the first egg, the dough might look curdled or separated don’t worry, this is normal! As you add the subsequent eggs, the dough will come together and become smooth and glossy. The final dough should be thick and pipeable, with a consistency similar to that of thick mayonnaise. To test the consistency, lift the paddle attachment. The dough should slowly fall off in a V shape. If it’s too stiff, beat in a tablespoon of beaten egg. If it’s too loose, you’ve added too much egg, and it’s best to start over.
- Transfer to Piping Bag: Fit a large piping bag with a large round tip (or a star tip if you prefer a more decorative look). Transfer the choux pastry dough to the piping bag.
Piping and Baking the Cream Puffs:
- Preheat Oven and Prepare Baking Sheet: Preheat your oven to 400°F (200°C). Line a baking sheet with parchment paper or a silicone baking mat.
- Pipe the Cream Puffs: Pipe the choux pastry onto the prepared baking sheet, spacing them about 2 inches apart. Aim for mounds that are about 1 1/2 to 2 inches in diameter. If you have any peaks on top of the piped dough, gently smooth them down with a wet finger. This will help the cream puffs bake evenly.
- Bake the Cream Puffs: Place the baking sheet in the preheated oven and immediately reduce the oven temperature to 375°F (190°C). Bake for 30-40 minutes, or until the cream puffs are golden brown and puffed up. Do not open the oven door during the first 25 minutes of baking! Opening the oven door can cause the cream puffs to deflate.
- Create Steam Vents (Optional): After about 30 minutes, if the cream puffs are browning nicely but still seem a bit soft, you can carefully poke a small hole in the side of each cream puff with a toothpick or a paring knife. This will allow steam to escape and help the insides dry out.
- Cool Completely: Once the cream puffs are golden brown and firm, turn off the oven and crack the oven door open slightly. Let the cream puffs cool in the oven for about 30 minutes. This helps to prevent them from collapsing as they cool. Then, transfer the cream puffs to a wire rack to cool completely.
Making the Pastry Cream Filling:
- Infuse the Milk (Optional): In a medium saucepan, combine the milk and the vanilla bean (if using). Heat over medium heat until the milk is simmering. Remove from heat, cover, and let steep for 30 minutes to infuse the milk with vanilla flavor. If you’re using vanilla extract, you’ll add it later.
- Whisk Egg Yolks and Sugar: In a large bowl, whisk together the egg yolks and sugar until pale and thick. This usually takes about 2-3 minutes.
- Add Cornstarch: Whisk in the cornstarch until fully incorporated. Make sure there are no lumps.
- Temper the Egg Yolks: If you infused the milk with a vanilla bean, remove the vanilla bean and discard it. Slowly pour a small amount of the hot milk into the egg yolk mixture, whisking constantly to temper the eggs. This prevents the eggs from scrambling when you add them to the hot milk. Continue to add the hot milk in a slow, steady stream, whisking constantly, until the egg yolk mixture is warmed through.
- Cook the Pastry Cream: Pour the tempered egg yolk mixture back into the saucepan with the remaining milk. Place the saucepan over medium heat and cook, whisking constantly, until the pastry cream thickens and comes to a boil. Continue to cook, whisking constantly, for 1-2 minutes more to ensure the cornstarch is fully cooked and the pastry cream is thick and stable. The pastry cream should be thick enough to coat the back of a spoon.
- Finish the Pastry Cream: Remove the saucepan from the heat and stir in the butter and salt. If you’re using vanilla extract, stir it in now.
- Cool the Pastry Cream: Pour the pastry cream into a clean bowl. Cover the surface of the pastry cream with plastic wrap, pressing the plastic wrap directly onto the surface to prevent a skin from forming. Refrigerate for at least 2 hours, or preferably overnight, to allow the pastry cream to cool completely and thicken further.
Making the Chocolate Ganache (Optional):
- Heat the Cream: Place the heavy cream in a small saucepan and heat over medium heat until it just comes to a simmer. Do not boil.
- Pour Over Chocolate: Place the finely chopped chocolate in a heatproof bowl. Pour the hot cream over the chocolate and let it sit for 1 minute to soften the chocolate.
- Stir Until Smooth: Gently stir the chocolate and cream together until the chocolate is completely melted and the ganache is smooth and glossy. If the chocolate doesn’t melt completely, you can microwave the mixture in 15-second intervals, stirring after each interval, until smooth.
- Cool Slightly: Let the ganache cool slightly before using it to drizzle over the cream puffs.
Assembling the Cream Puffs:
- Prepare the Cream Puffs: Once the cream puffs have cooled completely, use a serrated knife to slice them in half horizontally. Alternatively, you can use a piping bag fitted with a small round tip to poke a hole in the bottom of each cream puff.
- Fill the Cream Puffs: Transfer the pastry cream to a piping bag fitted with a large round tip (or use a spoon). Pipe or spoon the pastry cream into the bottom half of each cream puff. If you poked a hole in the bottom, pipe the pastry cream in through the hole until the cream puff is full.
- Top with the Other Half: Place the top half of each cream puff on top of the filled bottom half.
Conclusion:
Well, there you have it! I truly believe this cream puff recipe is a must-try for anyone who loves a delightful, airy pastry. From the satisfying crackle of the choux pastry to the creamy, dreamy filling, every bite is an experience. It’s a classic for a reason, and once you’ve tasted a homemade cream puff, you’ll understand why. But why is this recipe so special? It’s all about the technique, and I’ve broken it down into easy-to-follow steps so even a novice baker can achieve perfect results. The reward is a light, golden shell that’s just begging to be filled with your favorite cream. And speaking of filling, the possibilities are endless! Think beyond the classic vanilla pastry cream. How about a rich chocolate ganache for a decadent treat? Or a light and tangy lemon curd for a burst of sunshine? For a more savory option, consider filling them with a creamy chicken salad or a flavorful herbed cheese. These cream puffs are incredibly versatile and can be adapted to suit any occasion or craving. Serving Suggestions and Variations: * Dust with powdered sugar: A simple yet elegant finish. * Drizzle with chocolate: Dark, milk, or white the choice is yours! * Add fresh berries: Strawberries, raspberries, or blueberries complement the cream beautifully. * Make mini cream puffs: Perfect for parties and gatherings. * Freeze for later: Unfilled cream puffs can be frozen for up to a month. Just thaw and fill when ready to serve. * Coffee Cream Puffs: Add a tablespoon of instant coffee to the pastry cream for a coffee-flavored delight. * Pistachio Cream Puffs: Fold in chopped pistachios into the pastry cream for added texture and flavor. I know baking can sometimes seem intimidating, but trust me, this recipe is worth the effort. The satisfaction of creating these beautiful and delicious cream puffs from scratch is truly rewarding. Plus, imagine the look on your friends’ and family’s faces when you present them with these homemade treats! Don’t be afraid to experiment and make this recipe your own. Baking is all about creativity and having fun in the kitchen. So, gather your ingredients, preheat your oven, and get ready to embark on a cream puff adventure! I’m so excited for you to try this recipe! Once you do, please come back and share your experience in the comments below. I’d love to hear about your variations, your successes, and any tips you might have for other bakers. Let’s build a community of cream puff enthusiasts! Did you try a different filling? Did you add a special topping? I’m all ears! And remember, the most important ingredient in any recipe is love. So, bake with passion, enjoy the process, and savor every delicious bite. Happy baking! I hope you enjoy making these delightful cream puffs as much as I do. Print
Cream Puffs: The Ultimate Guide to Baking Perfect Puffs
- Total Time: 395 minutes
- Yield: 12 cream puffs 1x
Description
Classic cream puffs filled with a rich vanilla pastry cream and drizzled with chocolate ganache (optional). A delightful and impressive dessert!
Ingredients
- 1 cup (240ml) water
- 1/2 cup (113g) unsalted butter, cut into cubes
- 1/4 teaspoon salt
- 1 cup (120g) all-purpose flour
- 4 large eggs, at room temperature
- 2 cups (480ml) whole milk
- 1 vanilla bean, split lengthwise and seeds scraped (or 1 teaspoon vanilla extract)
- 6 large egg yolks
- 3/4 cup (150g) granulated sugar
- 1/4 cup (30g) cornstarch
- 2 tablespoons (28g) unsalted butter, cut into cubes
- Pinch of salt
- 4 ounces (113g) semi-sweet chocolate, finely chopped
- 1/2 cup (120ml) heavy cream
- Powdered sugar (optional)
Instructions
- Combine Water, Butter, and Salt: In a medium saucepan, combine the water, butter, and salt. Place the saucepan over medium heat and bring the mixture to a rolling boil. Make sure the butter is completely melted before the water boils.
- Add Flour and Cook: Once the mixture is boiling, remove the saucepan from the heat and immediately add all of the flour at once. Using a wooden spoon or a sturdy spatula, vigorously stir the flour into the liquid until a smooth dough forms and pulls away from the sides of the pan. Continue to cook the dough over low heat, stirring constantly, for about 1-2 minutes. You’ll notice a thin film forming on the bottom of the pan.
- Cool the Dough Slightly: Transfer the dough to the bowl of a stand mixer fitted with the paddle attachment (or use a large bowl and an electric hand mixer). Let the dough cool for about 5-10 minutes. The dough should be warm, not hot.
- Add Eggs One at a Time: With the mixer on medium speed, add the eggs one at a time, mixing well after each addition. It’s important to incorporate each egg fully before adding the next. After adding the first egg, the dough might look curdled or separated don’t worry, this is normal! As you add the subsequent eggs, the dough will come together and become smooth and glossy. The final dough should be thick and pipeable, with a consistency similar to that of thick mayonnaise. To test the consistency, lift the paddle attachment. The dough should slowly fall off in a V shape. If it’s too stiff, beat in a tablespoon of beaten egg. If it’s too loose, you’ve added too much egg, and it’s best to start over.
- Transfer to Piping Bag: Fit a large piping bag with a large round tip (or a star tip if you prefer a more decorative look). Transfer the choux pastry dough to the piping bag.
- Preheat Oven and Prepare Baking Sheet: Preheat your oven to 400°F (200°C). Line a baking sheet with parchment paper or a silicone baking mat.
- Pipe the Cream Puffs: Pipe the choux pastry onto the prepared baking sheet, spacing them about 2 inches apart. Aim for mounds that are about 1 1/2 to 2 inches in diameter. If you have any peaks on top of the piped dough, gently smooth them down with a wet finger.
- Bake the Cream Puffs: Place the baking sheet in the preheated oven and immediately reduce the oven temperature to 375°F (190°C). Bake for 30-40 minutes, or until the cream puffs are golden brown and puffed up. Do not open the oven door during the first 25 minutes of baking!
- Create Steam Vents (Optional): After about 30 minutes, if the cream puffs are browning nicely but still seem a bit soft, you can carefully poke a small hole in the side of each cream puff with a toothpick or a paring knife.
- Cool Completely: Once the cream puffs are golden brown and firm, turn off the oven and crack the oven door open slightly. Let the cream puffs cool in the oven for about 30 minutes. Then, transfer the cream puffs to a wire rack to cool completely.
- Infuse the Milk (Optional): In a medium saucepan, combine the milk and the vanilla bean (if using). Heat over medium heat until the milk is simmering. Remove from heat, cover, and let steep for 30 minutes to infuse the milk with vanilla flavor. If you’re using vanilla extract, you’ll add it later.
- Whisk Egg Yolks and Sugar: In a large bowl, whisk together the egg yolks and sugar until pale and thick. This usually takes about 2-3 minutes.
- Add Cornstarch: Whisk in the cornstarch until fully incorporated. Make sure there are no lumps.
- Temper the Egg Yolks: If you infused the milk with a vanilla bean, remove the vanilla bean and discard it. Slowly pour a small amount of the hot milk into the egg yolk mixture, whisking constantly to temper the eggs. Continue to add the hot milk in a slow, steady stream, whisking constantly, until the egg yolk mixture is warmed through.
- Cook the Pastry Cream: Pour the tempered egg yolk mixture back into the saucepan with the remaining milk. Place the saucepan over medium heat and cook, whisking constantly, until the pastry cream thickens and comes to a boil. Continue to cook, whisking constantly, for 1-2 minutes more to ensure the cornstarch is fully cooked and the pastry cream is thick and stable. The pastry cream should be thick enough to coat the back of a spoon.
- Finish the Pastry Cream: Remove the saucepan from the heat and stir in the butter and salt. If you’re using vanilla extract, stir it in now.
- Cool the Pastry Cream: Pour the pastry cream into a clean bowl. Cover the surface of the pastry cream with plastic wrap, pressing the plastic wrap directly onto the surface to prevent a skin from forming. Refrigerate for at least 2 hours, or preferably overnight, to allow the pastry cream to cool completely and thicken further.
- Heat the Cream: Place the heavy cream in a small saucepan and heat over medium heat until it just comes to a simmer. Do not boil.
- Pour Over Chocolate: Place the finely chopped chocolate in a heatproof bowl. Pour the hot cream over the chocolate and let it sit for 1 minute to soften the chocolate.
- Stir Until Smooth: Gently stir the chocolate and cream together until the chocolate is completely melted and the ganache is smooth and glossy. If the chocolate doesn’t melt completely, you can microwave the mixture in 15-second intervals, stirring after each interval, until smooth.
- Cool Slightly: Let the ganache cool slightly before using it to drizzle over the cream puffs.
- Prepare the Cream Puffs: Once the cream puffs have cooled completely, use a serrated knife to slice them in half horizontally. Alternatively, you can use a piping bag fitted with a small round tip to poke a hole in the bottom of each cream puff.
- Fill the Cream Puffs: Transfer the pastry cream to a piping bag fitted with a large round tip (or use a spoon). Pipe or spoon the pastry cream into the bottom half of each cream puff. If you poked a hole in the bottom, pipe the pastry cream in through the hole until the cream puff is full.
- Top with the Other Half: Place the top half of each cream puff on top of the filled bottom half. Dust with powdered sugar or drizzle with chocolate ganache, if desired.
Notes
- Choux Pastry Success: The key to successful choux pastry is ensuring the butter is fully melted before the water boils and cooking the dough sufficiently to dry it out slightly. Also, don’t open the oven door during the first 25 minutes of baking.
- Pastry Cream Consistency: The pastry cream should be thick enough to coat the back of a spoon. If it’s too thin, continue cooking it for a few more minutes, whisking constantly.
- Storage: Filled cream puffs are best enjoyed the same day they are made. However, you can store the unfilled cream puffs in an airtight container at room
- Prep Time: 45 minutes
- Cook Time: 30 minutes


Leave a Comment