
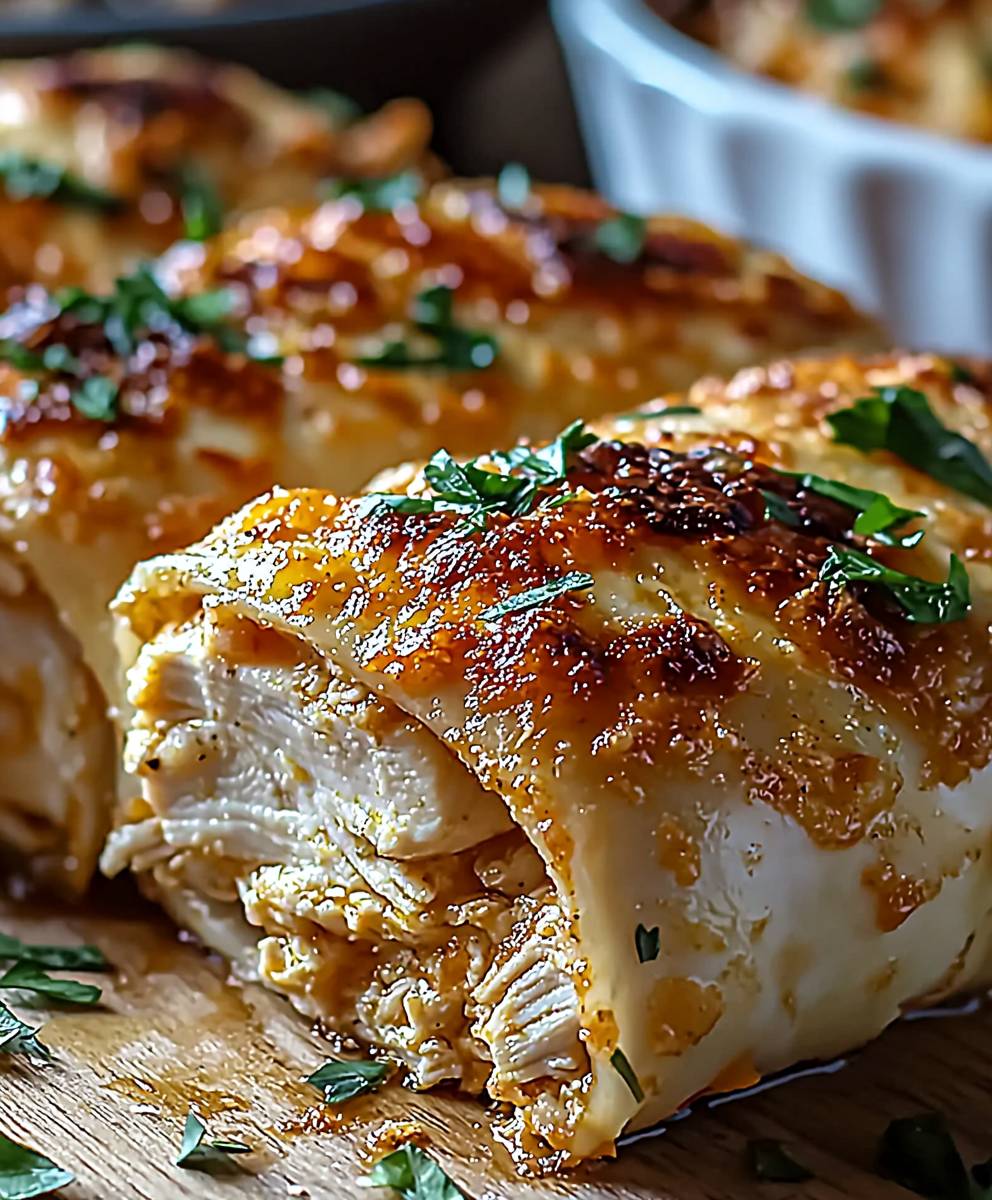
Costco Chicken Bake: Prepare to unlock a world of cheesy, savory goodness right in your own kitchen! Have you ever craved that warm, comforting sensation of biting into a perfectly baked, handheld delight? Well, look no further. We’re about to embark on a culinary adventure to recreate the iconic Costco Chicken Bake, a beloved treat that has captured the hearts (and stomachs) of shoppers for years.
While the exact origins of the Costco Chicken Bake remain shrouded in a bit of mystery, its popularity is undeniable. It’s become a symbol of the Costco experience, a must-have snack after navigating those warehouse aisles. But what makes this bake so irresistible? It’s the harmonious blend of tender chicken, creamy Caesar dressing, smoky bacon, and a generous blanket of melted cheese, all encased in a perfectly golden, slightly crispy crust. The combination of flavors and textures is simply divine.
People adore the Costco Chicken Bake for its convenience, its satisfyingly rich flavor, and its ability to transport you to a happy place with every bite. It’s the ultimate comfort food, perfect for a quick lunch, a satisfying snack, or even a casual dinner. And now, you can enjoy this iconic treat without even leaving your house! Follow our step-by-step guide to create your own homemade version of the legendary Costco Chicken Bake. Get ready to impress your friends and family with this surprisingly easy and incredibly delicious recipe!

Ingredients:
- For the Dough:
- 2 1/4 cups (281g) all-purpose flour, plus more for dusting
- 1 teaspoon granulated sugar
- 1 teaspoon salt
- 1 packet (2 1/4 teaspoons) active dry yeast
- 1 cup (237ml) warm water (105-115°F)
- 2 tablespoons olive oil, plus more for greasing
- For the Filling:
- 2 cups cooked chicken, shredded or diced (Costco rotisserie chicken works great!)
- 1 cup cooked bacon, crumbled
- 1 cup shredded mozzarella cheese
- 1/2 cup shredded provolone cheese
- 1/4 cup grated Parmesan cheese
- 1/2 cup finely chopped green onions
- 1/4 cup mayonnaise
- 2 tablespoons Dijon mustard
- 1 teaspoon garlic powder
- 1/2 teaspoon black pepper
- 1/4 teaspoon cayenne pepper (optional, for a little kick)
- For the Topping:
- 1 egg, beaten
- Everything bagel seasoning, for sprinkling
Preparing the Dough:
- Activate the Yeast: In a large bowl, dissolve the sugar and yeast in the warm water. Let it sit for 5-10 minutes, or until foamy. This indicates that the yeast is active and ready to go. If it doesn’t foam, your yeast might be old, and you’ll need to start over with fresh yeast.
- Combine Dry Ingredients: In a separate bowl, whisk together the flour and salt.
- Combine Wet and Dry Ingredients: Add the olive oil to the yeast mixture. Then, gradually add the dry ingredients to the wet ingredients, mixing with a wooden spoon or dough hook attachment on your stand mixer until a shaggy dough forms.
- Knead the Dough: Turn the dough out onto a lightly floured surface and knead for 5-7 minutes, or until it becomes smooth and elastic. If you’re using a stand mixer, knead with the dough hook for about 5 minutes. The dough should be slightly tacky but not sticky. If it’s too sticky, add a little more flour, one tablespoon at a time.
- First Rise: Lightly grease a large bowl with olive oil. Place the dough in the bowl, turning to coat. Cover the bowl with plastic wrap or a clean kitchen towel and let it rise in a warm place for 1-1.5 hours, or until doubled in size. This is crucial for a light and airy crust.
Preparing the Filling:
- Combine Chicken and Bacon: In a large bowl, combine the shredded or diced cooked chicken and crumbled cooked bacon. Make sure the chicken is cooled slightly before mixing, so it doesn’t melt the cheese later.
- Add Cheeses: Add the mozzarella, provolone, and Parmesan cheeses to the chicken and bacon mixture.
- Incorporate Wet Ingredients and Seasonings: Add the green onions, mayonnaise, Dijon mustard, garlic powder, black pepper, and cayenne pepper (if using) to the bowl. Mix everything together thoroughly until well combined. Taste and adjust seasonings as needed. You might want to add a little more salt or pepper to your liking.
Assembling and Baking the Chicken Bakes:
- Preheat Oven and Prepare Baking Sheet: Preheat your oven to 400°F (200°C). Line a baking sheet with parchment paper. This will prevent the chicken bakes from sticking and make cleanup easier.
- Divide the Dough: Once the dough has doubled in size, punch it down gently to release the air. Turn it out onto a lightly floured surface and divide it into 4 equal portions.
- Roll Out the Dough: Roll out each portion of dough into an oval shape, about 8-10 inches long and 4-5 inches wide. The dough should be thin but not so thin that it tears easily.
- Fill the Dough: Spoon about 1/4 of the chicken filling onto one half of each oval of dough, leaving a small border around the edges.
- Fold and Seal: Fold the other half of the dough over the filling to create a half-moon shape. Pinch the edges together firmly to seal. You can also crimp the edges with a fork for a decorative touch and to ensure a tight seal.
- Place on Baking Sheet: Place the assembled chicken bakes on the prepared baking sheet, leaving some space between them.
- Egg Wash and Seasoning: Brush the tops of the chicken bakes with the beaten egg. This will give them a beautiful golden-brown color. Then, sprinkle generously with everything bagel seasoning.
- Bake: Bake for 20-25 minutes, or until the chicken bakes are golden brown and the filling is heated through. The internal temperature should reach 165°F (74°C).
- Cool Slightly and Serve: Let the chicken bakes cool on the baking sheet for a few minutes before serving. This will prevent the filling from being too hot and messy. Serve warm and enjoy!
Tips and Variations:
- Cheese Variations: Feel free to experiment with different types of cheese in the filling. Monterey Jack, cheddar, or even pepper jack would be delicious additions.
- Vegetable Additions: You can add chopped vegetables to the filling, such as bell peppers, onions, or mushrooms. Sauté them before adding them to the filling to soften them.
- Spice Level: Adjust the amount of cayenne pepper to your liking, or omit it altogether if you prefer a milder flavor. You could also add a pinch of red pepper flakes for extra heat.
- Dough Options: If you’re short on time, you can use store-bought pizza dough instead of making your own. Just make sure to adjust the baking time accordingly.
- Make-Ahead Option: You can assemble the chicken bakes ahead of time and store them in the refrigerator for up to 24 hours before baking. Just add a few extra minutes to the baking time.
- Freezing Instructions: To freeze the chicken bakes, bake them as directed, let them cool completely, and then wrap them individually in plastic wrap and aluminum foil. Freeze for up to 2 months. To reheat, thaw in the refrigerator overnight and then bake at 350°F (175°C) for 15-20 minutes, or until heated through.
- Serving Suggestions: Serve the chicken bakes with a side salad, coleslaw, or your favorite dipping sauce. Ranch dressing, honey mustard, or BBQ sauce would all be great choices.
Troubleshooting:
- Dough Not Rising: If your dough isn’t rising, make sure your yeast is fresh and that the water is the correct temperature (105-115°F). Also, ensure that the room is warm enough for the dough to rise properly.
- Filling Too Runny: If your filling is too runny, you can add a tablespoon or two of breadcrumbs or cornstarch to help absorb some of the moisture.
- Chicken Bakes Burning: If your chicken bakes are browning too quickly, you can tent them with aluminum foil during the last few minutes of baking.
Enjoy your homemade Costco Chicken Bakes! They’re a delicious and satisfying meal that’s perfect for lunch, dinner, or a snack.
Conclusion:
This isn’t just another recipe; it’s your ticket to recreating that iconic Costco Chicken Bake experience right in your own kitchen! From the flaky, golden crust to the savory, creamy filling bursting with chicken, bacon, and cheese, every bite is a nostalgic trip to your favorite warehouse store. But trust me, this homemade version is even better you have complete control over the ingredients, ensuring a fresher, more flavorful bake that’s tailored to your exact preferences. Why is this a must-try? Because it’s incredibly satisfying, surprisingly easy to make, and a guaranteed crowd-pleaser. Forget long lines and limited availability; now you can enjoy a warm, delicious chicken bake whenever the craving strikes. Plus, it’s a fantastic way to use up leftover cooked chicken or rotisserie chicken, making it a budget-friendly and sustainable meal option. But the fun doesn’t stop there! This recipe is incredibly versatile, offering endless possibilities for customization. Want to kick up the spice? Add a pinch of red pepper flakes or a dash of your favorite hot sauce to the filling. Craving more veggies? Sauté some diced mushrooms, onions, or bell peppers and incorporate them into the mix. For a vegetarian twist, substitute the chicken with plant-based chicken alternatives or a medley of roasted vegetables like broccoli, cauliflower, and carrots. Serving Suggestions and Variations: * Serve your freshly baked chicken bake with a side of crisp green salad for a complete and balanced meal. * Pair it with a warm bowl of tomato soup for a comforting and satisfying lunch. * Cut the bake into smaller squares and serve as appetizers at your next party. * For a cheesy explosion, sprinkle extra shredded cheese on top during the last few minutes of baking. * Experiment with different types of cheese, such as Monterey Jack, Pepper Jack, or Gruyere, to create unique flavor profiles. * Add a sprinkle of everything bagel seasoning before baking for an extra layer of flavor and texture. * Consider using different types of dough, such as puff pastry or croissant dough, for a flakier and richer crust. * If you’re short on time, use pre-made pizza dough as a shortcut. I’m absolutely confident that you’ll love this recipe as much as I do. It’s a comforting, flavorful, and customizable dish that’s perfect for any occasion. So, gather your ingredients, preheat your oven, and get ready to embark on a culinary adventure that will transport you straight to Costco (without the membership fee!). I can’t wait to hear about your experience making this Costco Chicken Bake! Please, don’t hesitate to leave a comment below sharing your tips, variations, and any modifications you made to the recipe. Did you add any special ingredients? Did you try a different type of cheese? Did you serve it with a unique side dish? Your feedback is invaluable and will help other readers create their own perfect chicken bake. Happy baking, and enjoy! Print
Costco Chicken Bake: The Ultimate Guide to This Fan Favorite
- Total Time: 165 minutes
- Yield: 4 Chicken Bakes 1x
Description
Savory chicken bakes filled with shredded chicken, bacon, cheese, and seasonings, all wrapped in a homemade dough and baked to golden perfection. A delicious and satisfying meal!
Ingredients
- 2 1/4 cups (281g) all-purpose flour, plus more for dusting
- 1 teaspoon granulated sugar
- 1 teaspoon salt
- 1 packet (2 1/4 teaspoons) active dry yeast
- 1 cup (237ml) warm water (105-115°F)
- 2 tablespoons olive oil, plus more for greasing
- 2 cups cooked chicken, shredded or diced (Costco rotisserie chicken works great!)
- 1 cup cooked bacon, crumbled
- 1 cup shredded mozzarella cheese
- 1/2 cup shredded provolone cheese
- 1/4 cup grated Parmesan cheese
- 1/2 cup finely chopped green onions
- 1/4 cup mayonnaise
- 2 tablespoons Dijon mustard
- 1 teaspoon garlic powder
- 1/2 teaspoon black pepper
- 1/4 teaspoon cayenne pepper (optional, for a little kick)
- 1 egg, beaten
- Everything bagel seasoning, for sprinkling
Instructions
- In a large bowl, dissolve the sugar and yeast in the warm water. Let it sit for 5-10 minutes, or until foamy. This indicates that the yeast is active and ready to go. If it doesn’t foam, your yeast might be old, and you’ll need to start over with fresh yeast.
- In a separate bowl, whisk together the flour and salt.
- Add the olive oil to the yeast mixture. Then, gradually add the dry ingredients to the wet ingredients, mixing with a wooden spoon or dough hook attachment on your stand mixer until a shaggy dough forms.
- Turn the dough out onto a lightly floured surface and knead for 5-7 minutes, or until it becomes smooth and elastic. If you’re using a stand mixer, knead with the dough hook for about 5 minutes. The dough should be slightly tacky but not sticky. If it’s too sticky, add a little more flour, one tablespoon at a time.
- Lightly grease a large bowl with olive oil. Place the dough in the bowl, turning to coat. Cover the bowl with plastic wrap or a clean kitchen towel and let it rise in a warm place for 1-1.5 hours, or until doubled in size. This is crucial for a light and airy crust.
- In a large bowl, combine the shredded or diced cooked chicken and crumbled cooked bacon. Make sure the chicken is cooled slightly before mixing, so it doesn’t melt the cheese later.
- Add the mozzarella, provolone, and Parmesan cheeses to the chicken and bacon mixture.
- Add the green onions, mayonnaise, Dijon mustard, garlic powder, black pepper, and cayenne pepper (if using) to the bowl. Mix everything together thoroughly until well combined. Taste and adjust seasonings as needed. You might want to add a little more salt or pepper to your liking.
- Preheat your oven to 400°F (200°C). Line a baking sheet with parchment paper. This will prevent the chicken bakes from sticking and make cleanup easier.
- Once the dough has doubled in size, punch it down gently to release the air. Turn it out onto a lightly floured surface and divide it into 4 equal portions.
- Roll out each portion of dough into an oval shape, about 8-10 inches long and 4-5 inches wide. The dough should be thin but not so thin that it tears easily.
- Spoon about 1/4 of the chicken filling onto one half of each oval of dough, leaving a small border around the edges.
- Fold the other half of the dough over the filling to create a half-moon shape. Pinch the edges together firmly to seal. You can also crimp the edges with a fork for a decorative touch and to ensure a tight seal.
- Place the assembled chicken bakes on the prepared baking sheet, leaving some space between them.
- Brush the tops of the chicken bakes with the beaten egg. This will give them a beautiful golden-brown color. Then, sprinkle generously with everything bagel seasoning.
- Bake for 20-25 minutes, or until the chicken bakes are golden brown and the filling is heated through. The internal temperature should reach 165°F (74°C).
- Let the chicken bakes cool on the baking sheet for a few minutes before serving. This will prevent the filling from being too hot and messy. Serve warm and enjoy!
Notes
- Feel free to experiment with different types of cheese in the filling. Monterey Jack, cheddar, or even pepper jack would be delicious additions.
- You can add chopped vegetables to the filling, such as bell peppers, onions, or mushrooms. Sauté them before adding them to the filling to soften them.
- Adjust the amount of cayenne pepper to your liking, or omit it altogether if you prefer a milder flavor. You could also add a pinch of red pepper flakes for extra heat.
- If you’re short on time, you can use store-bought pizza dough instead of making your own. Just make sure to adjust the baking time accordingly.
- You can assemble the chicken bakes ahead of time and store them in the refrigerator for up to 24 hours before baking. Just add a few extra minutes to the baking time.
- To freeze the chicken bakes, bake them as directed, let them cool completely, and then wrap them individually in plastic wrap and aluminum foil. Freeze for up to 2 months. To reheat, thaw in the refrigerator overnight and then bake at 350°F (175°C) for 15-20 minutes, or until heated through.
- Serve the chicken bakes with a side salad, coleslaw, or your favorite dipping sauce. Ranch dressing, honey mustard, or BBQ sauce would all be great choices.
- Prep Time: 45 minutes
- Cook Time: 25 minutes
Leave a Comment