
Cosmic Brownie Cookies: Remember those fudgy, chewy, intensely chocolatey Cosmic Brownies from your childhood lunchbox? The ones with the rainbow sprinkles that always seemed to stick to everything? Well, get ready to relive that nostalgic joy in a brand new, even more irresistible form! We’ve taken everything you love about the classic treat and transformed it into a delightful cookie that’s perfect for satisfying your sweet tooth.
While the exact origins of the original Cosmic Brownie remain shrouded in a bit of mystery (Little Debbie, we’re looking at you!), its impact on American snack culture is undeniable. These individually wrapped squares of chocolatey goodness became a staple in lunchboxes and vending machines across the nation, offering a quick and satisfying sugar rush. But what is it about them that makes them so beloved?
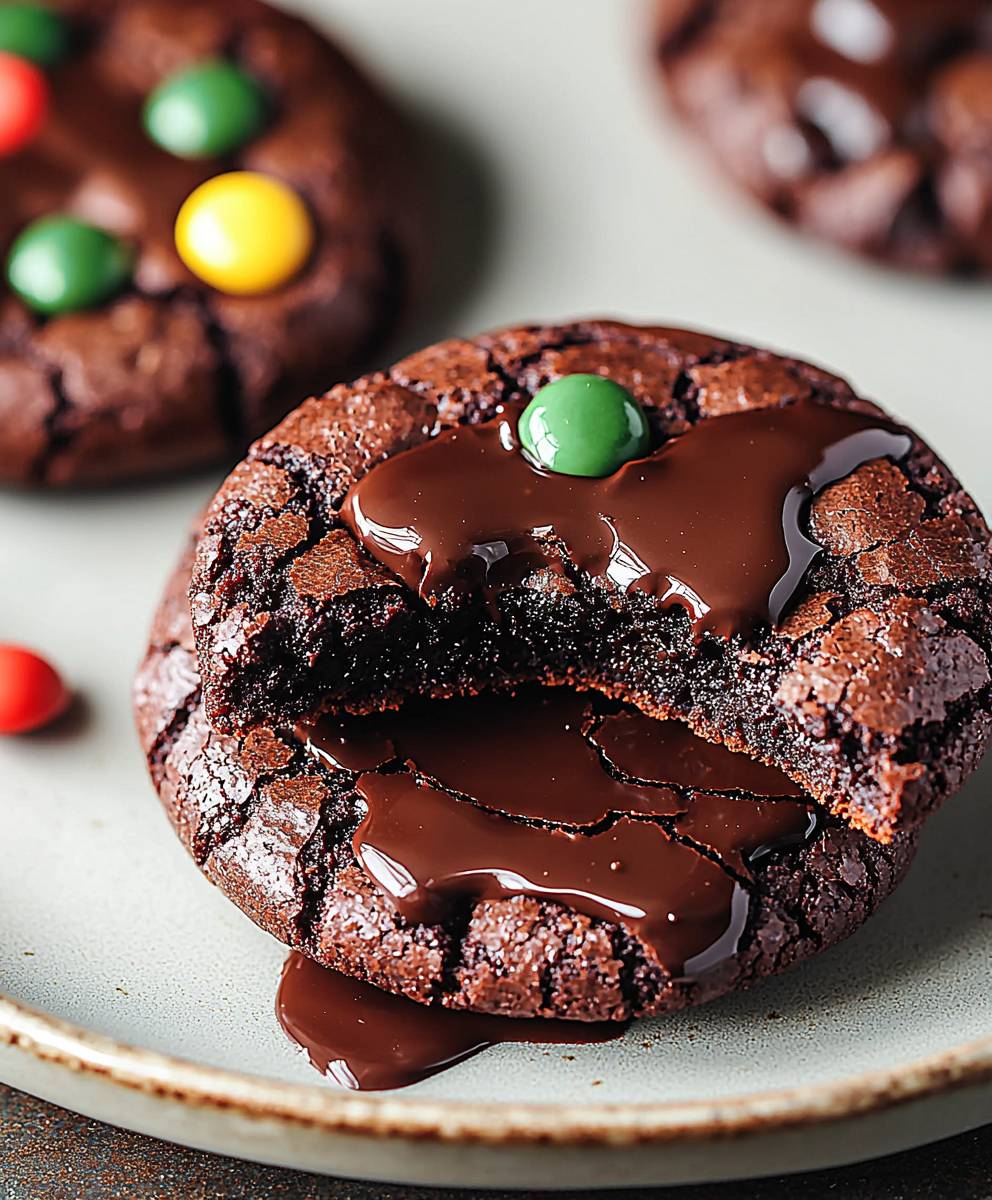
It’s the combination of textures and flavors, of course! The dense, fudgy brownie base, the rich chocolate frosting, and those iconic rainbow sprinkles create a symphony of sweetness and fun. And now, with our Cosmic Brownie Cookies recipe, you can enjoy all of that in a perfectly portioned, homemade cookie. These cookies are incredibly easy to make, requiring minimal ingredients and effort. They’re also incredibly versatile perfect for bake sales, potlucks, or simply a cozy night in. So, ditch the store-bought version and let’s get baking! You will love this Cosmic Brownie Cookies recipe!

Ingredients:
- For the Cookies:
- 1 cup (2 sticks) unsalted butter, softened
- 1 ½ cups granulated sugar
- ½ cup packed light brown sugar
- 2 large eggs
- 1 tablespoon vanilla extract
- 2 cups all-purpose flour
- ¾ cup unsweetened cocoa powder
- 1 teaspoon baking soda
- ½ teaspoon salt
- 1 cup semi-sweet chocolate chips
- For the Fudgy Frosting:
- ½ cup (1 stick) unsalted butter, softened
- 3 cups powdered sugar
- ½ cup unsweetened cocoa powder
- ¼ cup milk (or more, as needed)
- 1 teaspoon vanilla extract
- Pinch of salt
- For the Chocolate Chip Sprinkles:
- ½ cup mini semi-sweet chocolate chips
- 1 teaspoon vegetable shortening (optional, for smoother melting)
Preparing the Cookie Dough:
- Cream the Butter and Sugars: In a large bowl, or the bowl of your stand mixer, cream together the softened butter, granulated sugar, and brown sugar until light and fluffy. This usually takes about 3-5 minutes. Make sure to scrape down the sides of the bowl occasionally to ensure everything is evenly mixed. This step is crucial for creating a tender cookie!
- Add the Eggs and Vanilla: Beat in the eggs one at a time, mixing well after each addition. Then, stir in the vanilla extract. The mixture should be smooth and well combined.
- Combine Dry Ingredients: In a separate medium bowl, whisk together the flour, cocoa powder, baking soda, and salt. Whisking ensures that the baking soda and salt are evenly distributed throughout the flour mixture, which is important for the cookies to rise properly and have a balanced flavor.
- Gradually Add Dry Ingredients to Wet Ingredients: Gradually add the dry ingredients to the wet ingredients, mixing on low speed until just combined. Be careful not to overmix! Overmixing can develop the gluten in the flour, resulting in tough cookies.
- Stir in Chocolate Chips: Gently fold in the chocolate chips until they are evenly distributed throughout the dough.
- Chill the Dough: Cover the bowl with plastic wrap and chill the dough in the refrigerator for at least 30 minutes. This step is important because it allows the butter to firm up, which will prevent the cookies from spreading too much during baking. Chilling also helps to develop the flavors. You can chill the dough for longer, even overnight, if you prefer.
Baking the Cookies:
- Preheat the Oven: Preheat your oven to 350°F (175°C). Line baking sheets with parchment paper or silicone baking mats. Parchment paper or silicone mats prevent the cookies from sticking to the baking sheets and make cleanup easier.
- Scoop the Dough: Use a cookie scoop or spoon to drop rounded tablespoons of dough onto the prepared baking sheets, leaving about 2 inches between each cookie.
- Bake: Bake for 9-11 minutes, or until the edges are set and the centers are still slightly soft. Be careful not to overbake the cookies, as they will continue to bake slightly as they cool on the baking sheet.
- Cool: Let the cookies cool on the baking sheets for a few minutes before transferring them to a wire rack to cool completely.
Making the Fudgy Frosting:
- Cream the Butter: In a large bowl, or the bowl of your stand mixer, cream the softened butter until smooth and creamy.
- Add Powdered Sugar and Cocoa Powder: Gradually add the powdered sugar and cocoa powder to the butter, mixing on low speed until combined. Be sure to add the powdered sugar gradually to prevent a cloud of sugar from erupting!
- Add Milk and Vanilla: Add the milk and vanilla extract, and beat until the frosting is smooth and creamy. Add more milk, one tablespoon at a time, if needed to reach your desired consistency.
- Add Salt: Stir in a pinch of salt to balance the sweetness.
Preparing the Chocolate Chip Sprinkles:
- Melt Chocolate Chips: In a microwave-safe bowl, combine the mini chocolate chips and vegetable shortening (if using). Microwave in 30-second intervals, stirring after each interval, until the chocolate is melted and smooth. Be careful not to overheat the chocolate, as it can burn.
- Transfer to Piping Bag: Transfer the melted chocolate to a small piping bag or a zip-top bag with a small corner snipped off.
Assembling the Cosmic Brownie Cookies:
- Frost the Cookies: Once the cookies are completely cool, spread a generous layer of the fudgy frosting over the top of each cookie.
- Drizzle with Chocolate: Immediately drizzle the melted chocolate over the frosting in a zig-zag pattern. Work quickly, as the frosting will start to set.
- Add Sprinkles: While the chocolate is still wet, sprinkle the cookies with mini chocolate chips to resemble the classic Cosmic Brownie look.
- Let Set: Allow the frosting and chocolate to set completely before serving. This will take about 30 minutes to an hour. You can speed up the process by placing the cookies in the refrigerator for a shorter period.
Conclusion:
This isn’t just another cookie recipe; it’s a nostalgic trip back to childhood, reimagined in a delicious, chewy, and utterly irresistible form. These Cosmic Brownie Cookies are a must-try because they perfectly capture the fudgy, intensely chocolatey essence of the classic treat, but with the added satisfaction of a homemade cookie. The slight crispness around the edges gives way to a soft, almost brownie-like center, studded with those iconic candy-coated chocolate chips that make every bite a celebration.
But the real magic lies in the depth of flavor. We’ve carefully balanced the sweetness with a hint of bitterness from the dark cocoa powder, creating a cookie that’s rich and complex, not just sugary. And let’s be honest, who can resist those colorful sprinkles? They’re not just for decoration; they add a delightful textural contrast and a burst of fun to every single cookie.
Beyond the sheer deliciousness, these cookies are surprisingly easy to make. The recipe is straightforward, using ingredients you likely already have in your pantry. No fancy equipment or complicated techniques are required, making it perfect for bakers of all skill levels. Whether you’re a seasoned pro or just starting out, you’ll be able to whip up a batch of these incredible cookies in no time.
Looking for serving suggestions? These Cosmic Brownie Cookies are fantastic on their own, of course, but they’re also amazing when paired with a cold glass of milk or a scoop of vanilla ice cream. Imagine a warm cookie melting into the ice cream pure bliss! For a more decadent treat, try crumbling them over a chocolate mousse or using them as the base for an ice cream sandwich.
And the variations are endless! Feel free to experiment with different types of chocolate chips white chocolate, peanut butter chips, or even chopped nuts would be delicious additions. You could also add a swirl of caramel or a dollop of peanut butter to the center of each cookie before baking for an extra layer of flavor. For a truly indulgent experience, try dipping the baked cookies in melted chocolate and then covering them in even more sprinkles!
Don’t be afraid to get creative and make these cookies your own. The most important thing is to have fun and enjoy the process. Baking should be a joyful experience, and these cookies are guaranteed to bring a smile to your face.
I truly believe that these Cosmic Brownie Cookies will become a new family favorite. They’re perfect for birthdays, holidays, or just a simple weeknight treat. They’re also a great way to show someone you care a batch of homemade cookies is always a thoughtful and appreciated gift.
So, what are you waiting for? Gather your ingredients, preheat your oven, and get ready to bake up a batch of these amazing cookies. I’m confident that you’ll love them as much as I do.
And most importantly, I want to hear about your experience! Did you try the recipe? Did you make any variations? What did you think? Share your photos and comments on social media using [Your Hashtag Here] I can’t wait to see your creations! Happy baking! Let me know if you have any questions, and I hope you enjoy these fudgy, sprinkle-covered delights!
Cosmic Brownie Cookies: The Ultimate Guide to Baking Perfection
Chewy, fudgy chocolate cookies topped with a rich chocolate frosting and mini chocolate chip sprinkles, just like the classic Cosmic Brownies!
Ingredients
- 1 cup (2 sticks) unsalted butter, softened
- 1 ½ cups granulated sugar
- ½ cup packed light brown sugar
- 2 large eggs
- 1 tablespoon vanilla extract
- 2 cups all-purpose flour
- ¾ cup unsweetened cocoa powder
- 1 teaspoon baking soda
- ½ teaspoon salt
- 1 cup semi-sweet chocolate chips
- ½ cup (1 stick) unsalted butter, softened
- 3 cups powdered sugar
- ½ cup unsweetened cocoa powder
- ¼ cup milk (or more, as needed)
- 1 teaspoon vanilla extract
- Pinch of salt
- ½ cup mini semi-sweet chocolate chips
- 1 teaspoon vegetable shortening (optional, for smoother melting)
Instructions
- Cream the Butter and Sugars: In a large bowl, or the bowl of your stand mixer, cream together the softened butter, granulated sugar, and brown sugar until light and fluffy (3-5 minutes). Scrape down the sides of the bowl occasionally.
- Add the Eggs and Vanilla: Beat in the eggs one at a time, mixing well after each addition. Stir in the vanilla extract.
- Combine Dry Ingredients: In a separate medium bowl, whisk together the flour, cocoa powder, baking soda, and salt.
- Gradually Add Dry Ingredients to Wet Ingredients: Gradually add the dry ingredients to the wet ingredients, mixing on low speed until just combined. Do not overmix.
- Stir in Chocolate Chips: Gently fold in the chocolate chips until evenly distributed.
- Chill the Dough: Cover the bowl with plastic wrap and chill the dough in the refrigerator for at least 30 minutes (or longer, even overnight).
- Preheat the Oven: Preheat your oven to 350°F (175°C). Line baking sheets with parchment paper or silicone baking mats.
- Scoop the Dough: Use a cookie scoop or spoon to drop rounded tablespoons of dough onto the prepared baking sheets, leaving about 2 inches between each cookie.
- Bake: Bake for 9-11 minutes, or until the edges are set and the centers are still slightly soft. Do not overbake.
- Cool: Let the cookies cool on the baking sheets for a few minutes before transferring them to a wire rack to cool completely.
- Cream the Butter (Frosting): In a large bowl, or the bowl of your stand mixer, cream the softened butter until smooth and creamy.
- Add Powdered Sugar and Cocoa Powder (Frosting): Gradually add the powdered sugar and cocoa powder to the butter, mixing on low speed until combined.
- Add Milk and Vanilla (Frosting): Add the milk and vanilla extract, and beat until the frosting is smooth and creamy. Add more milk, one tablespoon at a time, if needed to reach your desired consistency.
- Add Salt (Frosting): Stir in a pinch of salt to balance the sweetness.
- Melt Chocolate Chips (Sprinkles): In a microwave-safe bowl, combine the mini chocolate chips and vegetable shortening (if using). Microwave in 30-second intervals, stirring after each interval, until the chocolate is melted and smooth.
- Transfer to Piping Bag (Sprinkles): Transfer the melted chocolate to a small piping bag or a zip-top bag with a small corner snipped off.
- Frost the Cookies: Once the cookies are completely cool, spread a generous layer of the fudgy frosting over the top of each cookie.
- Drizzle with Chocolate: Immediately drizzle the melted chocolate over the frosting in a zig-zag pattern. Work quickly.
- Add Sprinkles: While the chocolate is still wet, sprinkle the cookies with mini chocolate chips.
- Let Set: Allow the frosting and chocolate to set completely before serving (30 minutes to an hour, or refrigerate to speed up the process).
Notes
- Creaming the butter and sugars well is crucial for tender cookies.
- Whisking the dry ingredients ensures even distribution of baking soda and salt.
- Do not overmix the dough after adding the dry ingredients.
- Chilling the dough prevents excessive spreading during baking and develops flavor.
- Be careful not to overbake the cookies.
- Add powdered sugar gradually to the frosting to avoid a mess.
- Do not overheat the chocolate when melting.

Leave a Comment