
Cooked salmon albumin: Prepare to unlock a culinary secret that will transform your understanding of salmon! Have you ever wondered about that white, sometimes unsightly, substance that appears when you cook salmon? That, my friends, is albumin, and contrary to popular belief, it’s not something to be feared or scraped away. In fact, understanding how to manage and even minimize albumin is the key to achieving perfectly cooked, succulent salmon every single time.
Salmon has been a staple food for coastal communities for centuries, revered not only for its rich flavor but also for its nutritional benefits. From the indigenous peoples of the Pacific Northwest, who hold salmon sacred in their traditions, to modern-day foodies seeking healthy and delicious meals, salmon has consistently held a place of honor on our plates. But let’s be honest, that white albumin can sometimes be a bit off-putting, even if it doesn’t affect the taste.
People adore salmon for its versatility, its healthy fats, and its distinctive, delicate flavor. Whether grilled, baked, pan-fried, or poached, salmon offers a delightful culinary experience. But what if I told you that mastering the art of cooking salmon, and understanding how to handle cooked salmon albumin, could elevate your salmon dishes to a whole new level of deliciousness? Join me as we delve into the science behind albumin and discover the secrets to perfectly cooked salmon that will impress your family and friends!

Ingredients:
- 1.5 lbs Cooked Salmon (skin removed, flaked)
- 1 cup Cooked Quinoa
- 1/2 cup Finely Diced Red Onion
- 1/4 cup Chopped Fresh Dill
- 1/4 cup Chopped Fresh Parsley
- 2 Large Eggs
- 1/4 cup Breadcrumbs (Panko preferred for extra crispiness)
- 2 tbsp Lemon Juice
- 1 tbsp Dijon Mustard
- 1 tsp Garlic Powder
- 1/2 tsp Smoked Paprika
- 1/4 tsp Cayenne Pepper (optional, for a little heat)
- Salt and Black Pepper to taste
- 2 tbsp Olive Oil (for cooking)
- Lemon wedges, for serving
- Tartar Sauce, for serving (optional)
Preparing the Salmon Cakes
Alright, let’s get started on these delicious salmon cakes! The key to great salmon cakes is to ensure everything is well combined and that the mixture isn’t too wet. We want them to hold their shape beautifully when we cook them.
- Combine the Salmon and Quinoa: In a large bowl, gently flake the cooked salmon with a fork. Be careful not to overwork it; we want some texture. Add the cooked quinoa to the bowl. The quinoa acts as a binder and adds a lovely nutty flavor.
- Add the Aromatics and Herbs: Now, toss in the finely diced red onion, chopped fresh dill, and chopped fresh parsley. The red onion provides a nice bite, while the dill and parsley bring a fresh, vibrant flavor that complements the salmon perfectly. Make sure the red onion is diced very finely; large chunks can prevent the cakes from holding together.
- Incorporate the Wet Ingredients: In a separate small bowl, whisk together the eggs, lemon juice, and Dijon mustard. The eggs will bind the mixture, the lemon juice adds brightness, and the Dijon mustard provides a subtle tang. Pour this mixture over the salmon and quinoa.
- Add the Dry Ingredients and Spices: Sprinkle the breadcrumbs, garlic powder, smoked paprika, and cayenne pepper (if using) over the salmon mixture. The breadcrumbs will help absorb any excess moisture and create a nice crust when cooked. The garlic powder adds a savory note, the smoked paprika provides a smoky depth, and the cayenne pepper gives a little kick if you’re feeling adventurous.
- Season and Mix: Season the mixture generously with salt and black pepper. Don’t be shy with the seasoning; it’s crucial for bringing out the flavors. Gently mix all the ingredients together until just combined. Be careful not to overmix, as this can make the salmon cakes tough. We want a light and airy texture.
- Chill the Mixture: Cover the bowl with plastic wrap and refrigerate the salmon mixture for at least 30 minutes. This allows the flavors to meld together and helps the cakes hold their shape better when cooking. Trust me, this step is worth it! You can even chill it for a few hours or overnight if you want to prepare it in advance.
Forming the Salmon Cakes
Now that our salmon mixture has had a chance to chill and the flavors have melded, it’s time to form the cakes. This is a crucial step for achieving that perfect shape and even cooking.
- Prepare Your Work Surface: Line a baking sheet with parchment paper. This will prevent the salmon cakes from sticking and make cleanup a breeze.
- Shape the Cakes: Using your hands or a 1/4 cup measuring cup, scoop out portions of the salmon mixture. Gently form each portion into a round, flat cake, about 3/4 inch thick. Aim for consistency in size so they cook evenly. Don’t press too hard; we want to keep them light and airy.
- Place on Baking Sheet: Place the formed salmon cakes on the prepared baking sheet. Make sure they are not touching each other to allow for even cooking.
- Optional: Breadcrumb Coating (for extra crispiness): If you want an extra crispy crust, you can lightly coat the salmon cakes in additional breadcrumbs. Simply place some breadcrumbs in a shallow dish and gently press each side of the salmon cake into the breadcrumbs. This will create a beautiful golden-brown crust when cooked.
Cooking the Salmon Cakes
Here comes the fun part cooking the salmon cakes! We’ll be pan-frying them to achieve a golden-brown, crispy exterior while keeping the inside moist and tender. The key is to use medium heat and not overcrowd the pan.
- Heat the Olive Oil: Heat the olive oil in a large skillet over medium heat. Make sure the skillet is large enough to accommodate the salmon cakes without overcrowding. The oil should be shimmering but not smoking.
- Cook the Salmon Cakes: Carefully place the salmon cakes in the hot skillet, leaving enough space between them. Cook for about 4-5 minutes per side, or until golden brown and heated through. Be patient and don’t flip them too early; you want a nice crust to form.
- Check for Doneness: To ensure the salmon cakes are cooked through, you can gently press down on them with a spatula. They should feel firm to the touch. You can also use a food thermometer to check the internal temperature; it should reach 145°F (63°C).
- Remove and Drain: Once the salmon cakes are cooked through and golden brown, remove them from the skillet and place them on a plate lined with paper towels to drain any excess oil. This will help keep them crispy.
- Repeat: Repeat the cooking process with the remaining salmon cakes, adding more olive oil to the skillet as needed.
Serving the Salmon Cakes
Congratulations, you’ve made delicious salmon cakes! Now it’s time to serve them and enjoy the fruits of your labor. These salmon cakes are incredibly versatile and can be served in a variety of ways.
- Serve Immediately: Serve the salmon cakes immediately while they are still warm and crispy.
- Garnish: Garnish with fresh lemon wedges and a dollop of tartar sauce (if desired). The lemon wedges add a bright, citrusy flavor that complements the salmon perfectly, and the tartar sauce provides a creamy, tangy contrast.
- Serving Suggestions: Here are a few ideas for serving your salmon cakes:
- As an Appetizer: Serve them as a delicious appetizer with a dipping sauce of your choice.
- As a Main Course: Serve them as a main course with a side salad, roasted vegetables, or rice.
- In a Sandwich or Burger: Serve them on a bun with your favorite toppings for a tasty salmon burger.
- On Top of a Salad: Crumble them over a salad for a protein-packed and flavorful meal.
- Storage: Leftover salmon cakes can be stored in an airtight container in the refrigerator for up to 3 days. Reheat them in a skillet or oven until heated through. They may not be as crispy as when they were first cooked, but they will still be delicious.
Tips for Perfect Salmon Cakes
- Don’t Overmix: Overmixing the salmon mixture can result in tough salmon cakes. Mix just until the ingredients are combined.
- Chill the Mixture: Chilling the salmon mixture helps the cakes hold their shape better when cooking.
- Use Medium Heat: Cooking the salmon cakes over medium heat ensures they cook evenly and don’t burn.
- Don’t Overcrowd the Pan: Overcrowding the pan can lower the temperature of the oil and result in soggy salmon cakes. Cook them in batches.
- Adjust Seasoning: Taste the salmon mixture before forming the cakes and adjust the seasoning as needed.
Variations
- Spicy Salmon Cakes: Add more cayenne pepper or a pinch of red pepper flakes for a spicier kick.
- Herbaceous Salmon Cakes: Experiment with different herbs, such as chives, oregano, or thyme.
- Vegetable Salmon Cakes: Add finely diced vegetables, such as bell peppers, zucchini, or carrots, to the salmon mixture.
- Gluten-Free Salmon Cakes: Use gluten-free breadcrumbs or almond flour instead of regular breadcrumbs.
Conclusion:
So, there you have it! This recipe, born from a desire to minimize waste and maximize flavor, transforms what is often discarded the cooked salmon albumin into something truly special. I know, I know, salmon albumin might not sound glamorous, but trust me on this one. The delicate, almost custard-like texture, combined with the savory seasonings, creates a surprisingly delicious and versatile dish. It’s a testament to the fact that even the most unexpected ingredients can be elevated with a little creativity and culinary know-how.
But why is this recipe a must-try? Beyond its eco-friendly appeal, it’s simply delicious! The subtle salmon flavor is enhanced, not overpowered, by the other ingredients, resulting in a light yet satisfying dish that’s perfect as an appetizer, a side, or even a light lunch. It’s also incredibly easy to make, requiring minimal effort and readily available ingredients. Plus, it’s a conversation starter! Imagine serving this to your friends and family they’ll be amazed by your resourcefulness and impressed by the unique flavor profile.
Think of it as a blank canvas for your culinary creativity. Want to add a touch of spice? A pinch of red pepper flakes or a dash of hot sauce will do the trick. Craving something more herbaceous? Fresh dill, chives, or parsley would be wonderful additions. For a richer flavor, try incorporating a dollop of crème fraîche or sour cream. The possibilities are endless!
Here are a few serving suggestions to get you started:
* As an appetizer: Serve chilled or at room temperature on toasted baguette slices, crackers, or cucumber rounds. A sprinkle of fresh herbs and a drizzle of olive oil will elevate the presentation.
* As a side dish: Pair it with grilled vegetables, a simple salad, or roasted potatoes. Its light and refreshing flavor complements a variety of main courses.
* As a light lunch: Enjoy it on its own with a side of crusty bread or a mixed green salad. It’s a healthy and satisfying option that won’t weigh you down.
* Variations: For a Japanese-inspired twist, add a touch of soy sauce, mirin, and grated ginger. Garnish with sesame seeds and chopped scallions. For a Mediterranean flair, incorporate chopped sun-dried tomatoes, olives, and feta cheese.
Don’t be intimidated by the unusual ingredient. Cooked salmon albumin is a hidden gem, waiting to be discovered. This recipe is a testament to sustainable cooking and a delicious way to reduce food waste. It’s a win-win!
I truly believe you’ll be pleasantly surprised by how much you enjoy this dish. It’s a unique and flavorful way to appreciate every part of the salmon. So, go ahead, give it a try! I’m confident that you’ll find it to be a delightful and unexpected culinary adventure.
I’m so excited for you to try this recipe and discover the delicious potential of cooked salmon albumin. Once you’ve made it, I’d love to hear about your experience! Did you make any variations? What did you serve it with? Share your thoughts and photos in the comments below. Let’s inspire each other to be more creative and sustainable in the kitchen! Happy cooking!
Cooked Salmon Albumin: Benefits, Nutrition, and Preparation
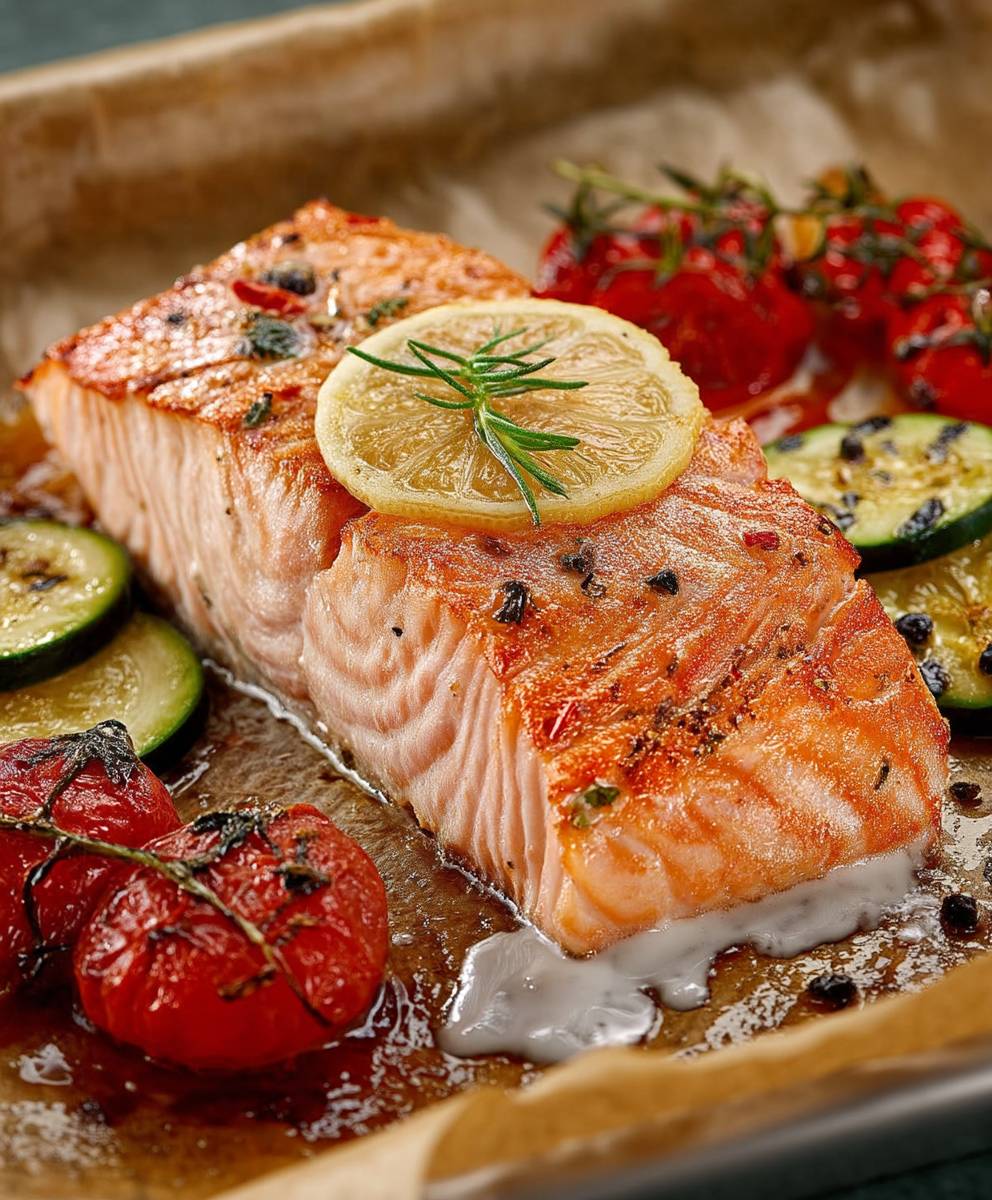
Flaky salmon cakes with quinoa, fresh herbs, and a hint of spice, pan-fried to golden perfection. A delicious and versatile dish perfect as an appetizer or main course.
Ingredients
- 1.5 lbs Cooked Salmon (skin removed, flaked)
- 1 cup Cooked Quinoa
- 1/2 cup Finely Diced Red Onion
- 1/4 cup Chopped Fresh Dill
- 1/4 cup Chopped Fresh Parsley
- 2 Large Eggs
- 1/4 cup Breadcrumbs (Panko preferred for extra crispiness)
- 2 tbsp Lemon Juice
- 1 tbsp Dijon Mustard
- 1 tsp Garlic Powder
- 1/2 tsp Smoked Paprika
- 1/4 tsp Cayenne Pepper (optional, for a little heat)
- Salt and Black Pepper to taste
- 2 tbsp Olive Oil (for cooking)
- Lemon wedges, for serving
- Tartar Sauce, for serving (optional)
Instructions
- Combine Salmon and Quinoa: In a large bowl, gently flake the cooked salmon with a fork. Add the cooked quinoa.
- Add Aromatics and Herbs: Add the finely diced red onion, chopped fresh dill, and chopped fresh parsley to the bowl.
- Incorporate Wet Ingredients: In a separate small bowl, whisk together the eggs, lemon juice, and Dijon mustard. Pour this mixture over the salmon and quinoa.
- Add Dry Ingredients and Spices: Sprinkle the breadcrumbs, garlic powder, smoked paprika, and cayenne pepper (if using) over the salmon mixture.
- Season and Mix: Season the mixture generously with salt and black pepper. Gently mix all the ingredients together until just combined. Be careful not to overmix.
- Chill the Mixture: Cover the bowl with plastic wrap and refrigerate the salmon mixture for at least 30 minutes (or longer).
- Prepare Work Surface: Line a baking sheet with parchment paper.
- Shape the Cakes: Using your hands or a 1/4 cup measuring cup, scoop out portions of the salmon mixture. Gently form each portion into a round, flat cake, about 3/4 inch thick.
- Place on Baking Sheet: Place the formed salmon cakes on the prepared baking sheet.
- Optional: Breadcrumb Coating: If desired, lightly coat the salmon cakes in additional breadcrumbs.
- Heat the Olive Oil: Heat the olive oil in a large skillet over medium heat.
- Cook the Salmon Cakes: Carefully place the salmon cakes in the hot skillet, leaving enough space between them. Cook for about 4-5 minutes per side, or until golden brown and heated through.
- Check for Doneness: Ensure the salmon cakes are cooked through by gently pressing down on them. They should feel firm. Internal temperature should reach 145°F (63°C).
- Remove and Drain: Remove the salmon cakes from the skillet and place them on a plate lined with paper towels to drain any excess oil.
- Repeat: Repeat the cooking process with the remaining salmon cakes, adding more olive oil to the skillet as needed.
- Serve Immediately: Serve the salmon cakes immediately while they are still warm and crispy.
- Garnish: Garnish with fresh lemon wedges and a dollop of tartar sauce (if desired).
Notes
- Don’t overmix the salmon mixture.
- Chilling the mixture is crucial for the cakes to hold their shape.
- Use medium heat to prevent burning.
- Don’t overcrowd the pan; cook in batches.
- Adjust seasoning to taste before forming the cakes.
- Leftover salmon cakes can be stored in an airtight container in the refrigerator for up to 3 days. Reheat in a skillet or oven.

Leave a Comment