
Coconut Chocolate Dome: Prepare to be transported to a realm of pure dessert bliss! Imagine a dessert so decadent, so visually stunning, and so utterly delicious that it becomes the centerpiece of any gathering. This isn’t just a recipe; it’s an experience, a journey for your taste buds that culminates in a symphony of flavors and textures.
While the exact origins of the coconut chocolate dome are shrouded in a bit of mystery, the combination of coconut and chocolate has a long and celebrated history in confectionery. From classic chocolate bars to exotic truffles, this pairing has consistently delighted dessert lovers for generations. The creamy sweetness of coconut perfectly complements the rich, intense flavor of chocolate, creating a harmonious balance that is simply irresistible.
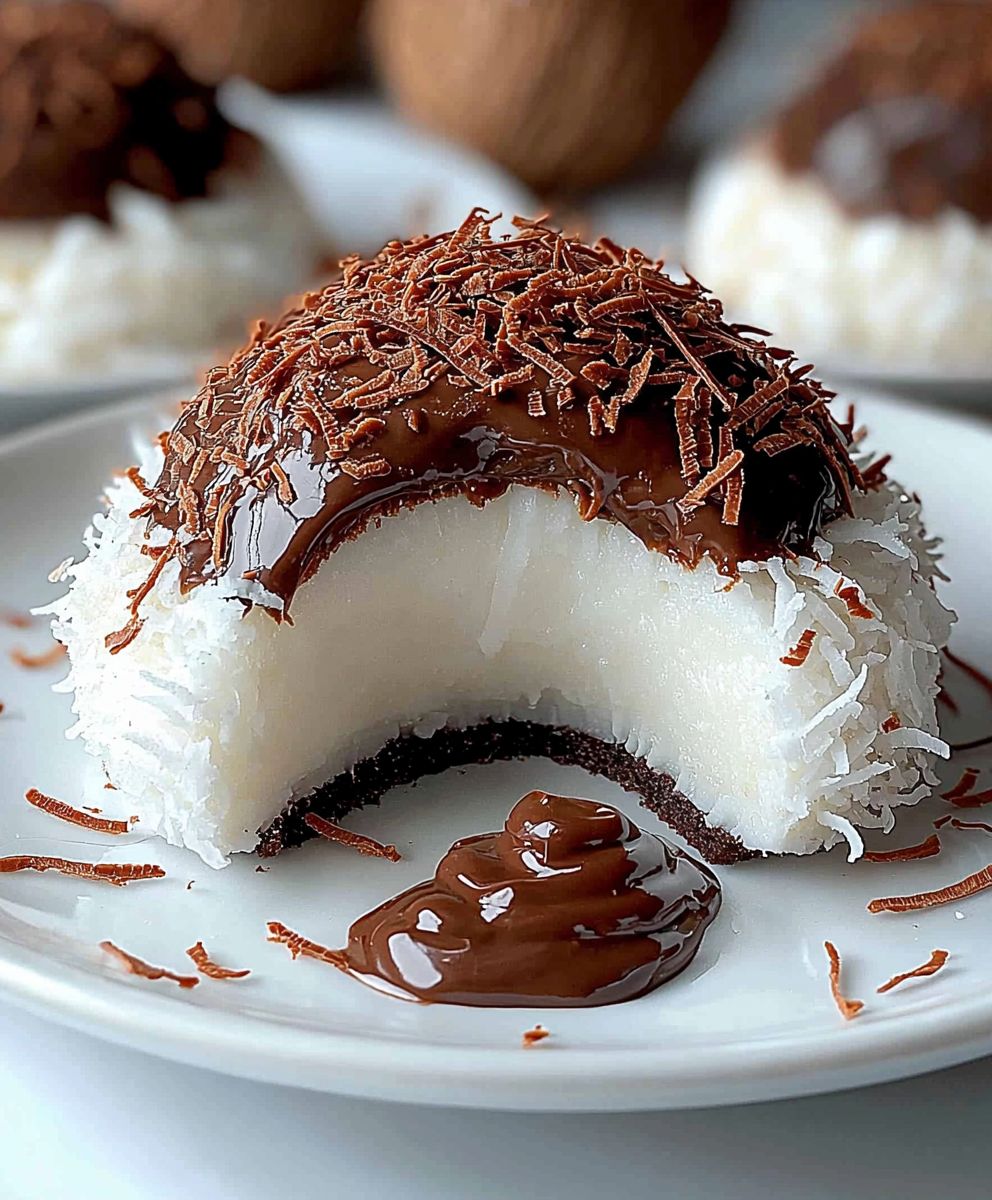
What makes this particular dessert so beloved? It’s the combination of several factors. First, there’s the visual appeal. The dome shape is elegant and impressive, making it perfect for special occasions. Then, there’s the taste: the smooth, melt-in-your-mouth chocolate shell gives way to a creamy, coconut-infused filling that is both refreshing and indulgent. Finally, while it looks complicated, the coconut chocolate dome is surprisingly straightforward to make, making it an achievable treat for even novice bakers. Get ready to impress your friends and family with this show-stopping dessert!

Ingredients:
- For the Chocolate Dome:
- 12 ounces high-quality dark chocolate (60-70% cacao), finely chopped
- 1 tablespoon coconut oil (optional, for extra shine)
- For the Coconut Filling:
- 1 (14-ounce) can full-fat coconut milk, refrigerated overnight
- 1/2 cup powdered sugar, sifted
- 1 teaspoon vanilla extract
- 1/4 teaspoon almond extract (optional, enhances the coconut flavor)
- 1 cup shredded coconut, unsweetened
- For the Chocolate Ganache (Optional):
- 4 ounces semi-sweet chocolate, finely chopped
- 1/4 cup heavy cream
- For Decoration (Optional):
- Shredded coconut, toasted
- Chocolate shavings
- Edible gold leaf
- Fresh berries (raspberries, blueberries)
Preparing the Chocolate Domes:
- Melt the Chocolate: In a heatproof bowl set over a saucepan of simmering water (double boiler), melt the dark chocolate and coconut oil (if using), stirring occasionally until smooth. Make sure the bottom of the bowl doesn’t touch the water. This prevents the chocolate from burning. Alternatively, you can melt the chocolate in the microwave in 30-second intervals, stirring in between, until melted and smooth.
- Prepare the Molds: You’ll need dome-shaped silicone molds for this recipe. I find that molds with a diameter of about 3 inches work perfectly. Ensure the molds are clean and completely dry.
- Coat the Molds: Using a spoon or pastry brush, evenly coat the inside of each dome mold with a layer of melted chocolate. Make sure to cover the entire surface, including the edges. The thickness of this layer is important too thin, and the domes will be fragile; too thick, and they’ll be difficult to unmold.
- Chill the First Layer: Place the molds in the freezer for 10-15 minutes, or until the chocolate is firm to the touch. This chilling process is crucial for creating a sturdy shell.
- Apply a Second Layer: Remove the molds from the freezer and apply a second layer of melted chocolate, again ensuring even coverage. This second layer adds strength and prevents the domes from breaking easily.
- Chill Again: Return the molds to the freezer for another 15-20 minutes, or until the chocolate is completely hardened.
Making the Coconut Filling:
- Separate the Coconut Cream: After refrigerating the can of coconut milk overnight, carefully scoop out the thick, solidified coconut cream from the top of the can, leaving the watery liquid behind. This separation is essential for achieving a rich and creamy filling.
- Whip the Coconut Cream: In a mixing bowl, beat the coconut cream with an electric mixer until light and fluffy. This usually takes about 2-3 minutes.
- Add Sweeteners and Flavorings: Gradually add the sifted powdered sugar to the whipped coconut cream, beating until well combined. Then, stir in the vanilla extract and almond extract (if using). Sifting the powdered sugar prevents lumps in the filling.
- Fold in the Coconut: Gently fold in the shredded coconut until it’s evenly distributed throughout the filling. Be careful not to overmix, as this can deflate the coconut cream.
- Chill the Filling: Cover the bowl with plastic wrap and refrigerate the coconut filling for at least 30 minutes. This allows the flavors to meld together and the filling to firm up slightly, making it easier to work with.
Assembling the Coconut Chocolate Domes:
- Unmold the Chocolate Domes: Carefully remove the chocolate domes from the silicone molds. Gently peel back the edges of the mold to release the domes. If they’re sticking, you can try running a warm (not hot!) knife around the edges.
- Fill the Domes: Spoon the chilled coconut filling into each chocolate dome, filling it almost to the top. Leave a little space for the base.
- Seal the Domes (Optional): If you want to seal the domes completely, melt a small amount of the remaining dark chocolate and use it to cover the bottom of each dome, creating a flat base. Alternatively, you can simply leave the filling exposed.
- Chill the Assembled Domes: Place the filled chocolate domes on a baking sheet lined with parchment paper and refrigerate them for at least 30 minutes to allow the filling to set completely.
Preparing the Chocolate Ganache (Optional):
- Heat the Cream: In a small saucepan, heat the heavy cream over medium heat until it just begins to simmer. Do not boil.
- Pour over Chocolate: Place the finely chopped semi-sweet chocolate in a heatproof bowl. Pour the hot cream over the chocolate and let it sit for 1 minute to soften the chocolate.
- Stir until Smooth: Gently stir the chocolate and cream together until the chocolate is completely melted and the ganache is smooth and glossy. If there are any stubborn pieces of chocolate, you can microwave the mixture in 10-second intervals, stirring in between, until smooth.
- Cool Slightly: Let the ganache cool slightly for about 5-10 minutes before using it. This will allow it to thicken slightly, making it easier to drizzle or spread.
Decorating the Coconut Chocolate Domes (Optional):
- Drizzle with Ganache: If using, drizzle the cooled chocolate ganache over the chilled coconut chocolate domes. You can create a simple drizzle pattern or completely cover the domes with ganache.
- Add Toppings: While the ganache is still wet, sprinkle the domes with toasted shredded coconut, chocolate shavings, or edible gold leaf. You can also add fresh berries for a pop of color and flavor.
- Chill Again: Return the decorated domes to the refrigerator for another 15-20 minutes to allow the ganache to set completely.
Tips and Variations:
- Chocolate Choice: The quality of the chocolate you use will greatly impact the flavor of the domes. I recommend using a high-quality dark chocolate with a cacao percentage between 60% and 70%. You can also experiment with different types of chocolate, such as milk chocolate or white chocolate, for a different flavor profile.
- Coconut Milk: Using full-fat coconut milk is crucial for achieving a rich and creamy filling. Do not use light coconut milk, as it will not solidify properly.
- Sweetness Level: Adjust the amount of powdered sugar in the coconut filling to your liking. If you prefer a less sweet filling, you can reduce the amount of sugar.
- Flavor Variations: Get creative with the flavor combinations! You can add a pinch of sea salt to the coconut filling to enhance the sweetness, or incorporate other extracts, such as peppermint or orange, for a unique twist. You can also add chopped nuts, such as macadamia nuts or almonds, to the filling for added texture.
- Vegan Option: This recipe can easily be made vegan by using vegan chocolate and ensuring that the powdered sugar is vegan-friendly (some brands use bone char in the refining process).
- Storage: Store the coconut chocolate domes in an airtight container in the refrigerator for up to 3 days.
- Freezing: You can freeze the assembled domes for up to 1 month. Thaw them in the refrigerator overnight before serving.
Conclusion:
This Coconut Chocolate Dome isn’t just a dessert; it’s an experience. The creamy coconut filling, the rich dark chocolate shell, and the delightful textural contrast make it a truly unforgettable treat. I wholeheartedly believe this recipe is a must-try for anyone who loves chocolate and coconut, or simply enjoys creating something special in the kitchen. It’s surprisingly easy to make, yet looks incredibly impressive, making it perfect for dinner parties, special occasions, or even just a weekend indulgence. But why is this Coconut Chocolate Dome so special? It’s the perfect balance of flavors and textures. The sweetness of the coconut is perfectly offset by the slight bitterness of the dark chocolate, creating a symphony of taste that will leave you wanting more. The smooth, creamy filling contrasts beautifully with the crisp, snappy chocolate shell, providing a satisfying textural experience with every bite. Plus, it’s a showstopper! Imagine presenting this elegant dome to your guests they’ll be amazed by your culinary skills. And the best part? It’s incredibly versatile! While I’ve shared my favorite version, feel free to experiment with different variations to suit your taste.Serving Suggestions and Variations:
* Serving Suggestions: Serve the Coconut Chocolate Dome chilled, straight from the refrigerator. A dollop of whipped cream or a scoop of vanilla ice cream would be a delightful addition. You could also garnish it with fresh berries, such as raspberries or strawberries, for a pop of color and flavor. A dusting of cocoa powder or a drizzle of melted chocolate would also add a touch of elegance. For a truly decadent experience, serve it with a glass of dessert wine or a cup of strong coffee. * Variations: Want to add a little extra something? Consider incorporating chopped nuts, such as almonds or pecans, into the coconut filling for added crunch. You could also add a layer of raspberry jam or other fruit preserves between the coconut filling and the chocolate shell for a burst of fruity flavor. For a more intense chocolate flavor, use a higher percentage of cacao in your dark chocolate. If you’re feeling adventurous, try using white chocolate or milk chocolate for the shell instead of dark chocolate. You could even add a touch of rum or other liqueur to the coconut filling for an adult twist. For a vegan version, use vegan chocolate and coconut cream instead of regular cream. The possibilities are endless! I’m so excited for you to try this recipe and create your own delicious Coconut Chocolate Dome. Don’t be intimidated by the appearance it’s much easier to make than it looks. Just follow the instructions carefully, and you’ll be rewarded with a truly stunning and delicious dessert. I truly believe that this recipe will become a new favorite in your household. It’s a crowd-pleaser, a showstopper, and most importantly, it’s absolutely delicious. So, gather your ingredients, put on your apron, and get ready to create something amazing. I can’t wait to hear about your experience! Please share your photos and comments with me I’d love to see your creations and hear about any variations you try. Happy baking! Let me know how your Coconut Chocolate Dome turns out! Print
Coconut Chocolate Dome: A Decadent Dessert Recipe
- Total Time: 115 minutes
- Yield: 6–8 domes 1x
Description
Dark chocolate domes with a creamy coconut filling. Elegant and perfect for any occasion.
Ingredients
- 12 ounces high-quality dark chocolate (60-70% cacao), finely chopped
- 1 tablespoon coconut oil (optional, for extra shine)
- 1 (14-ounce) can full-fat coconut milk, refrigerated overnight
- 1/2 cup powdered sugar, sifted
- 1 teaspoon vanilla extract
- 1/4 teaspoon almond extract (optional, enhances the coconut flavor)
- 1 cup shredded coconut, unsweetened
- 4 ounces semi-sweet chocolate, finely chopped
- 1/4 cup heavy cream
- Shredded coconut, toasted
- Chocolate shavings
- Edible gold leaf
- Fresh berries (raspberries, blueberries)
Instructions
- In a heatproof bowl set over a saucepan of simmering water (double boiler), melt the dark chocolate and coconut oil (if using), stirring occasionally until smooth. Alternatively, melt in the microwave in 30-second intervals, stirring in between.
- Ensure dome-shaped silicone molds (about 3-inch diameter) are clean and dry.
- Coat the inside of each dome mold with a layer of melted chocolate.
- Place the molds in the freezer for 10-15 minutes, or until firm.
- Remove from freezer and apply a second layer of melted chocolate.
- Return to the freezer for another 15-20 minutes, or until completely hardened.
- After refrigerating coconut milk overnight, scoop out the thick coconut cream, leaving the watery liquid behind.
- In a mixing bowl, beat the coconut cream with an electric mixer until light and fluffy (2-3 minutes).
- Gradually add the sifted powdered sugar, vanilla extract, and almond extract (if using).
- Gently fold in the shredded coconut.
- Cover and refrigerate the coconut filling for at least 30 minutes.
- Carefully remove the chocolate domes from the silicone molds.
- Spoon the chilled coconut filling into each chocolate dome, filling almost to the top.
- Melt remaining dark chocolate and use it to cover the bottom of each dome.
- Place on a baking sheet lined with parchment paper and refrigerate for at least 30 minutes.
- In a small saucepan, heat the heavy cream over medium heat until it just begins to simmer. Do not boil.
- Place the finely chopped semi-sweet chocolate in a heatproof bowl. Pour the hot cream over the chocolate and let it sit for 1 minute to soften the chocolate.
- Gently stir the chocolate and cream together until the chocolate is completely melted and the ganache is smooth and glossy.
- Let the ganache cool slightly for about 5-10 minutes before using it.
- Drizzle the cooled chocolate ganache over the chilled coconut chocolate domes.
- Sprinkle with toasted shredded coconut, chocolate shavings, edible gold leaf, or fresh berries.
- Return to the refrigerator for another 15-20 minutes to allow the ganache to set completely.
Notes
- Chocolate Choice: Use high-quality dark chocolate (60-70% cacao).
- Coconut Milk: Use full-fat coconut milk.
- Sweetness Level: Adjust powdered sugar to taste.
- Flavor Variations: Add sea salt, peppermint extract, orange extract, or chopped nuts to the filling.
- Vegan Option: Use vegan chocolate and vegan-friendly powdered sugar.
- Storage: Store in an airtight container in the refrigerator for up to 3 days.
- Freezing: Freeze assembled domes for up to 1 month. Thaw in the refrigerator overnight.
- Prep Time: 45 minutes
- Cook Time: 10 minutes

Leave a Comment