
Christmas shortbread cookies: just the name conjures up images of cozy fireplaces, twinkling lights, and the sweet aroma of butter and sugar filling the air. But these aren’t just any cookies; they’re a symbol of holiday tradition, a taste of nostalgia, and a guaranteed crowd-pleaser. Have you ever wondered why these crumbly, melt-in-your-mouth treats are such a staple during the festive season?
Shortbread, in its simplest form, dates back to medieval Scotland, where it evolved from “biscuit bread,” a leftover bread dough sweetened and baked into a rusk. Over centuries, butter replaced yeast, transforming it into the rich, decadent treat we know and love. It was associated with celebrations and special occasions, eventually becoming a quintessential part of Christmas festivities.
What makes Christmas shortbread cookies so irresistible? It’s the perfect balance of simplicity and indulgence. The buttery, crumbly texture is incredibly satisfying, and the subtle sweetness allows the rich flavor of the butter to truly shine. Plus, they are incredibly versatile! You can enjoy them plain, dipped in chocolate, sprinkled with festive sugars, or even flavored with extracts like vanilla or almond. They’re also surprisingly easy to make, making them a perfect baking project for families to enjoy together. So, get ready to create some holiday magic with this classic recipe that’s sure to become a cherished tradition in your own home!

Ingredients:
- 1 cup (2 sticks) unsalted butter, softened
- 1/2 cup granulated sugar
- 1/4 cup powdered sugar, plus more for dusting
- 1 teaspoon vanilla extract
- 2 1/4 cups all-purpose flour, plus more for dusting
- 1/4 teaspoon salt
- Optional: Sprinkles, sanding sugar, or royal icing for decorating
Preparing the Dough:
- Cream the Butter and Sugars: In a large bowl, or the bowl of your stand mixer fitted with the paddle attachment, cream together the softened butter, granulated sugar, and powdered sugar until light and fluffy. This usually takes about 3-5 minutes on medium speed. Make sure to scrape down the sides of the bowl occasionally to ensure everything is evenly incorporated. The mixture should be pale and airy. This step is crucial for achieving a tender shortbread.
- Add Vanilla Extract: Stir in the vanilla extract until just combined. Don’t overmix at this stage. Overmixing can develop the gluten in the flour, leading to a tougher cookie.
- Combine Dry Ingredients: In a separate medium bowl, whisk together the all-purpose flour and salt. Whisking helps to evenly distribute the salt throughout the flour, ensuring a consistent flavor in every cookie.
- Gradually Add Dry Ingredients to Wet Ingredients: Gradually add the dry ingredients to the wet ingredients, mixing on low speed until just combined. Be careful not to overmix! Overmixing will result in tough cookies. Add the flour in three additions, mixing until just incorporated after each addition. The dough will start to come together and form a ball.
- Form the Dough into a Disc: Turn the dough out onto a lightly floured surface. Gently knead the dough a few times to bring it together into a smooth disc. Be careful not to overwork the dough.
- Chill the Dough: Wrap the dough disc tightly in plastic wrap and refrigerate for at least 1 hour, or preferably 2 hours. This chilling time is essential! It allows the gluten to relax, preventing the cookies from spreading too much during baking and resulting in a more tender texture. The cold dough is also easier to roll out and cut. You can even chill the dough overnight if you prefer.
Rolling and Cutting the Cookies:
- Preheat Oven and Prepare Baking Sheets: Preheat your oven to 325°F (160°C). Line baking sheets with parchment paper or silicone baking mats. This will prevent the cookies from sticking and make cleanup a breeze.
- Roll Out the Dough: Remove the chilled dough from the refrigerator and let it sit at room temperature for a few minutes to soften slightly. On a lightly floured surface, roll out the dough to about 1/4 inch thickness. Use a rolling pin and apply even pressure to ensure a uniform thickness. If the dough is sticking, sprinkle a little more flour underneath.
- Cut Out the Cookies: Use your favorite Christmas cookie cutters to cut out shapes from the rolled-out dough. I love using star, tree, and gingerbread man shapes for a festive touch. Dip the cookie cutters in flour before each cut to prevent sticking.
- Place Cookies on Baking Sheets: Carefully transfer the cut-out cookies to the prepared baking sheets, leaving about 1/2 inch space between each cookie.
- Re-roll Scraps: Gather the dough scraps, re-roll them, and cut out more cookies until all the dough is used. Keep in mind that the cookies made from re-rolled dough may be slightly tougher than the first batch, so try to minimize the number of times you re-roll the dough.
- Optional: Dock the Cookies: Use a fork to prick the tops of the cookies a few times. This helps to prevent them from puffing up too much during baking.
Baking the Cookies:
- Bake the Cookies: Bake the cookies for 12-15 minutes, or until the edges are lightly golden brown. The baking time will vary depending on the thickness of your cookies and your oven. Keep a close eye on them to prevent burning.
- Cool the Cookies: Remove the baking sheets from the oven and let the cookies cool on the baking sheets for a few minutes before transferring them to a wire rack to cool completely.
Decorating the Cookies (Optional):
- Dust with Powdered Sugar: Once the cookies are completely cool, dust them generously with powdered sugar. This gives them a beautiful snowy appearance.
- Decorate with Sprinkles or Sanding Sugar: If desired, decorate the cookies with sprinkles or sanding sugar before baking or after dusting with powdered sugar.
- Decorate with Royal Icing: For more elaborate decorations, use royal icing to pipe designs onto the cookies. You can find many royal icing recipes online. Let the royal icing dry completely before storing the cookies.
Storing the Cookies:
Store the cooled cookies in an airtight container at room temperature for up to 5 days. They can also be frozen for longer storage. To freeze, place the cookies in a single layer on a baking sheet and freeze until solid. Then, transfer them to a freezer-safe container or bag. They can be frozen for up to 2 months. Thaw the cookies at room temperature before serving.
Tips for Perfect Shortbread:
- Use High-Quality Butter: The flavor of shortbread relies heavily on the butter, so use the best quality butter you can find.
- Don’t Overmix: Overmixing the dough will develop the gluten in the flour, resulting in tough cookies. Mix until just combined.
- Chill the Dough: Chilling the dough is essential for preventing the cookies from spreading too much during baking and for making the dough easier to roll out.
- Bake at a Low Temperature: Baking at a low temperature ensures that the cookies bake evenly and don’t brown too quickly.
- Let the Cookies Cool Completely: Let the cookies cool completely before decorating or storing them. This will prevent them from becoming soggy.
Variations:
- Lemon Shortbread: Add the zest of one lemon to the dough for a bright, citrusy flavor.
- Chocolate Chip Shortbread: Add 1/2 cup of mini chocolate chips to the dough.
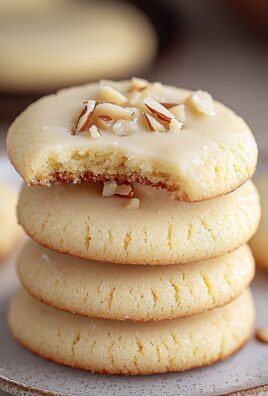
- Pecan Shortbread: Add 1/2 cup of chopped pecans to the dough.
- Lavender Shortbread: Add 1 teaspoon of dried lavender to the dough.

Conclusion:
This isn’t just another cookie recipe; it’s an invitation to create cherished memories, one buttery bite at a time. These Christmas shortbread cookies are a must-try because they perfectly capture the essence of the holiday season. The simple ingredients belie the incredible depth of flavor and the melt-in-your-mouth texture that will have everyone reaching for seconds (and thirds!). Trust me, the aroma alone, as these bake, is enough to fill your home with festive cheer. But the real magic lies in their versatility. While the classic recipe is divine on its own, feel free to unleash your inner artist and experiment! For a touch of elegance, dip half of each cookie in melted dark chocolate and sprinkle with crushed peppermint candies. Or, if you’re feeling adventurous, try adding a hint of citrus zest orange or lemon to the dough for a bright, refreshing twist. A sprinkle of coarse sea salt before baking can also elevate the flavor profile, creating a delightful sweet-and-salty combination. Serving suggestions? Oh, the possibilities are endless! These Christmas shortbread cookies are the perfect accompaniment to a steaming mug of hot cocoa or a glass of chilled eggnog. Arrange them beautifully on a festive platter for your holiday gatherings, or package them in decorative tins as thoughtful homemade gifts for friends and family. They’re also a wonderful addition to a cookie exchange, guaranteed to be a crowd-pleaser. Don’t forget to leave a plate out for Santa he’ll definitely appreciate the upgrade from the usual chocolate chip! Beyond the taste and versatility, what truly makes these cookies special is the joy they bring. Baking is an act of love, and sharing these cookies is a way to spread that love to those around you. Imagine the smiles on the faces of your loved ones as they savor the rich, buttery goodness of these homemade treats. It’s moments like these that make the holidays truly memorable. So, what are you waiting for? Preheat your oven, gather your ingredients, and get ready to embark on a baking adventure. I promise you, this recipe is foolproof, even for novice bakers. The simple steps and readily available ingredients make it a breeze to whip up a batch of these delectable cookies in no time. I’m absolutely confident that you’ll love these Christmas shortbread cookies as much as I do. They’re a timeless classic for a reason, and I’m thrilled to share this recipe with you. Now, it’s your turn! I’m so eager to hear about your baking experience. Did you try any of the variations I suggested? Did you add your own creative flair? Please, don’t hesitate to share your photos and stories in the comments below. I can’t wait to see your beautiful creations and hear about the joy these cookies brought to your holiday season. Happy baking, and happy holidays! Let’s make this Christmas the sweetest one yet! Print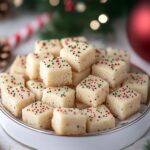
Christmas Shortbread Cookies: The Ultimate Festive Recipe
- Total Time: 92 minutes
- Yield: 24–36 cookies 1x
Description
Classic, melt-in-your-mouth shortbread cookies perfect for the holidays or any occasion. Easy to make and endlessly customizable with sprinkles, sanding sugar, or royal icing!
Ingredients
- 1 cup (2 sticks) unsalted butter, softened
- 1/2 cup granulated sugar
- 1/4 cup powdered sugar, plus more for dusting
- 1 teaspoon vanilla extract
- 2 1/4 cups all-purpose flour, plus more for dusting
- 1/4 teaspoon salt
- Optional: Sprinkles, sanding sugar, or royal icing for decorating
Instructions
- Cream the Butter and Sugars: In a large bowl, or the bowl of your stand mixer fitted with the paddle attachment, cream together the softened butter, granulated sugar, and powdered sugar until light and fluffy. This usually takes about 3-5 minutes on medium speed. Make sure to scrape down the sides of the bowl occasionally to ensure everything is evenly incorporated. The mixture should be pale and airy. This step is crucial for achieving a tender shortbread.
- Add Vanilla Extract: Stir in the vanilla extract until just combined. Don’t overmix at this stage. Overmixing can develop the gluten in the flour, leading to a tougher cookie.
- Combine Dry Ingredients: In a separate medium bowl, whisk together the all-purpose flour and salt. Whisking helps to evenly distribute the salt throughout the flour, ensuring a consistent flavor in every cookie.
- Gradually Add Dry Ingredients to Wet Ingredients: Gradually add the dry ingredients to the wet ingredients, mixing on low speed until just combined. Be careful not to overmix! Overmixing will result in tough cookies. Add the flour in three additions, mixing until just incorporated after each addition. The dough will start to come together and form a ball.
- Form the Dough into a Disc: Turn the dough out onto a lightly floured surface. Gently knead the dough a few times to bring it together into a smooth disc. Be careful not to overwork the dough.
- Chill the Dough: Wrap the dough disc tightly in plastic wrap and refrigerate for at least 1 hour, or preferably 2 hours. This chilling time is essential! It allows the gluten to relax, preventing the cookies from spreading too much during baking and resulting in a more tender texture. The cold dough is also easier to roll out and cut. You can even chill the dough overnight if you prefer.
- Preheat Oven and Prepare Baking Sheets: Preheat your oven to 325°F (160°C). Line baking sheets with parchment paper or silicone baking mats. This will prevent the cookies from sticking and make cleanup a breeze.
- Roll Out the Dough: Remove the chilled dough from the refrigerator and let it sit at room temperature for a few minutes to soften slightly. On a lightly floured surface, roll out the dough to about 1/4 inch thickness. Use a rolling pin and apply even pressure to ensure a uniform thickness. If the dough is sticking, sprinkle a little more flour underneath.
- Cut Out the Cookies: Use your favorite Christmas cookie cutters to cut out shapes from the rolled-out dough. I love using star, tree, and gingerbread man shapes for a festive touch. Dip the cookie cutters in flour before each cut to prevent sticking.
- Place Cookies on Baking Sheets: Carefully transfer the cut-out cookies to the prepared baking sheets, leaving about 1/2 inch space between each cookie.
- Re-roll Scraps: Gather the dough scraps, re-roll them, and cut out more cookies until all the dough is used. Keep in mind that the cookies made from re-rolled dough may be slightly tougher than the first batch, so try to minimize the number of times you re-roll the dough.
- Optional: Dock the Cookies: Use a fork to prick the tops of the cookies a few times. This helps to prevent them from puffing up too much during baking.
- Bake the Cookies: Bake the cookies for 12-15 minutes, or until the edges are lightly golden brown. The baking time will vary depending on the thickness of your cookies and your oven. Keep a close eye on them to prevent burning.
- Cool the Cookies: Remove the baking sheets from the oven and let the cookies cool on the baking sheets for a few minutes before transferring them to a wire rack to cool completely.
- Dust with Powdered Sugar: Once the cookies are completely cool, dust them generously with powdered sugar. This gives them a beautiful snowy appearance.
- Decorate with Sprinkles or Sanding Sugar: If desired, decorate the cookies with sprinkles or sanding sugar before baking or after dusting with powdered sugar.
- Decorate with Royal Icing: For more elaborate decorations, use royal icing to pipe designs onto the cookies. You can find many royal icing recipes online. Let the royal icing dry completely before storing the cookies.
Notes
- Use high-quality butter for the best flavor.
- Don’t overmix the dough, or the cookies will be tough.
- Chilling the dough is essential for preventing spreading.
- Bake at a low temperature for even baking.
- Let the cookies cool completely before decorating or storing.
- Store the cooled cookies in an airtight container at room temperature for up to 5 days. They can also be frozen for longer storage. To freeze, place the cookies in a single layer on a baking sheet and freeze until solid. Then, transfer them to a freezer-safe container or bag. They can be frozen for up to 2 months. Thaw the cookies at room temperature before serving.
- Lemon Shortbread: Add the zest of one lemon to the dough for a bright, citrusy flavor.
- Chocolate Chip Shortbread: Add 1/2 cup of mini chocolate chips to the dough.
- Pecan Shortbread: Add 1/2 cup of chopped pecans to the dough.
- Lavender Shortbread: Add 1 teaspoon of dried lavender to the dough.
- Prep Time: 20 minutes
- Cook Time: 12-15 minutes
Leave a Comment