
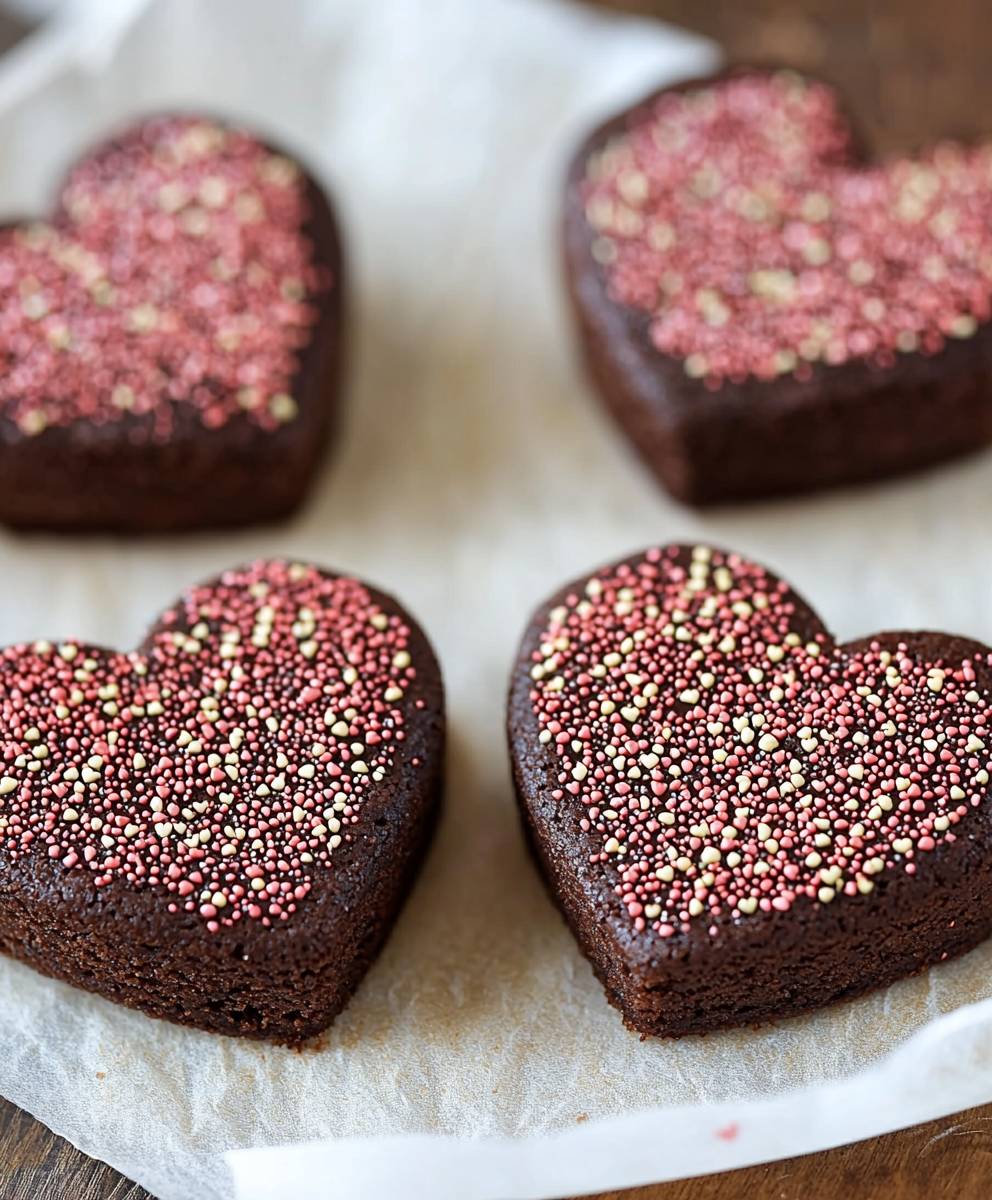
Chocolate Shortbread Cookies: Prepare to be utterly captivated by these melt-in-your-mouth delights! Imagine a cookie so rich, so buttery, and so intensely chocolatey that it redefines your definition of “perfect treat.” These aren’t just cookies; they’re an experience, a journey into the heart of cocoa bliss.
Shortbread itself boasts a fascinating history, originating in Scotland centuries ago. It was initially a luxury, reserved for special occasions like Christmas and Hogmanay. Over time, variations emerged, and the addition of chocolate elevated it to a new level of indulgence. While the traditional shortbread recipe is simple, the addition of cocoa powder creates a depth of flavor that is simply irresistible.
What makes these Chocolate Shortbread Cookies so universally loved? It’s the exquisite combination of textures the delicate crumb that practically dissolves on your tongue, contrasted with the satisfying snap of a perfectly baked edge. Then there’s the taste: a symphony of buttery richness balanced by the deep, dark notes of chocolate. They are surprisingly easy to make, requiring only a handful of ingredients and minimal effort. Whether you’re looking for a sophisticated treat to serve guests or a comforting indulgence for yourself, these cookies are guaranteed to impress. So, let’s get baking and create some chocolate magic!

Ingredients:
- 1 cup (2 sticks) unsalted butter, softened
- ½ cup granulated sugar
- ¼ cup packed light brown sugar
- 1 teaspoon vanilla extract
- 2 cups all-purpose flour
- ½ cup unsweetened cocoa powder
- ¼ teaspoon salt
- Optional: ½ cup chocolate chips or chunks for extra chocolatey goodness
Preparing the Dough:
- First, let’s get that butter nice and soft. Make sure it’s at room temperature, but not melted. This is crucial for a tender shortbread. If you’re in a hurry, you can carefully microwave it in 5-second intervals, but watch it like a hawk!
- In a large bowl, cream together the softened butter, granulated sugar, and brown sugar. I like to use an electric mixer for this, but you can definitely do it by hand. Just make sure you really get in there and cream it until it’s light and fluffy. This usually takes about 3-5 minutes with an electric mixer. We’re looking for a pale and airy mixture.
- Once the butter and sugars are creamed, stir in the vanilla extract. Just a teaspoon will do, but it adds a lovely warmth to the cookies.
- Now, in a separate bowl, whisk together the all-purpose flour, unsweetened cocoa powder, and salt. This ensures that the cocoa powder is evenly distributed throughout the flour, preventing any bitter clumps in your cookies.
- Gradually add the dry ingredients to the wet ingredients, mixing on low speed (or by hand) until just combined. Be careful not to overmix! Overmixing develops the gluten in the flour, which can result in tough cookies. We want these to be melt-in-your-mouth tender. Stop mixing as soon as the flour is incorporated. It’s okay if there are a few streaks of flour remaining.
- If you’re adding chocolate chips or chunks, now’s the time! Gently fold them into the dough until they’re evenly distributed.
- Divide the dough in half. This makes it easier to handle and roll out. Place each half on a sheet of plastic wrap.
- Shape each half into a disc about 1 inch thick. Flattening them into discs helps them chill more evenly and quickly.
- Wrap each disc tightly in plastic wrap and refrigerate for at least 2 hours, or preferably overnight. This chilling time is essential! It allows the butter to solidify, which prevents the cookies from spreading too much in the oven. It also allows the flavors to meld together.
Rolling and Cutting the Cookies:
- Preheat your oven to 325°F (160°C). Line a baking sheet with parchment paper. Parchment paper is your best friend when baking cookies! It prevents them from sticking and makes cleanup a breeze.
- Remove one disc of dough from the refrigerator. Let it sit at room temperature for about 5-10 minutes to soften slightly. This will make it easier to roll out.
- On a lightly floured surface, roll out the dough to about ¼ inch thickness. Try to roll it out evenly so the cookies bake at the same rate.
- Use cookie cutters to cut out your desired shapes. You can use any shape you like! Circles, stars, hearts get creative!
- Carefully transfer the cut-out cookies to the prepared baking sheet, leaving about ½ inch space between each cookie.
- Gather the scraps of dough, re-roll them, and cut out more cookies. Repeat until all the dough is used.
- Repeat steps 2-6 with the second disc of dough.
Baking the Cookies:
- Bake the cookies for 12-15 minutes, or until the edges are lightly golden brown. Keep a close eye on them, as they can burn easily. The baking time will depend on the thickness of your cookies and your oven.
- Remove the baking sheet from the oven and let the cookies cool on the baking sheet for a few minutes before transferring them to a wire rack to cool completely. This prevents them from breaking while they’re still warm and soft.
Optional Decorations:
- Once the cookies are completely cool, you can decorate them as desired. Here are a few ideas:
- Dust them with powdered sugar.
- Drizzle them with melted chocolate.
- Dip them in melted chocolate and sprinkle with sprinkles.
- Make a simple glaze by mixing powdered sugar with a little milk or lemon juice and drizzle it over the cookies.
Storage:
Store the cooled cookies in an airtight container at room temperature for up to 5 days. They also freeze well for up to 2 months. Just make sure they’re completely cooled before freezing.
Tips for Perfect Chocolate Shortbread Cookies:
- Use high-quality cocoa powder: The quality of your cocoa powder will greatly impact the flavor of your cookies. Opt for a Dutch-processed cocoa powder for a richer, smoother flavor.
- Don’t overmix the dough: Overmixing develops the gluten in the flour, which can result in tough cookies. Mix until just combined.
- Chill the dough thoroughly: Chilling the dough is essential for preventing the cookies from spreading too much in the oven.
- Bake until lightly golden brown: The cookies are done when the edges are lightly golden brown. Be careful not to overbake them, as they will become dry.
- Let the cookies cool completely before decorating: This will prevent the decorations from melting or running.
Troubleshooting:
- Cookies are spreading too much: Make sure your butter is not too soft. Also, ensure you’ve chilled the dough for the recommended time. You can also try adding a tablespoon or two of flour to the dough.
- Cookies are too dry: Don’t overbake the cookies. Also, make sure you’re using the correct amount of butter and sugar.
- Cookies are tough: Don’t overmix the dough.
- Cookies are burning: Lower the oven temperature slightly and bake for a longer time.
Enjoy your delicious homemade Chocolate Shortbread Cookies! They’re perfect for holidays, special occasions, or just a simple treat.
Conclusion:
And there you have it! These Chocolate Shortbread Cookies are more than just a treat; they’re an experience. From the rich, buttery aroma that fills your kitchen to the satisfyingly crumbly texture that melts in your mouth, every aspect of this recipe is designed to delight. I truly believe this is a must-try recipe for any baker, whether you’re a seasoned pro or just starting out. The simplicity of the ingredients and the straightforward instructions make it incredibly accessible, while the decadent flavor profile ensures it’s a crowd-pleaser every single time.
Why is this recipe a must-try? Because it delivers maximum flavor with minimal effort. It’s the perfect solution when you need a quick and impressive dessert for a last-minute gathering, a thoughtful homemade gift, or simply a little something special to brighten your day. The deep chocolate notes, balanced by the subtle sweetness and the characteristic shortbread crumb, create a symphony of flavors and textures that will leave you wanting more. Plus, who can resist a cookie that looks as good as it tastes? These Chocolate Shortbread Cookies are undeniably beautiful, making them a standout addition to any cookie platter or dessert table.
But the fun doesn’t stop there! This recipe is incredibly versatile, offering endless opportunities for customization. For a festive touch, try adding a sprinkle of crushed peppermint candies before baking, especially around the holidays. If you’re a fan of nuts, incorporate chopped pecans or walnuts into the dough for added crunch and flavor. A drizzle of melted white chocolate after the cookies have cooled adds a touch of elegance and visual appeal. You could even sandwich two cookies together with a layer of chocolate ganache or raspberry jam for an extra-indulgent treat.
Serving suggestions? These cookies are perfect on their own with a glass of cold milk or a cup of hot coffee. They also pair beautifully with ice cream, making them an ideal dessert for warmer weather. For a more sophisticated presentation, arrange them on a tiered dessert stand alongside other sweet treats. And don’t forget to package them up in a pretty box or tin for a thoughtful homemade gift that’s sure to be appreciated.
I’m so excited for you to try this recipe and experience the magic of these Chocolate Shortbread Cookies for yourself. I’ve poured my heart into perfecting this recipe, and I’m confident that you’ll love it as much as I do. So, gather your ingredients, preheat your oven, and get ready to bake up a batch of pure deliciousness.
Once you’ve had a chance to try the recipe, I would absolutely love to hear about your experience! Did you make any variations? What did you think of the flavor and texture? Did you share them with friends and family? Please feel free to leave a comment below and share your thoughts and photos. Your feedback is invaluable, and it helps me continue to create and share recipes that you’ll love. Happy baking, and I can’t wait to hear from you! Let me know if you think these are the best Chocolate Shortbread Cookies you’ve ever tasted!
Chocolate Shortbread Cookies: The Ultimate Recipe & Baking Guide
Rich, buttery, melt-in-your-mouth chocolate shortbread cookies. Perfect for holidays, special occasions, or a simple treat!
Ingredients
- 1 cup (2 sticks) unsalted butter, softened
- ½ cup granulated sugar
- ¼ cup packed light brown sugar
- 1 teaspoon vanilla extract
- 2 cups all-purpose flour
- ½ cup unsweetened cocoa powder
- ¼ teaspoon salt
- Optional: ½ cup chocolate chips or chunks for extra chocolatey goodness
Instructions
- Ensure butter is softened but not melted.
- In a large bowl, cream together the softened butter, granulated sugar, and brown sugar until light and fluffy (3-5 minutes with an electric mixer).
- Stir in the vanilla extract.
- In a separate bowl, whisk together the all-purpose flour, unsweetened cocoa powder, and salt.
- Gradually add the dry ingredients to the wet ingredients, mixing on low speed (or by hand) until just combined. Be careful not to overmix.
- If adding chocolate chips or chunks, gently fold them into the dough.
- Divide the dough in half and place each half on a sheet of plastic wrap.
- Shape each half into a disc about 1 inch thick.
- Wrap each disc tightly in plastic wrap and refrigerate for at least 2 hours, or preferably overnight.
- Preheat oven to 325°F (160°C). Line a baking sheet with parchment paper.
- Remove one disc of dough from the refrigerator and let it sit at room temperature for about 5-10 minutes to soften slightly.
- On a lightly floured surface, roll out the dough to about ¼ inch thickness.
- Use cookie cutters to cut out your desired shapes.
- Carefully transfer the cut-out cookies to the prepared baking sheet, leaving about ½ inch space between each cookie.
- Gather the scraps of dough, re-roll them, and cut out more cookies. Repeat until all the dough is used.
- Repeat steps 2-6 with the second disc of dough.
- Bake the cookies for 12-15 minutes, or until the edges are lightly golden brown.
- Remove the baking sheet from the oven and let the cookies cool on the baking sheet for a few minutes before transferring them to a wire rack to cool completely.
- Once the cookies are completely cool, you can decorate them as desired. Here are a few ideas:
- Dust them with powdered sugar.
- Drizzle them with melted chocolate.
- Dip them in melted chocolate and sprinkle with sprinkles.
- Make a simple glaze by mixing powdered sugar with a little milk or lemon juice and drizzle it over the cookies.
- Store the cooled cookies in an airtight container at room temperature for up to 5 days. They also freeze well for up to 2 months. Just make sure they’re completely cooled before freezing.
Notes
- Use high-quality cocoa powder for a richer flavor. Dutch-processed is recommended.
- Don’t overmix the dough to avoid tough cookies.
- Chilling the dough is essential to prevent spreading.
- Bake until lightly golden brown; avoid overbaking.
- Let cookies cool completely before decorating.
Leave a Comment