
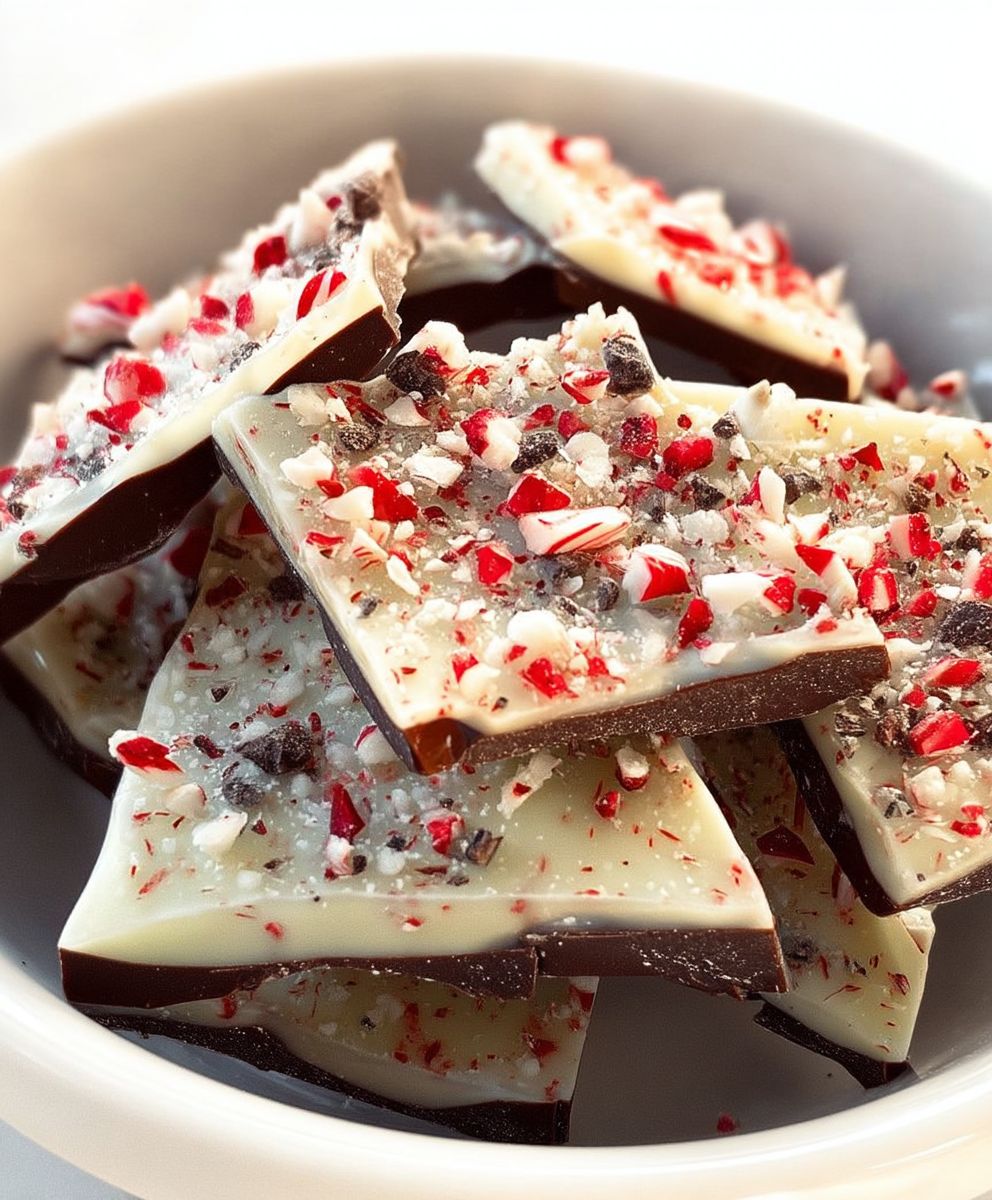
Chocolate Peppermint Bark: the quintessential holiday treat that’s as visually stunning as it is delicious! Are you ready to transform your kitchen into a winter wonderland of festive flavors? This isn’t just a recipe; it’s an invitation to create edible magic, a symphony of rich chocolate and invigorating peppermint that will have everyone reaching for seconds (and thirds!).
While its exact origins are shrouded in a bit of sweet mystery, Chocolate Peppermint Bark has become a modern classic, synonymous with holiday cheer. It evokes memories of cozy evenings by the fire, the scent of pine needles, and the joyful anticipation of the season. It’s a relatively recent addition to the holiday dessert repertoire, gaining immense popularity in the late 20th century, but its impact has been undeniable.
What makes this bark so irresistible? It’s the perfect balance of textures and tastes. The smooth, decadent layers of dark and white chocolate melt in your mouth, while the crunchy peppermint candy canes provide a delightful contrast and a burst of refreshing flavor. It’s incredibly easy to make, requiring no fancy equipment or advanced baking skills, making it a perfect project for both seasoned bakers and kitchen novices alike. Plus, it’s endlessly customizable! You can experiment with different types of chocolate, add nuts or other candies, or even create your own signature peppermint blend. Get ready to spread some holiday joy with this simple yet spectacular treat!

Ingredients:
- 1 pound high-quality dark chocolate, finely chopped
- 1 pound high-quality white chocolate, finely chopped
- 1/2 teaspoon peppermint extract
- 1/4 teaspoon pure vanilla extract
- 1 cup crushed peppermint candies (about 10-12 candy canes)
- 1 tablespoon vegetable oil or coconut oil (optional, for smoother melting)
- Pinch of sea salt (optional, to enhance flavor)
Preparing the Dark Chocolate Layer:
- Melt the Dark Chocolate: Place the finely chopped dark chocolate in a heat-safe bowl. I like to use a glass bowl set over a saucepan of simmering water (a double boiler). Make sure the bottom of the bowl doesn’t touch the water. This gentle heat will prevent the chocolate from burning. Alternatively, you can melt the chocolate in the microwave in 30-second intervals, stirring well after each interval, until smooth. If you’re using oil, add it now to help with the melting process and create a smoother texture.
- Check the Temperature: Use a candy thermometer to ensure the dark chocolate reaches a temperature between 88-90°F (31-32°C). This is crucial for tempering the chocolate, which will give it a nice shine and snap. If you don’t have a thermometer, just make sure the chocolate is completely melted and smooth, without any lumps.
- Add Vanilla Extract: Once the dark chocolate is melted and smooth, remove it from the heat and stir in the vanilla extract. This will enhance the chocolate flavor and add a subtle warmth.
- Pour and Spread: Line a 12×17 inch baking sheet with parchment paper or a silicone baking mat. Pour the melted dark chocolate onto the prepared baking sheet. Use an offset spatula or a large spoon to spread the chocolate evenly into a thin layer, about 1/8 inch thick. Make sure the chocolate reaches all the edges of the baking sheet for a neat and professional look.
- Chill the Dark Chocolate Layer: Place the baking sheet in the refrigerator for about 20-30 minutes, or until the dark chocolate layer is firm but not completely hard. You want it to be solid enough to support the white chocolate layer without the two layers mixing.
Preparing the White Chocolate Layer:
- Melt the White Chocolate: While the dark chocolate layer is chilling, prepare the white chocolate. Place the finely chopped white chocolate in a clean, heat-safe bowl set over a saucepan of simmering water (double boiler), ensuring the bowl doesn’t touch the water. Alternatively, melt it in the microwave in 30-second intervals, stirring well after each interval, until smooth. White chocolate is more prone to burning than dark chocolate, so be extra careful and use low heat. If you’re using oil, add it now.
- Check the Temperature: Use a candy thermometer to ensure the white chocolate reaches a temperature between 86-88°F (30-31°C). Again, this is important for tempering the chocolate. If you don’t have a thermometer, make sure the chocolate is completely melted and smooth, without any lumps.
- Add Peppermint Extract: Once the white chocolate is melted and smooth, remove it from the heat and stir in the peppermint extract. Be careful not to add too much, as peppermint extract can be quite strong. Start with 1/2 teaspoon and add more to taste, if desired.
- Pour and Spread: Remove the baking sheet from the refrigerator. The dark chocolate layer should be firm but not rock solid. Pour the melted white chocolate over the chilled dark chocolate layer. Use an offset spatula or a large spoon to spread the white chocolate evenly into a thin layer, covering the dark chocolate completely.
Adding the Peppermint Candy Topping:
- Sprinkle with Crushed Peppermint: Immediately after spreading the white chocolate, sprinkle the crushed peppermint candies evenly over the top. Gently press the peppermint candies into the white chocolate to ensure they adhere well. This will prevent them from falling off when you break the bark.
- Add Sea Salt (Optional): If you’re using sea salt, sprinkle a pinch of it over the peppermint candies. The salt will enhance the sweetness of the chocolate and the coolness of the peppermint, creating a delicious flavor contrast.
Chilling and Breaking the Bark:
- Chill the Bark: Place the baking sheet back in the refrigerator for at least 1-2 hours, or until the bark is completely firm and set. You can also place it in the freezer for about 30 minutes to speed up the process.
- Break the Bark: Once the bark is completely firm, remove it from the refrigerator. Lift the parchment paper or silicone baking mat from the baking sheet. Place the bark on a cutting board. Use a large knife or your hands to break the bark into irregular pieces. Don’t worry about making them perfect; the rustic, uneven shapes are part of the charm of peppermint bark.
- Store the Bark: Store the peppermint bark in an airtight container in a cool, dry place. It will keep for several weeks, but it’s so delicious, it probably won’t last that long! You can also store it in the refrigerator for longer storage, but be aware that the chocolate may develop a slight bloom (a white coating) due to the temperature change. This doesn’t affect the taste, but it can affect the appearance.
Tips and Variations:
- Use High-Quality Chocolate: The quality of the chocolate will greatly affect the taste of the bark. I recommend using high-quality dark and white chocolate for the best results. Look for chocolate with a high cocoa butter content for a smoother, richer flavor.
- Adjust the Peppermint Flavor: If you prefer a stronger peppermint flavor, you can add more peppermint extract to the white chocolate. You can also use peppermint oil instead of extract, but be very careful, as peppermint oil is much more concentrated. Start with just a drop or two and add more to taste.
- Add Other Toppings: Get creative with your toppings! You can add chopped nuts, pretzels, sprinkles, or even dried fruit to the bark. Just make sure to add them while the white chocolate is still wet so they adhere properly.
- Make it Vegan: To make vegan peppermint bark, use vegan dark and white chocolate. You can find vegan chocolate at most health food stores or online.
- Troubleshooting: If your chocolate seizes (becomes thick and grainy) while melting, try adding a teaspoon of vegetable oil or shortening. This can help to smooth it out. If your white chocolate is too thick to spread, you can add a teaspoon of milk or cream to thin it out.
- Candy Cane Prep: For the crushed candy canes, I find it easiest to unwrap them and place them in a zip-top bag. Then, use a rolling pin or meat mallet to crush them into small pieces. You can also use a food processor, but be careful not to over-process them into a powder. You want some texture.
- Tempering Chocolate (Optional but Recommended): Tempering chocolate gives it a glossy shine and a satisfying snap. While not strictly necessary for peppermint bark, it elevates the final product. To temper, melt the chocolate as described above, then cool it slightly before spreading. The specific temperatures vary depending on the type of chocolate, so consult a tempering guide for best results.
- Serving Suggestions: Peppermint bark makes a wonderful holiday gift. Package it in cellophane bags or decorative tins. It’s also a great addition to a holiday dessert platter. Serve it with coffee, tea, or hot chocolate for a festive treat.
Conclusion:
This Chocolate Peppermint Bark recipe isn’t just another holiday treat; it’s a symphony of textures and flavors that will have everyone reaching for seconds (and thirds!). The rich, dark chocolate, the creamy white chocolate, and the invigorating crunch of peppermint come together in perfect harmony, creating a truly irresistible experience. I promise, once you taste it, you’ll understand why this has become a staple in my own holiday baking repertoire.
But what truly elevates this bark beyond the ordinary is its simplicity. It requires minimal ingredients, no fancy equipment, and comes together in under an hour. That’s right, you can whip up a batch of this decadent delight even on the busiest of days! And the best part? It’s incredibly versatile.
Looking for serving suggestions? This Chocolate Peppermint Bark is fantastic on its own, of course, but it also shines as a delightful addition to a holiday dessert platter. Crumble it over ice cream for an extra festive sundae, or use it as a garnish for your favorite hot chocolate. You can even package it up in cute little tins and give it as a homemade gift trust me, it will be greatly appreciated!
Now, if you’re feeling adventurous, there are plenty of ways to put your own spin on this classic recipe. For a richer, more intense chocolate flavor, use a higher percentage of cacao in your dark chocolate. If you prefer a sweeter bark, opt for milk chocolate instead. You could also experiment with different types of peppermint candies crushed candy canes, peppermint swirls, or even peppermint patties would all work beautifully.
Want to add a little extra flair? Try sprinkling some chopped nuts, like pecans or walnuts, over the white chocolate layer before it sets. Or, for a truly decadent treat, drizzle a little melted caramel over the finished bark. The possibilities are endless!
I’ve poured my heart into perfecting this recipe, and I’m confident that you’ll love it as much as I do. It’s the perfect blend of festive flavors, easy preparation, and impressive presentation. Its a guaranteed crowd-pleaser, and I can already picture the smiles on your loved ones’ faces as they savor each bite.
So, what are you waiting for? Gather your ingredients, preheat your oven (just kidding, no oven needed!), and get ready to create some holiday magic. I truly believe that this Chocolate Peppermint Bark will become a cherished tradition in your own home.
I’m so excited for you to try this recipe! And I would absolutely love to hear about your experience. Did you make any variations? Did you serve it at a holiday party? Did your family devour it in minutes? Please, share your photos and stories in the comments below. I can’t wait to see what you create! Happy baking, and happy holidays! Let me know if you have any questions, and I’ll do my best to help. Enjoy!
Chocolate Peppermint Bark: The Ultimate Holiday Recipe
Festive homemade peppermint bark with dark and white chocolate layers, topped with crushed peppermint candies. Perfect for holiday gifting!
Ingredients
- 1 pound high-quality dark chocolate, finely chopped
- 1 pound high-quality white chocolate, finely chopped
- 1/2 teaspoon peppermint extract
- 1/4 teaspoon pure vanilla extract
- 1 cup crushed peppermint candies (about 10-12 candy canes)
- 1 tablespoon vegetable oil or coconut oil (optional, for smoother melting)
- Pinch of sea salt (optional, to enhance flavor)
Instructions
- Place the finely chopped dark chocolate in a heat-safe bowl set over a saucepan of simmering water (double boiler). Ensure the bottom of the bowl doesn’t touch the water. Alternatively, melt in the microwave in 30-second intervals, stirring well after each interval, until smooth. If using oil, add it now.
- Use a candy thermometer to ensure the dark chocolate reaches a temperature between 88-90°F (31-32°C).
- Remove from heat and stir in the vanilla extract.
- Line a 12×17 inch baking sheet with parchment paper or a silicone baking mat. Pour the melted dark chocolate onto the prepared baking sheet. Use an offset spatula or a large spoon to spread the chocolate evenly into a thin layer, about 1/8 inch thick.
- Place the baking sheet in the refrigerator for about 20-30 minutes, or until the dark chocolate layer is firm but not completely hard.
- Place the finely chopped white chocolate in a clean, heat-safe bowl set over a saucepan of simmering water (double boiler), ensuring the bowl doesn’t touch the water. Alternatively, melt it in the microwave in 30-second intervals, stirring well after each interval, until smooth. If using oil, add it now.
- Use a candy thermometer to ensure the white chocolate reaches a temperature between 86-88°F (30-31°C).
- Remove from the heat and stir in the peppermint extract.
- Remove the baking sheet from the refrigerator. Pour the melted white chocolate over the chilled dark chocolate layer. Use an offset spatula or a large spoon to spread the white chocolate evenly into a thin layer, covering the dark chocolate completely.
- Immediately after spreading the white chocolate, sprinkle the crushed peppermint candies evenly over the top. Gently press the peppermint candies into the white chocolate to ensure they adhere well.
- If you’re using sea salt, sprinkle a pinch of it over the peppermint candies.
- Place the baking sheet back in the refrigerator for at least 1-2 hours, or until the bark is completely firm and set. You can also place it in the freezer for about 30 minutes to speed up the process.
- Once the bark is completely firm, remove it from the refrigerator. Lift the parchment paper or silicone baking mat from the baking sheet. Place the bark on a cutting board. Use a large knife or your hands to break the bark into irregular pieces.
- Store the peppermint bark in an airtight container in a cool, dry place.
Notes
- Use high-quality chocolate for the best flavor.
- Adjust the peppermint extract to your taste preference.
- Tempering the chocolate is optional but recommended for a glossy shine and satisfying snap.
- Get creative with toppings! Add chopped nuts, pretzels, or dried fruit.
- For vegan peppermint bark, use vegan dark and white chocolate.
- If your chocolate seizes, try adding a teaspoon of vegetable oil or shortening.
- If your white chocolate is too thick, add a teaspoon of milk or cream.
- Crush candy canes in a zip-top bag with a rolling pin or meat mallet.
- Peppermint bark makes a wonderful holiday gift. Package it in cellophane bags or decorative tins. Serve it with coffee, tea, or hot chocolate for a festive treat.
Leave a Comment