
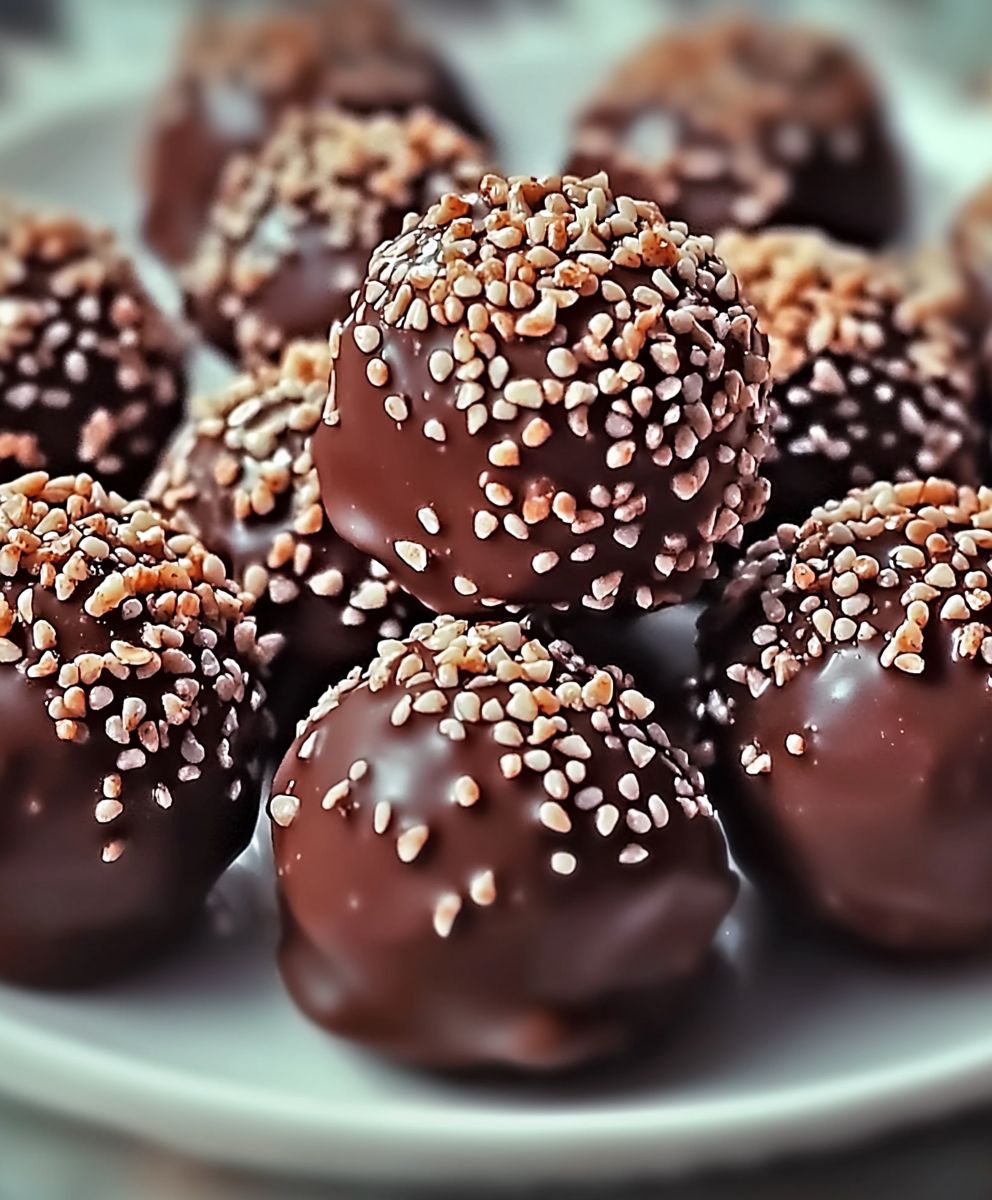
Chocolate Kahlua Truffles, need I say more? These decadent little bites are the perfect indulgence, a sophisticated treat that’s surprisingly easy to make. Imagine sinking your teeth into a velvety smooth, intensely chocolatey center, infused with the rich, coffee-kissed notes of Kahlua. It’s a flavor explosion that will leave you craving more!
While the exact origins of the truffle are debated, these luxurious confections gained popularity in France in the early 20th century. They were named after the prized fungus due to their similar appearance. Our version, the Chocolate Kahlua Truffles, adds a modern twist to this classic treat, incorporating the beloved coffee liqueur for an extra layer of flavor and warmth.
People adore these truffles for several reasons. First, the taste is simply divine the combination of dark chocolate and Kahlua is a match made in heaven. Second, the texture is incredibly smooth and melt-in-your-mouth. Finally, despite their elegant appearance, these truffles are surprisingly simple to prepare. They’re perfect for gifting, serving at parties, or simply enjoying as a personal indulgence. So, let’s get started and create these irresistible treats!

Ingredients:
- 16 ounces bittersweet chocolate, finely chopped (at least 70% cacao)
- 1 cup heavy cream
- 4 tablespoons (1/2 stick) unsalted butter, cut into small pieces
- 1/4 cup Kahlua coffee liqueur
- 1 teaspoon vanilla extract
- Pinch of sea salt
- Optional coatings: unsweetened cocoa powder, finely chopped nuts (almonds, pecans, walnuts), powdered sugar, sprinkles, melted chocolate
Preparing the Chocolate Ganache:
This is the heart of our truffles, so let’s take our time and do it right! A smooth, rich ganache is key to that melt-in-your-mouth experience.
- Chop the Chocolate: Finely chop the bittersweet chocolate. This is crucial for even melting. If the pieces are too large, they won’t melt properly, and you’ll end up with a grainy ganache. I like to use a serrated knife for this, as it helps to create smaller, more uniform pieces. Place the chopped chocolate in a heatproof bowl. Make sure the bowl is completely dry! Any water will seize the chocolate.
- Heat the Cream: In a small saucepan, heat the heavy cream over medium heat. Watch it carefully! You want it to just come to a simmer small bubbles forming around the edges. Do NOT let it boil. Boiling the cream can change its texture and affect the final ganache.
- Pour Over Chocolate: Once the cream is simmering, immediately pour it over the chopped chocolate in the bowl. Let it sit for about a minute. This allows the heat from the cream to start melting the chocolate. Don’t stir it yet!
- Whisk Until Smooth: After a minute, gently whisk the cream and chocolate together, starting from the center and working your way outwards. Be patient! It might take a few minutes for the chocolate to fully melt and incorporate into the cream. Continue whisking until the ganache is smooth, glossy, and completely homogenous. If you have any stubborn chocolate pieces that refuse to melt, you can place the bowl over a double boiler (a saucepan with simmering water, making sure the bottom of the bowl doesn’t touch the water) and gently stir until melted.
- Add Butter, Kahlua, Vanilla, and Salt: Add the butter, Kahlua, vanilla extract, and a pinch of sea salt to the ganache. The butter adds richness and shine, the Kahlua provides that delicious coffee flavor, the vanilla enhances the chocolate, and the salt balances the sweetness. Whisk everything together until the butter is completely melted and incorporated, and the ganache is smooth and emulsified.
- Chill the Ganache: Cover the bowl with plastic wrap, pressing it directly onto the surface of the ganache. This prevents a skin from forming. Refrigerate the ganache for at least 4 hours, or preferably overnight. This is essential for the ganache to firm up enough to be rolled into truffles. The longer it chills, the easier it will be to work with.
Forming the Truffles:
Now comes the fun part turning that chilled ganache into beautiful, bite-sized truffles!
- Prepare Your Workspace: Line a baking sheet with parchment paper or a silicone baking mat. This will prevent the truffles from sticking. Also, prepare your chosen coatings (cocoa powder, chopped nuts, powdered sugar, etc.) in separate shallow bowls.
- Scoop the Ganache: Once the ganache is firm, use a small cookie scoop or a spoon to scoop out portions of the ganache. I find that a small cookie scoop (about 1 tablespoon) works best for creating uniform truffles.
- Roll into Balls: Gently roll each scoop of ganache between your palms to form a smooth ball. Don’t worry if they’re not perfectly round a little rustic charm is perfectly fine! If the ganache is too soft and sticky, you can chill it for another 30 minutes. You can also lightly dust your hands with cocoa powder or powdered sugar to prevent sticking.
- Place on Baking Sheet: Place the rolled truffles onto the prepared baking sheet.
- Chill Again (Optional): For easier coating, you can chill the formed truffles in the refrigerator for another 30 minutes. This will help them firm up even more.
Coating the Truffles:
This is where you can get creative and customize your truffles to your liking! Choose your favorite coatings or try a variety for a beautiful assortment.
- Roll in Coating: One at a time, gently roll each truffle in your chosen coating, ensuring it’s evenly covered. For cocoa powder, I like to use a fine-mesh sieve to dust the truffles. For chopped nuts, gently press the truffles into the nuts to help them adhere.
- Remove Excess Coating: Gently tap off any excess coating. This will prevent the truffles from looking messy.
- Place Back on Baking Sheet: Place the coated truffles back onto the prepared baking sheet.
- Repeat: Repeat the coating process with the remaining truffles and coatings.
Melting Chocolate for Coating (Optional):
If you’re opting for a melted chocolate coating, here’s how to do it:
- Melt the Chocolate: Melt the chocolate using a double boiler or in the microwave. For a double boiler, place a heatproof bowl over a saucepan of simmering water (making sure the bottom of the bowl doesn’t touch the water). Stir the chocolate frequently until it’s completely melted and smooth. For the microwave, heat the chocolate in 30-second intervals, stirring in between, until melted. Be careful not to overheat the chocolate, as it can burn.
- Dip the Truffles: Use a fork or dipping tools to dip each truffle into the melted chocolate, ensuring it’s completely coated.
- Remove Excess Chocolate: Gently tap the fork or dipping tool against the side of the bowl to remove any excess chocolate.
- Place on Baking Sheet: Place the dipped truffles onto the prepared baking sheet.
- Add Sprinkles (Optional): If desired, sprinkle the dipped truffles with sprinkles before the chocolate sets.
- Chill to Set: Refrigerate the dipped truffles for about 15-20 minutes, or until the chocolate is set.
Final Touches and Storage:
Almost there! Just a few more steps to ensure your truffles are perfect.
- Chill the Truffles: Refrigerate the finished truffles for at least 30 minutes to allow the coatings to set completely. This will also help them maintain their shape.
- Serve: Serve the truffles chilled or at room temperature. They’re delicious either way!
- Store: Store the truffles in an airtight container in the refrigerator for up to 2 weeks. They can also be frozen for up to 2 months. If freezing, thaw them in the refrigerator overnight before serving.
Conclusion:
And there you have it! These Chocolate Kahlua Truffles are more than just a dessert; they’re an experience. The rich, dark chocolate, the smooth, creamy texture, and that unmistakable Kahlua kick it all comes together to create a truly unforgettable treat. If you’re looking for a show-stopping dessert to impress your guests, a decadent treat to indulge in yourself, or a unique homemade gift that will be truly appreciated, then look no further. This recipe is a guaranteed winner.
Why is this a must-try? Because it’s surprisingly simple to make, yet delivers a level of sophistication and flavor that rivals anything you’d find in a high-end chocolate shop. The combination of high-quality chocolate and the coffee-infused liqueur creates a symphony of flavors that will dance on your palate. Plus, the process of making them is actually quite therapeutic a little bit of mindful chocolate rolling can be incredibly relaxing!
But the best part? The versatility! While the recipe as written is absolutely divine, there’s plenty of room for experimentation. For a slightly different flavor profile, try using a different type of liqueur. Baileys Irish Cream would add a lovely creamy, vanilla note, while Frangelico would impart a hazelnutty warmth. You could even use a spiced rum for a more adventurous flavor.
Serving suggestions are endless. These truffles are perfect on their own, enjoyed with a cup of strong coffee or a glass of dessert wine. They also make a stunning addition to a dessert platter, alongside fresh berries, whipped cream, and other sweet treats. For a truly decadent experience, try serving them with a scoop of vanilla bean ice cream and a drizzle of chocolate sauce.
And don’t forget the toppings! While the cocoa powder provides a classic finish, you can get creative with your decorations. Try rolling them in chopped nuts (almonds, hazelnuts, or pecans would be delicious), shredded coconut, sprinkles, or even edible glitter for a touch of sparkle. You could also drizzle them with melted white chocolate or dark chocolate for an extra layer of indulgence.
I truly believe that everyone should experience the joy of making and tasting these Chocolate Kahlua Truffles at least once. They’re the perfect embodiment of indulgence, sophistication, and homemade goodness.
So, what are you waiting for? Gather your ingredients, put on some music, and get ready to embark on a chocolate-making adventure! I’m confident that you’ll be thrilled with the results.
And most importantly, I want to hear about your experience! Did you try any variations? Did you have any challenges? What did your friends and family think? Please, share your thoughts and photos in the comments below. I’m always eager to learn from your experiences and see your creative twists on this classic recipe. Happy truffle-making! I can’t wait to hear all about your delicious creations and how you made these Chocolate Kahlua Truffles your own. Let the chocolatey goodness begin!
Chocolate Kahlua Truffles: Decadent Recipe & Easy Instructions
Rich, decadent chocolate truffles infused with Kahlua coffee liqueur. Melt-in-your-mouth treats perfect for gifting or indulging. Coat in cocoa, nuts, or chocolate for a beautiful presentation.
Ingredients
- 16 ounces bittersweet chocolate, finely chopped (at least 70% cacao)
- 1 cup heavy cream
- 4 tablespoons (1/2 stick) unsalted butter, cut into small pieces
- 1/4 cup Kahlua coffee liqueur
- 1 teaspoon vanilla extract
- Pinch of sea salt
- Optional coatings: unsweetened cocoa powder, finely chopped nuts (almonds, pecans, walnuts), powdered sugar, sprinkles, melted chocolate
Instructions
- Prepare the Chocolate Ganache: Finely chop the bittersweet chocolate and place it in a heatproof bowl.
- In a small saucepan, heat the heavy cream over medium heat until it just comes to a simmer (small bubbles forming around the edges). Do NOT let it boil.
- Immediately pour the hot cream over the chopped chocolate. Let it sit for 1 minute.
- Gently whisk the cream and chocolate together, starting from the center and working outwards, until the ganache is smooth, glossy, and completely homogenous. If needed, place the bowl over a double boiler to melt any stubborn chocolate pieces.
- Add the butter, Kahlua, vanilla extract, and a pinch of sea salt to the ganache. Whisk until the butter is completely melted and incorporated.
- Cover the bowl with plastic wrap, pressing it directly onto the surface of the ganache. Refrigerate for at least 4 hours, or preferably overnight.
- Forming the Truffles: Line a baking sheet with parchment paper or a silicone baking mat. Prepare your chosen coatings in separate shallow bowls.
- Use a small cookie scoop or a spoon to scoop out portions of the ganache.
- Gently roll each scoop of ganache between your palms to form a smooth ball. If the ganache is too soft and sticky, chill it for another 30 minutes. You can also lightly dust your hands with cocoa powder or powdered sugar to prevent sticking.
- Place the rolled truffles onto the prepared baking sheet.
- Chill Again (Optional): For easier coating, you can chill the formed truffles in the refrigerator for another 30 minutes. This will help them firm up even more.
- Coating the Truffles: One at a time, gently roll each truffle in your chosen coating, ensuring it’s evenly covered. For cocoa powder, I like to use a fine-mesh sieve to dust the truffles. For chopped nuts, gently press the truffles into the nuts to help them adhere.
- Gently tap off any excess coating.
- Place the coated truffles back onto the prepared baking sheet.
- Repeat the coating process with the remaining truffles and coatings.
- Melting Chocolate for Coating (Optional): Melt the chocolate using a double boiler or in the microwave. For a double boiler, place a heatproof bowl over a saucepan of simmering water (making sure the bottom of the bowl doesn’t touch the water). Stir the chocolate frequently until it’s completely melted and smooth. For the microwave, heat the chocolate in 30-second intervals, stirring in between, until melted. Be careful not to overheat the chocolate, as it can burn.
- Use a fork or dipping tools to dip each truffle into the melted chocolate, ensuring it’s completely coated.
- Gently tap the fork or dipping tool against the side of the bowl to remove any excess chocolate.
- Place the dipped truffles onto the prepared baking sheet.
- If desired, sprinkle the dipped truffles with sprinkles before the chocolate sets.
- Refrigerate the dipped truffles for about 15-20 minutes, or until the chocolate is set.
- Final Touches and Storage: Refrigerate the finished truffles for at least 30 minutes to allow the coatings to set completely.
- Serve chilled or at room temperature.
- Store in an airtight container in the refrigerator for up to 2 weeks. They can also be frozen for up to 2 months. If freezing, thaw them in the refrigerator overnight before serving.
Notes
- Finely chopping the chocolate is crucial for even melting.
- Make sure the bowl used for melting the chocolate is completely dry. Any water will seize the chocolate.
- Do not let the cream boil. Boiling the cream can change its texture and affect the final ganache.
- Press the plastic wrap directly onto the surface of the ganache to prevent a skin from forming.
- If the ganache is too soft and sticky to roll, chill it for another 30 minutes.
- Lightly dust your hands with cocoa powder or powdered sugar to prevent sticking when rolling the truffles.
- Get creative with your coatings! Try a variety for a beautiful assortment.
- Be careful not to overheat the chocolate when melting it for coating, as it can burn.

Leave a Comment