
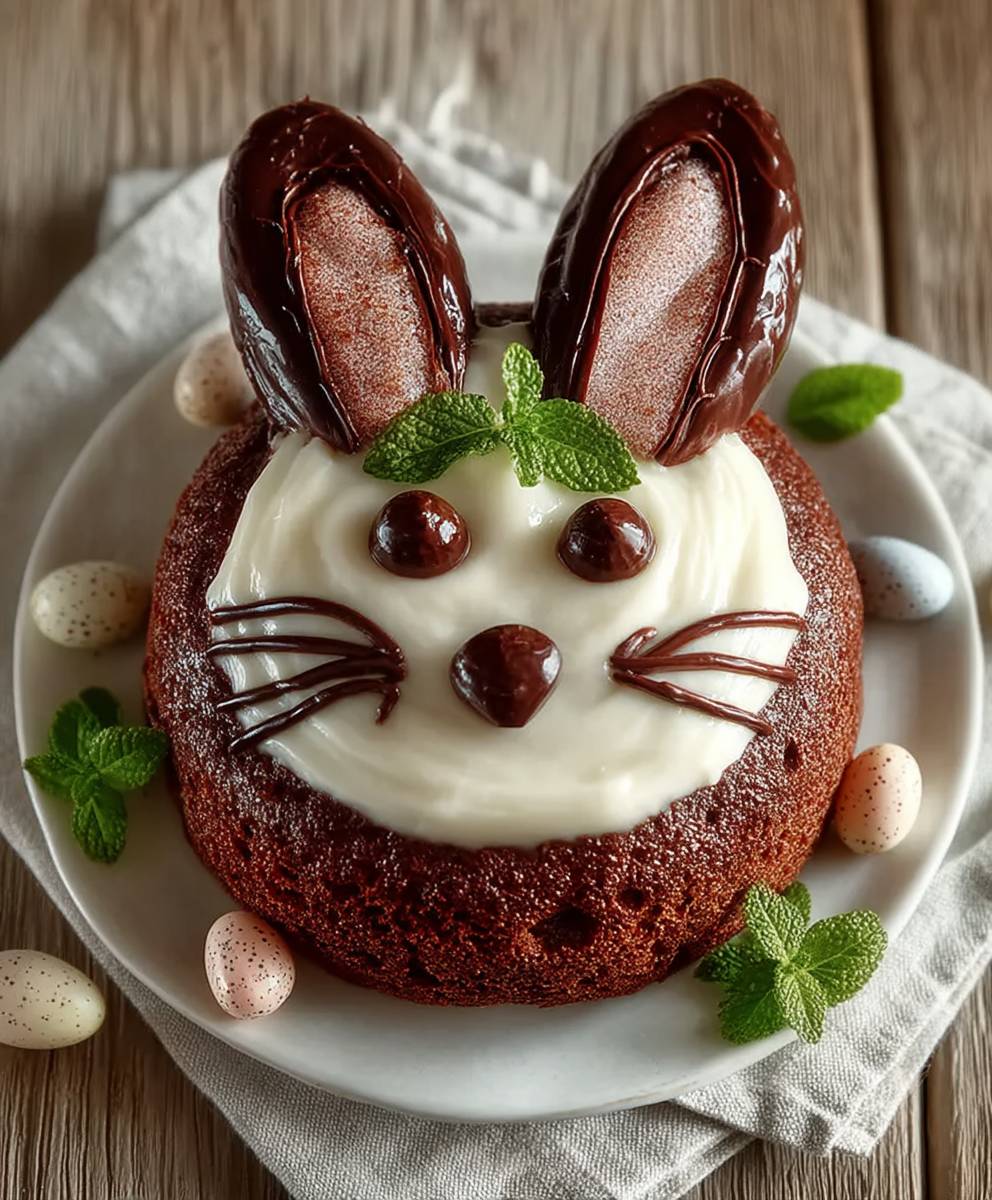
Chocolate Bunny Cake: Is there anything that screams Easter quite like a delightful, chocolatey bunny? This isn’t just any bunny; it’s a show-stopping cake that will be the centerpiece of your Easter celebration! Forget the store-bought sweets this year and prepare to wow your family and friends with a homemade masterpiece that’s surprisingly simple to create.
The tradition of Easter bunny-shaped treats has roots stretching back to Germanic folklore, where the Easter Hare was believed to lay eggs. Over time, this mythical creature evolved into the beloved Easter Bunny we know today, bringing joy and sweet surprises to children (and adults!) everywhere. What better way to honor this tradition than with a delectable Chocolate Bunny Cake?
People adore this cake for so many reasons. First, the rich, moist chocolate flavor is undeniably irresistible. Second, the novelty of the bunny shape adds a playful touch that’s perfect for the holiday. And finally, while it looks impressive, this cake is actually quite easy to make, even for beginner bakers. The combination of delicious taste, charming presentation, and manageable preparation makes this Chocolate Bunny Cake a guaranteed crowd-pleaser. So, let’s hop to it and bake up some Easter magic!

Ingredients:
- For the Chocolate Cake:
- 2 cups all-purpose flour
- 2 cups granulated sugar
- ¾ cup unsweetened cocoa powder
- 1 ½ teaspoons baking powder
- 1 ½ teaspoons baking soda
- 1 teaspoon salt
- 1 cup buttermilk
- ½ cup vegetable oil
- 2 large eggs
- 2 teaspoons vanilla extract
- 1 cup boiling water
- For the Chocolate Buttercream Frosting:
- 1 cup (2 sticks) unsalted butter, softened
- 3 cups powdered sugar
- ¾ cup unsweetened cocoa powder
- ½ cup heavy cream
- 1 teaspoon vanilla extract
- Pinch of salt
- For the Bunny Decoration:
- 1 large chocolate bunny (hollow or solid, depending on preference)
- Assorted pastel sprinkles
- Mini chocolate eggs (optional)
- Shredded coconut, tinted green (optional, for grass)
- Pink fondant or marzipan (for bunny ears and nose)
- Black gel icing (for bunny eyes and whiskers)
Preparing the Chocolate Cake:
- Preheat and Prepare: First things first, preheat your oven to 350°F (175°C). Grease and flour two 9-inch round cake pans. This is crucial to prevent the cake from sticking! You can also line the bottoms with parchment paper circles for extra insurance.
- Combine Dry Ingredients: In a large bowl, whisk together the flour, sugar, cocoa powder, baking powder, baking soda, and salt. Make sure everything is evenly distributed. This ensures a consistent texture and rise.
- Combine Wet Ingredients: In a separate bowl, whisk together the buttermilk, oil, eggs, and vanilla extract. Don’t overmix at this stage; just ensure everything is well combined.
- Combine Wet and Dry: Gradually add the wet ingredients to the dry ingredients, mixing on low speed until just combined. Be careful not to overmix, as this can lead to a tough cake.
- Add Boiling Water: Slowly pour in the boiling water while mixing on low speed. The batter will be thin, but don’t worry, that’s perfectly normal! The hot water helps to bloom the cocoa powder and creates a moist cake.
- Divide and Bake: Divide the batter evenly between the prepared cake pans. Bake for 30-35 minutes, or until a toothpick inserted into the center comes out clean.
- Cool Completely: Let the cakes cool in the pans for 10 minutes before inverting them onto a wire rack to cool completely. This prevents them from sticking and allows them to cool evenly. Make sure the cakes are completely cool before frosting!
Making the Chocolate Buttercream Frosting:
- Cream the Butter: In a large bowl (or the bowl of a stand mixer), beat the softened butter on medium speed until light and fluffy. This usually takes about 3-5 minutes.
- Add Powdered Sugar and Cocoa: Gradually add the powdered sugar and cocoa powder, beating on low speed until combined. Be careful not to add it all at once, or you’ll end up with a cloud of powdered sugar!
- Add Heavy Cream and Vanilla: Add the heavy cream, vanilla extract, and salt. Beat on medium speed until the frosting is smooth and creamy. If the frosting is too thick, add a little more heavy cream, one tablespoon at a time, until you reach the desired consistency. If it’s too thin, add a little more powdered sugar.
- Whip for Fluffiness: Continue to beat the frosting for another 2-3 minutes until it’s light and fluffy. This incorporates air into the frosting, making it easier to spread.
Assembling the Chocolate Bunny Cake:
- Level the Cakes (Optional): If your cakes have a dome, use a serrated knife to level them. This will make it easier to stack and frost them evenly.
- Frost the First Layer: Place one cake layer on a serving plate or cake stand. Spread a generous layer of chocolate buttercream frosting evenly over the top.
- Add the Second Layer: Carefully place the second cake layer on top of the frosting.
- Crumb Coat: Apply a thin layer of frosting over the entire cake. This is called a crumb coat, and it helps to seal in any loose crumbs. Refrigerate the cake for 15-20 minutes to allow the crumb coat to set. This step is crucial for a smooth final frosting layer.
- Final Frosting: Apply a final, thicker layer of chocolate buttercream frosting over the entire cake. Use an offset spatula or knife to create a smooth and even surface. You can also create swirls or other decorative patterns with the frosting.
- Prepare the Chocolate Bunny: Carefully unwrap your chocolate bunny. If it’s a solid bunny, you can place it directly on top of the cake. If it’s a hollow bunny, you might want to fill it with mini chocolate eggs or other candies for a fun surprise!
- Position the Bunny: Place the chocolate bunny in the center of the cake. You can position it standing upright or lying down, depending on your preference.
- Decorate with Sprinkles: Sprinkle the cake with assorted pastel sprinkles. Get creative with your sprinkle placement! You can create a border around the base of the cake or sprinkle them randomly over the entire surface.
- Add Optional Decorations: If you’re using shredded coconut for grass, sprinkle it around the base of the bunny. Use pink fondant or marzipan to create bunny ears and a nose. Attach the ears to the bunny with a small amount of frosting. Use black gel icing to draw eyes and whiskers on the bunny.
- Chill and Serve: Refrigerate the cake for at least 30 minutes before serving. This allows the frosting to set and the flavors to meld together.
Tips and Tricks for the Perfect Chocolate Bunny Cake:
- Use Room Temperature Ingredients: Using room temperature ingredients, especially butter and eggs, helps to create a smoother batter and a more tender cake.
- Don’t Overmix the Batter: Overmixing the batter can develop the gluten in the flour, resulting in a tough cake. Mix until just combined.
- Measure Accurately: Accurate measurements are crucial for baking success. Use measuring cups and spoons specifically designed for baking.
- Cool Cakes Completely: Make sure the cakes are completely cool before frosting. Otherwise, the frosting will melt and slide off.
- Chill the Cake: Chilling the cake before serving allows the frosting to set and the flavors to meld together.
- Get Creative with Decorations: Don’t be afraid to get creative with your decorations! Use different types of sprinkles, candies, or even fresh flowers to personalize your cake.
- Make Ahead: You can bake the cake layers and make the frosting a day or two in advance. Store the cake layers wrapped tightly in plastic wrap at room temperature. Store the frosting in an airtight container in the refrigerator. Bring the frosting to room temperature and re-whip it before using.
- Adjust Sweetness: If you prefer a less sweet frosting, reduce the amount of powdered sugar. You can also add a pinch of salt to balance the sweetness.
- Cocoa Powder Quality: The quality of your cocoa powder will affect the flavor of the cake and frosting. Use a high-quality unsweetened cocoa powder for the best results. Dutch-processed cocoa powder will give a darker, richer flavor.
- Buttermilk Substitute: If you don’t have buttermilk, you can make a substitute by adding 1 tablespoon of white vinegar or lemon juice to 1 cup of milk. Let it sit for 5 minutes before using.
Troubleshooting:
- Cake is Dry: Make sure you’re not overbaking the cake. Check for doneness with a toothpick. Also, ensure you’re using enough liquid in the batter.
- Cake is Dense: Overmixing the batter can lead to a dense cake. Also, make sure your baking powder and baking soda are fresh.
- Frosting is Too Thick: Add a little more heavy cream, one tablespoon at a time, until you reach the desired consistency.
- Frosting is Too Thin: Add a little more powdered sugar until you reach the desired consistency.
- Frosting is Grainy: Make sure your butter is softened but not melted. Also, sift the powdered sugar to remove any lumps.
Conclusion:
This Chocolate Bunny Cake isn’t just a dessert; it’s a centerpiece, a conversation starter, and a memory maker all rolled into one delicious, chocolatey package. I know, I know, it might seem a little daunting at first glance, but trust me, the “wow” factor you’ll get when you present this adorable bunny to your family and friends is absolutely worth the effort. From the rich, moist chocolate cake to the creamy, decadent frosting, every bite is an explosion of flavor that will have everyone hopping for joy!
But why is this recipe a must-try? Beyond the sheer cuteness, it’s about creating something special, something that goes beyond the ordinary store-bought cake. It’s about the joy of baking, the satisfaction of seeing your creation come to life, and the smiles it brings to those you share it with. Its about making memories, one delicious slice at a time. Plus, let’s be honest, who can resist a chocolate bunny?
And the best part? This recipe is incredibly versatile! Feel free to get creative with your decorations. Instead of the classic buttercream frosting, you could try a chocolate ganache for an extra-rich experience. Or, for a lighter touch, a whipped cream frosting would be equally delightful. Consider adding shredded coconut to the frosting for a “furry” effect, or use different colored sprinkles to personalize your bunny’s outfit. You could even add mini chocolate chips to the cake batter for an extra burst of chocolatey goodness.
Serving suggestions are endless! This Chocolate Bunny Cake is perfect for Easter, of course, but it’s also a fantastic choice for birthdays, spring celebrations, or any occasion that calls for a touch of whimsy and a whole lot of chocolate. Serve it with a scoop of vanilla ice cream, a dollop of whipped cream, or a side of fresh berries for a complete and utterly irresistible dessert. For the adults, a glass of chilled milk or a cup of strong coffee would be the perfect accompaniment.
Don’t be afraid to experiment and make this recipe your own. Baking is all about having fun and expressing your creativity. So, gather your ingredients, preheat your oven, and get ready to embark on a delicious adventure. I promise you, the end result will be a cake that’s not only visually stunning but also incredibly delicious.
I’m so excited for you to try this recipe and experience the joy of creating your own Chocolate Bunny Cake. Once you do, I would absolutely love to hear about your experience! Share your photos, your variations, and your tips in the comments below. Let’s create a community of bunny-baking enthusiasts! Did you add any special ingredients? Did you try a different frosting? Did you encounter any challenges along the way? Your feedback is invaluable and will help other bakers create their own perfect bunny cakes. So, go ahead, hop to it and let the baking begin! I can’t wait to see your creations!
Chocolate Bunny Cake: The Ultimate Easter Dessert Recipe
A moist and decadent chocolate cake decorated with a creamy chocolate buttercream frosting and a charming chocolate bunny centerpiece. Perfect for Easter or any special occasion!
Ingredients
- 2 cups all-purpose flour
- 2 cups granulated sugar
- ¾ cup unsweetened cocoa powder
- 1 ½ teaspoons baking powder
- 1 ½ teaspoons baking soda
- 1 teaspoon salt
- 1 cup buttermilk
- ½ cup vegetable oil
- 2 large eggs
- 2 teaspoons vanilla extract
- 1 cup boiling water
- 1 cup (2 sticks) unsalted butter, softened
- 3 cups powdered sugar
- ¾ cup unsweetened cocoa powder
- ½ cup heavy cream
- 1 teaspoon vanilla extract
- Pinch of salt
- 1 large chocolate bunny (hollow or solid, depending on preference)
- Assorted pastel sprinkles
- Mini chocolate eggs (optional)
- Shredded coconut, tinted green (optional, for grass)
- Pink fondant or marzipan (for bunny ears and nose)
- Black gel icing (for bunny eyes and whiskers)
Instructions
- Preheat oven to 350°F (175°C). Grease and flour two 9-inch round cake pans. Line the bottoms with parchment paper circles.
- In a large bowl, whisk together the flour, sugar, cocoa powder, baking powder, baking soda, and salt.
- In a separate bowl, whisk together the buttermilk, oil, eggs, and vanilla extract.
- Gradually add the wet ingredients to the dry ingredients, mixing on low speed until just combined.
- Slowly pour in the boiling water while mixing on low speed.
- Divide the batter evenly between the prepared cake pans. Bake for 30-35 minutes, or until a toothpick inserted into the center comes out clean.
- Let the cakes cool in the pans for 10 minutes before inverting them onto a wire rack to cool completely.
- In a large bowl (or the bowl of a stand mixer), beat the softened butter on medium speed until light and fluffy (3-5 minutes).
- Gradually add the powdered sugar and cocoa powder, beating on low speed until combined.
- Add the heavy cream, vanilla extract, and salt. Beat on medium speed until the frosting is smooth and creamy. Adjust cream or powdered sugar for desired consistency.
- Continue to beat the frosting for another 2-3 minutes until it’s light and fluffy.
- Level the cakes with a serrated knife if needed.
- Place one cake layer on a serving plate or cake stand. Spread a generous layer of chocolate buttercream frosting evenly over the top.
- Carefully place the second cake layer on top of the frosting.
- Apply a thin layer of frosting over the entire cake. Refrigerate the cake for 15-20 minutes to allow the crumb coat to set.
- Apply a final, thicker layer of chocolate buttercream frosting over the entire cake. Use an offset spatula or knife to create a smooth and even surface.
- Unwrap your chocolate bunny. Fill with mini chocolate eggs if hollow.
- Place the chocolate bunny in the center of the cake.
- Sprinkle the cake with assorted pastel sprinkles.
- Sprinkle shredded coconut around the base of the bunny (if using). Use pink fondant or marzipan to create bunny ears and a nose. Attach the ears to the bunny with a small amount of frosting. Use black gel icing to draw eyes and whiskers on the bunny.
- Refrigerate the cake for at least 30 minutes before serving.
Notes
- Use room temperature ingredients for best results.
- Don’t overmix the cake batter.
- Cool cakes completely before frosting.
- Chill the cake before serving.
- Get creative with decorations!
- Cake layers and frosting can be made a day or two in advance.
- Adjust sweetness of frosting to your preference.
- Use high-quality cocoa powder.
- Buttermilk substitute: 1 tbsp white vinegar or lemon juice + milk to equal 1 cup. Let sit 5 minutes.
- Troubleshooting tips provided for common baking issues.
Leave a Comment