
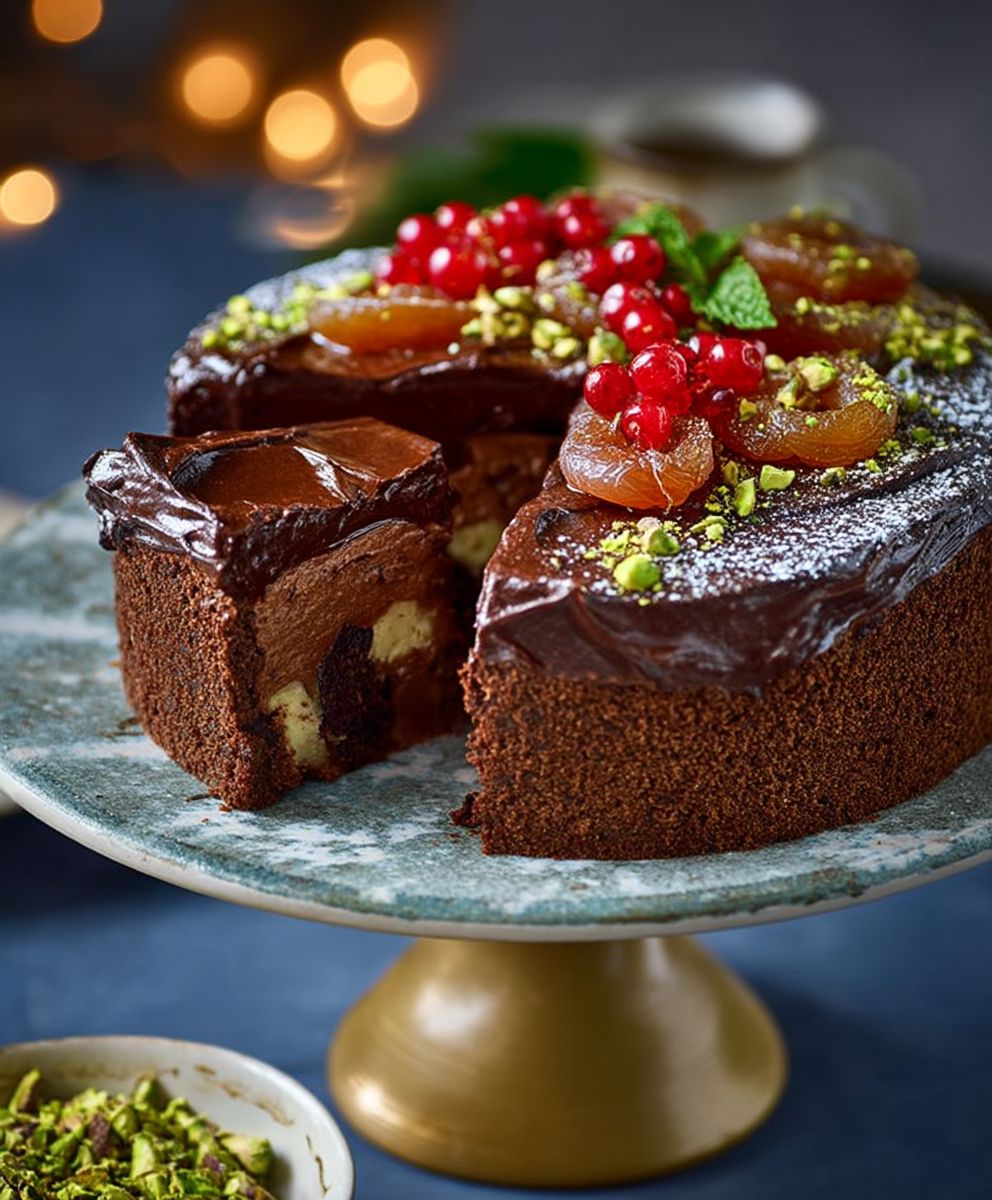
Chocolate biscuit cake fruits the name itself conjures images of decadent indulgence, doesn’t it? But this isn’t just any cake; it’s a no-bake masterpiece that’s surprisingly easy to create and guaranteed to impress. Forget slaving over a hot oven; this recipe is all about layering rich flavors and textures for a truly unforgettable treat.
This particular dessert has a fascinating history, rumored to be a favorite of the British Royal Family, particularly Prince William. It’s said to be his groom’s cake, a tradition that speaks to its comforting and celebratory nature. The beauty of chocolate biscuit cake fruits lies in its simplicity and adaptability. It’s a blank canvas for your creativity, allowing you to customize the fruit and chocolate to your liking.
People adore this cake for several reasons. First, the combination of crunchy biscuits, creamy chocolate, and chewy dried fruits is simply irresistible. The textures play off each other beautifully, creating a satisfying mouthfeel. Second, it’s incredibly convenient. No baking is required, making it perfect for those times when you need a show-stopping dessert without the fuss. Finally, it’s a crowd-pleaser. Whether you’re serving it at a birthday party, a holiday gathering, or simply enjoying it as an afternoon treat, this cake is sure to be a hit with everyone. So, let’s dive in and discover how to make this delightful confection!

Ingredients:
- For the Biscuit Base:
- 500g Rich Tea biscuits (or similar plain biscuits)
- 200g Unsalted Butter, melted
- 100g Caster Sugar
- 4 tbsp Cocoa Powder
- 4 tbsp Milk
- 1 tsp Vanilla Extract
- For the Chocolate Ganache:
- 300g Dark Chocolate (at least 70% cocoa solids), broken into pieces
- 300ml Double Cream
- 2 tbsp Golden Syrup
- For the Fruit & Decoration:
- 200g Mixed Dried Fruit (raisins, sultanas, cranberries, etc.)
- 50ml Brandy or Orange Juice (optional, for soaking the fruit)
- Icing Sugar, for dusting (optional)
- Fresh Berries (strawberries, raspberries, blueberries), for decoration (optional)
- Edible Gold Leaf, for decoration (optional)
Preparing the Fruit (Optional):
This step is optional, but I highly recommend it as it adds a lovely depth of flavour to the cake. Soaking the dried fruit in brandy or orange juice plumps them up and makes them extra juicy.
- Place the mixed dried fruit in a bowl.
- Pour the brandy or orange juice over the fruit, ensuring it’s evenly distributed.
- Cover the bowl with cling film and leave to soak for at least 2 hours, or preferably overnight, in the refrigerator. The longer they soak, the better! If you’re short on time, even 30 minutes will make a difference.
Making the Biscuit Base:
This is where the magic happens! We’re going to create a delicious, crumbly base that will hold all that lovely chocolate ganache and fruit.
- Crush the Biscuits: The first step is to crush the biscuits. You can do this in a couple of ways. My preferred method is to place the biscuits in a large ziplock bag and bash them with a rolling pin until you have a mixture of fine crumbs and slightly larger pieces. You don’t want them to be completely powdered, as the larger pieces add texture. Alternatively, you can use a food processor, but be careful not to over-process them.
- Melt the Butter: In a saucepan or microwave-safe bowl, melt the butter until it’s completely liquid. Be careful not to burn it.
- Combine the Dry Ingredients: In a large mixing bowl, combine the crushed biscuits, caster sugar, and cocoa powder. Mix well to ensure the cocoa powder is evenly distributed.
- Add the Wet Ingredients: Pour the melted butter, milk, and vanilla extract into the bowl with the dry ingredients.
- Mix Thoroughly: Use a wooden spoon or spatula to mix everything together until well combined. The mixture should be damp and resemble wet sand. If it seems too dry, add a tablespoon of milk at a time until it reaches the right consistency.
- Add the Soaked Fruit (if using): If you soaked the dried fruit, drain any excess liquid and add the fruit to the biscuit mixture. Mix well to distribute the fruit evenly throughout the base.
Assembling the Cake:
Now it’s time to bring everything together and create the shape of our cake. We’ll be using a springform tin for this, but you can also use a loaf tin if you prefer.
- Prepare the Tin: Line the base of an 8-inch (20cm) springform tin with baking parchment. This will make it easier to remove the cake later.
- Press the Biscuit Mixture into the Tin: Spoon the biscuit mixture into the prepared tin. Use the back of a spoon or your fingers to press the mixture firmly and evenly into the base of the tin. Make sure it’s packed tightly to create a solid base.
- Refrigerate the Base: Cover the tin with cling film and refrigerate for at least 2 hours, or preferably overnight. This will allow the biscuit base to firm up and set.
Making the Chocolate Ganache:
The chocolate ganache is the star of the show! It’s rich, decadent, and adds a beautiful shine to the cake.
- Heat the Cream: In a saucepan, heat the double cream over medium heat until it just comes to a simmer. Do not boil it.
- Pour over the Chocolate: Remove the saucepan from the heat and add the broken dark chocolate and golden syrup.
- Let it Sit: Let the mixture sit for a minute or two to allow the heat from the cream to melt the chocolate.
- Stir Until Smooth: Gently stir the mixture with a whisk or spatula until the chocolate is completely melted and the ganache is smooth and glossy. Be patient, as it may take a few minutes. If there are any stubborn lumps, you can gently heat the mixture over a very low heat, stirring constantly, until smooth.
- Cool Slightly: Let the ganache cool slightly for about 10-15 minutes before pouring it over the biscuit base. This will help it to thicken slightly and prevent it from running off the sides of the cake.
Pouring and Setting the Ganache:
This is the final step in creating our masterpiece! We’ll pour the ganache over the biscuit base and let it set to create a beautiful, smooth finish.
- Pour the Ganache: Remove the biscuit base from the refrigerator. Pour the slightly cooled chocolate ganache evenly over the biscuit base, ensuring it covers the entire surface.
- Smooth the Surface: Use a spatula or palette knife to smooth the surface of the ganache. You can create swirls or patterns if you like, or simply leave it smooth.
- Refrigerate to Set: Return the cake to the refrigerator and refrigerate for at least 4 hours, or preferably overnight, to allow the ganache to set completely. The longer it sets, the firmer it will be.
Decorating the Cake (Optional):
Now for the fun part! You can decorate the cake however you like. Here are a few ideas:
- Remove from the Tin: Once the ganache is set, carefully remove the cake from the springform tin. Run a thin knife around the edge of the cake to loosen it from the tin before releasing the spring.
- Dust with Icing Sugar: Lightly dust the top of the cake with icing sugar for a simple and elegant finish.
- Add Fresh Berries: Arrange fresh berries, such as strawberries, raspberries, and blueberries, on top of the cake for a pop of color and freshness.
- Add Edible Gold Leaf: For a touch of luxury, add small pieces of edible gold leaf to the top of the cake.
- Chocolate Shavings: Create chocolate shavings using a vegetable peeler and sprinkle them over the cake.
- Drizzle with White Chocolate: Melt some white chocolate and drizzle it over the cake for a contrasting effect.
Serving and Storing:
Your Chocolate Biscuit Cake with Fruit is now ready to be served! Here are a few tips for serving and storing:
- Serving: Cut the cake into slices using a sharp knife. Serve chilled or at room temperature.
- Storing: Store the cake in an airtight container in the refrigerator for up to 5 days.
- Freezing: You can also freeze the cake for up to 2 months. Wrap it tightly in cling film and then in foil before freezing. Thaw it in the refrigerator overnight before serving.
Conclusion:
So, there you have it! This chocolate biscuit cake with fruits is truly a showstopper, and I genuinely believe it’s a recipe you absolutely must try. It’s the perfect blend of textures the satisfying crunch of the biscuits, the chewy sweetness of the dried fruits, and the rich, decadent chocolate that binds it all together. Forget complicated baking techniques and hours spent in the kitchen; this recipe is all about simplicity and maximum flavor impact. It’s a guaranteed crowd-pleaser, whether you’re serving it at a sophisticated dinner party or enjoying a cozy night in with your loved ones.
But why is it a must-try, you ask? Well, beyond the incredible taste, it’s the sheer versatility of this cake that makes it so special. It’s a fantastic make-ahead dessert, meaning you can prepare it a day or two in advance, allowing the flavors to meld and deepen. Plus, it requires no baking! That’s right, no oven required. This makes it ideal for those hot summer months or for anyone who’s a little intimidated by traditional baking.
And the best part? You can easily customize it to your liking! Feel free to experiment with different types of biscuits digestive biscuits, rich tea biscuits, or even ginger nuts would work beautifully. As for the dried fruits, the possibilities are endless. I’ve used a mix of cranberries, raisins, and apricots in this recipe, but you could also add chopped dates, figs, cherries, or even candied peel. If you’re feeling particularly adventurous, a splash of your favorite liqueur, like rum or brandy, will add an extra layer of warmth and complexity.
Serving Suggestions and Variations:
* For a truly indulgent experience, serve a slice of this chocolate biscuit cake with fruits with a scoop of vanilla ice cream or a dollop of freshly whipped cream.
* A dusting of cocoa powder or a drizzle of melted chocolate adds a touch of elegance.
* If you’re making it for a special occasion, consider decorating it with fresh berries or edible flowers.
* For a vegan version, simply use vegan biscuits and a dairy-free chocolate alternative. There are some excellent vegan dark chocolates available now that would work perfectly.
* Want to make individual portions? Simply press the mixture into muffin tins lined with parchment paper.
I’m so confident that you’ll love this recipe, and I can’t wait to hear about your experiences. Don’t be afraid to get creative and put your own spin on it. After all, cooking should be fun and enjoyable!
So, go ahead, gather your ingredients, and give this chocolate biscuit cake with fruits a try. I promise you won’t be disappointed. And when you do, please, please, please share your creations with me! Tag me in your photos on social media, leave a comment below, or send me an email. I’m always thrilled to see how my readers are enjoying my recipes. I’m especially interested in hearing about any variations you try and how they turn out. Happy baking (or rather, no-baking!) and I hope this becomes a new favorite in your household, just as it has in mine. Let the deliciousness begin!
Chocolate Biscuit Cake Fruits: A Delicious & Easy Recipe
A decadent no-bake chocolate biscuit cake with a rich dark chocolate ganache and optional dried fruit, perfect for a special occasion.
Ingredients
- 500g Rich Tea biscuits (or similar plain biscuits)
- 200g Unsalted Butter, melted
- 100g Caster Sugar
- 4 tbsp Cocoa Powder
- 4 tbsp Milk
- 1 tsp Vanilla Extract
- 300g Dark Chocolate (at least 70% cocoa solids), broken into pieces
- 300ml Double Cream
- 2 tbsp Golden Syrup
- 200g Mixed Dried Fruit (raisins, sultanas, cranberries, etc.)
- 50ml Brandy or Orange Juice (optional, for soaking the fruit)
- Icing Sugar, for dusting (optional)
- Fresh Berries (strawberries, raspberries, blueberries), for decoration (optional)
- Edible Gold Leaf, for decoration (optional)
Instructions
- (Optional) Prepare the Fruit: Place the mixed dried fruit in a bowl. Pour the brandy or orange juice over the fruit. Cover and soak for at least 2 hours, or preferably overnight, in the refrigerator. Drain any excess liquid before adding to the biscuit mixture.
- Crush the Biscuits: Place the biscuits in a large ziplock bag and bash them with a rolling pin until you have a mixture of fine crumbs and slightly larger pieces. Alternatively, use a food processor, but be careful not to over-process them.
- Melt the Butter: In a saucepan or microwave-safe bowl, melt the butter until it’s completely liquid. Be careful not to burn it.
- Combine the Dry Ingredients: In a large mixing bowl, combine the crushed biscuits, caster sugar, and cocoa powder. Mix well to ensure the cocoa powder is evenly distributed.
- Add the Wet Ingredients: Pour the melted butter, milk, and vanilla extract into the bowl with the dry ingredients.
- Mix Thoroughly: Use a wooden spoon or spatula to mix everything together until well combined. The mixture should be damp and resemble wet sand. If it seems too dry, add a tablespoon of milk at a time until it reaches the right consistency.
- Add the Soaked Fruit (if using): If you soaked the dried fruit, drain any excess liquid and add the fruit to the biscuit mixture. Mix well to distribute the fruit evenly throughout the base.
- Prepare the Tin: Line the base of an 8-inch (20cm) springform tin with baking parchment.
- Press the Biscuit Mixture into the Tin: Spoon the biscuit mixture into the prepared tin. Use the back of a spoon or your fingers to press the mixture firmly and evenly into the base of the tin. Make sure it’s packed tightly to create a solid base.
- Refrigerate the Base: Cover the tin with cling film and refrigerate for at least 2 hours, or preferably overnight. This will allow the biscuit base to firm up and set.
- Heat the Cream: In a saucepan, heat the double cream over medium heat until it just comes to a simmer. Do not boil it.
- Pour over the Chocolate: Remove the saucepan from the heat and add the broken dark chocolate and golden syrup.
- Let it Sit: Let the mixture sit for a minute or two to allow the heat from the cream to melt the chocolate.
- Stir Until Smooth: Gently stir the mixture with a whisk or spatula until the chocolate is completely melted and the ganache is smooth and glossy. Be patient, as it may take a few minutes. If there are any stubborn lumps, you can gently heat the mixture over a very low heat, stirring constantly, until smooth.
- Cool Slightly: Let the ganache cool slightly for about 10-15 minutes before pouring it over the biscuit base. This will help it to thicken slightly and prevent it from running off the sides of the cake.
- Pour the Ganache: Remove the biscuit base from the refrigerator. Pour the slightly cooled chocolate ganache evenly over the biscuit base, ensuring it covers the entire surface.
- Smooth the Surface: Use a spatula or palette knife to smooth the surface of the ganache. You can create swirls or patterns if you like, or simply leave it smooth.
- Refrigerate to Set: Return the cake to the refrigerator and refrigerate for at least 4 hours, or preferably overnight, to allow the ganache to set completely. The longer it sets, the firmer it will be.
- (Optional) Decorate the Cake: Once the ganache is set, carefully remove the cake from the springform tin. Dust with icing sugar, add fresh berries, edible gold leaf, chocolate shavings, or drizzle with white chocolate.
Notes
- Soaking the dried fruit in brandy or orange juice is highly recommended for added flavor and juiciness.
- The biscuit base needs to be firmly packed into the tin for a solid foundation.
- The ganache needs sufficient time to set in the refrigerator.
- Decorate the cake according to your preference.
- Store the cake in an airtight container in the refrigerator for up to 5 days.
- The cake can be frozen for up to 2 months.
Leave a Comment