
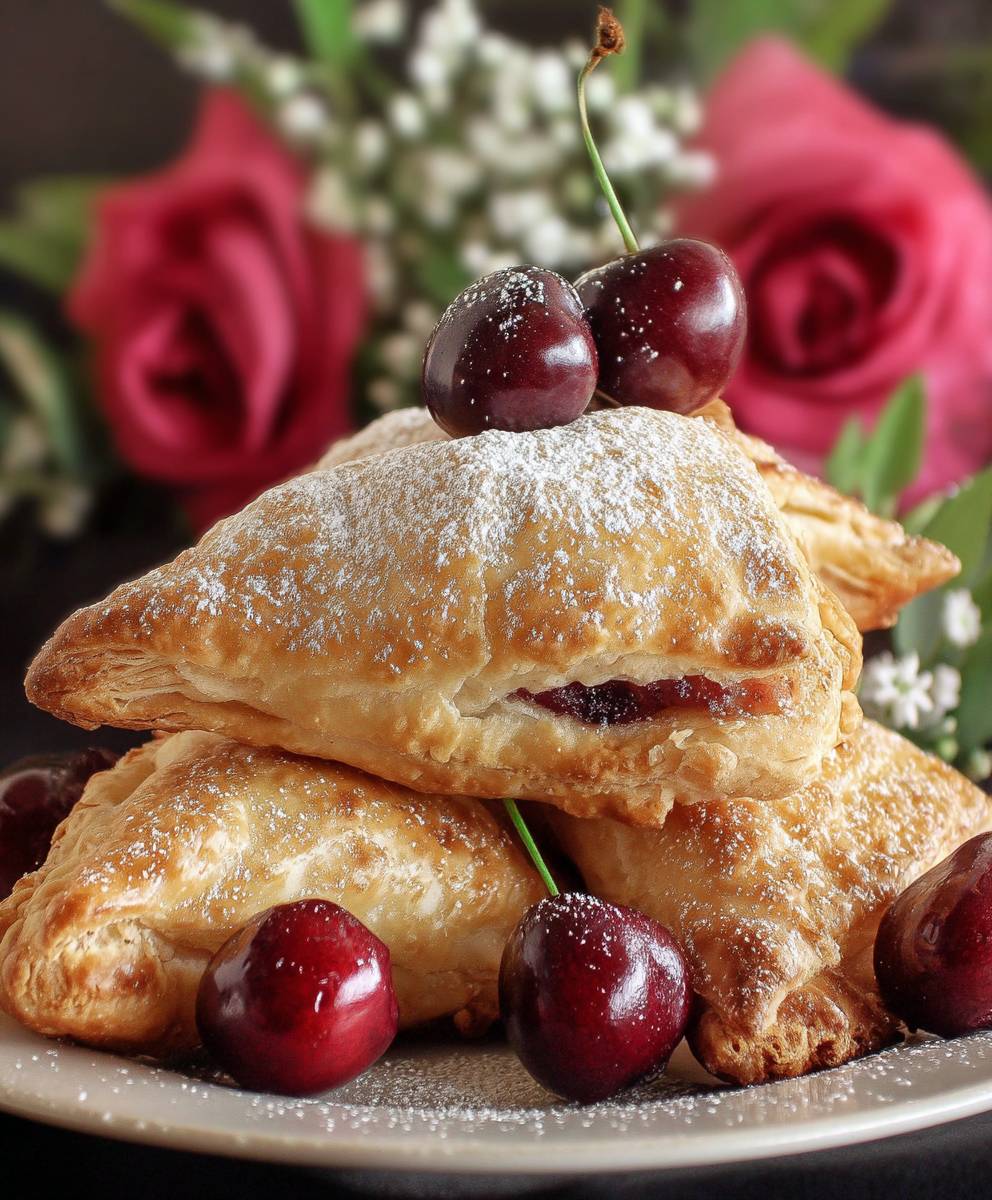
Cherry Turnovers, those delightful pockets of flaky pastry filled with sweet and tart cherries, are a guaranteed crowd-pleaser. Imagine biting into a warm, golden-brown pastry, the buttery layers shattering to reveal a juicy, vibrant cherry filling. Is your mouth watering yet? Mine is! This recipe brings that experience right to your kitchen, and trust me, it’s easier than you think.
While the exact origins of turnovers are debated, similar filled pastries have graced tables across cultures for centuries. Think of the Cornish pasty or the empanada all delicious variations on the same theme. The beauty of the Cherry Turnovers lies in their simplicity and adaptability. They’re perfect for a quick breakfast, an elegant dessert, or a delightful addition to a picnic basket.
People adore these little treats for several reasons. The combination of the crisp, buttery pastry and the sweet-tart cherry filling is simply irresistible. Plus, they’re incredibly convenient. You can make them ahead of time and bake them just before serving, or even freeze them for a future craving. Whether you’re a seasoned baker or a kitchen novice, this recipe will guide you to creating perfect cherry turnovers every time. So, let’s get baking!

Ingredients:
- For the Puff Pastry:
- 2 1/2 cups (315g) all-purpose flour, plus more for dusting
- 1 teaspoon salt
- 1 cup (2 sticks, 226g) unsalted butter, very cold, cut into 1/2-inch cubes
- 1 cup (240ml) ice water
- For the Cherry Filling:
- 4 cups (about 2 pounds) fresh or frozen (thawed) pitted cherries
- 1/2 cup (100g) granulated sugar
- 2 tablespoons cornstarch
- 1 tablespoon lemon juice
- 1/2 teaspoon almond extract (optional, but highly recommended!)
- Pinch of salt
- For the Egg Wash:
- 1 large egg
- 1 tablespoon milk or water
- For the Glaze (optional):
- 1 cup (120g) powdered sugar
- 2-3 tablespoons milk or water
- 1/4 teaspoon vanilla extract (optional)
Making the Puff Pastry (From Scratch – Totally Worth It!)
Okay, I know making puff pastry from scratch can seem intimidating, but trust me, it’s incredibly rewarding. The flaky, buttery layers are just divine. If you’re short on time, you can definitely use store-bought puff pastry, but if you’re feeling adventurous, let’s dive in!
- Combine Dry Ingredients: In a large bowl, whisk together the flour and salt. This ensures the salt is evenly distributed, which is crucial for flavor and gluten development.
- Add the Butter: Add the cold, cubed butter to the flour mixture. Now, this is where the magic happens. You want to work quickly to keep the butter as cold as possible. Use a pastry blender or your fingertips to cut the butter into the flour until the mixture resembles coarse crumbs. You should still see visible pieces of butter that’s what creates those beautiful layers!
- Add the Ice Water: Gradually add the ice water, a tablespoon at a time, mixing gently after each addition. You want to add just enough water to bring the dough together into a shaggy mass. Be careful not to overmix! Overmixing develops the gluten too much, resulting in a tough pastry.
- Form the Dough: Turn the dough out onto a lightly floured surface. Gently gather it into a rough rectangle. Don’t worry if it’s not perfectly smooth it’s supposed to be a little rustic at this stage.
- The First Turn: Lightly flour the dough and your rolling pin. Roll the dough into a rectangle about 12×6 inches. Fold the dough into thirds, like you’re folding a letter. This is called a “single turn.” Wrap the dough tightly in plastic wrap and refrigerate for at least 30 minutes. This allows the gluten to relax and the butter to firm up.
- Subsequent Turns: Repeat the rolling, folding, and chilling process five more times, for a total of six single turns. Each turn creates more layers of butter and dough, resulting in an incredibly flaky pastry. Make sure to always roll the dough in the same direction each time. If the butter starts to melt or the dough becomes too sticky, return it to the refrigerator for a longer chilling period. Patience is key!
- Final Chill: After the sixth turn, wrap the dough tightly in plastic wrap and refrigerate for at least 2 hours, or preferably overnight. This allows the dough to fully relax and the butter to solidify, making it easier to work with.
Making the Cherry Filling
While the puff pastry is chilling (or if you’re using store-bought), let’s whip up the cherry filling. This is super easy and bursting with flavor!
- Combine Ingredients: In a medium saucepan, combine the cherries, sugar, cornstarch, lemon juice, almond extract (if using), and salt.
- Cook the Filling: Cook over medium heat, stirring constantly, until the mixture comes to a simmer and thickens. This usually takes about 5-7 minutes. The cornstarch will help to create a nice, glossy filling.
- Cool the Filling: Remove the saucepan from the heat and let the cherry filling cool completely. This is important because you don’t want to melt the butter in the puff pastry when you assemble the turnovers. You can speed up the cooling process by transferring the filling to a shallow dish.
Assembling and Baking the Turnovers
Now for the fun part putting it all together! This is where your patience and hard work (or your smart choice of store-bought pastry!) really pay off.
- Preheat Oven: Preheat your oven to 400°F (200°C). Line a baking sheet with parchment paper. This prevents the turnovers from sticking and makes cleanup a breeze.
- Roll Out the Dough: On a lightly floured surface, roll out the chilled puff pastry to about 1/8-inch thickness. You want it thin enough to create those flaky layers, but not so thin that it tears easily.
- Cut the Dough: Use a sharp knife or pizza cutter to cut the dough into squares, about 4-5 inches each. The exact size doesn’t matter too much, just make sure they’re relatively uniform.
- Fill the Turnovers: Place a spoonful (about 2-3 tablespoons) of the cooled cherry filling in the center of each square. Be careful not to overfill them, or the filling will leak out during baking.
- Fold and Seal: Fold each square diagonally to form a triangle. Press the edges firmly together to seal. You can use a fork to crimp the edges for a decorative touch and to ensure a tight seal. This is important to prevent the filling from escaping.
- Egg Wash: In a small bowl, whisk together the egg and milk (or water) to create an egg wash. Brush the tops of the turnovers with the egg wash. This gives them a beautiful golden-brown color and a slight sheen.
- Bake: Place the turnovers on the prepared baking sheet and bake for 20-25 minutes, or until they are golden brown and puffed up. Keep a close eye on them, as baking times can vary depending on your oven.
- Cool: Remove the turnovers from the oven and let them cool on a wire rack for at least 15 minutes before glazing (if using). This allows them to firm up slightly and prevents the glaze from melting too much.
Making the Glaze (Optional, But Delicious!)
A simple glaze adds a touch of sweetness and makes these turnovers even more irresistible. It’s totally optional, but I highly recommend it!
- Combine Ingredients: In a small bowl, whisk together the powdered sugar, milk (or water), and vanilla extract (if using) until smooth. Add more milk or water, a teaspoon at a time, until you reach your desired consistency. You want the glaze to be thick enough to coat the turnovers, but thin enough to drizzle easily.
- Glaze the Turnovers: Drizzle the glaze over the cooled turnovers. You can use a spoon or a fork to drizzle it evenly.
- Let the Glaze Set: Let the glaze set for about 10-15 minutes before serving. This allows it to harden slightly and prevents it from being too sticky.
Conclusion:
And there you have it! These Cherry Turnovers are more than just a dessert; they’re a little pocket of happiness, bursting with sweet and tart cherry goodness, all wrapped up in a flaky, golden crust. I truly believe this recipe is a must-try for anyone who loves a simple yet satisfying treat. The combination of the homemade cherry filling and the buttery puff pastry is simply irresistible, and the aroma that fills your kitchen while they bake is pure bliss.
But why should you absolutely give these a go? Well, beyond the incredible flavor, they’re surprisingly easy to make. Yes, you can use store-bought puff pastry to save time, but even making the filling from scratch is a breeze. Plus, they’re incredibly versatile!
Think of the possibilities! For a truly decadent experience, serve them warm with a scoop of vanilla ice cream or a dollop of freshly whipped cream. A light dusting of powdered sugar adds a touch of elegance, or you could drizzle them with a simple glaze made from powdered sugar and milk.
Looking for variations? Absolutely! Feel free to experiment with different fruits. Imagine these with blueberries, raspberries, or even a mix of berries. You could also add a touch of almond extract to the filling for a deeper, more complex flavor. For a savory twist, try filling them with spinach and feta cheese the possibilities are endless!
These Cherry Turnovers are perfect for so many occasions. They’re a delightful addition to a brunch spread, a welcome treat at afternoon tea, or simply a comforting dessert after dinner. They’re also great for potlucks and parties, as they’re easy to transport and always a crowd-pleaser. I’ve even been known to sneak one (or two!) for breakfast with my morning coffee. Don’t judge!
I’ve poured my heart into perfecting this recipe, and I’m confident that you’ll love it as much as I do. The satisfaction of biting into a warm, flaky turnover filled with juicy cherries is truly unmatched. It’s a simple pleasure that can brighten any day.
So, what are you waiting for? Gather your ingredients, preheat your oven, and get ready to create some magic in your kitchen. I promise you won’t regret it. This recipe for Cherry Turnovers is a keeper, one that you’ll be making again and again for years to come.
And now, for the most important part: I want to hear about your experience! Did you try the recipe? Did you make any variations? What did you think? Share your photos and stories with me! Tag me on social media, leave a comment below, or send me an email. I’m genuinely excited to see your creations and hear your feedback. Your experiences inspire me and help me to continue creating delicious recipes that you’ll love. Happy baking! I hope you enjoy these Cherry Turnovers as much as I do!
Cherry Turnovers: The Ultimate Guide to Baking Perfect Pastries
Flaky, homemade puff pastry filled with a sweet and tangy cherry filling. These cherry turnovers are a delightful treat, perfect for breakfast, brunch, or dessert.
Ingredients
- 2 1/2 cups (315g) all-purpose flour, plus more for dusting
- 1 teaspoon salt
- 1 cup (2 sticks, 226g) unsalted butter, very cold, cut into 1/2-inch cubes
- 1 cup (240ml) ice water
- 4 cups (about 2 pounds) fresh or frozen (thawed) pitted cherries
- 1/2 cup (100g) granulated sugar
- 2 tablespoons cornstarch
- 1 tablespoon lemon juice
- 1/2 teaspoon almond extract (optional, but highly recommended!)
- Pinch of salt
- 1 large egg
- 1 tablespoon milk or water
- 1 cup (120g) powdered sugar
- 2-3 tablespoons milk or water
- 1/4 teaspoon vanilla extract (optional)
Instructions
- In a large bowl, whisk together the flour and salt.
- Add the cold, cubed butter to the flour mixture. Use a pastry blender or your fingertips to cut the butter into the flour until the mixture resembles coarse crumbs. You should still see visible pieces of butter.
- Gradually add the ice water, a tablespoon at a time, mixing gently after each addition. Add just enough water to bring the dough together into a shaggy mass. Be careful not to overmix.
- Turn the dough out onto a lightly floured surface. Gently gather it into a rough rectangle.
- Lightly flour the dough and your rolling pin. Roll the dough into a rectangle about 12×6 inches. Fold the dough into thirds, like you’re folding a letter (a “single turn”). Wrap the dough tightly in plastic wrap and refrigerate for at least 30 minutes.
- Repeat the rolling, folding, and chilling process five more times, for a total of six single turns. Make sure to always roll the dough in the same direction each time. If the butter starts to melt or the dough becomes too sticky, return it to the refrigerator for a longer chilling period.
- After the sixth turn, wrap the dough tightly in plastic wrap and refrigerate for at least 2 hours, or preferably overnight.
- In a medium saucepan, combine the cherries, sugar, cornstarch, lemon juice, almond extract (if using), and salt.
- Cook over medium heat, stirring constantly, until the mixture comes to a simmer and thickens (about 5-7 minutes).
- Remove the saucepan from the heat and let the cherry filling cool completely.
- Preheat your oven to 400°F (200°C). Line a baking sheet with parchment paper.
- On a lightly floured surface, roll out the chilled puff pastry to about 1/8-inch thickness.
- Use a sharp knife or pizza cutter to cut the dough into squares, about 4-5 inches each.
- Place a spoonful (about 2-3 tablespoons) of the cooled cherry filling in the center of each square.
- Fold each square diagonally to form a triangle. Press the edges firmly together to seal. You can use a fork to crimp the edges for a decorative touch and to ensure a tight seal.
- In a small bowl, whisk together the egg and milk (or water) to create an egg wash. Brush the tops of the turnovers with the egg wash.
- Place the turnovers on the prepared baking sheet and bake for 20-25 minutes, or until they are golden brown and puffed up.
- Remove the turnovers from the oven and let them cool on a wire rack for at least 15 minutes before glazing (if using).
- In a small bowl, whisk together the powdered sugar, milk (or water), and vanilla extract (if using) until smooth. Add more milk or water, a teaspoon at a time, until you reach your desired consistency.
- Drizzle the glaze over the cooled turnovers.
- Let the glaze set for about 10-15 minutes before serving.
Notes
- For the flakiest puff pastry, it’s crucial to keep the butter cold throughout the process. If the butter starts to melt, return the dough to the refrigerator to chill.
- If you’re short on time, you can use store-bought puff pastry.
- Make sure the cherry filling is completely cooled before assembling the turnovers to prevent the butter in the puff pastry from melting.
- Crimp the edges of the turnovers well to prevent the filling from leaking out during baking.
- Baking times may vary depending on your oven, so keep a close eye on the turnovers.
Leave a Comment