
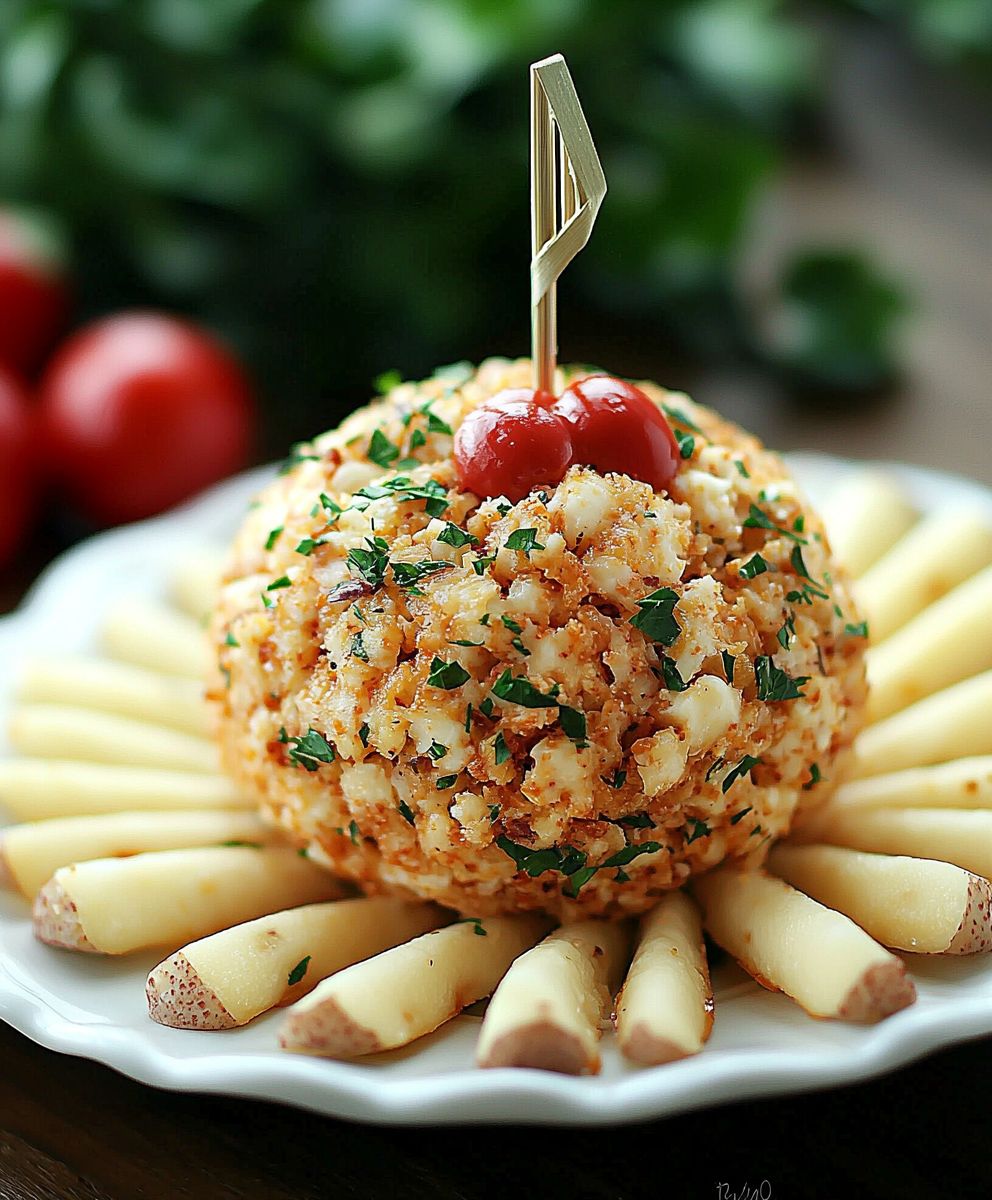
Cheese ball appetizer: the quintessential party snack that’s always a crowd-pleaser! I don’t know about you, but no holiday gathering or potluck feels complete without one. Imagine this: a creamy, savory sphere, encrusted with crunchy nuts and herbs, sitting proudly on a platter surrounded by crackers and eager guests. It’s a culinary centerpiece that practically screams “Let’s celebrate!”
While its exact origins are a bit hazy, the cheese ball’s popularity soared in the mid-20th century, becoming a staple of American entertaining. It’s a testament to our love of simple, delicious food that can be easily shared. The beauty of a cheese ball appetizer lies in its versatility. You can customize it with your favorite cheeses, herbs, and coatings, making it uniquely your own.
People adore this dish for so many reasons. The creamy texture is incredibly satisfying, and the combination of savory cheese with crunchy nuts is simply irresistible. Plus, it’s incredibly convenient! You can make it ahead of time, leaving you free to enjoy the party. Whether you’re a seasoned chef or a kitchen novice, a cheese ball is a guaranteed hit. So, let’s dive into my favorite recipe and create a cheese ball that will have everyone asking for more!

Ingredients:
- Cream Cheese: 3 (8-ounce) packages, softened to room temperature. This is the base, so make sure it’s nice and soft for easy mixing!
- Sharp Cheddar Cheese: 2 cups, shredded. I prefer sharp for that extra zing, but you can use mild or medium if you prefer.
- Monterey Jack Cheese: 1 cup, shredded. This adds a nice creamy texture and mild flavor.
- Blue Cheese: 1/2 cup, crumbled. If you’re not a blue cheese fan, you can omit this or substitute with another cheese like Gorgonzola or even a smoked Gouda.
- Green Onions: 1/2 cup, finely chopped. These add a fresh, mild onion flavor.
- Worcestershire Sauce: 1 tablespoon. This adds a savory depth of flavor.
- Garlic Powder: 1 teaspoon. For that subtle garlic kick.
- Onion Powder: 1 teaspoon. Complements the garlic powder and adds another layer of flavor.
- Hot Sauce: 1/2 teaspoon (or more to taste). I like a little heat, but you can adjust this to your liking. Tabasco or your favorite hot sauce will work.
- Black Pepper: 1/2 teaspoon, freshly ground. Freshly ground pepper makes a big difference!
- Pecans: 2 cups, finely chopped. These provide a delicious nutty coating. You can toast them lightly for even more flavor.
- Fresh Parsley: 1/4 cup, finely chopped. Adds a pop of color and fresh flavor to the coating.
- Optional: Bacon bits, dried cranberries, everything bagel seasoning, chopped walnuts, pretzel pieces get creative with your coating!
Preparing the Cheese Ball Mixture:
- In a large bowl, combine the softened cream cheese, shredded cheddar cheese, Monterey Jack cheese, and blue cheese (if using). Make sure the cream cheese is truly softened; otherwise, you’ll end up with lumps.
- Using an electric mixer (handheld or stand mixer), beat the cheeses together until they are smooth and well combined. This might take a few minutes, so be patient. Scrape down the sides of the bowl as needed to ensure everything is evenly mixed.
- Add the chopped green onions, Worcestershire sauce, garlic powder, onion powder, hot sauce, and black pepper to the cheese mixture.
- Mix again until all the ingredients are thoroughly incorporated. Taste the mixture and adjust the seasonings as needed. You might want to add a little more hot sauce for extra heat or a pinch of salt if it needs it.
- Cover the bowl with plastic wrap and refrigerate for at least 2 hours, or preferably overnight. This allows the flavors to meld together and the cheese mixture to firm up, making it easier to shape.
Preparing the Coating:
- While the cheese mixture is chilling, prepare the coating. In a medium bowl, combine the finely chopped pecans and fresh parsley.
- If you’re using any other optional coating ingredients, such as bacon bits, dried cranberries, everything bagel seasoning, chopped walnuts, or pretzel pieces, add them to the bowl as well.
- Mix the coating ingredients together until they are evenly distributed.
- Set the coating aside.
Assembling the Cheese Ball:
- Remove the cheese mixture from the refrigerator.
- Using your hands or a large spoon, shape the cheese mixture into a ball. It’s easiest to work with if it’s very cold. If it’s too soft, return it to the refrigerator for another 30 minutes.
- Place the pecan mixture on a large plate or shallow dish.
- Gently roll the cheese ball in the pecan mixture, pressing lightly to ensure the pecans adhere to the cheese. Make sure the entire cheese ball is covered in the coating.
- If necessary, use your hands to press any loose pecans onto the cheese ball.
- Once the cheese ball is completely coated, wrap it tightly in plastic wrap.
- Refrigerate the cheese ball for at least 1 hour to allow the coating to set and the cheese to firm up again. This will also help the flavors meld together even more.
Serving the Cheese Ball:
- Remove the cheese ball from the refrigerator about 15-20 minutes before serving. This will allow it to soften slightly, making it easier to spread.
- Place the cheese ball on a serving platter.
- Serve with your favorite crackers, baguette slices, pretzels, or vegetables. I like to offer a variety of options so everyone can find something they enjoy.
- Garnish the platter with fresh herbs, such as rosemary or thyme, for a festive touch.
Tips and Variations:
- Cheese Variations: Feel free to experiment with different types of cheese. Smoked Gouda, pepper jack, or even a little bit of goat cheese would be delicious additions.
- Spice It Up: If you like a lot of heat, add more hot sauce or a pinch of cayenne pepper to the cheese mixture. You could also use a spicy cheese like pepper jack.
- Sweet and Savory: Add some sweetness by incorporating dried cranberries, chopped dates, or even a drizzle of honey into the cheese mixture or coating.
- Herb Infusion: Mix fresh herbs like rosemary, thyme, or chives into the cheese mixture for a more herbaceous flavor.
- Make it Ahead: The cheese ball can be made up to 3 days in advance and stored in the refrigerator. Just be sure to wrap it tightly in plastic wrap to prevent it from drying out.
- Individual Cheese Balls: For a fun twist, make individual cheese balls instead of one large one. This is great for parties or gatherings where you want to offer individual servings.
- Coating Alternatives: If you’re not a fan of pecans, you can use walnuts, almonds, pistachios, or even crushed potato chips for the coating.
- Vegan Cheese Ball: For a vegan option, use vegan cream cheese and vegan shredded cheese. You can also use nutritional yeast to add a cheesy flavor.
- Serving Suggestions: Consider serving the cheese ball with a variety of accompaniments, such as grapes, apple slices, celery sticks, and carrot sticks.
- Presentation: Get creative with your presentation! Use a decorative platter, add some fresh herbs, and arrange the crackers and vegetables around the cheese ball in an appealing way.
Troubleshooting:
- Cheese Ball is Too Soft: If your cheese ball is too soft to shape, return it to the refrigerator for a longer period of time. You can also add a tablespoon or two of cornstarch to the cheese mixture to help it firm up.
- Coating Won’t Stick: If the coating isn’t sticking to the cheese ball, make sure the cheese mixture is cold and firm. You can also lightly moisten the cheese ball with a little bit of milk or water before rolling it in the coating.
- Cheese Ball is Too Dry: If your cheese ball is too dry, add a tablespoon or two of sour cream or mayonnaise to the cheese mixture.
- Flavor is Too Bland: If the flavor of your cheese ball is too bland, add more seasonings, such as garlic powder, onion powder, hot sauce, or Worcestershire sauce. You can also try adding a pinch of salt or a squeeze of lemon juice.
Storage Instructions:
- Store leftover cheese ball in an airtight container in the refrigerator for up to 5 days.
- The cheese ball can also be frozen for up to 2 months. Wrap it tightly in plastic wrap and then place it in a freezer-safe bag or container. Thaw in the refrigerator overnight before serving.
Nutritional Information (Approximate):
(Note: Nutritional information will vary depending on the specific ingredients used.)
- Serving Size: 1 ounce
- Calories: 150-200
- Fat: 12-16 grams
- Saturated Fat: 7-10 grams
- Cholesterol: 40-50 mg
- Sodium: 150-200 mg
- Carbohydrates: 3-5 grams
- Fiber: 1-2 grams
- Sugar: 1-2 grams
- Protein: 5-7 grams
Enjoy your delicious homemade cheese ball! It’s always a crowd-pleaser and a perfect appetizer for any occasion.
Conclusion:
So, there you have it! This isn’t just another appetizer; it’s a guaranteed crowd-pleaser, a conversation starter, and a delicious way to elevate any gathering. I truly believe this cheese ball appetizer is a must-try for anyone who loves easy, flavorful, and impressive snacks. The combination of creamy cheese, savory bacon, crunchy pecans, and that hint of sweetness from the dried cranberries creates a symphony of flavors that will have your guests begging for the recipe. But the best part? It’s incredibly versatile! Feel free to get creative with your serving suggestions and variations. I love serving it with an assortment of crackers think buttery crackers, whole wheat crackers, and even some gluten-free options to cater to everyone’s needs. Pretzel crisps are also a fantastic choice, adding a salty crunch that complements the richness of the cheese ball perfectly. And don’t forget the veggies! Carrot sticks, celery sticks, and cucumber slices provide a refreshing contrast and a healthy alternative to crackers. Looking for some fun variations? How about adding a touch of spice with a pinch of cayenne pepper or some finely chopped jalapeños? For a Mediterranean twist, incorporate sun-dried tomatoes, Kalamata olives, and feta cheese. If you’re a fan of blue cheese, crumble some into the mixture for a bolder flavor. And for the holidays, consider shaping the cheese ball into a festive Christmas tree or a pumpkin for Halloween. The possibilities are truly endless!Serving Suggestions to Elevate Your Cheese Ball:
* Crackers: Buttery, whole wheat, gluten-free * Pretzel Crisps: For a salty crunch * Veggies: Carrot sticks, celery sticks, cucumber slices * Fruit: Apple slices, pear slices, grapesFlavor Variations to Personalize Your Cheese Ball:
* Spicy: Add cayenne pepper or jalapeños * Mediterranean: Sun-dried tomatoes, Kalamata olives, feta cheese * Blue Cheese: Crumble in for a bolder flavor * Holiday Themed: Shape into a Christmas tree or pumpkin I’m confident that this recipe will become a staple in your appetizer repertoire. It’s perfect for everything from casual get-togethers to more formal parties. It’s also a great make-ahead option, which means you can prepare it a day or two in advance and simply pull it out of the refrigerator when you’re ready to serve. This takes so much stress out of party planning! So, what are you waiting for? Gather your ingredients, put on some music, and get ready to create a truly unforgettable cheese ball appetizer. I promise you won’t regret it! And most importantly, I want to hear about your experience! Did you try the recipe? Did you make any variations? What did your guests think? Share your photos and stories in the comments below. I can’t wait to see your creations and hear about your successes. Happy snacking! I hope you love this recipe as much as I do. It’s a guaranteed hit, and I know you’ll be making it for years to come. Don’t forget to rate the recipe and leave a comment your feedback is invaluable! Print
Cheese Ball Appetizer: The Ultimate Guide to Delicious Party Snacks
- Total Time: 140 minutes
- Yield: 10–12 servings 1x
Description
A classic cheese ball loaded with cheddar, Monterey Jack, and blue cheese, coated in crunchy pecans and fresh parsley. Perfect for parties!
Ingredients
- 3 (8-ounce) packages cream cheese, softened
- 2 cups sharp cheddar cheese, shredded
- 1 cup Monterey Jack cheese, shredded
- 1/2 cup blue cheese, crumbled (optional)
- 1/2 cup green onions, finely chopped
- 1 tablespoon Worcestershire sauce
- 1 teaspoon garlic powder
- 1 teaspoon onion powder
- 1/2 teaspoon hot sauce (or more to taste)
- 1/2 teaspoon black pepper, freshly ground
- 2 cups pecans, finely chopped
- 1/4 cup fresh parsley, finely chopped
- Optional: Bacon bits, dried cranberries, everything bagel seasoning, chopped walnuts, pretzel pieces
Instructions
- Prepare the Cheese Mixture: In a large bowl, combine softened cream cheese, cheddar cheese, Monterey Jack cheese, and blue cheese (if using). Beat with an electric mixer until smooth.
- Add green onions, Worcestershire sauce, garlic powder, onion powder, hot sauce, and black pepper. Mix well. Taste and adjust seasonings as needed.
- Cover and refrigerate for at least 2 hours, or preferably overnight.
- Prepare the Coating: In a medium bowl, combine chopped pecans and parsley. Add any optional coating ingredients. Mix well.
- Assemble the Cheese Ball: Remove cheese mixture from the refrigerator. Shape into a ball.
- Roll the cheese ball in the pecan mixture, pressing lightly to adhere. Ensure the entire ball is coated.
- Wrap tightly in plastic wrap and refrigerate for at least 1 hour to allow the coating to set.
- Serve: Remove from refrigerator 15-20 minutes before serving. Place on a platter and serve with crackers, baguette slices, pretzels, or vegetables.
Notes
- Cheese Variations: Experiment with smoked Gouda, pepper jack, or goat cheese.
- Spice It Up: Add more hot sauce or cayenne pepper.
- Sweet and Savory: Incorporate dried cranberries, chopped dates, or honey.
- Herb Infusion: Mix fresh herbs like rosemary, thyme, or chives into the cheese mixture.
- Make it Ahead: Can be made up to 3 days in advance.
- Individual Cheese Balls: Make individual cheese balls instead of one large one.
- Coating Alternatives: Use walnuts, almonds, pistachios, or crushed potato chips.
- Vegan Cheese Ball: Use vegan cream cheese and vegan shredded cheese.
- Serving Suggestions: Serve with grapes, apple slices, celery sticks, and carrot sticks.
- Presentation: Use a decorative platter, add some fresh herbs, and arrange the crackers and vegetables around the cheese ball in an appealing way.
- Prep Time: 20 minutes
- Cook Time: 0 minutes


Leave a Comment