
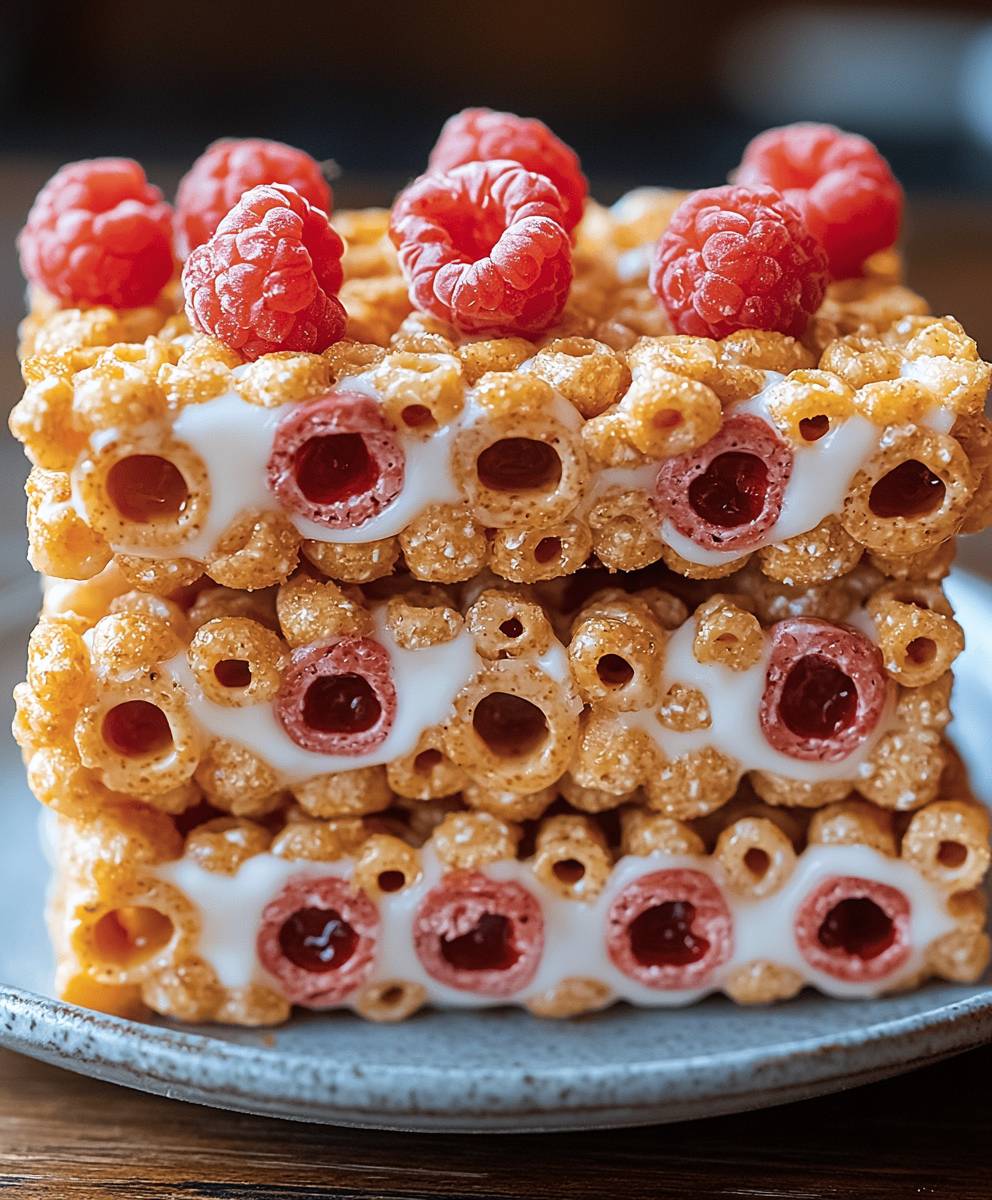
Cereal bars, those convenient and comforting rectangles of goodness, are more than just a quick breakfast or on-the-go snack. Have you ever wondered how to recreate that perfect balance of chewy, crunchy, and sweet in your own kitchen? I have, and after countless experiments, I’m thrilled to share my foolproof recipe with you!
While the exact origins of the modern cereal bar are debated, the concept of combining grains and sweeteners for sustenance dates back centuries. Think of ancient travelers carrying oatcakes or pioneers relying on hardtack portable energy was always a necessity. Today, cereal bars have evolved into a global phenomenon, gracing supermarket shelves and lunchboxes worldwide.
But what is it about these bars that makes them so universally appealing? For many, it’s the delightful combination of textures the satisfying crunch of toasted grains mingling with the soft, chewy binding ingredients. Others are drawn to the customizable flavors, from classic chocolate chip to fruity pebbles. And let’s not forget the sheer convenience! They’re perfect for busy mornings, post-workout fuel, or a midday pick-me-up. So, ditch the store-bought versions and let’s embark on a delicious journey to create homemade cereal bars that are healthier, tastier, and tailored to your exact preferences.

Ingredients:
- 3 cups rolled oats (old-fashioned or quick-cooking, but old-fashioned preferred for texture)
- 1 cup mixed nuts (almonds, walnuts, pecans, cashews roughly chopped)
- 1/2 cup seeds (pumpkin, sunflower, chia, flax a mix is great!)
- 1 cup dried fruit (cranberries, raisins, chopped apricots, cherries choose your favorites!)
- 1/2 cup shredded coconut (unsweetened)
- 1/2 teaspoon ground cinnamon
- 1/4 teaspoon salt
- 1/2 cup unsalted butter, melted
- 1/2 cup honey
- 1/2 cup brown sugar, packed
- 1/4 cup peanut butter (or other nut butter)
- 1 teaspoon vanilla extract
- Optional: 1/2 cup chocolate chips (milk, dark, or semi-sweet)
Preparing the Dry Ingredients:
- Preheat your oven to 350°F (175°C). This is crucial for toasting the oats and nuts, which adds a wonderful depth of flavor to the bars. Make sure your oven is properly calibrated for the best results.
- Prepare a 9×13 inch baking pan. Line the pan with parchment paper, leaving an overhang on the sides. This will make it incredibly easy to lift the bars out later and cut them neatly. Don’t skip this step! Trust me, it’s a lifesaver.
- Combine the oats, nuts, seeds, dried fruit, coconut, cinnamon, and salt in a large bowl. Make sure everything is evenly distributed. I like to use my hands to really get in there and mix it all up. This ensures that every bite is packed with goodness.
Making the Wet Ingredients:
- In a separate, microwave-safe bowl, melt the butter. You can also do this in a saucepan over low heat. Just be careful not to burn it!
- Add the honey, brown sugar, and peanut butter to the melted butter. Stir until everything is well combined and the sugar is mostly dissolved. The mixture should be smooth and glossy.
- Microwave the wet ingredients for 30 seconds. This helps to further dissolve the sugar and create a more cohesive mixture. Be careful, the bowl will be hot!
- Stir in the vanilla extract. The vanilla adds a lovely warmth and enhances the other flavors.
Combining Wet and Dry Ingredients:
- Pour the wet ingredients over the dry ingredients. Make sure to scrape the bowl to get every last bit of that delicious mixture.
- Stir everything together until the dry ingredients are completely coated. This is where you’ll need to put in a little elbow grease. You want to make sure that every oat and nut is covered in the sticky, sweet mixture. The mixture should be evenly moistened.
- If using chocolate chips, gently fold them in now. Be careful not to overmix, as this can cause the chocolate chips to melt and create streaks throughout the bars.
Baking the Cereal Bars:
- Pour the mixture into the prepared baking pan. Spread it out evenly and press it down firmly. I like to use the bottom of a measuring cup or a spatula to really pack it in. This will help the bars hold together better.
- Bake for 25-30 minutes, or until the edges are golden brown and the center is set. Keep a close eye on them, as baking times can vary depending on your oven. You want them to be golden brown, but not burnt.
- Remove the pan from the oven and let the bars cool completely in the pan. This is important! If you try to cut them while they’re still warm, they’ll crumble. I usually let them cool for at least 2 hours, or even overnight.
Cutting and Storing the Cereal Bars:
- Once the bars are completely cool, lift them out of the pan using the parchment paper overhang. Place them on a cutting board.
- Cut the bars into your desired size and shape. I usually cut them into rectangles, but you can also cut them into squares or triangles. A sharp knife is essential for clean cuts.
- Store the cereal bars in an airtight container at room temperature for up to a week. You can also store them in the refrigerator for longer storage. They also freeze well! Wrap them individually in plastic wrap and store them in a freezer bag for up to 2 months.
Tips for Success:
- Don’t overbake the bars. Overbaking will result in dry, crumbly bars.
- Press the mixture firmly into the pan. This will help the bars hold together better.
- Let the bars cool completely before cutting. This will prevent them from crumbling.
- Experiment with different ingredients. Feel free to substitute your favorite nuts, seeds, and dried fruit. You can also add other ingredients like spices, extracts, or even a drizzle of melted chocolate on top.
- Adjust the sweetness to your liking. If you prefer a less sweet bar, reduce the amount of honey and brown sugar.
- Use high-quality ingredients. The better the ingredients, the better the bars will taste.
Variations:
- Peanut Butter Chocolate Chip: Add 1/2 cup of peanut butter chips and 1/2 cup of chocolate chips.
- Apple Cinnamon: Use dried apples instead of other dried fruit and add 1/2 teaspoon of apple pie spice.
- Tropical: Use dried mango, pineapple, and macadamia nuts.
- Nut-Free: Substitute the nuts with more seeds or puffed rice cereal. Make sure to use a nut-free peanut butter alternative.
- Vegan: Use maple syrup instead of honey and a vegan butter substitute.
Troubleshooting:
- Bars are too crumbly: You may not have pressed the mixture firmly enough into the pan, or you may have overbaked them. Next time, press the mixture down more firmly and reduce the baking time.
- Bars are too sticky: You may have used too much honey or brown sugar. Next time, reduce the amount of these ingredients.
- Bars are too hard: You may have overbaked them. Next time, reduce the baking time.
- Bars are not holding together: Make sure the wet ingredients are thoroughly mixed with the dry ingredients. The mixture should be evenly moistened. You can also add a tablespoon of flaxseed meal mixed with 3 tablespoons of water to the wet ingredients. Let it sit for 5 minutes to thicken before adding it to the dry ingredients. This will act as a binder.
Enjoy your homemade cereal bars! They’re a healthy and delicious snack that you can feel good about eating. They are perfect for breakfast, a mid-afternoon pick-me-up, or a post-workout snack. Plus, they’re so easy to make, you’ll never want to buy store-bought bars again.
Conclusion:
So there you have it! These homemade cereal bars are truly a game-changer. They’re quick, easy, customizable, and a whole lot healthier than the store-bought kind. But more than that, they’re just plain delicious. The perfect balance of chewy and crunchy, sweet and satisfying, they’re the kind of treat that will have you reaching for seconds (and maybe thirds!).
I know what you might be thinking: “Another recipe I’ll bookmark and never make.” But trust me on this one. These bars are so simple to whip up, even on the busiest of mornings. And the payoff is huge a wholesome, energizing snack that you can feel good about eating and sharing. Plus, the sheer joy of creating something delicious from scratch is a reward in itself!
Think of these bars as a blank canvas for your culinary creativity. Feeling adventurous? Try adding a handful of dried cranberries and chopped walnuts for a festive twist. Or maybe some shredded coconut and dark chocolate chips for a more decadent treat. A drizzle of peanut butter or a sprinkle of sea salt can also elevate these bars to a whole new level of deliciousness.
Serving Suggestions and Variations:
* On-the-Go Breakfast: Wrap individual bars in parchment paper for a quick and easy breakfast on busy mornings.
* Lunchbox Treat: A healthier alternative to processed snacks, these bars are perfect for packing in lunchboxes.
* Post-Workout Fuel: The combination of carbohydrates and protein makes these bars a great source of energy after a workout.
* Dessert Alternative: Cut into smaller squares, these bars can be served as a light and satisfying dessert.
* Nut-Free Option: Substitute sunflower seed butter or tahini for peanut butter to make these bars allergy-friendly.
* Vegan Variation: Use maple syrup or agave nectar instead of honey to create a vegan-friendly version.
* Chocolate Lover’s Dream: Add cocoa powder to the cereal mixture and fold in plenty of chocolate chips for an extra-chocolatey treat.
* Fruity Delight: Incorporate dried fruits like raisins, apricots, or cherries for a burst of fruity flavor.
* Spice It Up: A pinch of cinnamon, nutmeg, or ginger can add warmth and depth to the flavor profile.
I truly believe that everyone should have a go-to recipe for homemade cereal bars, and I’m confident that this one will become yours. It’s a recipe that’s adaptable to your tastes, your dietary needs, and your lifestyle. It’s a recipe that’s guaranteed to bring a smile to your face with every bite.
So, what are you waiting for? Gather your ingredients, preheat your oven, and get ready to experience the joy of homemade cereal bars. I can’t wait to hear what you think!
And please, don’t be shy about sharing your creations! Snap a photo of your finished bars, post it on social media, and tag me. I’d love to see your variations and hear about your experience. Let’s spread the love of homemade goodness together! Happy baking!
Cereal Bars: The Ultimate Guide to Healthy and Delicious Options
Chewy, delicious homemade cereal bars with oats, nuts, seeds, dried fruit, and a touch of sweetness. A healthy, customizable snack for any time!
Ingredients
- 3 cups rolled oats (old-fashioned or quick-cooking, old-fashioned preferred)
- 1 cup mixed nuts (almonds, walnuts, pecans, cashews roughly chopped)
- 1/2 cup seeds (pumpkin, sunflower, chia, flax a mix is great!)
- 1 cup dried fruit (cranberries, raisins, chopped apricots, cherries choose your favorites!)
- 1/2 cup shredded coconut (unsweetened)
- 1/2 teaspoon ground cinnamon
- 1/4 teaspoon salt
- 1/2 cup unsalted butter, melted
- 1/2 cup honey
- 1/2 cup brown sugar, packed
- 1/4 cup peanut butter (or other nut butter)
- 1 teaspoon vanilla extract
- Optional: 1/2 cup chocolate chips (milk, dark, or semi-sweet)
Instructions
- Preheat: Preheat your oven to 350°F (175°C). Line a 9×13 inch baking pan with parchment paper, leaving an overhang.
- Combine Dry Ingredients: In a large bowl, combine the oats, nuts, seeds, dried fruit, coconut, cinnamon, and salt. Mix well.
- Melt Butter: In a microwave-safe bowl, melt the butter.
- Combine Wet Ingredients: Add the honey, brown sugar, and peanut butter to the melted butter. Stir until well combined. Microwave for 30 seconds and stir in the vanilla extract.
- Combine Wet and Dry: Pour the wet ingredients over the dry ingredients. Stir until the dry ingredients are completely coated. Fold in chocolate chips, if using.
- Bake: Pour the mixture into the prepared baking pan. Spread evenly and press down firmly. Bake for 25-30 minutes, or until the edges are golden brown and the center is set.
- Cool: Remove from the oven and let the bars cool completely in the pan (at least 2 hours or overnight).
- Cut and Store: Lift the bars out of the pan using the parchment paper overhang. Cut into desired size and shape. Store in an airtight container at room temperature for up to a week, or in the refrigerator for longer storage. Can also be frozen for up to 2 months.
Notes
- Don’t overbake the bars.
- Press the mixture firmly into the pan.
- Let the bars cool completely before cutting.
- Experiment with different ingredients to customize your bars.
- Adjust the sweetness to your liking.
- Use high-quality ingredients for the best flavor.


Leave a Comment