
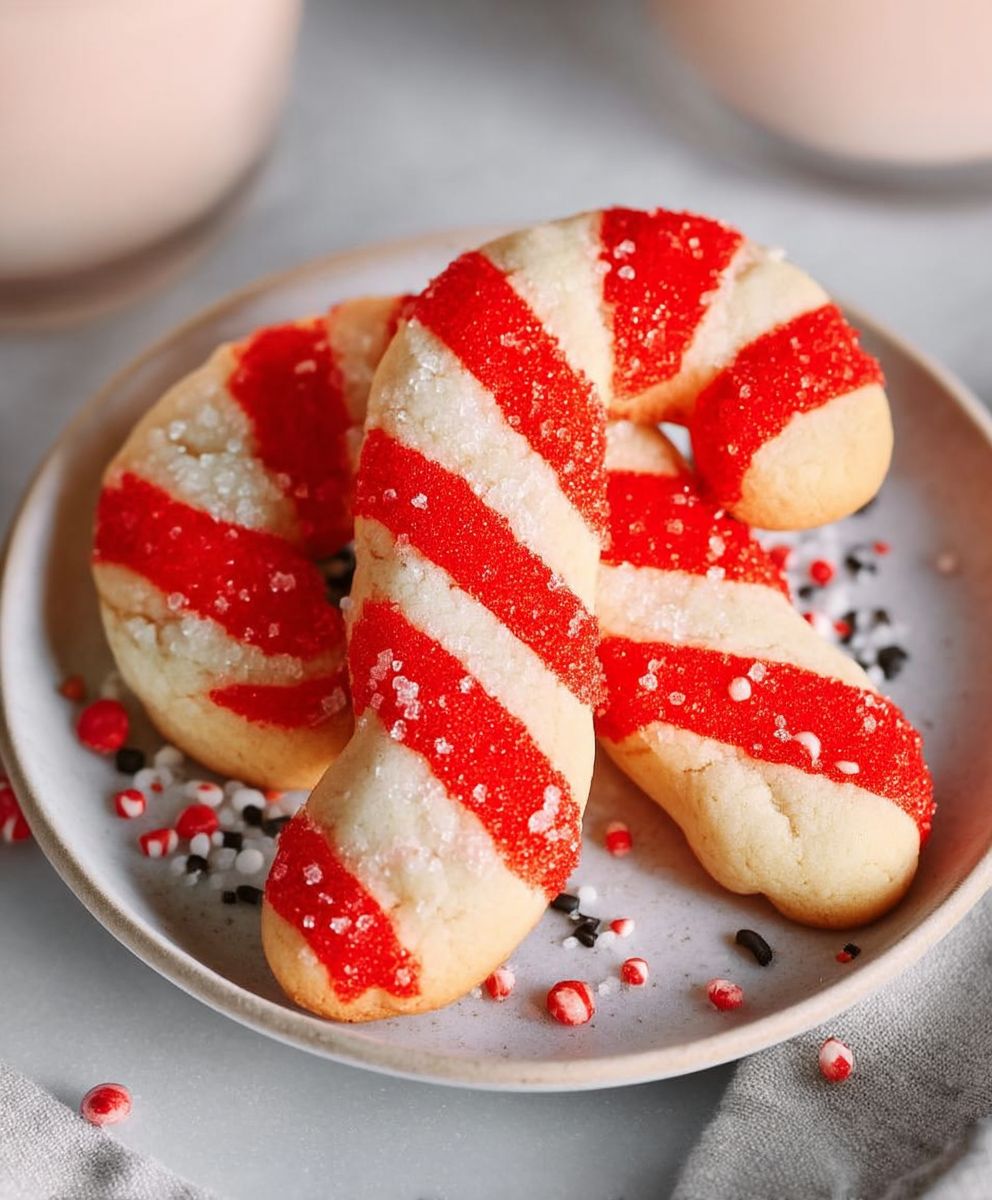
Candy cane cookies, those delightful swirls of red and white, aren’t just a treat; they’re a symbol of the holiday season! Imagine biting into a crisp, buttery cookie, the peppermint flavor dancing on your tongue, instantly transporting you to a cozy winter wonderland. Have you ever wondered where these festive delights originated? While the exact origins are debated, many believe they evolved from simple sugar cookies decorated with peppermint flavoring, becoming increasingly popular in the early 20th century as Christmas traditions became more widespread.
What makes candy cane cookies so irresistible? It’s a combination of factors! Their charming appearance, reminiscent of the iconic candy cane, makes them a visual delight. The refreshing peppermint flavor provides a welcome contrast to richer holiday desserts. Plus, they’re relatively easy to make, making them a perfect baking project for families to enjoy together. The satisfying crunch gives way to a melt-in-your-mouth texture that keeps you coming back for more. Whether you’re baking them for a cookie exchange, a holiday party, or simply to enjoy with a cup of hot cocoa, these cookies are guaranteed to spread holiday cheer!

Ingredients:
- 1 cup (2 sticks) unsalted butter, softened
- 1 ½ cups granulated sugar
- 2 large eggs
- 1 teaspoon vanilla extract
- ½ teaspoon peppermint extract
- 3 cups all-purpose flour, plus more for dusting
- 1 teaspoon baking powder
- ½ teaspoon salt
- Red food coloring gel
- Crushed candy canes, for decorating
Preparing the Dough:
- Cream the Butter and Sugar: In a large bowl, or the bowl of your stand mixer, cream together the softened butter and granulated sugar until light and fluffy. This usually takes about 3-5 minutes. Make sure the butter is properly softened, but not melted, for the best results. You want a smooth, pale mixture.
- Add Eggs and Extracts: Beat in the eggs one at a time, mixing well after each addition. Then, stir in the vanilla extract and peppermint extract. The peppermint extract is key to that classic candy cane flavor, so don’t skip it! But be careful not to add too much, as it can be overpowering.
- Combine Dry Ingredients: In a separate medium bowl, whisk together the flour, baking powder, and salt. This ensures that the baking powder and salt are evenly distributed throughout the flour, which is crucial for a consistent texture.
- Gradually Add Dry Ingredients to Wet Ingredients: Gradually add the dry ingredients to the wet ingredients, mixing on low speed until just combined. Be careful not to overmix the dough, as this can result in tough cookies. Mix until you see no more streaks of flour.
- Divide and Color the Dough: Divide the dough in half. In one half, knead in the red food coloring gel until you achieve your desired shade of red. I recommend using gel food coloring because it’s more concentrated and won’t change the consistency of the dough as much as liquid food coloring. Start with a few drops and add more until you get the color you want.
- Chill the Dough: Wrap each half of the dough (the plain and the red) separately in plastic wrap and chill in the refrigerator for at least 2 hours, or preferably overnight. This chilling time is essential because it allows the gluten in the flour to relax, which will prevent the cookies from spreading too much during baking. It also makes the dough easier to handle.
Shaping the Candy Cane Cookies:
- Preheat Oven and Prepare Baking Sheets: Preheat your oven to 375°F (190°C). Line baking sheets with parchment paper or silicone baking mats. This will prevent the cookies from sticking and make cleanup a breeze.
- Roll Out the Dough: On a lightly floured surface, roll out each color of dough into a rope about ½ inch thick. You’ll want the ropes to be roughly the same length.
- Twist the Dough: Place a red rope and a plain rope side by side. Gently twist them together to create a candy cane stripe effect.
- Shape into Candy Canes: Cut the twisted ropes into 4-inch lengths. Curve the top of each length to form a candy cane shape. You can make them as curvy or as straight as you like!
- Place on Baking Sheets: Place the shaped candy canes onto the prepared baking sheets, leaving about 1 inch of space between each cookie.
Baking the Cookies:
- Bake: Bake for 8-10 minutes, or until the edges are lightly golden brown. Keep a close eye on them, as they can burn easily. The baking time will depend on your oven, so start checking them at 8 minutes.
- Cool: Remove the baking sheets from the oven and let the cookies cool on the baking sheets for a few minutes before transferring them to a wire rack to cool completely.
Decorating the Cookies:
- Prepare the Candy Cane Crumbs: Place the candy canes in a zip-top bag and crush them with a rolling pin or mallet. You want a mixture of fine crumbs and slightly larger pieces.
- Add a Touch of Moisture (Optional): If you want the crushed candy canes to adhere really well, you can lightly brush the tops of the cookies with a simple glaze made from powdered sugar and a little milk or water. This is optional, but it helps the candy cane crumbs stick better.
- Sprinkle with Crushed Candy Canes: While the cookies are still slightly warm (or while the glaze is still wet, if you used it), sprinkle the crushed candy canes over the tops of the cookies. Gently press the candy cane crumbs into the cookies to ensure they adhere well.
- Let Set: Allow the cookies to cool completely and the candy cane crumbs to set before serving or storing.
Tips and Tricks for Perfect Candy Cane Cookies:
- Use Softened Butter: Make sure your butter is properly softened, but not melted. This will ensure that it creams properly with the sugar, resulting in a light and fluffy dough.
- Don’t Overmix the Dough: Overmixing the dough can develop the gluten, resulting in tough cookies. Mix until just combined.
- Chill the Dough: Chilling the dough is essential for preventing the cookies from spreading too much during baking and for making the dough easier to handle.
- Use Gel Food Coloring: Gel food coloring is more concentrated than liquid food coloring and won’t change the consistency of the dough as much.
- Bake Evenly: Rotate the baking sheets halfway through baking to ensure that the cookies bake evenly.
- Cool Completely: Allow the cookies to cool completely before decorating to prevent the candy cane crumbs from melting.
- Storage: Store the cookies in an airtight container at room temperature for up to 5 days.
- Variations: You can add other extracts to the dough, such as almond extract or lemon extract, for a different flavor. You can also use different colors of food coloring to create different striped patterns.
- Troubleshooting: If your cookies are spreading too much, try chilling the dough for a longer period of time. If your cookies are too dry, try adding a tablespoon or two of milk to the dough.
Making Ahead and Storage:
The dough for these candy cane cookies can be made ahead of time and stored in the refrigerator for up to 3 days. You can also freeze the dough for up to 2 months. Thaw the dough in the refrigerator overnight before using.
Baked cookies can be stored in an airtight container at room temperature for up to 5 days. They can also be frozen for up to 2 months. Thaw the cookies at room temperature before serving.
Serving Suggestions:
These candy cane cookies are perfect for serving at holiday parties, giving as gifts, or simply enjoying with a cup of hot cocoa. They’re also a fun activity to do with kids!
Here are a few serving suggestions:
- Serve them with a glass of milk or hot chocolate.
- Package them in festive tins or bags to give as gifts.
- Use them to decorate a holiday dessert platter.
- Crumble them over ice cream or yogurt.
- Enjoy them as a sweet treat any time of day!
Nutritional Information (Approximate):
Please note that the nutritional information is an estimate and may vary depending on the specific ingredients used.
- Calories: Approximately 150-200 per cookie
- Fat: 8-10 grams
- Saturated Fat: 5-6 grams
- Cholesterol: 30-40 milligrams
- Sodium: 50-70 milligrams
- Carbohydrates: 20-25 grams
- Sugar: 12-15 grams
- Protein: 1-2 grams
Enjoy your delicious homemade candy cane cookies! I hope this recipe helps you create some wonderful holiday memories.
Conclusion:
This isn’t just another cookie recipe; it’s a gateway to holiday cheer, a sprinkle of magic in every bite, and a guaranteed crowd-pleaser. These candy cane cookies are more than just delicious; they’re a tradition waiting to happen in your kitchen. The delightful peppermint flavor, the festive swirl, and the satisfying crunch all combine to create a truly unforgettable treat. I know you might be thinking, “Another cookie recipe? Really?” But trust me on this one. The simplicity of the ingredients and the straightforward instructions make this recipe accessible to bakers of all skill levels, from seasoned pros to kitchen novices.
But the real reason you absolutely must try these cookies is the sheer joy they bring. Imagine the smiles on your loved ones’ faces as they bite into these festive delights. Picture yourself, warm and cozy, sipping hot cocoa and enjoying a freshly baked candy cane cookie on a cold winter’s night. That’s the magic we’re talking about!
And the best part? You can easily customize these cookies to suit your own preferences. For a richer, more decadent experience, try dipping the finished cookies in melted dark chocolate and sprinkling them with crushed peppermint candies. Or, if you’re feeling adventurous, add a touch of almond extract to the dough for a subtle nutty flavor. You could even experiment with different food colorings to create a rainbow of festive swirls.
Serving suggestions are endless! These cookies are perfect for holiday parties, cookie exchanges, or simply as a sweet treat to enjoy with your family. Package them up in decorative tins and give them as gifts to friends, neighbors, and coworkers. They’re also a wonderful addition to any dessert platter. Imagine a plate piled high with these beautiful cookies, alongside other holiday favorites like gingerbread men and sugar plums. It’s a feast for the eyes and the taste buds!
Don’t be afraid to get creative and put your own spin on this recipe. Maybe you want to add a sprinkle of edible glitter for extra sparkle, or perhaps you’d like to use a different type of peppermint extract. The possibilities are endless! The most important thing is to have fun and enjoy the process of baking these delicious cookies.
I truly believe that these candy cane cookies will become a cherished part of your holiday traditions. They’re easy to make, incredibly delicious, and guaranteed to bring a smile to everyone’s face. So, what are you waiting for? Preheat your oven, gather your ingredients, and get ready to bake some holiday magic!
I’m so excited for you to try this recipe and experience the joy of baking these festive treats. And please, don’t forget to share your creations with me! I’d love to see your photos and hear about your experiences. Tag me on social media and let me know how your cookies turned out. I can’t wait to see your beautiful candy cane cookie creations! Happy baking!
Candy Cane Cookies: The Ultimate Festive Recipe
Festive candy cane cookies with peppermint flavor and crunchy candy cane topping, perfect for the holidays.
Ingredients
- 1 cup (2 sticks) unsalted butter, softened
- 1 ½ cups granulated sugar
- 2 large eggs
- 1 teaspoon vanilla extract
- ½ teaspoon peppermint extract
- 3 cups all-purpose flour, plus more for dusting
- 1 teaspoon baking powder
- ½ teaspoon salt
- Red food coloring gel
- Crushed candy canes, for decorating
Instructions
- Cream the Butter and Sugar: In a large bowl, or the bowl of your stand mixer, cream together the softened butter and granulated sugar until light and fluffy. This usually takes about 3-5 minutes. Make sure the butter is properly softened, but not melted, for the best results. You want a smooth, pale mixture.
- Add Eggs and Extracts: Beat in the eggs one at a time, mixing well after each addition. Then, stir in the vanilla extract and peppermint extract. The peppermint extract is key to that classic candy cane flavor, so don’t skip it! But be careful not to add too much, as it can be overpowering.
- Combine Dry Ingredients: In a separate medium bowl, whisk together the flour, baking powder, and salt. This ensures that the baking powder and salt are evenly distributed throughout the flour, which is crucial for a consistent texture.
- Gradually Add Dry Ingredients to Wet Ingredients: Gradually add the dry ingredients to the wet ingredients, mixing on low speed until just combined. Be careful not to overmix the dough, as this can result in tough cookies. Mix until you see no more streaks of flour.
- Divide and Color the Dough: Divide the dough in half. In one half, knead in the red food coloring gel until you achieve your desired shade of red. I recommend using gel food coloring because it’s more concentrated and won’t change the consistency of the dough as much as liquid food coloring. Start with a few drops and add more until you get the color you want.
- Chill the Dough: Wrap each half of the dough (the plain and the red) separately in plastic wrap and chill in the refrigerator for at least 2 hours, or preferably overnight. This chilling time is essential because it allows the gluten in the flour to relax, which will prevent the cookies from spreading too much during baking. It also makes the dough easier to handle.
- Preheat Oven and Prepare Baking Sheets: Preheat your oven to 375°F (190°C). Line baking sheets with parchment paper or silicone baking mats. This will prevent the cookies from sticking and make cleanup a breeze.
- Roll Out the Dough: On a lightly floured surface, roll out each color of dough into a rope about ½ inch thick. You’ll want the ropes to be roughly the same length.
- Twist the Dough: Place a red rope and a plain rope side by side. Gently twist them together to create a candy cane stripe effect.
- Shape into Candy Canes: Cut the twisted ropes into 4-inch lengths. Curve the top of each length to form a candy cane shape. You can make them as curvy or as straight as you like!
- Place on Baking Sheets: Place the shaped candy canes onto the prepared baking sheets, leaving about 1 inch of space between each cookie.
- Bake: Bake for 8-10 minutes, or until the edges are lightly golden brown. Keep a close eye on them, as they can burn easily. The baking time will depend on your oven, so start checking them at 8 minutes.
- Cool: Remove the baking sheets from the oven and let the cookies cool on the baking sheets for a few minutes before transferring them to a wire rack to cool completely.
- Prepare the Candy Cane Crumbs: Place the candy canes in a zip-top bag and crush them with a rolling pin or mallet. You want a mixture of fine crumbs and slightly larger pieces.
- Add a Touch of Moisture (Optional): If you want the crushed candy canes to adhere really well, you can lightly brush the tops of the cookies with a simple glaze made from powdered sugar and a little milk or water. This is optional, but it helps the candy cane crumbs stick better.
- Sprinkle with Crushed Candy Canes: While the cookies are still slightly warm (or while the glaze is still wet, if you used it), sprinkle the crushed candy canes over the tops of the cookies. Gently press the candy cane crumbs into the cookies to ensure they adhere well.
- Let Set: Allow the cookies to cool completely and the candy cane crumbs to set before serving or storing.
Notes
- Use softened butter, but not melted.
- Don’t overmix the dough.
- Chilling the dough is essential.
- Gel food coloring is recommended.
- Rotate baking sheets for even baking.
- Cool completely before decorating.
- Store in an airtight container at room temperature for up to 5 days.
- Dough can be made ahead and stored in the refrigerator for up to 3 days or frozen for up to 2 months.
- Baked cookies can be frozen for up to 2 months.


Leave a Comment