
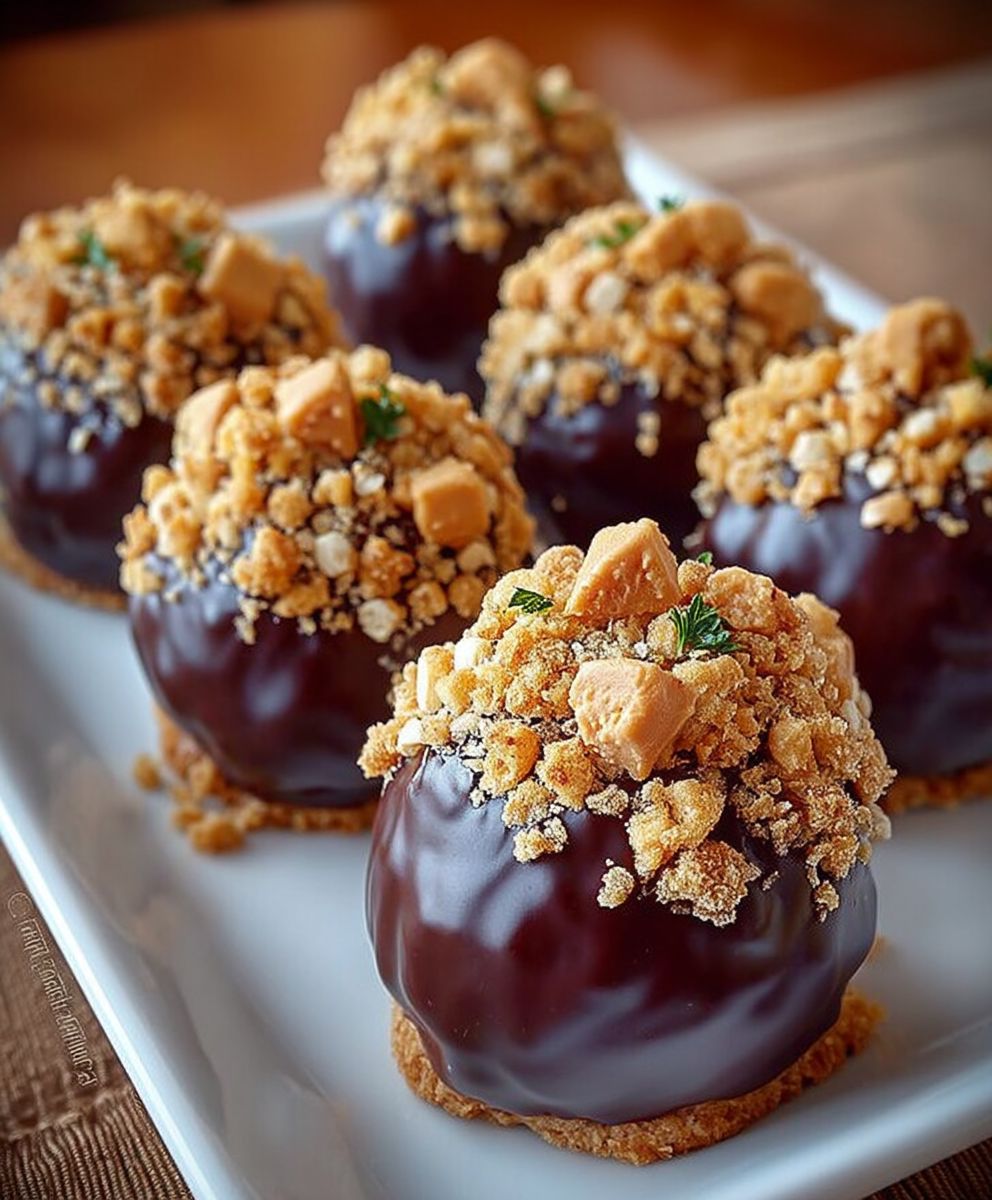
Butterfinger Balls: Prepare to be amazed by this no-bake treat that perfectly captures the irresistible flavor of a Butterfinger candy bar in a bite-sized ball of deliciousness! Forget complicated baking projects; this recipe is so simple, even the kids can help.
While the Butterfinger candy bar itself doesn’t have a long, storied history like some classic confections, its unique peanut butter and cornflake crisp texture has captivated candy lovers since the 1920s. The name, cleverly chosen to entice consumers, has become synonymous with a distinct flavor profile that’s both sweet and satisfying. These Butterfinger Balls take that iconic flavor and elevate it to a new level of easy-to-make indulgence.
What’s not to love? The combination of creamy peanut butter, crunchy cornflakes, and sweet chocolate creates a symphony of textures and tastes that’s simply addictive. They’re perfect for holiday gatherings, potlucks, or just a quick and easy treat when you’re craving something sweet. Plus, the no-bake aspect makes them incredibly convenient, especially during those busy times when you don’t want to turn on the oven. Get ready to experience the joy of Butterfinger Balls your taste buds will thank you!

Ingredients:
- 1 (16 ounce) package of Butterfinger candy bars, unwrapped
- 8 ounces cream cheese, softened
- 1 teaspoon vanilla extract
- 1/2 cup powdered sugar, plus more for dusting
- 12 ounces chocolate candy coating (melting wafers or chocolate chips with a tablespoon of shortening), melted
- Optional: Sprinkles or chopped Butterfingers for decoration
Preparing the Butterfinger Mixture:
Okay, let’s get started! The first step is to break down those Butterfinger bars. You can use a food processor for this, which is super quick, or you can do it by hand. I personally like the hand method because it gives you more control over the size of the pieces. We want them finely crushed, but not completely pulverized.
- Crushing the Butterfingers: If you’re using a food processor, pulse the Butterfinger bars until they are finely crushed. Be careful not to over-process them into a paste. If you’re doing it by hand, place the unwrapped Butterfinger bars in a large zip-top bag. Seal the bag and use a rolling pin or meat mallet to crush the candy bars into small pieces. This might take a little elbow grease, but it’s a great way to relieve some stress!
- Combining Ingredients: In a large mixing bowl, combine the crushed Butterfinger bars, softened cream cheese, vanilla extract, and ½ cup of powdered sugar. Make sure your cream cheese is really soft; otherwise, you’ll end up with lumps, and nobody wants that!
- Mixing Thoroughly: Use an electric mixer (handheld or stand mixer) to beat the ingredients together until they are well combined and smooth. You might need to scrape down the sides of the bowl a few times to ensure everything is evenly mixed. The mixture should be thick and slightly sticky.
Forming the Balls:
Now comes the fun part rolling the Butterfinger mixture into balls! This can get a little messy, so I recommend having a clean workspace and maybe even dampening your hands slightly to prevent the mixture from sticking too much.
- Scooping the Mixture: Use a small cookie scoop or a spoon to scoop out portions of the Butterfinger mixture. I usually aim for about 1 tablespoon per ball, but you can make them bigger or smaller depending on your preference. Just keep in mind that larger balls will take longer to chill and dip.
- Rolling into Balls: Gently roll each portion of the mixture between your palms to form a smooth ball. Don’t press too hard, or the mixture will become too dense. If the mixture is too sticky, try chilling it in the refrigerator for about 15-20 minutes before rolling.
- Arranging on a Baking Sheet: Place the formed Butterfinger balls on a baking sheet lined with parchment paper or wax paper. This will prevent them from sticking to the sheet and make it easier to remove them later.
- Chilling the Balls: Once all the balls are formed, place the baking sheet in the refrigerator and chill for at least 30 minutes, or even better, for an hour. This will help them firm up and make them easier to dip in the chocolate. Trust me, this step is crucial!
Melting the Chocolate and Dipping:
While the Butterfinger balls are chilling, it’s time to melt the chocolate. You can use melting wafers, which are specifically designed for dipping, or you can use chocolate chips with a little bit of shortening. I prefer melting wafers because they melt smoothly and set up nicely, but chocolate chips work just fine too.
- Melting the Chocolate: Place the chocolate candy coating (or chocolate chips and shortening) in a microwave-safe bowl. Microwave in 30-second intervals, stirring after each interval, until the chocolate is completely melted and smooth. Be careful not to overheat the chocolate, as it can seize up and become grainy. If you prefer, you can also melt the chocolate in a double boiler over simmering water.
- Preparing the Dipping Station: Once the chocolate is melted, set up your dipping station. You’ll need the bowl of melted chocolate, the baking sheet with the chilled Butterfinger balls, and a fork or dipping tools. I like to use two forks one to dip the ball and the other to help remove it from the chocolate.
- Dipping the Balls: Remove the chilled Butterfinger balls from the refrigerator. One at a time, carefully dip each ball into the melted chocolate, making sure it is completely coated. Use the fork to lift the ball out of the chocolate and gently tap off any excess chocolate.
- Placing on Parchment Paper: Place the chocolate-covered Butterfinger ball back on the parchment-lined baking sheet.
- Decorating (Optional): If you want to add some extra flair, sprinkle the chocolate-covered balls with sprinkles or chopped Butterfingers while the chocolate is still wet. This will help the decorations adhere to the chocolate.
- Repeat: Repeat the dipping and decorating process with the remaining Butterfinger balls.
Setting and Storing:
Almost there! Now we just need to let the chocolate set up completely. This usually takes about 30 minutes to an hour at room temperature, or you can speed up the process by placing the baking sheet in the refrigerator for about 15-20 minutes.
- Setting the Chocolate: Allow the chocolate to set completely. You’ll know it’s ready when the chocolate is firm to the touch and no longer sticky.
- Dusting with Powdered Sugar (Optional): Once the chocolate is set, you can lightly dust the Butterfinger balls with powdered sugar for an extra touch of sweetness and visual appeal. This is totally optional, but I think it makes them look extra fancy!
- Storing the Butterfinger Balls: Store the Butterfinger balls in an airtight container in the refrigerator. They will keep for up to a week, but I doubt they’ll last that long!
Tips and Tricks for Perfect Butterfinger Balls:
- Softened Cream Cheese is Key: Make sure your cream cheese is completely softened before mixing it with the other ingredients. This will ensure a smooth and creamy texture.
- Don’t Overheat the Chocolate: Be careful not to overheat the chocolate when melting it, as it can seize up and become grainy. Microwave in short intervals and stir frequently.
- Chill the Balls Before Dipping: Chilling the Butterfinger balls before dipping them in chocolate is crucial. This will help them hold their shape and prevent them from melting in the warm chocolate.
- Use a Double Boiler for Extra Smooth Chocolate: If you want to ensure perfectly smooth melted chocolate, use a double boiler instead of the microwave.
- Get Creative with Decorations: Don’t be afraid to get creative with your decorations! You can use different types of sprinkles, chopped nuts, or even drizzle with white chocolate.
- Make Ahead: These Butterfinger balls can be made ahead of time and stored in the refrigerator until you’re ready to serve them.
Variations:
- Peanut Butter Cup Version: Substitute half of the Butterfinger bars with peanut butter cups for a delicious peanut butter and chocolate combination.
- Dark Chocolate: Use dark chocolate instead of milk chocolate for a richer, more intense flavor.
- White Chocolate: Use white chocolate for a sweet and creamy alternative.
- Add a Crunch: Mix in some crushed pretzels or rice cereal for added crunch.
Enjoy your homemade Butterfinger Balls! They’re the perfect treat for parties, holidays, or just a sweet snack any time of day. They are always a crowd-pleaser!
Conclusion:
And there you have it! These Butterfinger Balls are truly a must-try for anyone with a sweet tooth, especially if you’re looking for a no-bake treat that’s both incredibly easy and unbelievably delicious. The combination of the crunchy peanut butter candy, the creamy peanut butter, and the smooth chocolate coating creates a symphony of textures and flavors that will have everyone begging for more. I know I always do!
What makes these little bites of heaven so special is their versatility. They’re perfect for holiday gatherings, potlucks, or even just a simple weeknight dessert when you need a little pick-me-up. Plus, they’re so easy to customize!
Serving Suggestions and Variations:
* Elevate the Presentation: Arrange the Butterfinger Balls on a decorative platter and dust them with a light coating of powdered sugar for an elegant touch. You can also use mini cupcake liners to keep them neat and tidy.
* Drizzle Delight: After the chocolate coating has set, drizzle melted white chocolate or dark chocolate over the balls for an extra layer of decadence. A sprinkle of sea salt can also enhance the sweetness and add a delightful salty-sweet contrast.
* Nutty Goodness: Add chopped peanuts, pecans, or walnuts to the melted chocolate before dipping the balls for an extra crunch and nutty flavor.
* Spice it Up: A pinch of cinnamon or cayenne pepper in the peanut butter mixture can add a warm and subtle kick.
* Cookie Crumbles: Roll the finished Butterfinger Balls in crushed Oreos or graham crackers for a fun and flavorful twist.
* Ice Cream Topping: Crumble these Butterfinger Balls over your favorite ice cream for an instant upgrade. They add the perfect amount of crunch and sweetness.
* Gift Giving: Package these treats in small cellophane bags tied with ribbon for a thoughtful and homemade gift. They’re sure to be a hit!
I truly believe that this recipe for Butterfinger Balls is a winner. It’s simple enough for even the most novice baker (or non-baker, since there’s no baking involved!), yet the results are impressive enough to wow your friends and family. The best part is that you can easily adapt the recipe to suit your own taste preferences. Don’t be afraid to experiment with different coatings, fillings, and toppings to create your own signature version.
I’m so excited for you to try this recipe and experience the joy of these irresistible treats. Once you make them, I guarantee they’ll become a staple in your dessert repertoire. So, gather your ingredients, put on some music, and get ready to have some fun in the kitchen!
And now, for the most important part: I want to hear about your experience! Did you try the recipe? Did you make any variations? What did your friends and family think? Please share your thoughts, photos, and tips in the comments below. I can’t wait to see what you create! Happy baking (or rather, no-baking)! Let me know how your Butterfinger Balls turn out!
Butterfinger Balls: Easy Recipe & Tips for Perfect Treats
Easy, delicious, no-bake Butterfinger Balls made with crushed Butterfinger candy bars, cream cheese, and coated in melted chocolate. Perfect for any occasion!
Ingredients
- 1 (16 ounce) package of Butterfinger candy bars, unwrapped
- 8 ounces cream cheese, softened
- 1 teaspoon vanilla extract
- 1/2 cup powdered sugar, plus more for dusting
- 12 ounces chocolate candy coating (melting wafers or chocolate chips with a tablespoon of shortening), melted
- Optional: Sprinkles or chopped Butterfingers for decoration
Instructions
- Crush the Butterfingers: Use a food processor or place unwrapped Butterfinger bars in a zip-top bag and crush with a rolling pin until finely crushed.
- Combine Ingredients: In a large mixing bowl, combine crushed Butterfinger bars, softened cream cheese, vanilla extract, and ½ cup of powdered sugar.
- Mix Thoroughly: Use an electric mixer to beat the ingredients together until well combined and smooth. Scrape down the sides of the bowl as needed.
- Scoop the Mixture: Use a small cookie scoop or spoon to scoop out portions of the Butterfinger mixture (about 1 tablespoon per ball).
- Rolling into Balls: Gently roll each portion of the mixture between your palms to form a smooth ball. If the mixture is too sticky, chill for 15-20 minutes before rolling.
- Arranging on a Baking Sheet: Place the formed Butterfinger balls on a baking sheet lined with parchment paper.
- Chilling the Balls: Place the baking sheet in the refrigerator and chill for at least 30 minutes (or up to an hour).
- Melting the Chocolate: Place the chocolate candy coating (or chocolate chips and shortening) in a microwave-safe bowl. Microwave in 30-second intervals, stirring after each interval, until completely melted and smooth. Alternatively, melt in a double boiler.
- Dipping the Balls: Remove the chilled Butterfinger balls from the refrigerator. One at a time, carefully dip each ball into the melted chocolate, ensuring it is completely coated. Use a fork to lift the ball out of the chocolate and gently tap off any excess chocolate.
- Placing on Parchment Paper: Place the chocolate-covered Butterfinger ball back on the parchment-lined baking sheet.
- Decorating (Optional): Sprinkle the chocolate-covered balls with sprinkles or chopped Butterfingers while the chocolate is still wet.
- Repeat: Repeat the dipping and decorating process with the remaining Butterfinger balls.
- Setting the Chocolate: Allow the chocolate to set completely (about 30 minutes to an hour at room temperature, or 15-20 minutes in the refrigerator).
- Dusting with Powdered Sugar (Optional): Lightly dust the Butterfinger balls with powdered sugar.
- Storing the Butterfinger Balls: Store the Butterfinger balls in an airtight container in the refrigerator.
Notes
- Make sure the cream cheese is completely softened for a smooth texture.
- Don’t overheat the chocolate when melting.
- Chilling the balls before dipping is crucial for them to hold their shape.
- Use a double boiler for extra smooth melted chocolate.
- Get creative with decorations!
- These can be made ahead of time.

Leave a Comment