
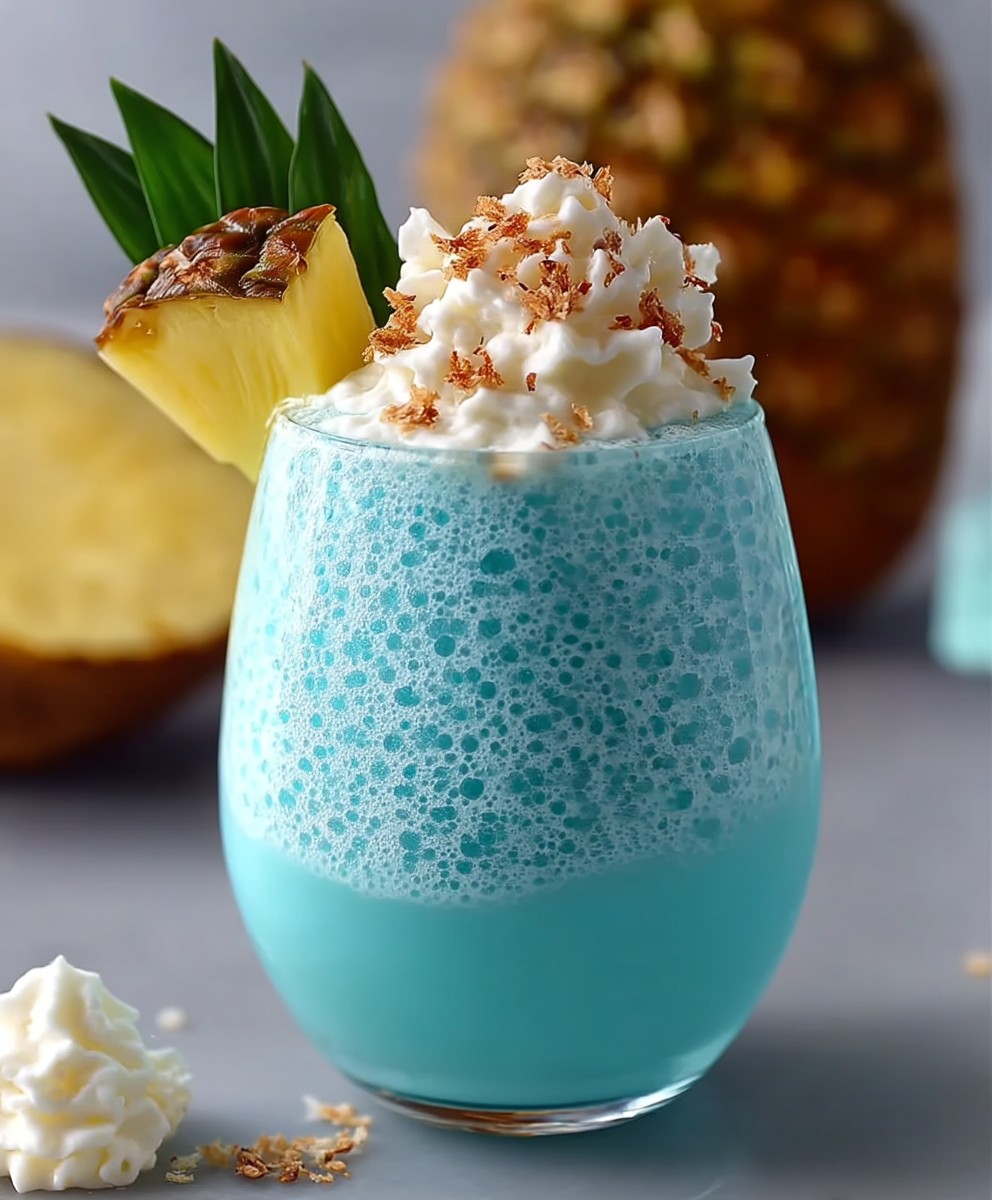
Blue Pina Colada: Just imagine yourself transported to a tropical paradise with every sip of this vibrant, eye-catching cocktail! Forget the everyday and dive into a world of creamy coconut, sweet pineapple, and a mesmerizing blue hue that will make you feel like you’re gazing at the crystal-clear waters of the Caribbean.
The classic Piña Colada, a beloved symbol of Puerto Rico, has a rich history dating back to the 1950s. While the exact origins are debated, its enduring popularity is undeniable. But we’re taking this classic to a whole new level with a stunning blue twist! The addition of blue curaçao not only gives this drink its captivating color but also adds a subtle citrus note that perfectly complements the traditional flavors.
What’s not to love about a Piña Colada? The creamy texture, the sweet and tangy taste, and the sheer vacation vibes it evokes make it a crowd-pleaser every time. This Blue Pina Colada is no exception. It’s incredibly easy to make, requiring just a few simple ingredients and a blender. Whether you’re hosting a summer barbecue, celebrating a special occasion, or simply craving a taste of the tropics, this drink is guaranteed to impress. Get ready to blend your way to paradise!

Ingredients:
- 1 cup frozen pineapple chunks
- 1/2 cup cream of coconut
- 1/4 cup white rum (or more, to taste!)
- 1/4 cup blue curaçao liqueur
- 1/4 cup pineapple juice
- 1 tablespoon lime juice, freshly squeezed
- 1 cup ice cubes
- Pineapple wedges, for garnish
- Maraschino cherries, for garnish
Preparing the Blue Piña Colada
- Combine the ingredients: In a high-powered blender, combine the frozen pineapple chunks, cream of coconut, white rum, blue curaçao liqueur, pineapple juice, and lime juice. I like to start with the liquids at the bottom to help the blender get going.
- Add the ice: Add the ice cubes to the blender. The amount of ice you use will affect the thickness of your piña colada, so adjust to your preference. If you like a really thick, almost smoothie-like consistency, add a little more ice. If you prefer a slightly thinner drink, use a little less.
- Blend until smooth: Secure the lid on the blender and blend on high speed until the mixture is completely smooth and creamy. This usually takes about 30-60 seconds, depending on the power of your blender. You may need to stop the blender a couple of times to scrape down the sides with a spatula to ensure that all the ingredients are fully incorporated.
- Check the consistency: Once the mixture is blended, check the consistency. If it’s too thick, add a splash of pineapple juice or water to thin it out. If it’s too thin, add a few more ice cubes and blend again until you reach your desired consistency.
- Taste and adjust: Give the piña colada a taste and adjust the flavors as needed. If you prefer a sweeter drink, add a little more cream of coconut or a touch of simple syrup. If you want a more tart flavor, add a squeeze more lime juice. If you want a stronger drink, add a little more rum. Remember to add small amounts at a time and blend again after each addition to ensure the flavors are well balanced.
Serving and Garnishing
- Prepare your glasses: Get your serving glasses ready. I like to use hurricane glasses or tall cocktail glasses for piña coladas, but any glass will work. You can chill the glasses in the freezer for a few minutes before serving to keep your piña colada extra cold.
- Pour the piña colada: Carefully pour the blended piña colada into the prepared glasses. Fill each glass almost to the top, leaving a little room for garnish.
- Garnish generously: Garnish each glass with a pineapple wedge and a maraschino cherry. You can also add a small paper umbrella for a festive touch. Get creative with your garnishes! You could also add a sprig of mint, a slice of lime, or even a sprinkle of toasted coconut flakes.
- Serve immediately: Serve the Blue Piña Coladas immediately and enjoy! These are best enjoyed fresh, as the ice will start to melt over time.
Tips and Variations
Here are a few extra tips and variations to help you customize your Blue Piña Colada to your liking:
- Use fresh pineapple: While frozen pineapple is convenient, using fresh pineapple will give your piña colada an even more vibrant flavor. If you’re using fresh pineapple, make sure it’s ripe and juicy. You’ll need about 1 cup of chopped fresh pineapple for this recipe.
- Make it virgin: To make a non-alcoholic version of this drink, simply omit the rum and blue curaçao. You can replace the rum with a little extra pineapple juice or coconut cream. The blue curaçao can be replaced with a few drops of blue food coloring (optional, for the color) and a splash of orange juice or orange extract for a similar flavor profile.
- Add a swirl of color: For an extra visual appeal, you can add a swirl of grenadine to the bottom of the glass before pouring in the piña colada. The grenadine will create a beautiful layered effect.
- Make it spicy: For a little kick, add a pinch of cayenne pepper or a few slices of jalapeño to the blender along with the other ingredients. This will add a subtle heat that complements the sweetness of the pineapple and coconut.
- Use different types of rum: Experiment with different types of rum to find your favorite flavor combination. Dark rum will add a richer, more complex flavor, while coconut rum will enhance the coconut flavor of the drink.
- Make it ahead of time: You can prepare the piña colada mixture ahead of time and store it in the refrigerator for up to 24 hours. Just be sure to blend it again before serving to ensure that the ingredients are well combined. Add the ice just before serving to prevent the drink from becoming watery.
- Get creative with the garnish: Don’t be afraid to get creative with your garnishes! Use different types of fruit, such as strawberries, blueberries, or kiwi. You can also add edible flowers or a sprinkle of colored sugar to the rim of the glass.
Choosing the Right Ingredients
The quality of your ingredients will greatly affect the taste of your Blue Piña Colada. Here’s what to look for when selecting your ingredients:
- Pineapple: Whether you’re using fresh or frozen pineapple, make sure it’s ripe and juicy. Fresh pineapple should have a sweet, fragrant aroma and a slightly soft texture. Frozen pineapple should be bright yellow and free of ice crystals.
- Cream of coconut: Cream of coconut is a thick, sweet coconut product that is different from coconut milk. Look for a high-quality brand that is made with real coconut cream and has a smooth, creamy texture. Coco Lopez is a popular and widely available brand.
- Rum: Choose a white rum that you enjoy drinking. A good quality white rum will have a smooth, clean flavor that complements the other ingredients in the piña colada.
- Blue Curaçao: Blue Curaçao is an orange-flavored liqueur that gets its vibrant blue color from food coloring. It adds a unique flavor and color to the piña colada.
- Pineapple juice: Use 100% pineapple juice for the best flavor. Avoid juices that are made with added sugar or artificial flavors.
- Lime juice: Freshly squeezed lime juice is always best. It has a brighter, more vibrant flavor than bottled lime juice.
Troubleshooting Your Piña Colada
Sometimes, things don’t go exactly as planned. Here are some common problems you might encounter when making a Blue Piña Colada and how to fix them:
- Piña Colada is too thick: If your piña colada is too thick, add a little more pineapple juice or water to thin it out. Blend again until you reach your desired consistency.
- Piña Colada is too thin: If your piña colada is too thin, add a few more ice cubes and blend again until you reach your desired consistency.
- Piña Colada is not sweet enough: If your piña colada is not sweet enough, add a little more cream of coconut or a touch of simple syrup. Blend again after each addition to ensure the flavors are well balanced.
- Piña Colada is too tart: If your piña colada is too tart, add a squeeze more lime juice. Blend again after each addition to ensure the flavors are well balanced.
- Piña Colada is not strong enough: If your piña colada is not strong enough, add a little more rum. Blend again after each addition to ensure the flavors are well balanced.
- Blender is struggling to blend the ingredients: If your blender is struggling to blend the ingredients, try adding a little more liquid to help it along. You can also try pulsing the blender a few times before blending on high speed. If necessary, stop the blender and scrape down the sides with a spatula to ensure that all the ingredients are fully incorporated.
Nutritional Information (Approximate)
Please note that the nutritional information is an estimate and can vary depending on the specific ingredients used.
- Calories: Approximately 350-450 per serving
- Fat: Approximately 20-30 grams
- Saturated Fat: Approximately 15-20 grams
- Sodium: Approximately 20-40 milligrams
- Carbohydrates: Approximately 30-40 grams
- Sugar: Approximately 25-35 grams
- Protein: Approximately 1-2 grams
Enjoy
Conclusion:
So there you have it! This Blue Pina Colada recipe is more than just a drink; it’s a mini-vacation in a glass, a burst of tropical flavor that will transport you to sun-drenched beaches with every sip. I truly believe this is a must-try for anyone looking to add a little pizzazz to their cocktail repertoire. The vibrant blue hue alone makes it a showstopper, perfect for parties, barbecues, or simply unwinding after a long day. But it’s not just about the looks; the creamy coconut, tangy pineapple, and subtle hint of blue curaçao create a symphony of flavors that will tantalize your taste buds.
Why is this recipe a must-try? Because it’s incredibly easy to make, requiring minimal ingredients and effort. You don’t need to be a professional bartender to whip up this delightful concoction. Plus, it’s endlessly customizable! Feel free to adjust the sweetness to your liking by adding more or less pineapple juice. For a richer, creamier texture, use full-fat coconut cream instead of coconut milk. And if you’re feeling adventurous, try adding a splash of lime juice for an extra zing.
Speaking of variations, the possibilities are endless! For a non-alcoholic version, simply omit the rum and increase the amount of pineapple juice or coconut cream. You can also experiment with different fruits, such as mango or passion fruit, to create your own unique tropical blend. Garnish is key to elevating this drink to the next level. I love adding a pineapple wedge, a maraschino cherry, and a miniature umbrella for that ultimate vacation vibe. You could even rim the glass with shredded coconut for an extra touch of elegance.
Serving suggestions? This Blue Pina Colada is perfect as a refreshing poolside drink, a festive addition to a summer barbecue, or a sophisticated cocktail for a special occasion. Pair it with grilled seafood, spicy tacos, or even a simple cheese platter for a delightful culinary experience. It’s also a fantastic option for themed parties, such as a luau or a beach party. Imagine serving these vibrant blue cocktails to your guests they’ll be instantly impressed!
But don’t just take my word for it. I wholeheartedly encourage you to try this recipe and experience the magic of the Blue Pina Colada for yourself. I’ve poured my heart into perfecting this recipe, and I’m confident that you’ll love it as much as I do. It’s a guaranteed crowd-pleaser, a conversation starter, and a delicious way to escape the everyday.
Once you’ve tried it, I’d absolutely love to hear about your experience! Did you make any modifications? What did you think of the flavor? What did you serve it with? Share your photos and stories on social media using #BluePinaColadaRecipe. I can’t wait to see your creations and hear your feedback. Let’s spread the tropical vibes and make the world a little bit bluer, one delicious cocktail at a time! Happy mixing!
Blue Pina Colada: Recipe, Ingredients, and Tropical Twist
A tropical twist on the classic Piña Colada! This vibrant blue cocktail combines pineapple, coconut, rum, and blue curaçao for a refreshing and visually stunning drink.
Ingredients
- 1 cup frozen pineapple chunks
- 1/2 cup cream of coconut
- 1/4 cup white rum (or more, to taste!)
- 1/4 cup blue curaçao liqueur
- 1/4 cup pineapple juice
- 1 tablespoon lime juice, freshly squeezed
- 1 cup ice cubes
- Pineapple wedges, for garnish
- Maraschino cherries, for garnish
Instructions
- Combine the ingredients: In a high-powered blender, combine the frozen pineapple chunks, cream of coconut, white rum, blue curaçao liqueur, pineapple juice, and lime juice. I like to start with the liquids at the bottom to help the blender get going.
- Add the ice: Add the ice cubes to the blender. The amount of ice you use will affect the thickness of your piña colada, so adjust to your preference. If you like a really thick, almost smoothie-like consistency, add a little more ice. If you prefer a slightly thinner drink, use a little less.
- Blend until smooth: Secure the lid on the blender and blend on high speed until the mixture is completely smooth and creamy. This usually takes about 30-60 seconds, depending on the power of your blender. You may need to stop the blender a couple of times to scrape down the sides with a spatula to ensure that all the ingredients are fully incorporated.
- Check the consistency: Once the mixture is blended, check the consistency. If it’s too thick, add a splash of pineapple juice or water to thin it out. If it’s too thin, add a few more ice cubes and blend again until you reach your desired consistency.
- Taste and adjust: Give the piña colada a taste and adjust the flavors as needed. If you prefer a sweeter drink, add a little more cream of coconut or a touch of simple syrup. If you want a more tart flavor, add a squeeze more lime juice. If you want a stronger drink, add a little more rum. Remember to add small amounts at a time and blend again after each addition to ensure the flavors are well balanced.
- Prepare your glasses: Get your serving glasses ready. I like to use hurricane glasses or tall cocktail glasses for piña coladas, but any glass will work. You can chill the glasses in the freezer for a few minutes before serving to keep your piña colada extra cold.
- Pour the piña colada: Carefully pour the blended piña colada into the prepared glasses. Fill each glass almost to the top, leaving a little room for garnish.
- Garnish generously: Garnish each glass with a pineapple wedge and a maraschino cherry. You can also add a small paper umbrella for a festive touch. Get creative with your garnishes! You could also add a sprig of mint, a slice of lime, or even a sprinkle of toasted coconut flakes.
- Serve immediately: Serve the Blue Piña Coladas immediately and enjoy! These are best enjoyed fresh, as the ice will start to melt over time.
Notes
- Use fresh pineapple: While frozen pineapple is convenient, using fresh pineapple will give your piña colada an even more vibrant flavor. If you’re using fresh pineapple, make sure it’s ripe and juicy. You’ll need about 1 cup of chopped fresh pineapple for this recipe.
- Make it virgin: To make a non-alcoholic version of this drink, simply omit the rum and blue curaçao. You can replace the rum with a little extra pineapple juice or coconut cream. The blue curaçao can be replaced with a few drops of blue food coloring (optional, for the color) and a splash of orange juice or orange extract for a similar flavor profile.
- Add a swirl of color: For an extra visual appeal, you can add a swirl of grenadine to the bottom of the glass before pouring in the piña colada. The grenadine will create a beautiful layered effect.
- Make it spicy: For a little kick, add a pinch of cayenne pepper or a few slices of jalapeño to the blender along with the other ingredients. This will add a subtle heat that complements the sweetness of the pineapple and coconut.
- Use different types of rum: Experiment with different types of rum to find your favorite flavor combination. Dark rum will add a richer, more complex flavor, while coconut rum will enhance the coconut flavor of the drink.
- Make it ahead of time: You can prepare the piña colada mixture ahead of time and store it in the refrigerator for up to 24 hours. Just be sure to blend it again before serving to ensure that the ingredients are well combined. Add the ice just before serving to prevent the drink from becoming watery.
- Get creative with the garnish: Don’t be afraid to get creative with your garnishes! Use different types of fruit, such as strawberries, blueberries, or kiwi. You can also add edible flowers or a sprinkle of colored sugar to the rim of the glass.
- Piña Colada is too thick: If your piña colada is too thick, add a little more pineapple juice or water to thin it out. Blend again until you reach your desired consistency.
- Piña Colada is too thin: If your piña colada is too thin, add a few more ice cubes and blend again until you reach your desired consistency.
- Piña Colada is not sweet enough: If your piña colada is not sweet enough, add a little more cream of coconut or a touch of simple syrup. Blend again after each addition to ensure the flavors are well balanced.
- Piña Colada is too tart: If your piña colada is too tart, add a squeeze more lime juice. Blend again after each addition to ensure the flavors are well balanced.
- Piña Colada is not strong enough: If your piña colada is not strong enough, add a little more rum. Blend again after each addition to ensure the flavors are well balanced.
- Blender is struggling to blend the ingredients: If your blender is struggling to blend the ingredients, try adding a little more liquid to help it along. You can also try pulsing the blender a few times before blending on high speed. If necessary, stop the blender and scrape down the sides with a spatula to ensure that all the ingredients are fully incorporated.
Leave a Comment