
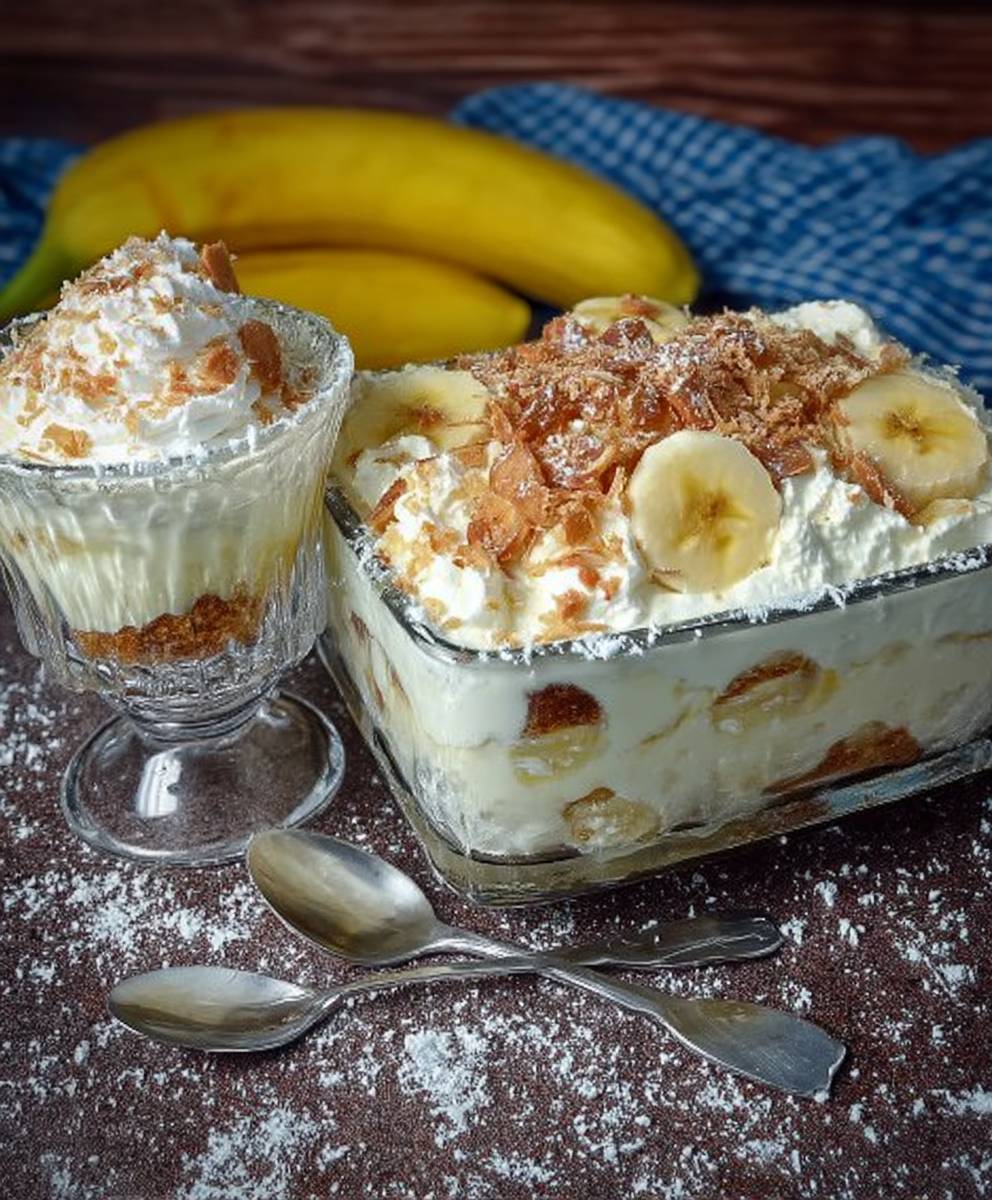
Banana pudding, oh, where do I even begin? Imagine sinking your spoon into layers of creamy vanilla custard, sweet slices of ripe banana, and crisp vanilla wafers, all melding together in perfect harmony. It’s a dessert that evokes feelings of warmth, nostalgia, and pure, unadulterated comfort. Have I got your attention yet?
This classic Southern treat has a surprisingly rich history. While its exact origins are debated, banana pudding gained widespread popularity in the early 20th century, thanks in part to the increased availability of bananas and the rise of convenience foods like vanilla wafers. It quickly became a staple at family gatherings, church potlucks, and holiday celebrations across the South, solidifying its place in American culinary tradition.
But what is it about banana pudding that makes it so irresistible? For many, it’s the delightful combination of textures the smooth, velvety custard, the soft, yielding bananas, and the satisfying crunch of the wafers. The flavor profile is equally appealing, offering a balance of sweetness, creaminess, and a hint of banana goodness. Plus, let’s be honest, it’s incredibly easy to make! Whether you’re a seasoned baker or a kitchen novice, you can whip up a batch of this crowd-pleasing dessert in no time. So, are you ready to learn how to make the best banana pudding you’ve ever tasted? Let’s get started!

Ingredients:
- 4 cups whole milk
- 1 (5.1 ounce) package instant vanilla pudding mix
- 1 (8 ounce) package cream cheese, softened
- 1 (14 ounce) can sweetened condensed milk
- 1 (12 ounce) container frozen whipped topping, thawed, divided
- About 40 vanilla wafers
- 4-5 ripe bananas, sliced
Preparing the Pudding Base:
Okay, let’s get started with the heart of our banana pudding the creamy, dreamy pudding base! This is where the magic happens, and trust me, it’s easier than you think.
- Whisk the Milk and Pudding Mix: In a large bowl (I prefer a glass one, but any large bowl will do), pour in your 4 cups of whole milk. Now, sprinkle in the entire package of instant vanilla pudding mix. Grab your whisk and get to work! Whisk the milk and pudding mix together until it’s well combined and starts to thicken slightly. This usually takes about 2-3 minutes. You’ll notice it getting a little heavier as you whisk.
- Beat in the Cream Cheese: This is where the cream cheese comes in. Make sure it’s softened! Seriously, don’t skip this step. Softened cream cheese will blend in much easier and give you a smooth, lump-free pudding. Add the softened cream cheese to the milk and pudding mixture. Using an electric mixer (a hand mixer works great!), beat the cream cheese into the pudding until it’s completely smooth and creamy. This might take a few minutes, so be patient and scrape down the sides of the bowl as needed to ensure everything is incorporated. You want a velvety texture here.
- Sweeten with Condensed Milk: Now for the sweetness! Pour in the entire can of sweetened condensed milk. This adds a rich, sweet flavor that’s just perfect for banana pudding. Continue to beat with the electric mixer until the condensed milk is fully incorporated and the mixture is smooth and homogenous. Give it a taste you should be getting that classic banana pudding sweetness!
- Fold in Half the Whipped Topping: We’re almost there! Take about half of your thawed whipped topping (that’s roughly 6 ounces) and gently fold it into the pudding mixture. Folding is important here you don’t want to deflate the whipped topping. Use a spatula and gently cut through the mixture, turning it over and over until the whipped topping is evenly distributed. This will make the pudding light and airy. Reserve the remaining whipped topping for the final layer.
Assembling the Banana Pudding:
Now comes the fun part layering all those delicious ingredients! This is where you get to be a little creative, but I’ll give you my tried-and-true method for perfect banana pudding every time.
- Choose Your Dish: You can use a large trifle bowl, a 9×13 inch baking dish, or individual serving dishes. I personally love using a trifle bowl because it shows off all the beautiful layers. If you’re using a baking dish, make sure it’s deep enough to hold all the ingredients. For individual servings, small glass bowls or mason jars are adorable.
- First Layer: Vanilla Wafers: Start by creating a layer of vanilla wafers on the bottom of your dish. You can arrange them neatly or just scatter them around it’s up to you! If you’re using a trifle bowl, you might need to break some of the wafers to fit them around the curved edges. Don’t worry about covering every single spot the pudding will fill in the gaps.
- Second Layer: Banana Slices: Next, arrange a layer of sliced bananas over the vanilla wafers. I like to slice my bananas about ¼ inch thick. Make sure the bananas are ripe but not too mushy. You want them to hold their shape. Try to cover as much of the vanilla wafer layer as possible with the banana slices.
- Third Layer: Pudding: Now, spoon about one-third of the pudding mixture over the banana slices. Gently spread it out to cover the bananas evenly. You can use a spatula or the back of a spoon to smooth it out.
- Repeat Layers: Repeat the layers of vanilla wafers, banana slices, and pudding two more times, ending with a layer of pudding on top. So, it’s wafers, bananas, pudding, wafers, bananas, pudding, wafers, bananas, pudding.
- Final Layer: Whipped Topping: Spread the remaining whipped topping evenly over the final layer of pudding. This creates a beautiful, creamy top layer. You can leave it smooth or create swirls with a spoon or spatula.
- Garnish (Optional): If you want to get fancy, you can garnish the top of the banana pudding with a few extra vanilla wafers, some banana slices, or a sprinkle of crushed vanilla wafers. I sometimes like to drizzle a little caramel sauce on top for extra indulgence.
Chilling and Serving:
This is the hardest part waiting! But trust me, chilling the banana pudding is essential for the flavors to meld together and for the wafers to soften. It’s worth the wait!
- Cover and Chill: Cover the banana pudding tightly with plastic wrap. Make sure the plastic wrap is touching the surface of the whipped topping to prevent a skin from forming. Place the banana pudding in the refrigerator and chill for at least 4 hours, or preferably overnight. This allows the vanilla wafers to soften and the flavors to blend together beautifully.
- Serve and Enjoy: Once the banana pudding is chilled, it’s ready to serve! Scoop it out into individual bowls or spoons and enjoy. The pudding will be creamy, the bananas will be soft, and the vanilla wafers will have a delightful, cake-like texture.
Tips for the Best Banana Pudding:
- Use Ripe Bananas: Ripe bananas are sweeter and have a better flavor than unripe bananas. However, avoid using overripe bananas, as they will be too mushy.
- Don’t Overmix the Pudding: Overmixing the pudding can make it tough. Just mix until the ingredients are combined.
- Chill Thoroughly: Chilling the banana pudding for at least 4 hours is essential for the flavors to meld together.
- Add a Pinch of Salt: A pinch of salt in the pudding mixture can enhance the sweetness and balance the flavors.
- Experiment with Flavors: Feel free to experiment with different flavors of pudding mix, such as banana cream or butterscotch. You can also add a layer of chopped nuts or chocolate shavings for extra flavor and texture.
- Preventing Banana Browning: To prevent the banana slices from browning, you can toss them with a little lemon juice before layering them in the pudding. This will help them stay fresh and vibrant.
- Vanilla Wafer Alternatives: If you’re not a fan of vanilla wafers, you can use other cookies, such as shortbread cookies or graham crackers. Just make sure they’re not too sweet or overpowering.
Variations:
- Chocolate Banana Pudding: Add a layer of chocolate pudding or chocolate shavings to the banana pudding for a chocolatey twist.
- Peanut Butter Banana Pudding: Swirl in some peanut butter into the pudding mixture or add a layer of peanut butter cups for a peanut butter flavor.
- Caramel Banana Pudding: Drizzle caramel sauce over the top of the banana pudding for a caramel flavor.
- Spiced Banana Pudding: Add a pinch of cinnamon or nutmeg to the pudding mixture for a warm, spiced flavor.
Enjoy your homemade banana pudding! I hope you love it as much as I do. It’s the perfect dessert for any occasion, from potlucks to family gatherings to a simple weeknight treat.
Conclusion:
This isn’t just another dessert; it’s a journey back to simpler times, a hug in a bowl, and quite possibly the best banana pudding you’ll ever taste. From the creamy, dreamy texture to the sweet, comforting flavor, every spoonful is pure bliss. I truly believe this recipe is a must-try because it’s more than just a collection of ingredients; it’s a labor of love that yields an incredibly satisfying and unforgettable treat. The layers of vanilla wafers, fresh bananas, and luscious custard create a symphony of flavors and textures that will have everyone begging for seconds.
But the beauty of this recipe lies not only in its simplicity but also in its versatility. Feel free to experiment and make it your own! For a richer, more decadent experience, try using sweetened condensed milk in the custard. If you’re feeling adventurous, a splash of rum or bourbon in the custard adds a delightful warmth and depth of flavor. For a lighter version, you can substitute the heavy cream with whipped coconut cream.
Serving suggestions are endless! This banana pudding is perfect on its own, chilled and ready to devour. But you can also elevate it with a few simple additions. A sprinkle of toasted coconut flakes adds a delightful crunch and nutty flavor. A drizzle of caramel sauce takes it to a whole new level of indulgence. And for a truly special occasion, top it with a dollop of freshly whipped cream and a few extra banana slices.
Consider individual servings in mason jars for a charming presentation at your next gathering. Or, for a potluck, assemble it in a large trifle bowl to showcase the beautiful layers. No matter how you choose to serve it, this banana pudding is guaranteed to be a crowd-pleaser.
I’ve poured my heart and soul into perfecting this recipe, and I’m confident that you’ll love it as much as I do. It’s the perfect dessert for any occasion, from casual weeknight dinners to festive holiday celebrations. It’s also a wonderful way to use up those ripe bananas that are sitting on your counter.
So, what are you waiting for? Gather your ingredients, put on your apron, and get ready to create some magic in the kitchen. I promise you, this banana pudding is worth every single minute of effort. It’s a dessert that will bring joy to your taste buds and warmth to your heart.
I’m so excited for you to try this recipe and experience the deliciousness for yourself. Once you’ve made it, I would absolutely love to hear about your experience! Did you make any variations? What did your family and friends think? Share your photos and stories in the comments below. Your feedback is invaluable, and it helps me continue to improve and create even more amazing recipes for you. Don’t be shy let me know what you think! Happy baking, and enjoy every single bite of your homemade banana pudding! I can’t wait to hear all about your banana pudding adventures!
Banana Pudding: The Ultimate Guide to Creamy, Dreamy Dessert
Creamy vanilla pudding layered with sweet bananas and crisp vanilla wafers, topped with whipped cream. A comforting and easy Southern dessert!
Ingredients
- 4 cups whole milk
- 1 (5.1 ounce) package instant vanilla pudding mix
- 1 (8 ounce) package cream cheese, softened
- 1 (14 ounce) can sweetened condensed milk
- 1 (12 ounce) container frozen whipped topping, thawed, divided
- About 40 vanilla wafers
- 4-5 ripe bananas, sliced
Instructions
- In a large bowl, whisk together the milk and pudding mix until slightly thickened (2-3 minutes).
- Beat in the softened cream cheese with an electric mixer until smooth. Scrape down the sides of the bowl as needed.
- Add the sweetened condensed milk and beat until fully incorporated.
- Gently fold in half of the thawed whipped topping until evenly distributed. Reserve the remaining whipped topping for the final layer.
- Choose a trifle bowl, 9×13 inch baking dish, or individual serving dishes.
- Layer vanilla wafers on the bottom of the dish.
- Arrange a layer of sliced bananas over the vanilla wafers.
- Spoon about one-third of the pudding mixture over the banana slices, spreading evenly.
- Repeat the layers of vanilla wafers, banana slices, and pudding two more times, ending with a layer of pudding on top.
- Spread the remaining whipped topping evenly over the final layer of pudding.
- Garnish with extra vanilla wafers, banana slices, or a drizzle of caramel sauce (optional).
- Cover the banana pudding tightly with plastic wrap, ensuring the plastic wrap touches the surface of the whipped topping.
- Chill in the refrigerator for at least 4 hours, or preferably overnight.
- Scoop into individual bowls and enjoy!
Notes
- Use ripe but not overripe bananas.
- Ensure cream cheese is fully softened for a smooth pudding.
- Fold in whipped topping gently to maintain its airiness.
- Chilling is crucial for the flavors to meld and the wafers to soften.
- To prevent banana browning, toss banana slices with a little lemon juice before layering.
- Experiment with different flavors of pudding mix, such as banana cream or butterscotch.
- Vanilla wafer alternatives: shortbread cookies or graham crackers.

Leave a Comment