
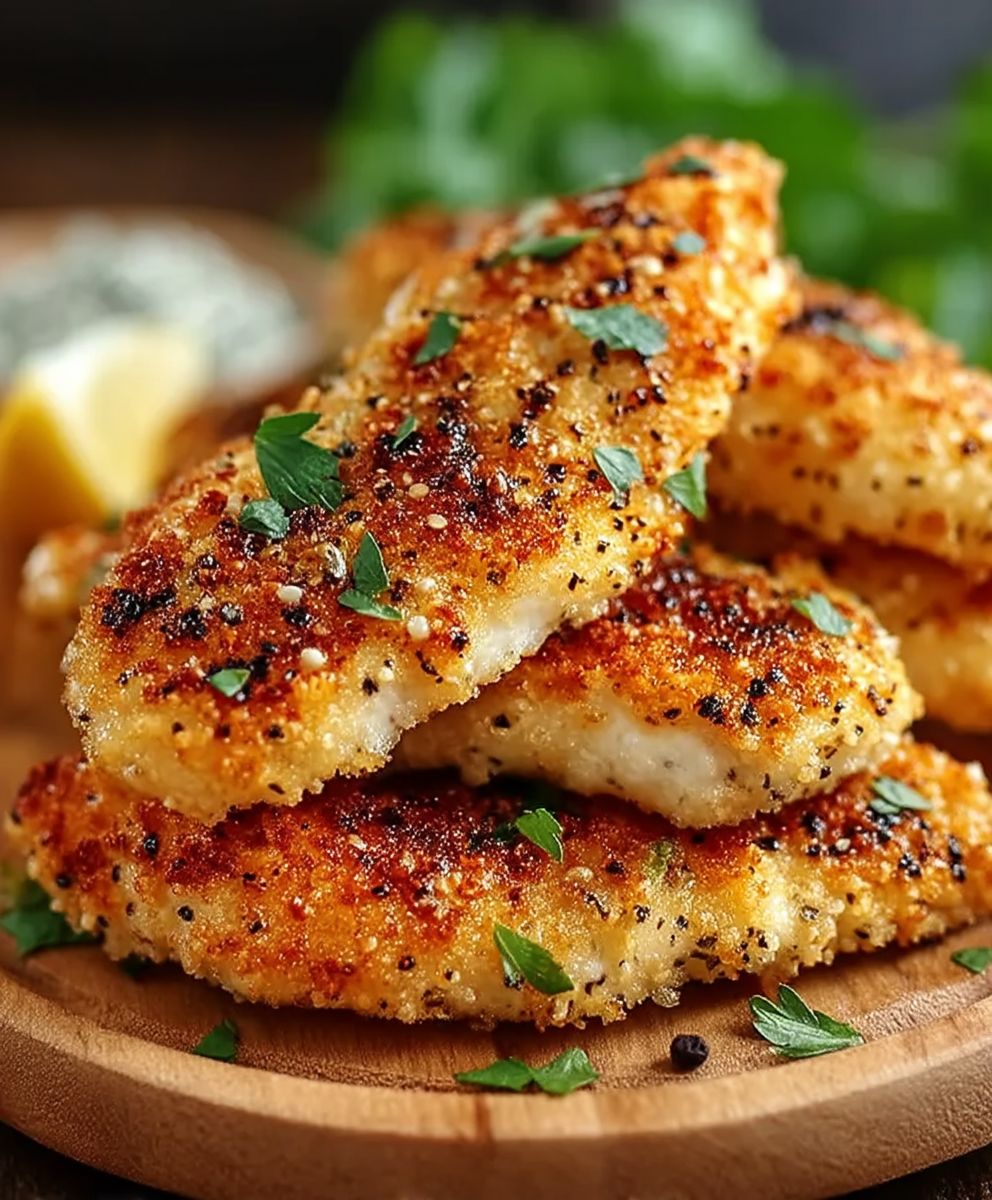
Baked Chicken Tenders: Crispy on the outside, juicy on the inside, and unbelievably easy to make say goodbye to greasy takeout and hello to your new favorite weeknight dinner! I’m so excited to share this recipe with you because it’s a total game-changer. Forget everything you thought you knew about bland, boring chicken tenders. These are bursting with flavor and have that satisfying crunch that everyone craves.
Chicken tenders, in their various forms, have become a staple in American cuisine, particularly as a kid-friendly option. But let’s be honest, adults love them too! While traditionally fried, baking offers a healthier alternative without sacrificing taste or texture. The beauty of baked chicken tenders lies in their simplicity and versatility. You can customize the seasonings to your liking, making them spicy, savory, or even sweet.
What makes this dish so universally appealing? It’s the perfect combination of crispy coating and tender, moist chicken. Plus, they’re incredibly convenient. Whether you’re looking for a quick and easy dinner for the family, a crowd-pleasing appetizer for a party, or a protein-packed snack, baked chicken tenders are always a winner. Get ready to experience chicken tender perfection!

Ingredients:
- 1.5 lbs boneless, skinless chicken breasts, cut into 1-inch thick strips
- 1 cup all-purpose flour
- 1 teaspoon salt
- 1/2 teaspoon black pepper
- 1 teaspoon garlic powder
- 1/2 teaspoon paprika
- 1/4 teaspoon cayenne pepper (optional, for a little kick!)
- 2 large eggs
- 1/4 cup milk
- 1 cup panko breadcrumbs
- 1/2 cup grated Parmesan cheese
- 1/4 cup olive oil
- Cooking spray
Preparing the Chicken and Breading Station
Okay, let’s get started! First things first, we need to prep our chicken and get our breading station ready. This is key to making sure everything goes smoothly.
- Prepare the Chicken: Take your chicken breasts and cut them into strips that are about 1-inch thick. You want them to be uniform in size so they cook evenly. If some are thicker than others, they might take longer to cook, and you don’t want any dry bits! Pat the chicken strips dry with paper towels. This helps the breading adhere better. Trust me, it makes a difference!
- Set up the Flour Mixture: In a shallow dish (like a pie plate or a wide bowl), combine the flour, salt, pepper, garlic powder, paprika, and cayenne pepper (if you’re using it). Whisk everything together really well to make sure the spices are evenly distributed. This is your first breading station.
- Prepare the Egg Wash: In another shallow dish, whisk together the eggs and milk until they are well combined. You want a nice, smooth egg wash. This will help the breadcrumbs stick to the chicken.
- Prepare the Panko Mixture: In a third shallow dish, combine the panko breadcrumbs and grated Parmesan cheese. Mix them together thoroughly. The Parmesan adds a lovely cheesy flavor and helps the breadcrumbs get nice and crispy in the oven.
Breading the Chicken Tenders
Now comes the fun part breading the chicken! This is where we transform those plain chicken strips into something truly delicious.
- Dredge in Flour: Take a chicken strip and dredge it in the flour mixture, making sure it’s completely coated on all sides. Shake off any excess flour. You don’t want a thick layer of flour, just a light coating.
- Dip in Egg Wash: Next, dip the floured chicken strip into the egg wash, again making sure it’s fully coated. Let any excess egg wash drip off.
- Coat in Panko: Finally, dredge the chicken strip in the panko breadcrumb mixture, pressing gently to make sure the breadcrumbs adhere well. You want a nice, even coating of breadcrumbs. Place the breaded chicken strip on a baking sheet that you’ve already prepared with cooking spray.
- Repeat: Repeat steps 1-3 with the remaining chicken strips until all of them are breaded. Try to keep one hand for the wet ingredients (egg wash) and one hand for the dry ingredients (flour and panko) to avoid making a huge mess. It’s a little trick, but it helps!
Baking the Chicken Tenders
We’re almost there! Now it’s time to bake these beauties to golden-brown perfection.
- Preheat the Oven: Preheat your oven to 400°F (200°C). Make sure your oven is fully preheated before you put the chicken in.
- Prepare the Baking Sheet: Lightly spray a baking sheet with cooking spray. This will help prevent the chicken tenders from sticking and ensure they get nice and crispy on the bottom.
- Arrange the Chicken: Arrange the breaded chicken tenders on the prepared baking sheet in a single layer. Make sure they’re not touching each other, so the heat can circulate evenly around each tender.
- Drizzle with Olive Oil: Drizzle the chicken tenders with olive oil. This helps them get extra crispy and golden brown in the oven. You don’t need a ton of oil, just a light drizzle over each tender.
- Bake: Bake for 20-25 minutes, or until the chicken is cooked through and the breadcrumbs are golden brown and crispy. The internal temperature of the chicken should reach 165°F (74°C). Use a meat thermometer to check for doneness.
- Flip (Optional): For even browning, you can flip the chicken tenders halfway through the baking time. This isn’t strictly necessary, but it can help them get extra crispy on both sides.
Serving and Enjoying
Congratulations, you’ve made delicious baked chicken tenders! Now it’s time to serve them up and enjoy the fruits of your labor.
- Let Rest: Once the chicken tenders are done, remove them from the oven and let them rest for a few minutes before serving. This allows the juices to redistribute, resulting in more tender and flavorful chicken.
- Serve with your Favorite Dipping Sauces: Serve the baked chicken tenders with your favorite dipping sauces. Some popular choices include ketchup, honey mustard, ranch dressing, barbecue sauce, or sweet chili sauce. Get creative and try different combinations!
- Enjoy! Enjoy your delicious, homemade baked chicken tenders! They’re perfect as a main course, appetizer, or snack.
Tips and Variations
Want to customize your baked chicken tenders? Here are a few tips and variations to try:
- Spice it Up: Add more cayenne pepper or a pinch of red pepper flakes to the flour mixture for extra heat.
- Add Herbs: Mix dried herbs like oregano, thyme, or rosemary into the panko breadcrumb mixture for added flavor.
- Use Different Cheese: Substitute the Parmesan cheese with other grated cheeses like Romano or Asiago.
- Gluten-Free Option: Use gluten-free flour and gluten-free panko breadcrumbs for a gluten-free version.
- Air Fryer Option: You can also cook these chicken tenders in an air fryer. Preheat your air fryer to 400°F (200°C) and cook for 12-15 minutes, flipping halfway through.
Storage Instructions
If you have any leftover baked chicken tenders (which is unlikely!), here’s how to store them:
- Refrigerate: Store the cooked chicken tenders in an airtight container in the refrigerator for up to 3-4 days.
- Reheat: Reheat the chicken tenders in the oven at 350°F (175°C) for 10-15 minutes, or until heated through. You can also reheat them in the microwave, but they may not be as crispy.
- Freeze: For longer storage, you can freeze the cooked chicken tenders. Place them in a single layer on a baking sheet and freeze for about 2 hours, or until solid. Then, transfer them to a freezer-safe bag or container and store in the freezer for up to 2-3 months. Reheat from frozen in the oven.
Conclusion:
So there you have it! These Baked Chicken Tenders are truly a game-changer. They’re crispy, juicy, and packed with flavor, all without the guilt of frying. I know, I know, it sounds too good to be true, but trust me, one bite and you’ll be hooked. The simplicity of the recipe is another huge win. We’re talking minimal ingredients and straightforward instructions, making it perfect for busy weeknights or when you just don’t feel like spending hours in the kitchen.
But the real reason these Baked Chicken Tenders are a must-try is their versatility. They’re not just a main course; they’re a blank canvas for culinary creativity! Think about it: you can serve them with classic sides like creamy mashed potatoes and steamed green beans for a comforting family meal. Or, for a lighter option, pair them with a vibrant salad and a zesty vinaigrette.
And the fun doesn’t stop there! Get creative with your dipping sauces. Forget the boring ketchup (unless that’s your thing, of course!). Try a tangy honey mustard, a spicy sriracha mayo, or even a cool and refreshing ranch dressing. For a more sophisticated twist, whip up a homemade aioli or a creamy avocado dip. The possibilities are endless!
Looking for variations? I’ve got you covered! Want to add a little heat? Sprinkle some cayenne pepper or chili flakes into the breadcrumb mixture. Craving a cheesy flavor? Mix in some grated Parmesan or Romano cheese. For a gluten-free option, simply use gluten-free breadcrumbs or almond flour. You can even experiment with different herbs and spices to create your own signature blend. Imagine a version with Italian herbs and garlic powder, or one with smoked paprika and onion powder. The only limit is your imagination!
These Baked Chicken Tenders are also fantastic for meal prepping. Make a big batch on Sunday and enjoy them throughout the week in salads, wraps, or even as a protein-packed snack. They’re also a great option for kids’ lunchboxes. They’re healthy, delicious, and easy to eat on the go.
I truly believe that this recipe will become a staple in your kitchen. It’s a crowd-pleaser, a time-saver, and a healthy alternative to traditional fried chicken tenders. Plus, it’s just plain delicious!
So, what are you waiting for? Grab your ingredients, preheat your oven, and get ready to experience the magic of these Baked Chicken Tenders. I’m confident that you’ll love them as much as I do.
And now for the most important part: I want to hear from you! Once you’ve tried the recipe, please come back and share your experience in the comments below. Did you make any variations? What dipping sauces did you use? What did your family think? I’m always eager to learn from your culinary adventures and see how you’ve made this recipe your own. Don’t be shy your feedback is invaluable! Happy cooking!
Baked Chicken Tenders: The Crispiest, Healthiest Recipe
Crispy and delicious baked chicken tenders, perfect for a quick and easy meal! These are coated in a flavorful panko breadcrumb mixture and baked to golden-brown perfection.
Ingredients
- 1.5 lbs boneless, skinless chicken breasts, cut into 1-inch thick strips
- 1 cup all-purpose flour
- 1 teaspoon salt
- 1/2 teaspoon black pepper
- 1 teaspoon garlic powder
- 1/2 teaspoon paprika
- 1/4 teaspoon cayenne pepper (optional, for a little kick!)
- 2 large eggs
- 1/4 cup milk
- 1 cup panko breadcrumbs
- 1/2 cup grated Parmesan cheese
- 1/4 cup olive oil
- Cooking spray
Instructions
- Prepare the Chicken: Cut chicken breasts into 1-inch thick strips. Pat dry with paper towels.
- Set up Flour Mixture: In a shallow dish, combine flour, salt, pepper, garlic powder, paprika, and cayenne pepper (if using). Whisk well.
- Prepare Egg Wash: In another shallow dish, whisk together eggs and milk until well combined.
- Prepare Panko Mixture: In a third shallow dish, combine panko breadcrumbs and grated Parmesan cheese. Mix thoroughly.
- Dredge in Flour: Dredge each chicken strip in the flour mixture, coating completely. Shake off excess.
- Dip in Egg Wash: Dip the floured chicken strip into the egg wash, coating fully. Let excess drip off.
- Coat in Panko: Dredge the chicken strip in the panko breadcrumb mixture, pressing gently to adhere. Place on a baking sheet prepared with cooking spray.
- Repeat: Repeat steps 5-7 with remaining chicken strips.
- Preheat Oven: Preheat oven to 400°F (200°C).
- Prepare Baking Sheet: Lightly spray a baking sheet with cooking spray.
- Arrange Chicken: Arrange breaded chicken tenders on the prepared baking sheet in a single layer, not touching.
- Drizzle with Olive Oil: Drizzle the chicken tenders with olive oil.
- Bake: Bake for 20-25 minutes, or until chicken is cooked through (internal temperature of 165°F/74°C) and breadcrumbs are golden brown and crispy.
- Flip (Optional): For even browning, flip the chicken tenders halfway through baking.
- Let Rest: Remove from oven and let rest for a few minutes before serving.
- Serve: Serve with your favorite dipping sauces.
Notes
- Spice it Up: Add more cayenne pepper or a pinch of red pepper flakes to the flour mixture for extra heat.
- Add Herbs: Mix dried herbs like oregano, thyme, or rosemary into the panko breadcrumb mixture for added flavor.
- Use Different Cheese: Substitute the Parmesan cheese with other grated cheeses like Romano or Asiago.
- Gluten-Free Option: Use gluten-free flour and gluten-free panko breadcrumbs for a gluten-free version.
- Air Fryer Option: Preheat your air fryer to 400°F (200°C) and cook for 12-15 minutes, flipping halfway through.
- Storage: Refrigerate leftovers in an airtight container for up to 3-4 days. Reheat in the oven at 350°F (175°C) for 10-15 minutes. Freeze for longer storage (up to 2-3 months).

Leave a Comment