
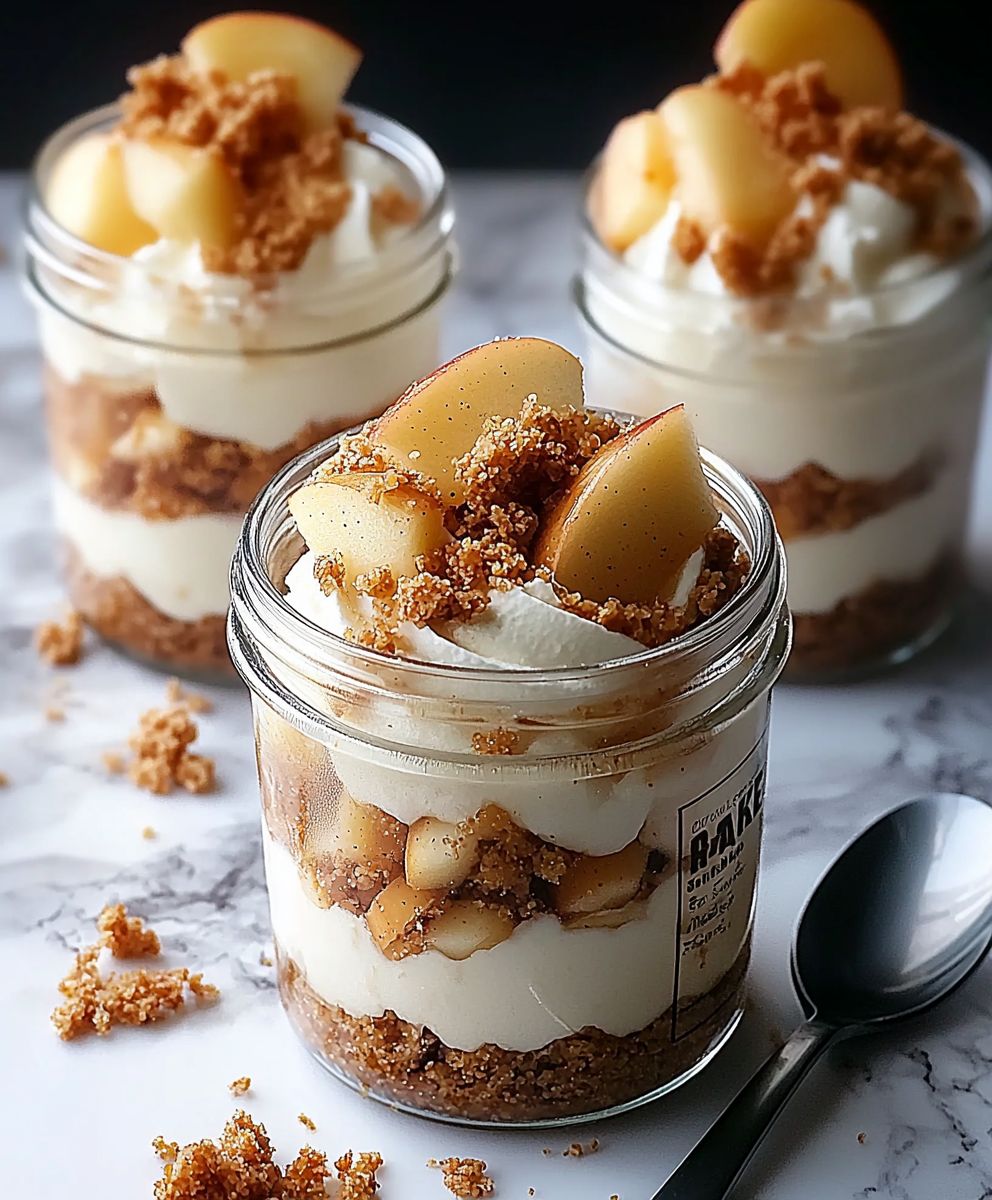
Apple Cheesecake Jars: Prepare to be utterly captivated by this delightful dessert that perfectly marries the comforting flavors of apple pie with the creamy indulgence of cheesecake, all conveniently layered in individual jars! Imagine sinking your spoon into a symphony of textures the buttery crumble, the tangy cheesecake filling, and the sweet, spiced apples. Its a taste of autumn in every bite, and trust me, its absolutely irresistible.
While the exact origins of layering desserts in jars are somewhat modern, the inspiration draws heavily from classic desserts like trifles and parfaits, which have graced tables for centuries. The beauty of these individual servings lies in their portability and ease of preparation, making them perfect for parties, picnics, or simply a delightful treat for yourself. The combination of apples and cheesecake, however, is a timeless pairing, evoking feelings of warmth and nostalgia. Think of it as a deconstructed apple cheesecake, offering all the familiar flavors in a fun and accessible format.
People adore Apple Cheesecake Jars for so many reasons. The taste is undeniably divine the sweet and tart apples complement the rich and creamy cheesecake beautifully. The texture is equally appealing, with the contrasting layers of crunchy crumble and smooth filling creating a delightful sensory experience. But perhaps the biggest draw is the convenience. These jars are incredibly easy to assemble, require no baking (unless you choose to bake your crumble), and are perfectly portioned for individual enjoyment. So, if you’re looking for a show-stopping dessert that’s both delicious and effortless, look no further than these charming Apple Cheesecake Jars!

Ingredients:
- For the Crust:
- 1 ½ cups graham cracker crumbs
- 5 tablespoons unsalted butter, melted
- ¼ cup granulated sugar
- ¼ teaspoon ground cinnamon
- For the Cheesecake Filling:
- 2 (8 ounce) packages cream cheese, softened
- ¾ cup granulated sugar
- 2 large eggs
- ½ cup sour cream
- 1 teaspoon vanilla extract
- ¼ teaspoon ground cinnamon
- For the Apple Pie Filling:
- 4 medium apples (Granny Smith, Honeycrisp, or a mix), peeled, cored, and diced
- ¼ cup granulated sugar
- 2 tablespoons unsalted butter
- 2 tablespoons all-purpose flour
- ¼ cup water
- 1 teaspoon lemon juice
- 1 teaspoon ground cinnamon
- ½ teaspoon ground nutmeg
- ¼ teaspoon ground cloves
- Optional Toppings:
- Caramel sauce
- Whipped cream
- Chopped pecans or walnuts
Preparing the Graham Cracker Crust:
- In a medium bowl, combine the graham cracker crumbs, melted butter, granulated sugar, and ground cinnamon. Mix well until all ingredients are evenly distributed and the mixture resembles wet sand.
- Divide the graham cracker mixture evenly among 6-8 small jars or glasses (depending on their size). Press the mixture firmly into the bottom of each jar to create a compact crust. I like to use the back of a spoon to really pack it in there.
- Place the jars in the refrigerator to chill while you prepare the cheesecake filling and apple pie filling. This will help the crust set and prevent it from becoming soggy.
Making the Cheesecake Filling:
- In a large bowl, beat the softened cream cheese with an electric mixer until smooth and creamy. It’s crucial that your cream cheese is properly softened to avoid any lumps in the filling.
- Gradually add the granulated sugar to the cream cheese and continue to beat until well combined and the mixture is light and fluffy. Scrape down the sides of the bowl as needed to ensure everything is incorporated.
- Add the eggs one at a time, beating well after each addition. Be careful not to overmix at this stage, as it can incorporate too much air into the batter and cause the cheesecake to crack during baking.
- Stir in the sour cream, vanilla extract, and ground cinnamon until just combined. Again, avoid overmixing. The sour cream adds a lovely tang and richness to the cheesecake filling.
Cooking the Apple Pie Filling:
- In a large skillet or saucepan, melt the butter over medium heat. Once melted, add the diced apples and cook for about 5-7 minutes, or until they begin to soften slightly. Stir occasionally to prevent burning.
- Add the granulated sugar, all-purpose flour, water, lemon juice, ground cinnamon, ground nutmeg, and ground cloves to the skillet. Stir well to combine all the ingredients. The flour will help to thicken the sauce.
- Bring the mixture to a simmer and cook for another 8-10 minutes, or until the apples are tender and the sauce has thickened. Stir frequently to prevent sticking and burning. The apples should be soft but still hold their shape.
- Remove the skillet from the heat and let the apple pie filling cool slightly before assembling the cheesecake jars.
Assembling the Apple Cheesecake Jars:
- Preheat your oven to 325°F (160°C).
- Remove the jars from the refrigerator.
- Spoon the cheesecake filling evenly over the graham cracker crust in each jar, leaving about ½ inch of space at the top for the apple pie filling.
- Place the jars on a baking sheet.
- Bake for 20-25 minutes, or until the cheesecake filling is set around the edges but still slightly jiggly in the center. The center will continue to set as it cools.
- Remove the baking sheet from the oven and let the jars cool completely on a wire rack.
- Once the cheesecake filling has cooled, spoon the apple pie filling evenly over the top of each jar.
- Cover the jars with plastic wrap or lids and refrigerate for at least 2 hours, or preferably overnight, to allow the flavors to meld and the cheesecake to fully set.
Serving and Storage:
- Before serving, you can add optional toppings such as caramel sauce, whipped cream, and chopped pecans or walnuts. I personally love a drizzle of warm caramel!
- These Apple Cheesecake Jars are best served chilled.
- Store any leftover cheesecake jars in the refrigerator for up to 3-4 days. Make sure they are tightly covered to prevent them from drying out.
Tips and Variations:
- Crust Variations: If you’re not a fan of graham crackers, you can use other types of cookies for the crust, such as Oreo cookies (without the filling), shortbread cookies, or even gingersnaps. Just adjust the amount of butter accordingly.
- Apple Variety: Feel free to experiment with different types of apples for the filling. Braeburn, Fuji, or Gala apples would also work well.
- Spice it Up: For a more intense apple pie flavor, you can add a pinch of ground ginger or allspice to the apple pie filling.
- No-Bake Option: If you prefer a no-bake version, you can skip the baking step and simply chill the cheesecake filling in the jars for at least 4 hours, or until set. The texture will be slightly softer, but it will still be delicious.
- Individual Servings: Using jars makes these cheesecakes perfect for individual servings, but you can also make one large cheesecake in a springform pan if you prefer. Just adjust the baking time accordingly.
- Caramel Apple Cheesecake: Drizzle caramel sauce into the cheesecake filling before baking for a caramel apple twist.
- Make Ahead: These cheesecake jars are perfect for making ahead of time. You can prepare them up to 2 days in advance and store them in the refrigerator until ready to serve.
- Gluten-Free Option: Use gluten-free graham crackers for the crust to make this recipe gluten-free.
Enjoy your delicious Apple Cheesecake Jars!
Conclusion:
This isn’t just another dessert recipe; it’s an invitation to experience pure, unadulterated joy in a jar! These Apple Cheesecake Jars are a symphony of textures and flavors, from the crunchy graham cracker base to the creamy, tangy cheesecake filling, all topped with the warm, comforting sweetness of spiced apples. Seriously, what’s not to love? I truly believe this is a must-try recipe for anyone who appreciates a delicious and relatively easy dessert. But beyond the incredible taste, what makes these jars so special is their versatility. They’re perfect for individual servings, making them ideal for parties, potlucks, or even just a delightful treat for yourself after a long day. Imagine surprising your guests with these adorable and delectable desserts they’ll be raving about them for weeks! And the best part? You can easily customize them to your liking. Feeling adventurous? Try adding a layer of salted caramel between the graham cracker crust and the cheesecake filling for an extra touch of indulgence. Or, if you’re a fan of nuts, sprinkle some chopped pecans or walnuts on top of the apple topping for added crunch and flavor. For a more festive twist, especially around the holidays, consider incorporating a hint of cinnamon or nutmeg into the cheesecake filling itself. You could even swap out the graham crackers for gingersnap cookies for a spicier, more seasonal base. Serving suggestions are endless! Enjoy them straight from the fridge for a refreshing treat, or let them sit at room temperature for a few minutes to soften the cheesecake slightly. A dollop of whipped cream on top is always a welcome addition, and a sprinkle of cinnamon adds a touch of elegance. For a truly decadent experience, pair these jars with a scoop of vanilla ice cream or a warm cup of coffee. They’re also fantastic alongside a glass of dessert wine or a sparkling cider. I’ve poured my heart and soul into perfecting this recipe, and I’m confident that you’ll love it as much as I do. It’s a guaranteed crowd-pleaser, and it’s surprisingly simple to make. Don’t be intimidated by the layers each step is straightforward and easy to follow. So, what are you waiting for? Gather your ingredients, preheat your oven, and get ready to create some magic in a jar! I promise you, these Apple Cheesecake Jars will become a new favorite in your household. I’m so excited for you to try this recipe! Once you’ve made them, please, please, please come back and share your experience in the comments below. I’d love to hear what you thought, what variations you tried, and any tips or tricks you discovered along the way. Did you add a secret ingredient? Did you find a particularly delicious type of apple to use? Let me know! Your feedback is invaluable, and it helps me to continue creating and sharing recipes that you’ll love. Happy baking, and enjoy every delicious bite! I can’t wait to hear all about your Apple Cheesecake Jars adventures! Print
Apple Cheesecake Jars: Easy Recipe & Perfect Dessert
- Total Time: 175 minutes
- Yield: 6–8 servings 1x
Description
Individual apple cheesecake jars with graham cracker crust, creamy cheesecake filling, and spiced apple pie topping. Perfect for an easy and delicious dessert!
Ingredients
- 1 ½ cups graham cracker crumbs
- 5 tablespoons unsalted butter, melted
- ¼ cup granulated sugar
- ¼ teaspoon ground cinnamon
- 2 (8 ounce) packages cream cheese, softened
- ¾ cup granulated sugar
- 2 large eggs
- ½ cup sour cream
- 1 teaspoon vanilla extract
- ¼ teaspoon ground cinnamon
- 4 medium apples (Granny Smith, Honeycrisp, or a mix), peeled, cored, and diced
- ¼ cup granulated sugar
- 2 tablespoons unsalted butter
- 2 tablespoons all-purpose flour
- ¼ cup water
- 1 teaspoon lemon juice
- 1 teaspoon ground cinnamon
- ½ teaspoon ground nutmeg
- ¼ teaspoon ground cloves
- Caramel sauce
- Whipped cream
- Chopped pecans or walnuts
Instructions
- **Preparing the Graham Cracker Crust:** In a medium bowl, combine the graham cracker crumbs, melted butter, granulated sugar, and ground cinnamon. Mix well until all ingredients are evenly distributed and the mixture resembles wet sand.
- Divide the graham cracker mixture evenly among 6-8 small jars or glasses (depending on their size). Press the mixture firmly into the bottom of each jar to create a compact crust.
- Place the jars in the refrigerator to chill while you prepare the cheesecake filling and apple pie filling.
- **Making the Cheesecake Filling:** In a large bowl, beat the softened cream cheese with an electric mixer until smooth and creamy.
- Gradually add the granulated sugar to the cream cheese and continue to beat until well combined and the mixture is light and fluffy. Scrape down the sides of the bowl as needed.
- Add the eggs one at a time, beating well after each addition. Be careful not to overmix.
- Stir in the sour cream, vanilla extract, and ground cinnamon until just combined. Avoid overmixing.
- **Cooking the Apple Pie Filling:** In a large skillet or saucepan, melt the butter over medium heat. Once melted, add the diced apples and cook for about 5-7 minutes, or until they begin to soften slightly. Stir occasionally.
- Add the granulated sugar, all-purpose flour, water, lemon juice, ground cinnamon, ground nutmeg, and ground cloves to the skillet. Stir well to combine all the ingredients.
- Bring the mixture to a simmer and cook for another 8-10 minutes, or until the apples are tender and the sauce has thickened. Stir frequently.
- Remove the skillet from the heat and let the apple pie filling cool slightly before assembling the cheesecake jars.
- **Assembling the Apple Cheesecake Jars:** Preheat your oven to 325°F (160°C).
- Remove the jars from the refrigerator.
- Spoon the cheesecake filling evenly over the graham cracker crust in each jar, leaving about ½ inch of space at the top for the apple pie filling.
- Place the jars on a baking sheet.
- Bake for 20-25 minutes, or until the cheesecake filling is set around the edges but still slightly jiggly in the center.
- Remove the baking sheet from the oven and let the jars cool completely on a wire rack.
- Once the cheesecake filling has cooled, spoon the apple pie filling evenly over the top of each jar.
- Cover the jars with plastic wrap or lids and refrigerate for at least 2 hours, or preferably overnight, to allow the flavors to meld and the cheesecake to fully set.
- **Serving:** Before serving, you can add optional toppings such as caramel sauce, whipped cream, and chopped pecans or walnuts.
- These Apple Cheesecake Jars are best served chilled.
- Store any leftover cheesecake jars in the refrigerator for up to 3-4 days. Make sure they are tightly covered.
Notes
- It’s crucial that your cream cheese is properly softened to avoid any lumps in the filling.
- Be careful not to overmix the cheesecake filling after adding the eggs, as it can incorporate too much air into the batter and cause the cheesecake to crack during baking.
- The apples should be soft but still hold their shape.
- The center of the cheesecake will continue to set as it cools.
- Refrigerating overnight is recommended for the best flavor and texture.
- Crust Variations: If you’re not a fan of graham crackers, you can use other types of cookies for the crust, such as Oreo cookies (without the filling), shortbread cookies, or even gingersnaps. Just adjust the amount of butter accordingly.
- Apple Variety: Feel free to experiment with different types of apples for the filling. Braeburn, Fuji, or Gala apples would also work well.
- Spice it Up: For a more intense apple pie flavor, you can add a pinch of ground ginger or allspice to the apple pie filling.
- No-Bake Option: If you prefer a no-bake version, you can skip the baking step and simply chill the cheesecake filling in the jars for at least 4 hours, or until set. The texture will be slightly softer, but it will still be delicious.
- Individual Servings: Using jars makes these cheesecakes perfect for individual servings, but you can also make one large cheesecake in a springform pan if you prefer. Just adjust the baking time accordingly.
- Caramel Apple Cheesecake: Drizzle caramel sauce into the cheesecake filling before baking for a caramel apple twist.
- Make Ahead: These cheesecake jars are perfect for making ahead of time. You can prepare them up to 2 days in advance and store them in the refrigerator until ready to serve.
- Gluten-Free Option: Use gluten-free graham crackers for the crust to make this recipe gluten-free.
- Prep Time: 30 minutes
- Cook Time: 25 minutes
Leave a Comment