
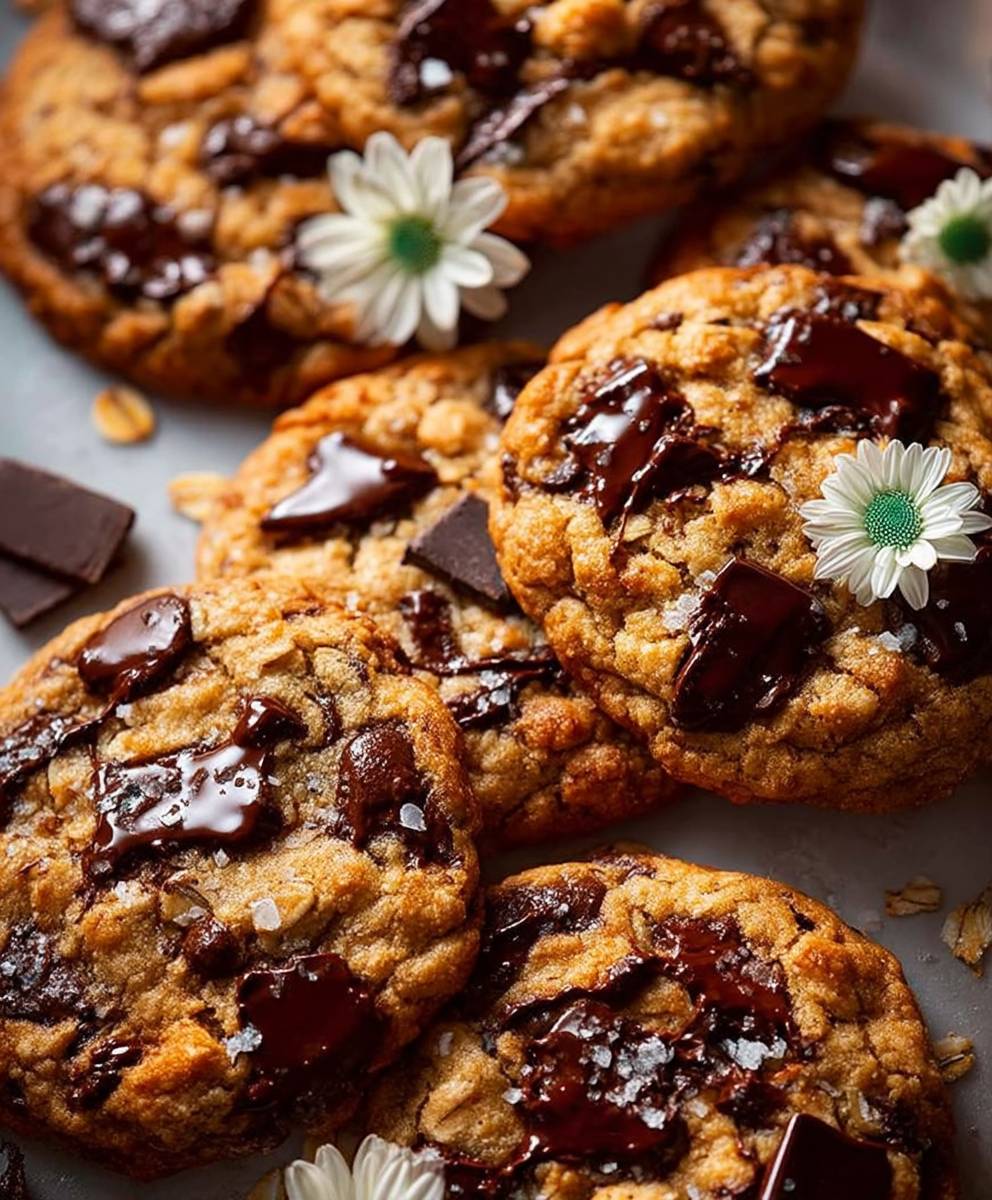
Brown Butter Chocolate Chip Cookies: Prepare to enter a realm of unparalleled cookie perfection! Forget everything you thought you knew about this classic treat because this recipe elevates it to a whole new level. Imagine sinking your teeth into a cookie that boasts a nutty, caramelized depth of flavor, a chewy center, and crisp, golden edges studded with pools of melted chocolate. Sounds divine, doesn’t it?
The secret to this extraordinary cookie lies in the brown butter. While chocolate chip cookies have a long and beloved history in American baking, dating back to the 1930s, the addition of browned butter is a more recent innovation, a chef’s trick that home bakers are now embracing with open arms (and hungry mouths!). This simple step of gently cooking butter until it transforms into a fragrant, amber liquid unlocks a depth of flavor that regular melted butter simply can’t match. It’s a game-changer!
People adore chocolate chip cookies for their comforting familiarity and satisfying sweetness. But these Brown Butter Chocolate Chip Cookies take that comfort to the next level. The nutty notes of the browned butter complement the rich chocolate beautifully, creating a complex and irresistible flavor profile. The texture is also key: a perfectly balanced combination of chewy and crisp that will leave you wanting more. Plus, they’re relatively easy to make, making them the perfect treat for any occasion, from a cozy night in to a celebratory gathering. Get ready to bake the best chocolate chip cookies you’ve ever tasted!

Ingredients:
- 1 cup (2 sticks) unsalted butter
- 1 ¼ cups packed light brown sugar
- ½ cup granulated sugar
- 2 large eggs
- 2 teaspoons vanilla extract
- 2 ¼ cups all-purpose flour
- 1 teaspoon baking soda
- 1 teaspoon salt
- 2 cups semi-sweet chocolate chips
- Optional: Flaky sea salt, for sprinkling
Browning the Butter: The Key to Flavor
Okay, friends, let’s talk about the star of the show: brown butter. This isn’t just melted butter; it’s butter that’s been cooked until the milk solids toast and turn a beautiful amber color, giving it a nutty, toasty flavor that elevates these cookies to a whole new level. Trust me, it’s worth the extra few minutes!
- Melt the butter: Place the butter in a light-colored saucepan over medium heat. A light-colored pan will help you see the color change more easily.
- Watch closely: As the butter melts, it will start to foam. Keep a close eye on it! The foam will subside, and you’ll start to see brown specks forming at the bottom of the pan.
- Swirl and stir: Gently swirl the pan occasionally to ensure even cooking. You can also use a heat-resistant spatula to scrape the bottom of the pan to prevent burning.
- Look for the color change: The butter is ready when it turns a golden amber color and has a nutty aroma. Be careful not to burn it! Burnt butter will taste bitter.
- Remove from heat: Immediately remove the saucepan from the heat and pour the brown butter into a heatproof bowl. This will stop the cooking process.
- Cool slightly: Let the brown butter cool for about 10-15 minutes. It should still be liquid but not scalding hot. This is important because you don’t want to cook the eggs when you add them later.
Making the Cookie Dough
Now that we have our beautiful brown butter, we can move on to making the cookie dough. This part is pretty straightforward, but there are a few key things to keep in mind to ensure perfect cookies every time.
- Combine sugars and brown butter: In a large bowl, whisk together the brown sugar and granulated sugar. Pour in the slightly cooled brown butter and whisk until well combined. The mixture should be smooth and creamy.
- Add eggs and vanilla: Add the eggs one at a time, whisking well after each addition. Then, stir in the vanilla extract.
- Whisk dry ingredients: In a separate medium bowl, whisk together the flour, baking soda, and salt. This ensures that the baking soda and salt are evenly distributed throughout the flour.
- Gradually add dry ingredients to wet ingredients: Gradually add the dry ingredients to the wet ingredients, mixing on low speed with an electric mixer (or by hand) until just combined. Be careful not to overmix! Overmixing can lead to tough cookies.
- Fold in chocolate chips: Gently fold in the chocolate chips until they are evenly distributed throughout the dough.
- Chill the dough: Cover the bowl with plastic wrap and chill the dough in the refrigerator for at least 30 minutes, or up to 24 hours. Chilling the dough helps to prevent the cookies from spreading too much during baking and also allows the flavors to meld together. I find that chilling for at least 2 hours gives the best results.
Baking the Cookies
Almost there! Now for the fun part: baking these delicious cookies. Here are a few tips to ensure they come out perfectly golden brown and chewy.
- Preheat oven: Preheat your oven to 375°F (190°C).
- Prepare baking sheets: Line baking sheets with parchment paper. This will prevent the cookies from sticking and make cleanup a breeze.
- Scoop the dough: Use a cookie scoop or spoon to drop rounded tablespoons of dough onto the prepared baking sheets, leaving about 2 inches between each cookie.
- Sprinkle with sea salt (optional): If desired, sprinkle the tops of the cookies with flaky sea salt before baking. This adds a nice salty-sweet contrast.
- Bake: Bake for 9-11 minutes, or until the edges are golden brown and the centers are still slightly soft. The cookies will continue to bake on the hot baking sheet after you remove them from the oven.
- Cool: Let the cookies cool on the baking sheets for a few minutes before transferring them to a wire rack to cool completely.
Tips for Perfect Cookies
Here are a few extra tips to help you achieve cookie perfection:
- Don’t overbake: Overbaked cookies will be dry and crumbly. It’s better to err on the side of underbaking.
- Use quality ingredients: The quality of your ingredients will affect the taste of your cookies. Use good quality butter, chocolate chips, and vanilla extract.
- Measure accurately: Accurate measurements are important for baking. Use measuring cups and spoons to measure your ingredients carefully.
- Adjust baking time as needed: Baking times may vary depending on your oven. Keep an eye on the cookies and adjust the baking time as needed.
- Store properly: Store the cookies in an airtight container at room temperature for up to 3 days.
- Freezing the dough: You can freeze the cookie dough for later use. Scoop the dough into balls and place them on a baking sheet lined with parchment paper. Freeze for about 30 minutes, or until the dough is firm. Then, transfer the frozen dough balls to a freezer bag and store in the freezer for up to 2 months. When you’re ready to bake, simply bake the frozen dough balls as directed, adding a few extra minutes to the baking time.
- Variations: Feel free to experiment with different variations of this recipe. You can add nuts, dried fruit, or different types of chocolate chips.
Troubleshooting
Sometimes things don’t go exactly as planned. Here are some common cookie problems and how to fix them:
- Cookies are too flat: This can be caused by using too much butter, not chilling the dough enough, or baking the cookies on a hot baking sheet. Make sure to chill the dough for at least 30 minutes and use parchment paper to line your baking sheets.
- Cookies are too dry: This can be caused by overbaking the cookies or using too much flour. Be careful not to overbake the cookies and measure your flour accurately.
- Cookies are too hard: This can be caused by overmixing the dough or using too much sugar. Be careful not to overmix the dough and measure your sugar accurately.
- Cookies are not spreading enough: This can be caused by using too little butter or chilling the dough for too long. Make sure to use enough butter and don’t chill the dough for more than 24 hours.
Enjoy!
These brown butter chocolate chip cookies are best enjoyed warm, straight from the oven. They’re perfect with a glass of milk or a cup of coffee. Enjoy!
Conclusion:
And there you have it! These Brown Butter Chocolate Chip Cookies are truly something special, and I genuinely believe they deserve a spot in your regular baking rotation. The nutty, caramelized depth of the brown butter elevates the classic chocolate chip cookie to a whole new level of deliciousness. It’s not just a cookie; it’s an experience! The subtle nuances of flavor, the perfect balance of chewy and crispy, and the sheer joy of biting into a warm, gooey chocolate chip it all comes together to create a truly unforgettable treat.
But why is this recipe a must-try? It’s simple: the brown butter. It’s the secret ingredient that transforms ordinary cookies into extraordinary ones. The process of browning the butter might seem a little intimidating at first, but trust me, it’s incredibly easy and the payoff is HUGE. It adds a richness and complexity that you just can’t achieve with regular melted butter. Plus, the aroma that fills your kitchen while the butter is browning is simply divine! It’s like a warm, comforting hug in a scent.
Beyond the incredible flavor, these cookies are also incredibly versatile. Looking for serving suggestions? Warm from the oven, they’re perfect with a cold glass of milk or a scoop of vanilla ice cream. For a truly decadent experience, try sandwiching a scoop of your favorite ice cream between two cookies. Or, crumble them over a bowl of yogurt or oatmeal for a delightful breakfast treat.
And don’t be afraid to experiment with variations! Swap out the semi-sweet chocolate chips for dark chocolate chips for a richer, more intense flavor. Add a sprinkle of sea salt on top before baking to enhance the sweetness and create a delightful salty-sweet contrast. Stir in some chopped nuts, like walnuts or pecans, for added texture and flavor. You could even add a pinch of cinnamon or nutmeg to the dough for a warm, spicy twist. Get creative and make these cookies your own!
I’ve poured my heart and soul into perfecting this recipe, and I’m so excited for you to try it. I truly believe that these Brown Butter Chocolate Chip Cookies will become a new favorite in your household. They’re perfect for sharing with friends and family, bringing to potlucks, or simply enjoying as a well-deserved treat after a long day.
So, what are you waiting for? Preheat your oven, gather your ingredients, and get ready to bake some seriously delicious cookies! I promise you won’t regret it.
And most importantly, I want to hear about your experience! Once you’ve tried the recipe, please come back and leave a comment below. Let me know what you thought, what variations you tried, and any tips or tricks you discovered along the way. I love hearing from you and seeing your creations! Sharing your baking adventures is what makes this community so special. Happy baking! I can’t wait to hear all about your Brown Butter Chocolate Chip Cookie success stories!
Brown Butter Chocolate Chip Cookies: The Ultimate Recipe
Brown butter elevates these chocolate chip cookies to new heights! Nutty, chewy, golden brown, and utterly irresistible.
Ingredients
- 1 cup (2 sticks) unsalted butter
- 1 1/4 cups packed light brown sugar
- 1/2 cup granulated sugar
- 2 large eggs
- 2 teaspoons vanilla extract
- 2 1/4 cups all-purpose flour
- 1 teaspoon baking soda
- 1 teaspoon salt
- 2 cups semi-sweet chocolate chips
- Optional: Flaky sea salt, for sprinkling
Instructions
- Place butter in a light-colored saucepan over medium heat. As it melts, it will foam. Watch closely for brown specks forming at the bottom. Swirl occasionally. When it turns golden amber and has a nutty aroma, remove from heat and pour into a heatproof bowl. Cool slightly for 10-15 minutes.
- In a large bowl, whisk together brown sugar and granulated sugar. Pour in the slightly cooled brown butter and whisk until well combined.
- Add the eggs one at a time, whisking well after each addition. Then, stir in the vanilla extract.
- In a separate medium bowl, whisk together the flour, baking soda, and salt.
- Gradually add the dry ingredients to the wet ingredients, mixing on low speed with an electric mixer (or by hand) until just combined. Be careful not to overmix!
- Gently fold in the chocolate chips until evenly distributed.
- Cover the bowl with plastic wrap and chill the dough in the refrigerator for at least 30 minutes, or up to 24 hours. Chilling for at least 2 hours gives the best results.
- Preheat your oven to 375°F (190°C).
- Line baking sheets with parchment paper.
- Use a cookie scoop or spoon to drop rounded tablespoons of dough onto the prepared baking sheets, leaving about 2 inches between each cookie.
- If desired, sprinkle the tops of the cookies with flaky sea salt before baking.
- Bake for 9-11 minutes, or until the edges are golden brown and the centers are still slightly soft.
- Let the cookies cool on the baking sheets for a few minutes before transferring them to a wire rack to cool completely.
Notes
- Browning the Butter: Use a light-colored pan to easily see the color change. Don’t burn the butter!
- Chilling the Dough: Chilling prevents excessive spreading and allows flavors to meld.
- Don’t Overbake: Overbaked cookies will be dry.
- Use Quality Ingredients: Good quality butter, chocolate chips, and vanilla extract make a difference.
- Freezing the Dough: Scoop dough into balls, freeze on a baking sheet, then transfer to a freezer bag for up to 2 months. Bake from frozen, adding a few extra minutes to the baking time.
- Variations: Add nuts, dried fruit, or different types of chocolate chips.
- Troubleshooting:
- Cookies are too flat: Chill dough longer, use parchment paper.
- Cookies are too dry: Don’t overbake, measure flour accurately.
- Cookies are too hard: Don’t overmix, measure sugar accurately.
- Cookies are not spreading enough: Use enough butter, don’t chill dough too long.


Leave a Comment