
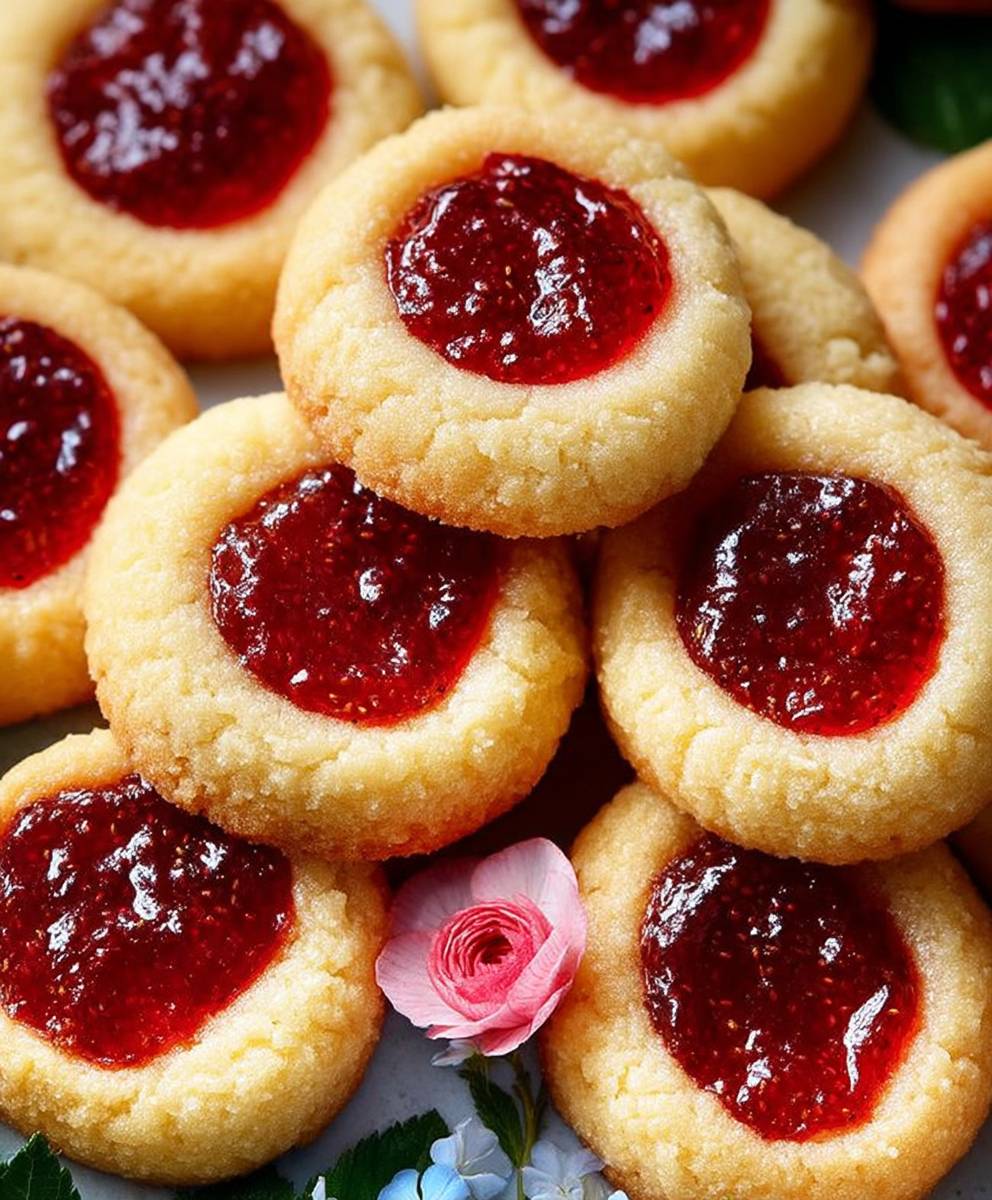
Jam Drops Cookies: Is there anything more nostalgic than biting into a perfectly baked, buttery cookie with a sweet, gooey jam center? I think not! These delightful little treats are more than just cookies; they’re a warm hug from childhood, a reminder of simpler times, and a burst of pure, unadulterated joy in every bite.
While the exact origins of Jam Drops Cookies are a bit hazy, similar filled cookies have been enjoyed for centuries across various cultures. Some believe they evolved from thumbprint cookies, a European tradition where a small indentation is made in the dough and filled with jam or nuts. Regardless of their specific ancestry, these cookies have become a beloved staple in bakeries and home kitchens worldwide.
What makes these cookies so irresistible? It’s the perfect combination of textures and flavors. The buttery, slightly crumbly cookie base provides a delightful contrast to the smooth, sweet, and often tangy jam filling. They’re also incredibly versatile! You can use your favorite jam raspberry, strawberry, apricot, the possibilities are endless! Plus, they’re relatively easy to make, making them a perfect baking project for beginners and seasoned bakers alike. So, get ready to create some magic in your kitchen and bake a batch of these timeless classics. You won’t regret it!

Ingredients:
- For the Dough:
- 225g (1 cup) unsalted butter, softened
- 150g (¾ cup) granulated sugar
- 1 large egg
- 1 teaspoon vanilla extract
- 300g (2 ½ cups) all-purpose flour
- ¼ teaspoon salt
- For the Filling:
- Your favorite jam (strawberry, raspberry, apricot, or mixed berry work well)
- Optional: a dusting of powdered sugar for finishing
Preparing the Dough:
- Cream the Butter and Sugar: In a large bowl (or the bowl of your stand mixer), cream together the softened butter and granulated sugar until light and fluffy. This usually takes about 3-5 minutes. Don’t rush this step! A well-creamed mixture is key to a tender cookie. You’ll know it’s ready when the mixture is pale and airy. Scrape down the sides of the bowl occasionally to ensure everything is evenly incorporated.
- Add the Egg and Vanilla: Beat in the egg and vanilla extract until well combined. Make sure the egg is fully incorporated before moving on to the next step. Again, scrape down the sides of the bowl to ensure even mixing.
- Combine Dry Ingredients: In a separate medium bowl, whisk together the all-purpose flour and salt. Whisking helps to distribute the salt evenly throughout the flour, which is important for the flavor of the cookies.
- Gradually Add Dry Ingredients to Wet Ingredients: Gradually add the dry ingredients to the wet ingredients, mixing on low speed until just combined. Be careful not to overmix! Overmixing can develop the gluten in the flour, resulting in tough cookies. Mix until the flour is just incorporated, and then stop. A few streaks of flour are okay at this point.
- Form the Dough into a Disc: Turn the dough out onto a lightly floured surface. Gently knead it a few times to bring it together into a smooth disc. Wrap the disc tightly in plastic wrap.
- Chill the Dough: Refrigerate the dough for at least 30 minutes, or up to 2 hours. Chilling the dough is crucial! It allows the gluten to relax, which prevents the cookies from spreading too much in the oven. It also makes the dough easier to handle and roll out. If you chill it for longer than 2 hours, you may need to let it sit at room temperature for a few minutes before rolling it out.
Shaping and Filling the Cookies:
- Preheat the Oven: Preheat your oven to 175°C (350°F). Line baking sheets with parchment paper or silicone baking mats. This will prevent the cookies from sticking and make cleanup a breeze.
- Roll Out the Dough: On a lightly floured surface, roll out the chilled dough to about 1/4 inch thickness. You want the dough to be thin enough to hold its shape but not so thin that it becomes brittle.
- Cut Out the Cookies: Use a cookie cutter to cut out shapes. I like to use round or fluted cutters, but you can use any shape you like. You’ll need an even number of cookies, as they will be sandwiched together with jam.
- Cut Out Centers of Half the Cookies: Using a smaller cookie cutter (or even a small knife), cut out the centers of half of the cookies. This will create the “window” for the jam to show through. I often use a small heart-shaped cutter for this, but a circle or star would also work well.
- Place Cookies on Baking Sheets: Carefully transfer the cookies to the prepared baking sheets, leaving about 1 inch of space between each cookie.
- Bake the Cookies: Bake for 8-10 minutes, or until the edges are lightly golden brown. Keep a close eye on them, as they can burn easily. The baking time will depend on the thickness of your cookies and your oven.
- Cool the Cookies: Let the cookies cool on the baking sheets for a few minutes before transferring them to a wire rack to cool completely.
Assembling the Jam Drops:
- Prepare the Jam: If your jam is very thick, you can warm it slightly in the microwave or on the stovetop to make it easier to spread. Be careful not to overheat it, as it can become too runny.
- Spread Jam on Bottom Cookies: Spread a small amount of jam (about 1 teaspoon) onto the flat side of each of the cookies without the cut-out centers. Don’t use too much jam, or it will squish out when you sandwich the cookies together.
- Top with Cut-Out Cookies: Carefully place the cookies with the cut-out centers on top of the jam-covered cookies, pressing gently to sandwich them together.
- Dust with Powdered Sugar (Optional): If desired, dust the finished cookies with powdered sugar. This adds a touch of sweetness and makes them look even more festive.
Tips for Perfect Jam Drops:
- Use High-Quality Jam: The flavor of the jam is a key component of these cookies, so use a high-quality jam that you enjoy.
- Don’t Overbake: Overbaked cookies will be dry and crumbly. Bake them until the edges are just lightly golden brown.
- Cool Completely Before Assembling: Make sure the cookies are completely cool before assembling them, or the jam will melt and make the cookies soggy.
- Store Properly: Store the assembled cookies in an airtight container at room temperature for up to 3 days.
- Experiment with Flavors: Feel free to experiment with different flavors of jam and extracts. You could try adding a little almond extract to the dough or using a citrus-flavored jam.
- Make Ahead: The dough can be made ahead of time and stored in the refrigerator for up to 2 days. You can also freeze the dough for up to 2 months. Just thaw it in the refrigerator overnight before rolling it out.
- Prevent Spreading: To prevent the cookies from spreading too much in the oven, make sure your butter is not too soft. It should be softened but still slightly firm. Also, chilling the dough is essential.
- Even Baking: For even baking, make sure your oven is properly preheated and that the baking sheets are placed in the center of the oven. You may need to rotate the baking sheets halfway through baking to ensure even browning.
- Jam Consistency: If your jam is too thick to spread easily, you can warm it slightly in the microwave or on the stovetop. Be careful not to overheat it, as it can become too runny.
- Cookie Cutter Shapes: Have fun with different cookie cutter shapes! You can use round, square, heart, star, or any other shape you like. Just make sure you have an even number of cookies and that you cut out the centers of half of them.
Troubleshooting:
- Cookies are too dry: You may have overbaked the cookies. Try reducing the baking time slightly next time. Also, make sure you are not using too much flour.
- Cookies are too crumbly: You may have overmixed the dough. Be careful not to overmix the dough, as this can develop the gluten in the flour and make the cookies tough.
- Cookies spread too much: Your butter may have been too soft, or you may not have chilled the dough long enough. Make sure your butter is softened but still slightly firm, and chill the dough for at least 30 minutes.
- Jam is running out: You may have used too much jam. Use a small amount of jam (about 1 teaspoon) on each cookie. Also, make sure the cookies are completely cool before assembling them.
Variations:
- Lemon Jam Drops: Add the zest of one lemon to the dough for a bright, citrusy flavor. Use lemon curd or lemon jam as the filling.
- Chocolate Jam Drops: Add 2 tablespoons of cocoa powder to the dry ingredients for a chocolatey twist. Use chocolate hazelnut spread or raspberry jam as the filling.
- Nutty Jam Drops: Add ½ cup of finely chopped nuts (such as almonds, walnuts, or pecans) to the dough. Use apricot or fig jam as the filling.
- Spice Jam Drops: Add ½ teaspoon of ground cinnamon or nutmeg to the dry ingredients for a warm, spiced flavor. Use apple butter or cranberry sauce as the filling.
Enjoy your homemade Jam Drops!
Conclusion:
Well, there you have it! I truly believe this Jam Drops Cookies recipe is a must-try for anyone who loves a classic, comforting treat. They’re simple enough for a beginner baker, yet satisfying enough for even the most discerning cookie connoisseur. The buttery, melt-in-your-mouth texture combined with the sweet burst of jam is simply irresistible. It’s a nostalgic flavor that brings back childhood memories, and who doesn’t love that?
But beyond the nostalgia, these cookies are just plain delicious. They’re the perfect balance of sweet and buttery, with a delightful textural contrast between the soft cookie and the slightly chewy jam. And the best part? They’re incredibly versatile!
Think of these Jam Drops Cookies as a blank canvas for your culinary creativity. While I’ve shared my go-to recipe, feel free to experiment with different types of jam. Raspberry and strawberry are classic choices, but don’t be afraid to venture out and try apricot, blackberry, or even fig jam for a more sophisticated flavor. You could even use a homemade jam for an extra special touch!
And the variations don’t stop there! For a nutty twist, try adding a handful of chopped almonds or pecans to the dough. Or, for a hint of citrus, add a teaspoon of lemon or orange zest. If you’re feeling adventurous, you could even dip the finished cookies in melted chocolate for an extra decadent treat.
Serving suggestions? Oh, the possibilities are endless! These cookies are perfect with a cup of tea or coffee for an afternoon pick-me-up. They’re also a delightful addition to a dessert platter or a sweet treat to bring to a potluck. And, of course, they’re always a hit with kids (and adults!) of all ages. Imagine a warm plate of these cookies after a long day, or a sweet surprise in a lunchbox. They’re guaranteed to bring a smile to anyone’s face.
But honestly, my favorite way to enjoy these cookies is simply straight from the oven, while they’re still warm and the jam is gooey. There’s just something so comforting and satisfying about that first bite.
I’m so confident that you’ll love this recipe, and I truly encourage you to give it a try. It’s a simple recipe, but the results are truly spectacular. Plus, baking is such a therapeutic activity! It’s a great way to unwind, de-stress, and create something delicious to share with your loved ones.
So, what are you waiting for? Gather your ingredients, preheat your oven, and get ready to bake some seriously delicious Jam Drops Cookies! I promise you won’t regret it.
And once you’ve made them, I’d absolutely love to hear about your experience! Did you try any variations? What kind of jam did you use? Did you share them with friends and family? Please, share your photos and stories in the comments below. I can’t wait to see your creations and hear all about your baking adventures. Happy baking!
Jam Drops Cookies: The Ultimate Guide to Baking Perfection
Delicate, buttery sandwich cookies filled with your favorite jam and dusted with powdered sugar. Perfect for tea time or a sweet treat!
Ingredients
- 225g (1 cup) unsalted butter, softened
- 150g (¾ cup) granulated sugar
- 1 large egg
- 1 teaspoon vanilla extract
- 300g (2 ½ cups) all-purpose flour
- ¼ teaspoon salt
- Your favorite jam (strawberry, raspberry, apricot, or mixed berry work well)
- Optional: a dusting of powdered sugar for finishing
Instructions
- Cream the Butter and Sugar: In a large bowl (or the bowl of your stand mixer), cream together the softened butter and granulated sugar until light and fluffy (3-5 minutes). Scrape down the sides of the bowl occasionally.
- Add the Egg and Vanilla: Beat in the egg and vanilla extract until well combined. Scrape down the sides of the bowl.
- Combine Dry Ingredients: In a separate medium bowl, whisk together the all-purpose flour and salt.
- Gradually Add Dry Ingredients to Wet Ingredients: Gradually add the dry ingredients to the wet ingredients, mixing on low speed until just combined. Be careful not to overmix.
- Form the Dough into a Disc: Turn the dough out onto a lightly floured surface. Gently knead it a few times to bring it together into a smooth disc. Wrap the disc tightly in plastic wrap.
- Chill the Dough: Refrigerate the dough for at least 30 minutes, or up to 2 hours.
- Preheat the Oven: Preheat your oven to 175°C (350°F). Line baking sheets with parchment paper or silicone baking mats.
- Roll Out the Dough: On a lightly floured surface, roll out the chilled dough to about 1/4 inch thickness.
- Cut Out the Cookies: Use a cookie cutter to cut out shapes. You’ll need an even number of cookies.
- Cut Out Centers of Half the Cookies: Using a smaller cookie cutter (or even a small knife), cut out the centers of half of the cookies.
- Place Cookies on Baking Sheets: Carefully transfer the cookies to the prepared baking sheets, leaving about 1 inch of space between each cookie.
- Bake the Cookies: Bake for 8-10 minutes, or until the edges are lightly golden brown.
- Cool the Cookies: Let the cookies cool on the baking sheets for a few minutes before transferring them to a wire rack to cool completely.
- Prepare the Jam: If your jam is very thick, you can warm it slightly in the microwave or on the stovetop to make it easier to spread.
- Spread Jam on Bottom Cookies: Spread a small amount of jam (about 1 teaspoon) onto the flat side of each of the cookies without the cut-out centers.
- Top with Cut-Out Cookies: Carefully place the cookies with the cut-out centers on top of the jam-covered cookies, pressing gently to sandwich them together.
- Dust with Powdered Sugar (Optional): If desired, dust the finished cookies with powdered sugar.
Notes
- Use high-quality jam for the best flavor.
- Don’t overbake the cookies. Bake until the edges are just lightly golden brown.
- Cool the cookies completely before assembling.
- Store assembled cookies in an airtight container at room temperature for up to 3 days.
- Experiment with different flavors of jam and extracts.
- The dough can be made ahead and stored in the refrigerator for up to 2 days or frozen for up to 2 months.
- To prevent spreading, make sure your butter is not too soft and chill the dough.
- For even baking, make sure your oven is properly preheated.
- Have fun with different cookie cutter shapes!

Leave a Comment