
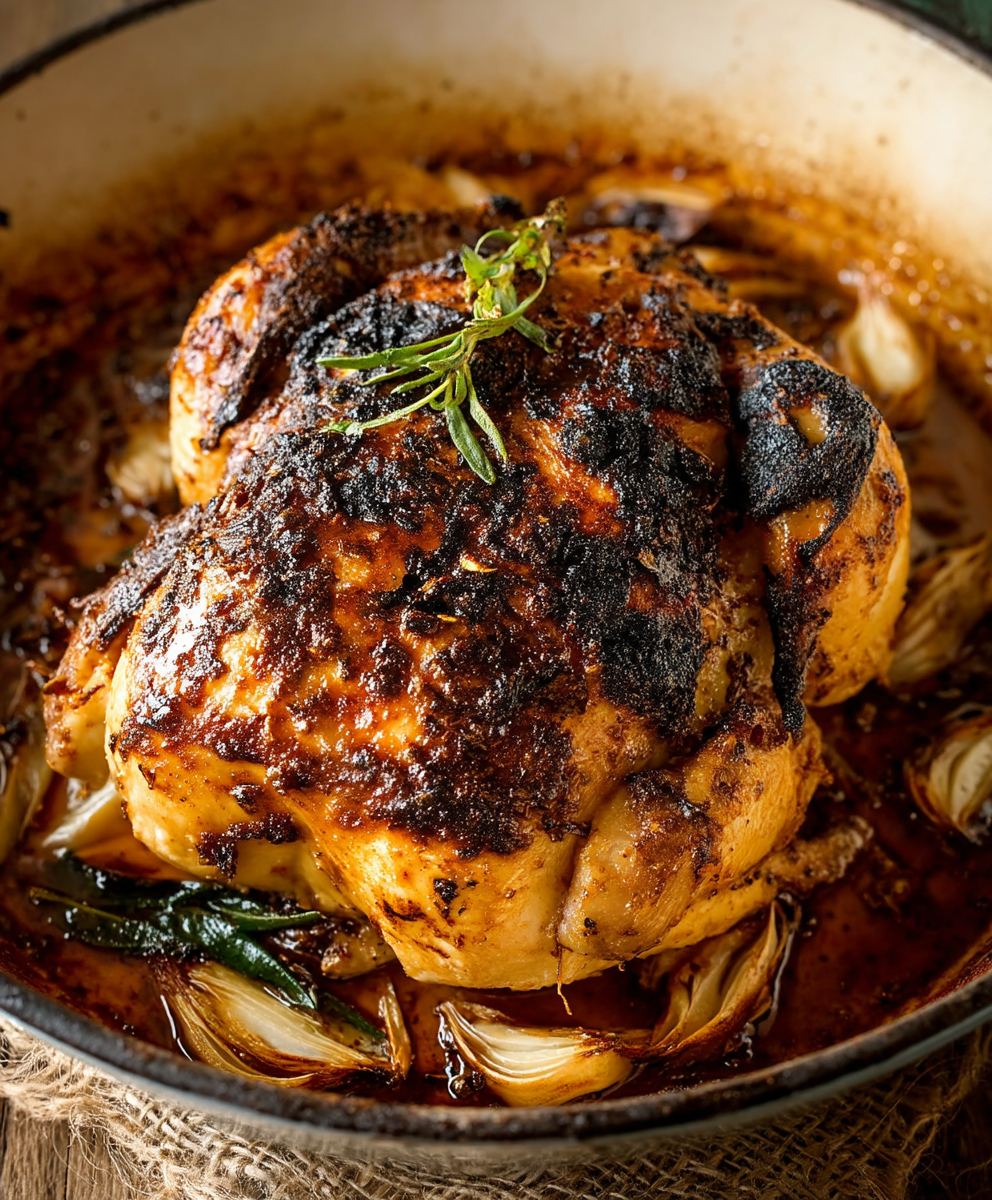
Roasted Chicken: Is there anything more comforting than the aroma of a perfectly roasted chicken wafting through your home? I think not! This isn’t just a meal; it’s an experience, a centerpiece that brings people together. Imagine sinking your teeth into crispy, golden skin, followed by juicy, tender meat that practically melts in your mouth.
The humble roasted chicken boasts a history as rich and varied as the cultures that have embraced it. From simple peasant fare to a celebratory feast fit for royalty, the preparation of chicken over an open flame or in an oven has been a culinary staple for centuries. Its enduring appeal lies in its simplicity and adaptability. You can dress it up with herbs and spices, baste it with flavorful sauces, or keep it classic with just salt and pepper the possibilities are endless!
But why do we love roasted chicken so much? Beyond the nostalgic memories it evokes, it’s undeniably delicious. The combination of crispy skin and succulent meat is a textural and flavorful masterpiece. Plus, it’s incredibly versatile. Enjoy it hot with your favorite sides, or use the leftovers for sandwiches, salads, soups, and more. It’s a budget-friendly and satisfying meal that’s perfect for any occasion. So, let’s get roasting and create a culinary masterpiece that will impress your family and friends!

Ingredients:
- 1 whole chicken (about 4-5 pounds), giblets removed
- 1 lemon, halved
- 1 head of garlic, halved horizontally
- 2 sprigs fresh rosemary
- 2 sprigs fresh thyme
- 2 tablespoons olive oil
- 1 tablespoon kosher salt
- 1 teaspoon black pepper
- 1 large onion, quartered
- 2 carrots, roughly chopped
- 2 celery stalks, roughly chopped
- 1 cup chicken broth
- Optional: 1 tablespoon smoked paprika
- Optional: 1 tablespoon garlic powder
Preparing the Chicken:
- Preheat your oven to 425°F (220°C). This high temperature is key for getting that crispy skin we all crave! Make sure your oven rack is in the middle position.
- Prepare the chicken. Remove the chicken from its packaging and pat it dry thoroughly with paper towels. This is crucial! The drier the skin, the crispier it will become. Don’t skip this step.
- Season generously. In a small bowl, combine the olive oil, kosher salt, black pepper, smoked paprika (if using), and garlic powder (if using). Mix well to create a flavorful rub.
- Rub it in! Using your hands, generously rub the olive oil mixture all over the chicken, including under the skin of the breast (carefully loosen the skin with your fingers first). This ensures the flavor penetrates deep and the skin gets beautifully browned.
- Stuff the cavity. Stuff the cavity of the chicken with the lemon halves, garlic head halves, rosemary sprigs, and thyme sprigs. This will infuse the chicken with aromatic flavors from the inside out.
- Prepare the roasting pan. Place the quartered onion, chopped carrots, and chopped celery stalks in the bottom of a roasting pan. These vegetables will create a flavorful base for the chicken and prevent it from sticking to the pan. They’ll also roast beautifully and become a delicious side dish.
- Position the chicken. Place the chicken on top of the vegetables in the roasting pan. Make sure it’s sitting securely.
Roasting the Chicken:
- Roast the chicken. Place the roasting pan in the preheated oven and roast for 1 hour and 15 minutes to 1 hour and 30 minutes, or until the internal temperature of the thickest part of the thigh reaches 165°F (74°C). Use a meat thermometer to ensure accuracy. Don’t guess!
- Basting (Optional but Recommended). About halfway through the roasting time (after about 45 minutes), baste the chicken with the pan juices. This helps to keep the chicken moist and adds flavor. You can also melt a tablespoon of butter and brush it over the chicken for extra richness and browning.
- Check for doneness. The best way to ensure the chicken is cooked through is to use a meat thermometer. Insert it into the thickest part of the thigh, being careful not to touch the bone. The internal temperature should reach 165°F (74°C). If the chicken is browning too quickly, you can tent it with aluminum foil to prevent it from burning.
- Resting is crucial! Once the chicken is cooked, remove it from the oven and let it rest for at least 15 minutes before carving. This allows the juices to redistribute throughout the chicken, resulting in a more tender and flavorful bird. Tent it loosely with foil while it rests.
Making a Simple Pan Sauce (Optional):
- Strain the pan juices. After the chicken has rested, carefully pour the pan juices into a fat separator or a heatproof bowl. If using a bowl, let the fat rise to the top and then skim it off with a spoon.
- Sauté (Optional). In a saucepan, melt 1 tablespoon of butter over medium heat. Add 1 tablespoon of flour and cook for 1 minute, stirring constantly, to create a roux. This will help thicken the sauce.
- Add the broth and pan juices. Gradually whisk in the chicken broth and the strained pan juices. Bring to a simmer and cook for 5-10 minutes, or until the sauce has thickened slightly.
- Season to taste. Season the sauce with salt and pepper to taste. You can also add a squeeze of lemon juice for brightness.
- Serve. Serve the pan sauce alongside the roasted chicken.
Carving and Serving:
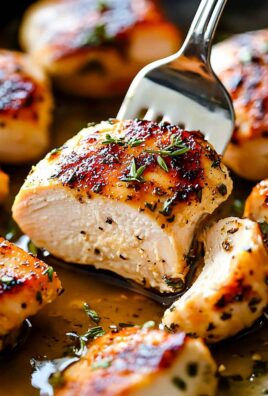
- Carve the chicken. Using a sharp carving knife, carefully carve the chicken. Start by removing the legs and thighs, then the wings. Finally, carve the breast meat.
- Serve and enjoy! Arrange the carved chicken on a platter and serve with the roasted vegetables from the pan and the pan sauce (if made). Enjoy your delicious roasted chicken!
Tips for the Best Roasted Chicken:
- Dry Brining: For even more flavorful and juicy chicken, try dry brining it. The day before you plan to roast the chicken, rub it generously with salt (about 1 teaspoon per pound) and let it sit uncovered in the refrigerator overnight. This will help the chicken retain moisture and enhance its flavor.
- Elevate the Chicken: Consider using a roasting rack inside your roasting pan. This allows for better air circulation around the chicken, resulting in more even cooking and crispier skin.
- Don’t Overcrowd the Pan: If you’re roasting vegetables alongside the chicken, make sure they’re not overcrowded in the pan. Overcrowding can cause the vegetables to steam instead of roast, resulting in soggy vegetables. If necessary, use two roasting pans.
- Use a Meat Thermometer: As mentioned before, a meat thermometer is essential for ensuring the chicken is cooked through. Don’t rely on visual cues alone.
- Let it Rest: Resting the chicken is crucial for allowing the juices to redistribute, resulting in a more tender and flavorful bird. Don’t skip this step!
- Save the Carcass: Don’t throw away the chicken carcass! You can use it to make a delicious and flavorful chicken broth. Simply simmer the carcass with vegetables and herbs for a few hours, then strain and use in soups, stews, or sauces.
Variations:
- Herb Roasted Chicken: Experiment with different herbs, such as sage, oregano, or marjoram.
- Citrus Roasted Chicken: Use different citrus fruits, such as oranges or grapefruits, instead of lemon.
- Spicy Roasted Chicken: Add a pinch of cayenne pepper or red pepper flakes to the olive oil mixture for a spicy kick.
- Honey Garlic Roasted Chicken: Brush the chicken with a mixture of honey and garlic during the last 15 minutes of roasting for a sweet and savory glaze.
Conclusion:
And there you have it! This isn’t just another recipe; it’s your new go-to for a truly exceptional roasted chicken. From the crispy, golden skin to the unbelievably juicy and flavorful meat, this method delivers results that will impress even the most discerning palates. I’ve shared all my secrets, from the dry brining technique that ensures maximum moisture retention to the precise roasting temperature that guarantees perfectly cooked chicken every single time. Trust me, once you try this, you’ll never look at roasted chicken the same way again.
But why is this recipe a must-try? It’s simple: it’s foolproof, it’s delicious, and it’s incredibly versatile. Forget dry, bland chicken this recipe unlocks a depth of flavor you never thought possible. The combination of herbs and spices creates an aromatic masterpiece that fills your kitchen with the most inviting scent. Plus, the hands-on time is minimal, allowing you to focus on other aspects of your meal or simply relax while the oven works its magic. It’s the perfect centerpiece for a weeknight dinner or a special occasion feast.
Now, let’s talk serving suggestions! This roasted chicken is fantastic on its own, served with a simple side salad and some crusty bread to soak up all those delicious pan juices. But don’t stop there! You can also shred the chicken and use it in tacos, salads, sandwiches, or even chicken pot pie. The possibilities are endless!
Feeling adventurous? Here are a few variations to try:
Lemon Herb Roasted Chicken:
Add slices of lemon and extra sprigs of rosemary and thyme to the cavity of the chicken for a bright, citrusy flavor.
Spicy Roasted Chicken:
Include a pinch of cayenne pepper or a drizzle of hot sauce in the dry brine for a fiery kick.
Garlic Roasted Chicken:
Smash a head of garlic and add the cloves to the cavity of the chicken for an intensely garlicky flavor.
Mediterranean Roasted Chicken:
Use a blend of Mediterranean herbs like oregano, basil, and marjoram, and add some chopped sun-dried tomatoes to the cavity.
Don’t be afraid to experiment and make this recipe your own! That’s the beauty of cooking it’s all about creativity and personal expression.
I truly believe that this roasted chicken recipe will become a staple in your kitchen. It’s a reliable, delicious, and versatile dish that’s sure to please everyone at your table. So, what are you waiting for? Preheat your oven, gather your ingredients, and get ready to experience the best roasted chicken of your life!
I’m so excited for you to try this recipe! And more importantly, I’d love to hear about your experience. Did you make any variations? What sides did you serve with it? What did your family and friends think? Please, share your thoughts and photos in the comments below. Your feedback is invaluable, and it helps me continue to create recipes that you’ll love. Happy cooking!
Roasted Chicken: The Ultimate Guide to Perfecting Your Roast
Perfectly roasted whole chicken with crispy skin and flavorful herbs, lemon, and garlic. A classic comfort food that's surprisingly easy to make.
Ingredients
- 1 whole chicken (about 4-5 pounds), giblets removed
- 1 lemon, halved
- 1 head of garlic, halved horizontally
- 2 sprigs fresh rosemary
- 2 sprigs fresh thyme
- 2 tablespoons olive oil
- 1 tablespoon kosher salt
- 1 teaspoon black pepper
- 1 large onion, quartered
- 2 carrots, roughly chopped
- 2 celery stalks, roughly chopped
- 1 cup chicken broth
- Optional: 1 tablespoon smoked paprika
- Optional: 1 tablespoon garlic powder
Instructions
- Preheat: Preheat oven to 425°F (220°C). Place oven rack in the middle position.
- Prepare Chicken: Remove chicken from packaging and pat dry thoroughly with paper towels.
- Season: In a small bowl, combine olive oil, kosher salt, black pepper, smoked paprika (if using), and garlic powder (if using). Mix well.
- Rub: Generously rub the olive oil mixture all over the chicken, including under the skin of the breast.
- Stuff: Stuff the cavity of the chicken with the lemon halves, garlic head halves, rosemary sprigs, and thyme sprigs.
- Prepare Pan: Place the quartered onion, chopped carrots, and chopped celery stalks in the bottom of a roasting pan.
- Position: Place the chicken on top of the vegetables in the roasting pan.
- Roast: Place the roasting pan in the preheated oven and roast for 1 hour and 15 minutes to 1 hour and 30 minutes, or until the internal temperature of the thickest part of the thigh reaches 165°F (74°C).
- Baste (Optional): About halfway through the roasting time (after about 45 minutes), baste the chicken with the pan juices.
- Check for Doneness: Use a meat thermometer to ensure the chicken is cooked through. Insert it into the thickest part of the thigh, being careful not to touch the bone. The internal temperature should reach 165°F (74°C). If the chicken is browning too quickly, you can tent it with aluminum foil to prevent it from burning.
- Rest: Once the chicken is cooked, remove it from the oven and let it rest for at least 15 minutes before carving. Tent it loosely with foil while it rests.
- Strain the pan juices: After the chicken has rested, carefully pour the pan juices into a fat separator or a heatproof bowl. If using a bowl, let the fat rise to the top and then skim it off with a spoon.
- Sauté (Optional): In a saucepan, melt 1 tablespoon of butter over medium heat. Add 1 tablespoon of flour and cook for 1 minute, stirring constantly, to create a roux. This will help thicken the sauce.
- Add the broth and pan juices: Gradually whisk in the chicken broth and the strained pan juices. Bring to a simmer and cook for 5-10 minutes, or until the sauce has thickened slightly.
- Season to taste: Season the sauce with salt and pepper to taste. You can also add a squeeze of lemon juice for brightness.
- Serve: Serve the pan sauce alongside the roasted chicken.
- Carve: Using a sharp carving knife, carefully carve the chicken. Start by removing the legs and thighs, then the wings. Finally, carve the breast meat.
- Serve and enjoy! Arrange the carved chicken on a platter and serve with the roasted vegetables from the pan and the pan sauce (if made). Enjoy your delicious roasted chicken!
Notes
- For even more flavorful and juicy chicken, try dry brining it. The day before you plan to roast the chicken, rub it generously with salt (about 1 teaspoon per pound) and let it sit uncovered in the refrigerator overnight.
- Consider using a roasting rack inside your roasting pan for better air circulation.
- Don’t overcrowd the pan with vegetables.
- A meat thermometer is essential for ensuring the chicken is cooked through.
- Resting the chicken is crucial for allowing the juices to redistribute.
- Save the carcass to make chicken broth.


Leave a Comment