
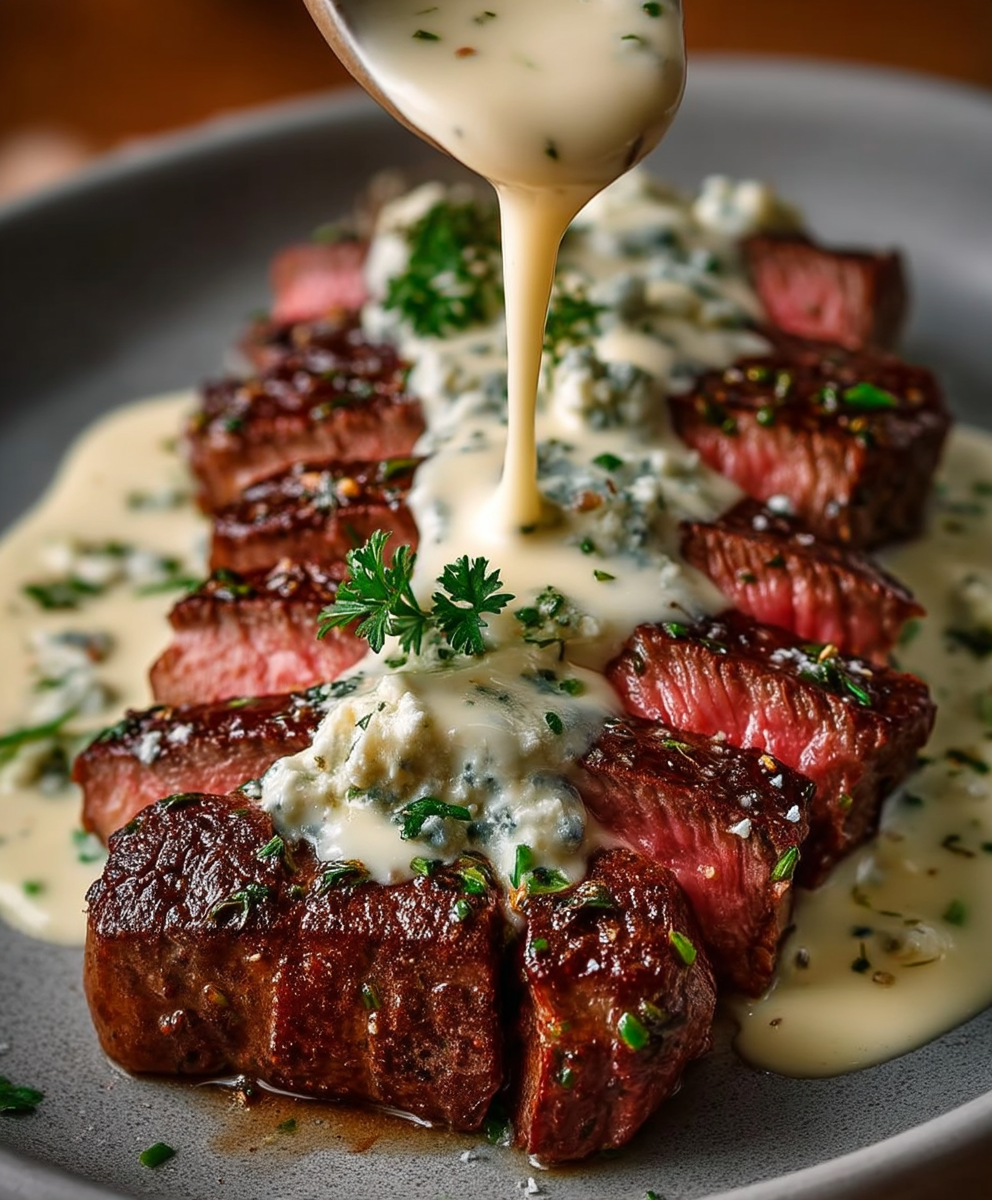
New York Strip Steak: just the name conjures images of sizzling perfection, doesn’t it? I’m about to share my foolproof method for achieving restaurant-quality results right in your own kitchen. Forget those tough, underwhelming steaks you’ve had in the past. We’re talking melt-in-your-mouth tenderness, a beautiful crust, and flavor that will have everyone begging for seconds.
The New York Strip, also known as a strip loin steak, boasts a rich history rooted in the steakhouses of, you guessed it, New York City. Emerging in the 19th century, it quickly became a symbol of culinary indulgence and remains a classic cut cherished by steak lovers worldwide. Its popularity stems from the perfect balance of lean meat and just enough marbling to deliver exceptional flavor and a satisfying chew.
What makes a truly great New York Strip Steak so irresistible? It’s the combination of that robust, beefy taste, the satisfying texture that’s both tender and firm, and the sheer simplicity of preparation. You don’t need fancy ingredients or complicated techniques to create a memorable meal. With just a few key steps and my expert tips, you’ll be grilling, pan-searing, or broiling your way to steakhouse glory in no time. So, grab your favorite cut and let’s get cooking!

Ingredients:
- 2 New York Strip Steaks (about 1-1.5 inches thick, approximately 12-16 ounces each)
- 2 tablespoons olive oil (extra virgin preferred)
- 2 tablespoons unsalted butter
- 4 cloves garlic, minced
- 2 sprigs fresh rosemary
- 2 sprigs fresh thyme
- Kosher salt, to taste
- Freshly ground black pepper, to taste
- Optional: 1/4 cup beef broth or red wine (for deglazing the pan)
Preparing the Steaks:
Before we even think about turning on the stove, let’s get our steaks ready. This is a crucial step for achieving that perfect sear and even cooking.
- Pat the Steaks Dry: This is probably the most important step! Use paper towels to thoroughly pat both sides of the New York strip steaks dry. Removing excess moisture is key to getting a beautiful, crusty sear. Trust me, don’t skip this.
- Season Generously: Now, season both sides of the steaks liberally with kosher salt and freshly ground black pepper. Don’t be shy! You want a good coating of seasoning to enhance the flavor. I like to season them at least 30 minutes before cooking, or even up to an hour, to allow the salt to penetrate the meat. If you’re short on time, even 15 minutes will make a difference.
- Let the Steaks Rest at Room Temperature: This is another important step for even cooking. Take the seasoned steaks out of the refrigerator and let them sit at room temperature for at least 30 minutes, or up to an hour. This allows the steaks to cook more evenly from edge to center. A cold steak will take longer to cook in the middle, potentially leading to an overcooked exterior.
Cooking the Steaks:
Alright, now for the fun part cooking the steaks! We’re going to use a combination of searing on the stovetop and finishing in the oven for the best results. This method gives us a beautiful crust and a perfectly cooked interior.
- Preheat the Oven: Preheat your oven to 400°F (200°C). Make sure your oven is fully preheated before you start cooking the steaks.
- Heat the Skillet: Place a heavy-bottomed, oven-safe skillet (cast iron is ideal) over high heat. Let the skillet heat up for several minutes until it’s screaming hot. A hot skillet is essential for achieving a good sear. You should see a slight shimmer or even a wisp of smoke coming from the pan.
- Add the Oil: Once the skillet is hot, add the olive oil. The oil should shimmer and spread evenly across the bottom of the pan.
- Sear the Steaks: Carefully place the seasoned steaks in the hot skillet, making sure not to overcrowd the pan. You should hear a satisfying sizzle when the steaks hit the pan. Sear the steaks for 2-3 minutes per side, without moving them, until a deep, golden-brown crust forms. Resist the urge to peek or move the steaks around let them develop that beautiful sear.
- Add Butter, Garlic, and Herbs: After searing both sides, reduce the heat to medium. Add the butter, minced garlic, rosemary sprigs, and thyme sprigs to the skillet. As the butter melts, tilt the skillet and use a spoon to baste the steaks with the melted butter, garlic, and herb mixture. This will add flavor and help to keep the steaks moist. Continue basting for about 1-2 minutes.
- Transfer to the Oven: Carefully transfer the skillet with the steaks to the preheated oven.
- Cook to Desired Doneness: Cook the steaks in the oven until they reach your desired level of doneness. Use a meat thermometer to check the internal temperature. Here’s a guide:
- Rare: 125-130°F (52-54°C)
- Medium-Rare: 130-135°F (54-57°C)
- Medium: 135-145°F (57-63°C)
- Medium-Well: 145-155°F (63-68°C)
- Well-Done: 155°F+ (68°C+)
The cooking time will vary depending on the thickness of the steaks and your oven. As a general guideline, for 1-inch thick steaks, it will take about 5-7 minutes for medium-rare. For 1.5-inch thick steaks, it will take about 7-10 minutes for medium-rare. Always use a meat thermometer to ensure accuracy.
- Optional: Deglaze the Pan (for a Sauce): If you want to make a quick pan sauce, remove the steaks from the skillet and set them aside to rest. Place the skillet back on the stovetop over medium heat. Add the beef broth or red wine to the skillet and scrape up any browned bits from the bottom of the pan. Let the sauce simmer for a few minutes, until it reduces slightly and thickens. You can add a pat of butter at the end for extra richness.
Resting and Serving:
Resting the steaks is just as important as cooking them! This allows the juices to redistribute throughout the meat, resulting in a more tender and flavorful steak.
- Rest the Steaks: Remove the steaks from the oven and transfer them to a cutting board. Tent them loosely with foil and let them rest for at least 10 minutes, or even up to 15 minutes. Don’t skip this step!
- Slice and Serve: After resting, slice the steaks against the grain into 1/4-inch to 1/2-inch thick slices. This will make them easier to chew and more tender.
- Serve Immediately: Serve the sliced steaks immediately. You can drizzle them with the pan sauce (if you made one) or simply enjoy them as is.
Tips for Success:
- Choose High-Quality Steaks: The quality of the steak will greatly impact the final result. Look for steaks that are well-marbled with fat, as this will add flavor and tenderness.
- Don’t Overcrowd the Pan: If you’re cooking more than two steaks, it’s best to sear them in batches to avoid overcrowding the pan. Overcrowding will lower the temperature of the pan and prevent the steaks from searing properly.
- Use a Meat Thermometer: A meat thermometer is your best friend when it comes to cooking steaks to the perfect doneness. It takes the guesswork out of the equation and ensures that your steaks are cooked exactly how you like them.
- Let the Steaks Rest: I can’t stress this enough! Resting the steaks is essential for juicy, tender results.
- Experiment with Flavors: Feel free to experiment with different herbs and spices to customize the flavor of your steaks. Garlic powder, onion powder, paprika, and chili powder are all great additions.
Serving Suggestions:
New York strip steaks are incredibly versatile and pair well with a variety of sides. Here are a few of my favorite serving suggestions:
- Roasted Vegetables: Roasted asparagus, Brussels sprouts, carrots, or potatoes are all delicious accompaniments.
- Mashed Potatoes: Creamy mashed potatoes are a classic pairing with steak.
- Salad: A simple green salad with a vinaigrette dressing provides a refreshing contrast to the richness of the steak.
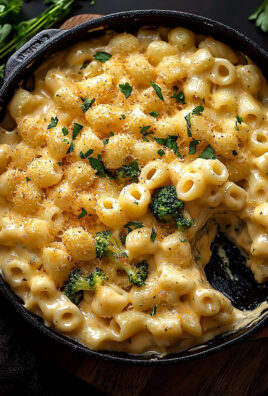
- Mac and Cheese: For a more indulgent meal, serve the steaks with creamy mac and cheese.
- Grilled Corn on the Cob: Grilled corn on the cob is a perfect summer side dish.
Troubleshooting:
- Steaks are tough: This could be due to several factors, including overcooking, under-resting, or using a low-quality steak. Make sure to use a meat thermometer to cook the steaks to the correct doneness, let them rest for at least 10 minutes, and choose high-quality steaks with good marbling.
- Steaks are not searing properly: This is usually caused by not having the skillet hot enough or overcrowding the pan. Make sure the skillet is screaming hot before adding the steaks, and sear them in batches if necessary.
- Steaks are burning on the outside but raw on the inside: This means the heat is too high. Reduce the heat slightly and continue cooking until the steaks reach your desired level of doneness
Conclusion:
And there you have it! This isn’t just another steak recipe; it’s your ticket to achieving restaurant-quality New York Strip Steak perfection right in your own kitchen. From the careful selection of your cut to the precise searing technique, every step is designed to unlock the full potential of this magnificent piece of beef. I truly believe that once you try this method, you’ll never look at cooking a New York Strip the same way again.
Why is this a must-try? Because it’s simple, effective, and delivers consistently amazing results. No fancy equipment or complicated techniques are required. Just a good steak, a hot pan, and a little bit of patience. The reward? A steak with a beautifully browned crust and a juicy, tender interior that will have your taste buds singing. Forget expensive steakhouses; you can create a culinary masterpiece at home for a fraction of the price.
But the beauty of this recipe lies not only in its simplicity but also in its versatility. Feel free to experiment with different seasonings. While I’m a big fan of the classic salt and pepper combination, a touch of garlic powder, onion powder, or even a pinch of smoked paprika can add a delightful twist. Consider adding fresh herbs like rosemary or thyme to the pan during the searing process to infuse the steak with their aromatic flavors.
Looking for serving suggestions? The possibilities are endless! A classic pairing is with creamy mashed potatoes and roasted asparagus. For a lighter meal, try slicing the steak thinly and serving it over a vibrant salad with a tangy vinaigrette. Or, for a truly decadent experience, top it with a pat of compound butter made with herbs and garlic. You could also create a fantastic steak sandwich with caramelized onions and a horseradish aioli. Don’t be afraid to get creative and tailor the sides to your own personal preferences.
Here are a few variations to consider:
* Reverse Sear: For an even more tender steak, try the reverse sear method. Cook the steak in a low oven (around 275°F) until it reaches your desired internal temperature, then sear it in a hot pan for a perfect crust.
* Grilling: This recipe can easily be adapted for the grill. Just make sure your grill is hot and follow the same searing and resting instructions.
* Different Cuts: While this recipe is specifically for New York Strip Steak, the same techniques can be applied to other cuts of steak, such as ribeye or sirloin. Just adjust the cooking time accordingly.I’m so excited for you to try this recipe and experience the joy of cooking a truly exceptional steak. I’ve poured my heart and soul into perfecting this method, and I’m confident that you’ll be thrilled with the results.
So, what are you waiting for? Grab a beautiful New York Strip Steak, gather your ingredients, and get ready to embark on a culinary adventure. And most importantly, don’t forget to share your experience! I’d love to hear how it turned out, what variations you tried, and what sides you paired it with. Leave a comment below, tag me in your photos on social media, and let’s celebrate the art of cooking a perfect steak together. Happy cooking!
New York Strip Steak: The Ultimate Guide to Cooking Perfection
Perfectly seared New York Strip Steaks, cooked to your desired doneness with a flavorful garlic-herb butter baste. A restaurant-quality meal made easy at home!
Ingredients
- 2 New York Strip Steaks (about 1-1.5 inches thick, approximately 12-16 ounces each)
- 2 tablespoons olive oil (extra virgin preferred)
- 2 tablespoons unsalted butter
- 4 cloves garlic, minced
- 2 sprigs fresh rosemary
- 2 sprigs fresh thyme
- Kosher salt, to taste
- Freshly ground black pepper, to taste
- Optional: 1/4 cup beef broth or red wine (for deglazing the pan)
Instructions
- Prepare the Steaks: Pat the steaks dry with paper towels. Season generously on both sides with kosher salt and freshly ground black pepper. Let the steaks rest at room temperature for at least 30 minutes, or up to an hour.
- Preheat the Oven: Preheat your oven to 400°F (200°C).
- Heat the Skillet: Place a heavy-bottomed, oven-safe skillet (cast iron is ideal) over high heat. Let the skillet heat up for several minutes until it’s screaming hot.
- Add the Oil: Once the skillet is hot, add the olive oil.
- Sear the Steaks: Carefully place the seasoned steaks in the hot skillet, making sure not to overcrowd the pan. Sear the steaks for 2-3 minutes per side, without moving them, until a deep, golden-brown crust forms.
- Add Butter, Garlic, and Herbs: After searing both sides, reduce the heat to medium. Add the butter, minced garlic, rosemary sprigs, and thyme sprigs to the skillet. As the butter melts, tilt the skillet and use a spoon to baste the steaks with the melted butter, garlic, and herb mixture. Continue basting for about 1-2 minutes.
- Transfer to the Oven: Carefully transfer the skillet with the steaks to the preheated oven.
- Cook to Desired Doneness: Cook the steaks in the oven until they reach your desired level of doneness. Use a meat thermometer to check the internal temperature.
- Optional: Deglaze the Pan (for a Sauce): If you want to make a quick pan sauce, remove the steaks from the skillet and set them aside to rest. Place the skillet back on the stovetop over medium heat. Add the beef broth or red wine to the skillet and scrape up any browned bits from the bottom of the pan. Let the sauce simmer for a few minutes, until it reduces slightly and thickens. You can add a pat of butter at the end for extra richness.
- Rest the Steaks: Remove the steaks from the oven and transfer them to a cutting board. Tent them loosely with foil and let them rest for at least 10 minutes, or even up to 15 minutes.
- Slice and Serve: After resting, slice the steaks against the grain into 1/4-inch to 1/2-inch thick slices. Serve immediately. You can drizzle them with the pan sauce (if you made one) or simply enjoy them as is.
Notes
- Choose High-Quality Steaks: The quality of the steak will greatly impact the final result. Look for steaks that are well-marbled with fat, as this will add flavor and tenderness.
- Don’t Overcrowd the Pan: If you’re cooking more than two steaks, it’s best to sear them in batches to avoid overcrowding the pan. Overcrowding will lower the temperature of the pan and prevent the steaks from searing properly.
- Use a Meat Thermometer: A meat thermometer is your best friend when it comes to cooking steaks to the perfect doneness. It takes the guesswork out of the equation and ensures that your steaks are cooked exactly how you like them.
- Let the Steaks Rest: Resting the steaks is essential for juicy, tender results.
- Experiment with Flavors: Feel free to experiment with different herbs and spices to customize the flavor of your steaks. Garlic powder, onion powder, paprika, and chili powder are all great additions.


Leave a Comment