
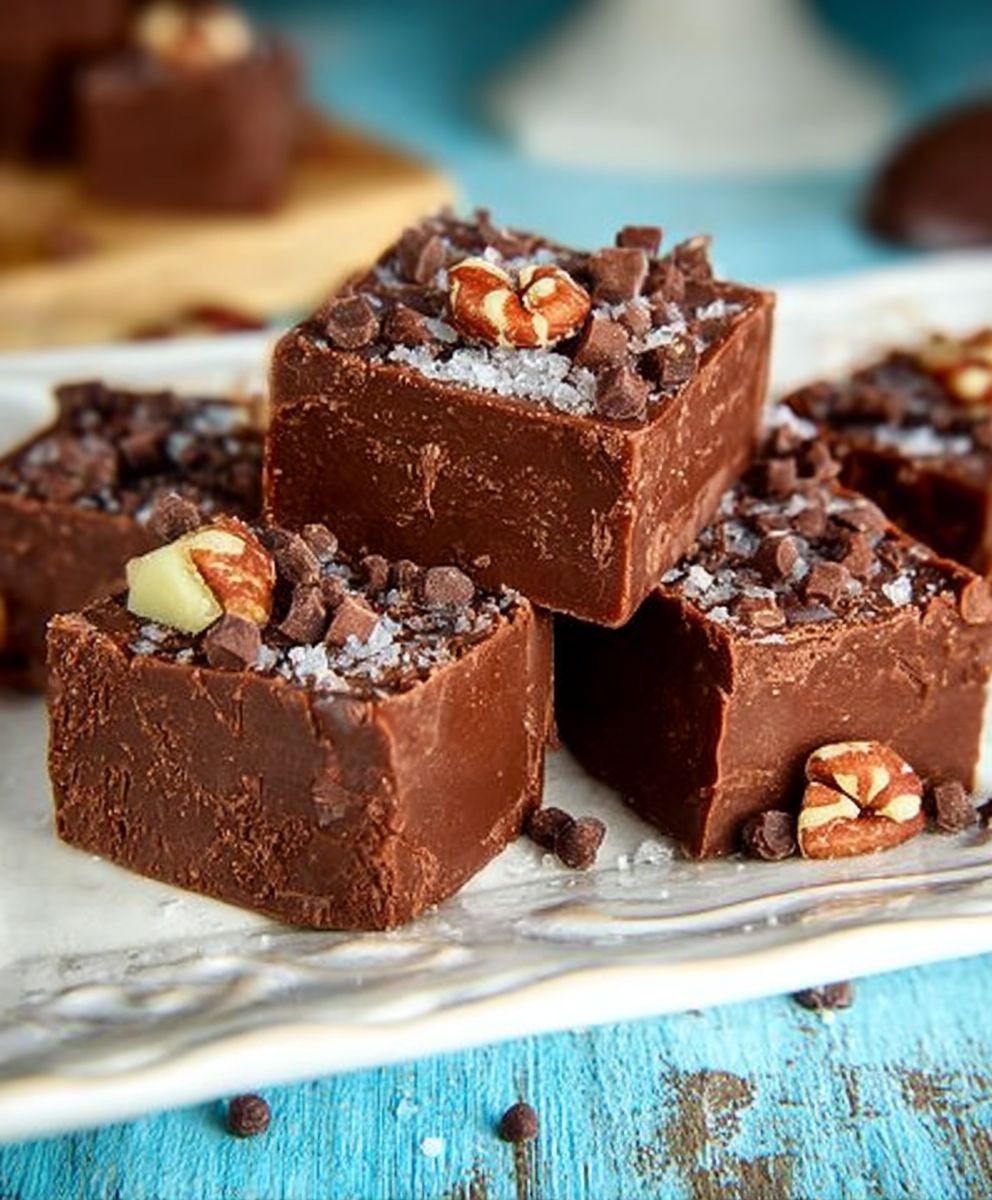
Grandma’s Homemade Fudge: just the name conjures up images of cozy kitchens, holiday gatherings, and the irresistible aroma of chocolate melting on the stove. Have you ever bitten into a piece of fudge so rich and creamy it practically melts in your mouth, transporting you back to childhood? That’s the magic of this recipe, passed down through generations, and I’m thrilled to share it with you.
Fudge, in its simplest form, is a confection born from a happy accident. Legend has it that fudge originated in the late 19th century when a batch of caramels went awry, resulting in a delightfully “fudged” texture. Since then, it has become a beloved treat, especially during festive seasons. But this isn’t just any fudge; this is Grandma’s Homemade Fudge, a recipe perfected over decades of love and experimentation.
What makes this fudge so special? It’s the perfect balance of rich chocolate flavor, a melt-in-your-mouth texture, and the comforting feeling of nostalgia. It’s incredibly easy to make, requiring only a few simple ingredients and minimal effort. Whether you’re looking for a sweet treat to share with loved ones or a comforting indulgence for yourself, this fudge is guaranteed to satisfy your sweet tooth and create lasting memories. Get ready to experience the joy of homemade goodness!

Ingredients:
- Unsalted Butter: 1 cup (2 sticks), plus extra for greasing the pan
- Granulated Sugar: 3 cups
- Unsweetened Cocoa Powder: 1 cup (high-quality, Dutch-processed recommended)
- Whole Milk: 1 cup
- Light Corn Syrup: 1/2 cup
- Salt: 1/4 teaspoon
- Vanilla Extract: 1 teaspoon (pure vanilla extract is best!)
- Chopped Walnuts or Pecans: 1 cup (optional, but highly recommended!)
Preparing the Fudge:
- Grease and Prepare Your Pan: The first step to perfect fudge is preparing your pan. Generously grease an 8×8 inch square baking pan with butter. You can also line the pan with parchment paper, leaving an overhang on two sides. This makes it super easy to lift the fudge out later. Trust me, you’ll thank me for this tip!
- Combine Sugar, Cocoa, and Salt: In a heavy-bottomed 3-quart saucepan, combine the granulated sugar, cocoa powder, and salt. Whisk these dry ingredients together thoroughly. This ensures that the cocoa powder is evenly distributed and prevents any clumps from forming later on.
- Add Milk and Corn Syrup: Pour in the whole milk and light corn syrup. Stir everything together until the dry ingredients are moistened. The mixture will look a bit thick at this point, but don’t worry, it will smooth out as it heats.
- Cook to the Soft-Ball Stage: This is the most crucial part of the fudge-making process. Place the saucepan over medium heat and bring the mixture to a boil, stirring constantly until the sugar is completely dissolved. Once it starts boiling, stop stirring and insert a candy thermometer. It’s important to stop stirring at this point to prevent sugar crystals from forming, which can result in grainy fudge. Cook until the thermometer registers 234°F (112°C), which is the soft-ball stage. This can take anywhere from 10 to 15 minutes, so be patient and keep a close eye on the thermometer. If you don’t have a candy thermometer, you can test for the soft-ball stage by dropping a small amount of the hot mixture into a bowl of cold water. If it forms a soft, pliable ball that you can flatten between your fingers, it’s ready.
- Remove from Heat and Add Butter: Once the mixture reaches the soft-ball stage, immediately remove the saucepan from the heat. Add the butter (1 cup, or 2 sticks) to the hot mixture. Do not stir! Let the butter sit on top of the mixture for a few minutes to soften.
- Cool Slightly and Add Vanilla: Allow the mixture to cool slightly, undisturbed, for about 5 minutes. This allows the butter to soften and the mixture to cool down a bit, which helps prevent the fudge from becoming grainy. After 5 minutes, add the vanilla extract.
The Secret to Creamy Fudge: The Stirring Process
- Stir Until Thickened: Now comes the part that requires a little elbow grease! Using a wooden spoon or a sturdy spatula, stir the mixture vigorously until it thickens and loses its glossy sheen. This process can take anywhere from 5 to 10 minutes, so be prepared to put in some effort. You’ll notice the mixture starting to become dull and less shiny as you stir. It will also become noticeably thicker and harder to stir. This is the key to achieving that perfect, creamy fudge texture. If you stir too little, the fudge will be too soft. If you stir too much, it will become dry and crumbly.
- Add Nuts (Optional): If you’re using nuts, gently fold them into the thickened fudge mixture. Be careful not to overmix, as this can cause the fudge to become tough.
Setting and Cutting the Fudge:
- Pour into Prepared Pan: Pour the fudge mixture into the prepared 8×8 inch baking pan. Spread it evenly with a spatula.
- Chill Until Firm: Cover the pan with plastic wrap and refrigerate for at least 2 hours, or preferably overnight, to allow the fudge to set completely. This is important for achieving the right consistency.
- Cut into Squares: Once the fudge is firm, remove it from the refrigerator. If you lined the pan with parchment paper, lift the fudge out using the overhang. Otherwise, carefully run a knife around the edges of the pan to loosen the fudge. Cut the fudge into 1-inch squares or desired size. A warm, sharp knife will make this process easier. You can run the knife under hot water and wipe it dry between cuts to prevent the fudge from sticking.
Tips for Perfect Fudge:
- Use High-Quality Ingredients: The quality of your ingredients will directly impact the taste and texture of your fudge. Use good-quality unsalted butter, pure vanilla extract, and Dutch-processed cocoa powder for the best results.
- Don’t Overcook: Overcooking the fudge mixture can result in a dry, crumbly fudge. Use a candy thermometer and remove the mixture from the heat as soon as it reaches the soft-ball stage (234°F).
- Don’t Understir: Understirring the fudge mixture can result in a soft, runny fudge. Stir vigorously until the mixture thickens and loses its glossy sheen.
- Be Patient: Fudge-making requires patience. Don’t rush the process, and follow the instructions carefully.
- Store Properly: Store the fudge in an airtight container at room temperature for up to 2 weeks, or in the refrigerator for up to 1 month.
Troubleshooting:
Why is my fudge grainy?
Grainy fudge is usually caused by sugar crystals forming during the cooking process. This can happen if you stir the mixture after it starts boiling, or if you don’t cook it to the correct temperature. Make sure to stop stirring once the mixture comes to a boil, and use a candy thermometer to ensure it reaches the soft-ball stage.
Why is my fudge too soft?
Soft fudge is usually caused by not cooking the mixture to the correct temperature, or by not stirring it enough. Make sure to use a candy thermometer and cook the mixture to the soft-ball stage. Also, stir the mixture vigorously until it thickens and loses its glossy sheen.
Why is my fudge too hard?
Hard fudge is usually caused by overcooking the mixture, or by stirring it too much. Use a candy thermometer and remove the mixture from the heat as soon as it reaches the soft-ball stage. Also, be careful not to overstir the mixture.
Can I use different types of nuts?
Absolutely! Feel free to experiment with different types of nuts, such as almonds, pecans, or macadamia nuts. You can also add other mix-ins, such as dried fruit, chocolate chips, or peanut butter chips.
Can I make this fudge without a candy thermometer?
Yes, you can, but it’s a bit trickier. You’ll need to use the cold water test to determine when the mixture has reached the soft-ball stage. Drop a small amount of the hot mixture into a bowl of cold water. If it forms a soft, pliable ball that you can flatten between your fingers, it’s ready.
Conclusion:
And there you have it! I truly believe this recipe for Grandma’s Homemade Fudge is more than just a sweet treat; it’s a journey back to simpler times, a warm hug in every bite, and a guaranteed crowd-pleaser. It’s the kind of fudge that disappears faster than you can say “seconds,” leaving behind only happy smiles and sticky fingers.
Why is this a must-try? Because it’s unbelievably easy, uses ingredients you likely already have in your pantry, and delivers a depth of flavor that rivals even the fanciest confectioneries. Forget those complicated, multi-step fudge recipes that require a candy thermometer and a PhD in sugar science. This one is foolproof, perfect for beginner bakers and seasoned pros alike. Plus, the rich, creamy texture is simply divine it melts in your mouth, leaving a lingering chocolatey goodness that will have you craving more.
But the best part? It’s Grandma’s Homemade Fudge! It’s a taste of nostalgia, a connection to family traditions, and a reminder of the simple joys in life. It’s the kind of recipe that gets passed down through generations, each batch carrying with it a little bit of love and a whole lot of deliciousness.
Now, let’s talk serving suggestions and variations, because the possibilities are endless! For a classic presentation, simply cut the fudge into squares and arrange them on a pretty platter. But don’t be afraid to get creative! Crumble it over ice cream for an extra-indulgent sundae, chop it up and mix it into your favorite cookie dough, or use it as a decadent filling for homemade truffles.
If you’re feeling adventurous, try adding a few twists to the basic recipe. A sprinkle of sea salt on top enhances the sweetness and adds a delightful salty-sweet contrast. Stir in some chopped nuts, like walnuts or pecans, for a bit of crunch. Or, for a festive touch, add a swirl of peppermint extract and crushed candy canes during the holiday season. You could even experiment with different types of chocolate, like dark chocolate for a richer flavor or white chocolate for a sweeter treat. A dash of espresso powder will deepen the chocolate flavor and add a subtle coffee kick. Consider adding a layer of peanut butter to the bottom of the pan before pouring in the fudge mixture for a delightful peanut butter cup fudge variation. The key is to have fun and make it your own!
I’m so excited for you to try this recipe and experience the magic of Grandma’s Homemade Fudge for yourself. I promise, you won’t be disappointed. It’s the perfect treat for any occasion, from holiday gatherings to cozy nights in.
So, what are you waiting for? Gather your ingredients, put on your apron, and get ready to create a batch of fudge that will impress your friends, delight your family, and transport you back to your childhood.
And most importantly, I want to hear about your experience! Did you try any variations? Did you make it for a special occasion? What did your family and friends think? Share your photos, stories, and tips in the comments below. I can’t wait to see what you create! Happy baking! I hope you enjoy this Grandma’s Homemade Fudge as much as my family does.
Grandmas Homemade Fudge: The Ultimate Recipe Guide
Rich, creamy chocolate fudge, perfect for gifting. Easy to make with simple ingredients.
Ingredients
- 1 cup (2 sticks) Unsalted Butter, plus extra for greasing the pan
- 3 cups Granulated Sugar
- 1 cup Unsweetened Cocoa Powder (high-quality, Dutch-processed recommended)
- 1 cup Whole Milk
- 1/2 cup Light Corn Syrup
- 1/4 teaspoon Salt
- 1 teaspoon Vanilla Extract (pure vanilla extract is best!)
- 1 cup Chopped Walnuts or Pecans (optional, but highly recommended!)
Instructions
- Grease and Prepare Your Pan: Generously grease an 8×8 inch square baking pan with butter. You can also line the pan with parchment paper, leaving an overhang on two sides.
- Combine Sugar, Cocoa, and Salt: In a heavy-bottomed 3-quart saucepan, combine the granulated sugar, cocoa powder, and salt. Whisk these dry ingredients together thoroughly.
- Add Milk and Corn Syrup: Pour in the whole milk and light corn syrup. Stir everything together until the dry ingredients are moistened.
- Cook to the Soft-Ball Stage: Place the saucepan over medium heat and bring the mixture to a boil, stirring constantly until the sugar is completely dissolved. Once it starts boiling, stop stirring and insert a candy thermometer. Cook until the thermometer registers 234°F (112°C), which is the soft-ball stage. If you don’t have a candy thermometer, you can test for the soft-ball stage by dropping a small amount of the hot mixture into a bowl of cold water. If it forms a soft, pliable ball that you can flatten between your fingers, it’s ready.
- Remove from Heat and Add Butter: Once the mixture reaches the soft-ball stage, immediately remove the saucepan from the heat. Add the butter (1 cup, or 2 sticks) to the hot mixture. Do not stir! Let the butter sit on top of the mixture for a few minutes to soften.
- Cool Slightly and Add Vanilla: Allow the mixture to cool slightly, undisturbed, for about 5 minutes. After 5 minutes, add the vanilla extract.
- Stir Until Thickened: Using a wooden spoon or a sturdy spatula, stir the mixture vigorously until it thickens and loses its glossy sheen. This process can take anywhere from 5 to 10 minutes.
- Add Nuts (Optional): If you’re using nuts, gently fold them into the thickened fudge mixture. Be careful not to overmix.
- Pour into Prepared Pan: Pour the fudge mixture into the prepared 8×8 inch baking pan. Spread it evenly with a spatula.
- Chill Until Firm: Cover the pan with plastic wrap and refrigerate for at least 2 hours, or preferably overnight, to allow the fudge to set completely.
- Cut into Squares: Once the fudge is firm, remove it from the refrigerator. If you lined the pan with parchment paper, lift the fudge out using the overhang. Otherwise, carefully run a knife around the edges of the pan to loosen the fudge. Cut the fudge into 1-inch squares or desired size. A warm, sharp knife will make this process easier.
Notes
- Use high-quality ingredients for the best flavor and texture.
- Stopping stirring after boiling prevents grainy fudge.
- The stirring process is key to creamy fudge.
- Don’t overcook or overstir the fudge.
- Store in an airtight container at room temperature for up to 2 weeks, or in the refrigerator for up to 1 month.
- If you don’t have a candy thermometer, use the cold water test to check for the soft-ball stage.

Leave a Comment