
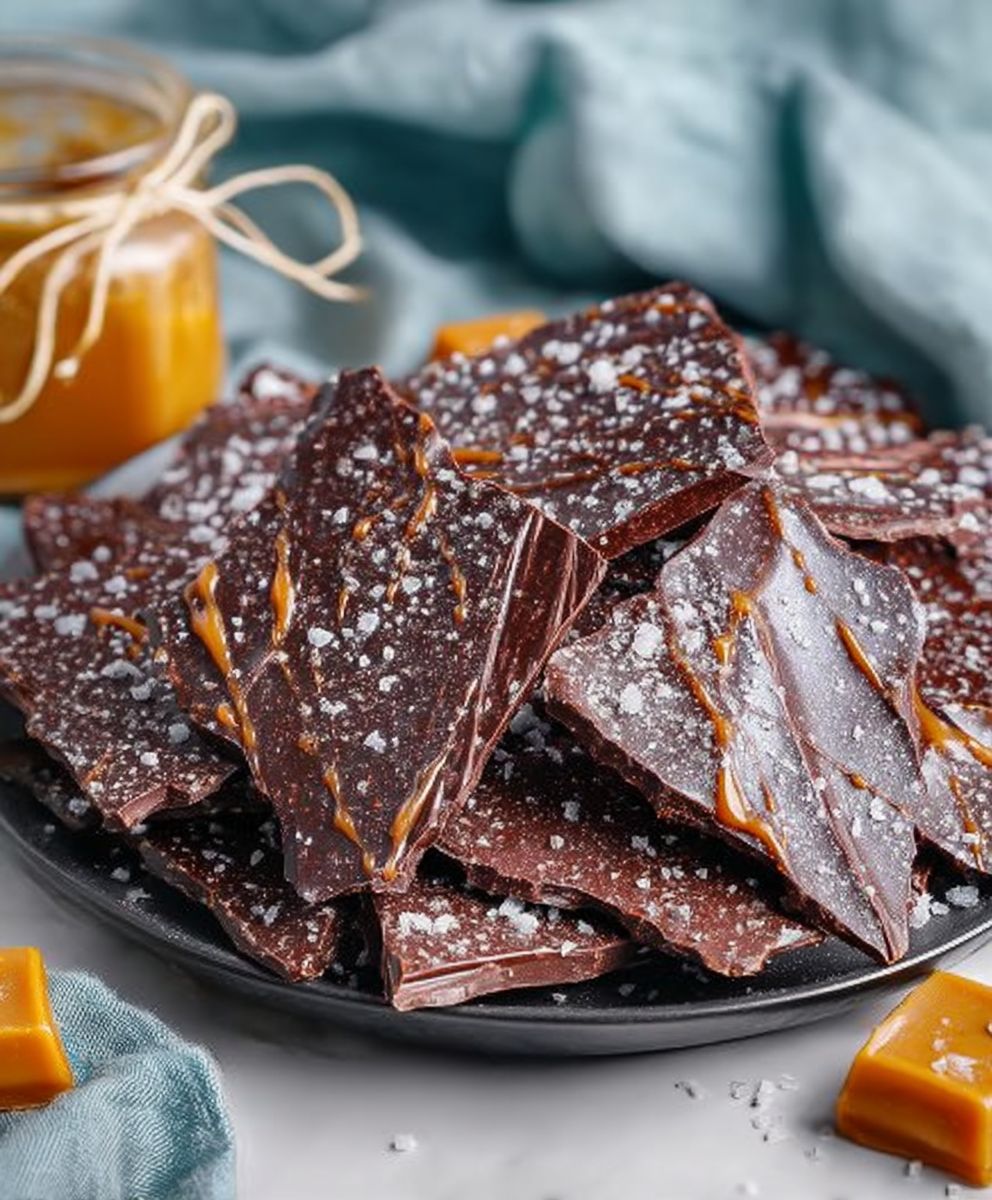
Dark Chocolate Sea Salt Bark: Prepare to be utterly captivated by this irresistible treat! Imagine the satisfying snap of rich, dark chocolate giving way to a delicate sprinkle of sea salt, creating a symphony of flavors that dance on your tongue. It’s a simple yet elegant confection that’s perfect for gifting, holiday gatherings, or simply indulging in a moment of pure bliss.
While the exact origins of chocolate bark are somewhat shrouded in mystery, its popularity has exploded in recent years, becoming a staple in artisanal chocolate shops and home kitchens alike. The beauty of dark chocolate sea salt bark lies in its versatility. You can customize it with your favorite toppings, from nuts and dried fruits to pretzels and candies, making it a truly personalized creation.
But why do people adore this delightful treat so much? It’s the perfect balance of sweet and salty, the satisfying crunch, and the sheer ease of preparation. Unlike complicated desserts that require hours in the kitchen, this bark comes together in minutes, making it an ideal option for busy individuals who crave a touch of decadence. The combination of high-quality dark chocolate and flaky sea salt creates an addictive flavor profile that’s simply impossible to resist. So, let’s dive in and discover how to make this delectable treat!

Ingredients:
- 16 ounces high-quality dark chocolate (at least 70% cacao), chopped
- 1/2 teaspoon sea salt flakes, plus more for sprinkling
- Optional toppings:
- 1/4 cup chopped pecans or walnuts
- 1/4 cup dried cranberries or cherries
- 1/4 cup crushed pretzels
- 1/4 cup cacao nibs
- Orange zest from 1 orange
Preparing the Chocolate:
- Prepare your workspace: Before you even think about melting chocolate, line a baking sheet with parchment paper or a silicone baking mat. This will prevent the bark from sticking and make cleanup a breeze. Make sure the baking sheet fits comfortably in your refrigerator.
- Chop the chocolate: Finely chop the dark chocolate. This is crucial for even melting. Large chunks take longer to melt and can lead to scorching. I like to use a serrated knife for this, as it cuts through the chocolate more easily.
- Choose your melting method: You have two main options for melting chocolate: the double boiler method or the microwave method. I’ll walk you through both.
- Double Boiler Method:
- Fill a saucepan with about an inch or two of water. Make sure the water doesn’t touch the bottom of the bowl you’ll be using.
- Bring the water to a simmer over medium heat.
- Place the chopped chocolate in a heatproof bowl (glass or stainless steel) that fits snugly over the saucepan.
- As the chocolate begins to melt, stir it gently and constantly with a rubber spatula. Be patient! It can take a few minutes for the chocolate to fully melt.
- Once the chocolate is completely melted and smooth, remove the bowl from the heat. Be careful not to get any water in the chocolate, as this can cause it to seize.
- Microwave Method:
- Place the chopped chocolate in a microwave-safe bowl.
- Microwave in 30-second intervals, stirring well after each interval. This is important to prevent burning.
- Continue microwaving and stirring until the chocolate is almost completely melted. There might be a few small lumps remaining.
- Remove the bowl from the microwave and stir vigorously until the remaining lumps melt and the chocolate is smooth. The residual heat will melt the last bits of chocolate.
- Tempering (Optional but Recommended): For a truly professional-looking bark with a glossy shine and a satisfying snap, consider tempering the chocolate. Tempering involves heating and cooling the chocolate to specific temperatures to stabilize the cocoa butter crystals. While it sounds intimidating, it’s not as difficult as you might think.
- Melt about two-thirds of the chocolate using either the double boiler or microwave method, as described above. Heat it to between 115-120°F (46-49°C). Use a candy thermometer to monitor the temperature.
- Remove the chocolate from the heat and add the remaining one-third of the chopped chocolate. Stir continuously until all the chocolate is melted and the temperature drops to between 88-90°F (31-32°C).
- The chocolate is now tempered and ready to use.
Creating the Bark:
- Pour and Spread: Pour the melted chocolate onto the prepared baking sheet. Use an offset spatula or the back of a spoon to spread the chocolate into an even layer, about 1/4 inch thick. Don’t worry about making it perfectly uniform; the rustic look is part of the charm.
- Sprinkle with Sea Salt: Immediately sprinkle the 1/2 teaspoon of sea salt flakes evenly over the melted chocolate. The salt enhances the sweetness of the chocolate and provides a delightful contrast in flavor.
- Add Toppings (Optional): If you’re using any additional toppings, now is the time to add them. Sprinkle the chopped pecans, dried cranberries, crushed pretzels, cacao nibs, or orange zest over the chocolate. Gently press the toppings into the chocolate to ensure they adhere.
- Chill and Set: Place the baking sheet in the refrigerator and let the chocolate bark chill for at least 30 minutes, or until it is firm and completely set. This is crucial for easy breaking.
Breaking and Storing:
- Break into Pieces: Once the chocolate bark is firm, remove it from the refrigerator. Use your hands to break the bark into irregular pieces. You can also use a large knife to score the bark before chilling, which will make it easier to break into more uniform pieces.
- Sprinkle with More Sea Salt (Optional): For an extra burst of flavor and visual appeal, sprinkle the broken pieces of bark with a little more sea salt.
- Store Properly: Store the dark chocolate sea salt bark in an airtight container at room temperature or in the refrigerator. It will keep for several weeks, although it’s unlikely to last that long! If storing in the refrigerator, let it sit at room temperature for a few minutes before serving to soften slightly.
Tips and Variations:
- Experiment with Different Chocolates: While I recommend dark chocolate for its intense flavor and health benefits, you can also use milk chocolate or white chocolate. Just be aware that milk chocolate and white chocolate are sweeter and may require less sea salt.
- Add a Touch of Spice: For a warm and spicy twist, add a pinch of cayenne pepper or cinnamon to the melted chocolate.
- Make it Nutty: In addition to pecans and walnuts, you can use other nuts like almonds, pistachios, or macadamia nuts. Toasting the nuts before adding them to the bark will enhance their flavor.
- Get Fruity: Experiment with different dried fruits like apricots, figs, or blueberries. You can also use freeze-dried fruits for a crispy texture.
- Add a Drizzle: After the bark has set, drizzle it with melted white chocolate or peanut butter for an extra layer of flavor and visual appeal.
- Make it Vegan: Use vegan dark chocolate and ensure any toppings you use are also vegan-friendly.
- Adjust the Salt: The amount of sea salt you use is a matter of personal preference. Start with the recommended amount and adjust to your liking.
- Don’t Overheat the Chocolate: Overheating chocolate can cause it to seize and become grainy. Be patient and melt the chocolate slowly and gently.
- Use High-Quality Ingredients: The quality of your ingredients will directly impact the flavor of the bark. Use high-quality dark chocolate and sea salt for the best results.
Conclusion:
This Dark Chocolate Sea Salt Bark isn’t just a recipe; it’s an experience, a delightful journey for your taste buds that balances the rich intensity of dark chocolate with the satisfying crunch and salty tang that will leave you craving more. I truly believe this is a must-try recipe for anyone who appreciates simple elegance and incredible flavor. It’s quick, requires minimal ingredients, and delivers a gourmet result that will impress your friends and family.
Why is it a must-try? Because it’s ridiculously easy! Seriously, if you can melt chocolate, you can make this. But beyond the simplicity, it’s the flavor profile that truly shines. The dark chocolate provides a deep, complex bitterness that’s perfectly offset by the flaky sea salt. It’s a symphony of sweet and salty, smooth and crunchy, that will have you reaching for another piece before you even realize it. Plus, it’s incredibly versatile.
Looking for serving suggestions? This Dark Chocolate Sea Salt Bark is perfect as a homemade gift. Wrap it in cellophane bags tied with a pretty ribbon, and you have a thoughtful and delicious present for any occasion. It’s also a fantastic addition to a dessert platter, adding a touch of sophistication and contrasting beautifully with other sweets. Crumble it over ice cream for an extra layer of texture and flavor, or serve it alongside a cup of hot coffee or tea for a cozy and indulgent treat.
But the fun doesn’t stop there! Feel free to get creative with variations. Want to add a little spice? A pinch of cayenne pepper to the melted chocolate will give it a delightful kick. Love nuts? Sprinkle chopped almonds, pecans, or walnuts over the chocolate before it sets. Dried cranberries, cherries, or even candied orange peel would also be fantastic additions. For a festive twist, try adding crushed peppermint candies during the holidays. You could even swirl in some white chocolate or milk chocolate for a marbled effect. The possibilities are endless!
Don’t be afraid to experiment and make this recipe your own. That’s the beauty of cooking, isn’t it? It’s about taking a basic idea and transforming it into something unique and personal. I encourage you to try this recipe and discover your own favorite variations. I promise you won’t be disappointed.
So, what are you waiting for? Gather your ingredients, put on some music, and get ready to create some magic in the kitchen. I’m confident that this Dark Chocolate Sea Salt Bark will become a staple in your repertoire.
And most importantly, I’d love to hear about your experience! Did you try any variations? What did your friends and family think? Share your photos and stories in the comments below. Let’s create a community of chocolate lovers and inspire each other with our culinary creations. Happy baking (or rather, melting and sprinkling)! I can’t wait to see what you come up with. Enjoy!
Dark Chocolate Sea Salt Bark: A Delicious & Easy Recipe
Easy dark chocolate bark with sea salt and optional toppings like nuts, dried fruit, and pretzels. A simple and delicious treat!
Ingredients
- 16 ounces high-quality dark chocolate (at least 70% cacao), chopped
- 1/2 teaspoon sea salt flakes, plus more for sprinkling
- 1/4 cup chopped pecans or walnuts
- 1/4 cup dried cranberries or cherries
- 1/4 cup crushed pretzels
- 1/4 cup cacao nibs
- Orange zest from 1 orange
Instructions
- Prepare your workspace: Line a baking sheet with parchment paper or a silicone baking mat.
- Chop the chocolate: Finely chop the dark chocolate.
- Choose your melting method: Double boiler or microwave.
- Double Boiler Method:
a. Fill a saucepan with about an inch or two of water and bring to a simmer.
b. Place the chopped chocolate in a heatproof bowl over the saucepan.
c. Stir gently and constantly until melted and smooth.
d. Remove from heat. - Microwave Method:
a. Place the chopped chocolate in a microwave-safe bowl.
b. Microwave in 30-second intervals, stirring well after each interval, until almost melted.
c. Remove from the microwave and stir vigorously until smooth. - Tempering (Optional):
a. Melt about two-thirds of the chocolate to 115-120°F (46-49°C).
b. Remove from heat and add the remaining one-third of the chopped chocolate.
c. Stir continuously until all the chocolate is melted and the temperature drops to between 88-90°F (31-32°C). - Pour and Spread: Pour the melted chocolate onto the prepared baking sheet and spread into an even layer, about 1/4 inch thick.
- Sprinkle with Sea Salt: Immediately sprinkle the 1/2 teaspoon of sea salt flakes evenly over the melted chocolate.
- Add Toppings (Optional): Sprinkle desired toppings over the chocolate and gently press them in.
- Chill and Set: Place the baking sheet in the refrigerator and let the chocolate bark chill for at least 30 minutes, or until it is firm and completely set.
- Break into Pieces: Once firm, remove from the refrigerator and break into irregular pieces.
- Sprinkle with More Sea Salt (Optional): Sprinkle the broken pieces of bark with a little more sea salt.
- Store Properly: Store in an airtight container at room temperature or in the refrigerator.
Notes
- Experiment with different chocolates (milk, white, vegan).
- Add a pinch of cayenne pepper or cinnamon for a spicy twist.
- Use different nuts, dried fruits, or freeze-dried fruits.
- Drizzle with melted white chocolate or peanut butter after setting.
- Adjust the amount of sea salt to your liking.
- Don’t overheat the chocolate.
- Use high-quality ingredients for the best results.


Leave a Comment