
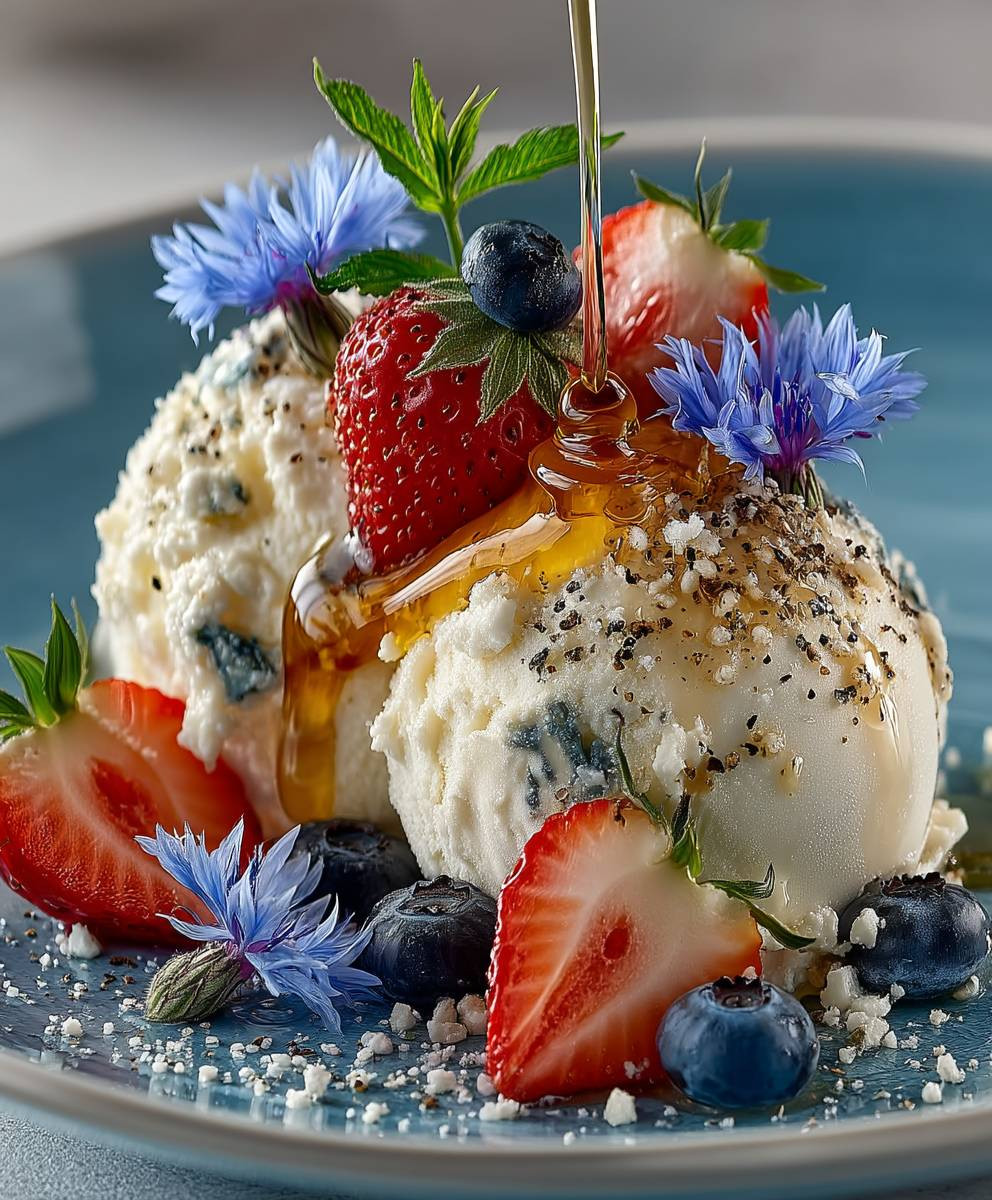
Olive oil ice cream might sound unconventional, even a little strange, but trust me, this is one dessert experience you absolutely have to try! Forget everything you think you know about ice cream; this recipe will redefine your understanding of creamy, decadent, and utterly delightful frozen treats.
While the exact origins are debated, the concept of incorporating olive oil into desserts, particularly in Mediterranean cuisine, has roots stretching back centuries. Olive oil, a staple in these regions, was often used not just for savory dishes but also as a source of richness and flavor in sweets. Today, chefs around the world are rediscovering this tradition, elevating simple ingredients into sophisticated culinary creations.
So, why is olive oil ice cream such a hit? It’s all about the unique flavor profile. The fruity, sometimes peppery notes of the olive oil beautifully complement the sweetness of the ice cream base, creating a complex and surprisingly refreshing taste. The olive oil also contributes to an incredibly smooth and luxurious texture that melts in your mouth. Plus, it’s a conversation starter! Imagine serving this at your next dinner party your guests will be amazed by the unexpected yet harmonious blend of flavors. Get ready to impress with this surprisingly simple and elegant dessert!

Ingredients:
- 1 ½ cups (360ml) heavy cream
- ¾ cup (180ml) whole milk
- ¾ cup (150g) granulated sugar
- Pinch of sea salt
- ½ cup (120ml) extra virgin olive oil, fruity and high-quality
- 2 large egg yolks
- Optional: Lemon zest (from ½ lemon)
- Optional: Flaky sea salt, for garnish
Preparing the Custard Base:
Okay, let’s get started! The first step in making this surprisingly delicious olive oil ice cream is creating a rich and creamy custard base. This is the foundation for that smooth, melt-in-your-mouth texture we’re aiming for.
- Combine Cream, Milk, Sugar, and Salt: In a medium saucepan, whisk together the heavy cream, whole milk, granulated sugar, and a pinch of sea salt. The salt might seem odd, but trust me, it enhances the sweetness and brings out the subtle flavors of the olive oil.
- Heat the Mixture: Place the saucepan over medium heat. Stir constantly until the sugar is completely dissolved and the mixture is steaming gently. You don’t want it to boil at this stage, just a gentle heat is perfect. Keep an eye on it, stirring regularly to prevent scorching.
- Temper the Egg Yolks: This is a crucial step to prevent scrambled eggs in your ice cream! In a separate medium bowl, whisk the egg yolks until they are light and slightly pale. Slowly drizzle about ½ cup of the hot cream mixture into the egg yolks, whisking constantly and vigorously. This gradually raises the temperature of the yolks, preventing them from curdling when added to the hot cream.
- Combine and Cook the Custard: Pour the tempered egg yolk mixture back into the saucepan with the remaining cream mixture. Reduce the heat to low. Cook, stirring constantly with a heat-resistant spatula or wooden spoon, until the custard thickens enough to coat the back of the spoon. This usually takes about 5-8 minutes. To test for doneness, dip the back of the spoon into the custard and run your finger across the coated surface. If the line remains distinct and doesn’t immediately run back together, the custard is ready. Be careful not to overcook the custard, as it can curdle.
- Strain the Custard: Immediately remove the saucepan from the heat and pour the custard through a fine-mesh sieve into a clean bowl. This will remove any lumps or cooked egg bits, ensuring a perfectly smooth ice cream base.
- Cool the Custard: Cover the bowl tightly with plastic wrap, pressing the plastic wrap directly onto the surface of the custard to prevent a skin from forming. Refrigerate the custard for at least 4 hours, or preferably overnight. This allows the flavors to meld and the custard to chill completely, which is essential for proper freezing.
Infusing with Olive Oil:
Now for the star of the show the olive oil! This is where the magic happens, transforming a simple custard into something truly special.
- Whisk in the Olive Oil: Once the custard is thoroughly chilled, remove it from the refrigerator. Remove the plastic wrap. Gently whisk in the extra virgin olive oil until it is fully incorporated and the mixture is smooth and emulsified. Don’t over-whisk, just enough to combine.
- Add Lemon Zest (Optional): If you’re using lemon zest, now is the time to add it. The lemon zest adds a bright, citrusy note that complements the olive oil beautifully. Stir it gently into the custard.
Churning the Ice Cream:
Time to get that ice cream maker working! This is where the custard transforms into creamy, dreamy ice cream.
- Prepare the Ice Cream Maker: Follow the manufacturer’s instructions for your ice cream maker. Most ice cream makers require the bowl to be frozen for at least 24 hours before use. Make sure your bowl is thoroughly frozen before proceeding.
- Churn the Ice Cream: Pour the chilled custard mixture into the prepared ice cream maker. Churn according to the manufacturer’s instructions, usually for about 20-25 minutes, or until the ice cream reaches a soft-serve consistency. The time may vary depending on your ice cream maker and the temperature of your custard.
- Check the Consistency: The ice cream should be thick and creamy, but still soft enough to scoop. If it’s too soft, you can transfer it to a freezer-safe container and freeze it for a few more hours to firm it up.
Freezing and Serving:
Almost there! A little patience is required for the final freeze, but it’s worth the wait.
- Transfer to a Freezer-Safe Container: Gently transfer the churned ice cream to a freezer-safe container. A loaf pan or a plastic container with a tight-fitting lid works well.
- Freeze to Harden: Cover the container tightly and freeze for at least 2-3 hours, or preferably overnight, to allow the ice cream to harden completely. This will give it a firmer, more scoopable texture.
- Scoop and Serve: When you’re ready to serve, remove the ice cream from the freezer and let it sit at room temperature for a few minutes to soften slightly. This will make it easier to scoop.
- Garnish (Optional): Scoop the ice cream into bowls or cones and garnish with a sprinkle of flaky sea salt, if desired. The flaky sea salt adds a delightful textural contrast and enhances the flavors of the olive oil. You can also drizzle a little extra olive oil on top for an extra touch of elegance.
Tips for Success:
- Use High-Quality Olive Oil: The quality of the olive oil is crucial for this recipe. Choose a fruity, extra virgin olive oil with a robust flavor. Avoid using a bland or neutral olive oil, as it won’t impart the same depth of flavor to the ice cream.
- Don’t Overcook the Custard: Overcooking the custard can result in a grainy or curdled texture. Keep a close eye on it and remove it from the heat as soon as it thickens enough to coat the back of a spoon.
- Chill the Custard Thoroughly: Chilling the custard completely is essential for proper freezing. It allows the flavors to meld and the custard to reach the optimal temperature for churning.
- Adjust Sweetness to Taste: If you prefer a less sweet ice cream, you can reduce the amount of sugar slightly.
- Experiment with Flavors: Feel free to experiment with other flavors that complement olive oil, such as rosemary, thyme, or orange zest.
Serving Suggestions:
- Serve as a standalone dessert.
- Pair with fresh fruit, such as berries or figs.
- Drizzle with balsamic glaze for a sweet and tangy contrast.
- Serve alongside a slice of olive oil cake.
- Use as a topping for grilled peaches or other stone fruits.
Enjoy your homemade olive oil ice cream! It’s a surprisingly delicious and sophisticated treat that’s sure to impress your friends and family.
Conclusion:
This isn’t just another dessert recipe; it’s an experience. The surprising richness and subtle peppery notes of the olive oil, combined with the creamy sweetness of the ice cream, create a flavor profile that’s both sophisticated and utterly addictive. Trust me, once you try this olive oil ice cream, you’ll never look at dessert the same way again. It’s a conversation starter, a palate cleanser, and a guaranteed crowd-pleaser, all rolled into one surprisingly simple recipe.
But why is this a must-try? Because it’s unexpected! In a world saturated with predictable flavors, this recipe dares to be different. It challenges your preconceptions about what ice cream can be and introduces you to a world of culinary possibilities. It’s also incredibly versatile. While I’ve presented a classic version, the beauty of this recipe lies in its adaptability.
Think about drizzling a high-quality balsamic glaze over a scoop for an extra layer of tangy sweetness. Or, for a more decadent treat, try pairing it with a warm chocolate brownie. The contrast between the cold ice cream and the warm brownie is simply divine. For a lighter option, consider serving it alongside fresh berries, like strawberries or raspberries, which will complement the olive oil’s subtle fruitiness.
And don’t be afraid to experiment with different types of olive oil! A robust, peppery extra virgin olive oil will create a more intense flavor, while a milder, fruitier olive oil will result in a more delicate ice cream. You can even infuse the olive oil with herbs like rosemary or thyme for an extra layer of complexity. Imagine a scoop of rosemary-infused olive oil ice cream served with grilled peaches pure summer perfection!
Beyond the flavor, this recipe is also surprisingly easy to make. You don’t need any fancy equipment or complicated techniques. Just a few simple ingredients and a little bit of patience, and you’ll be rewarded with a dessert that’s truly special. It’s the perfect recipe for impressing your friends and family, or for simply treating yourself to something a little bit different.
I truly believe that this olive oil ice cream is a game-changer. It’s a testament to the power of simple ingredients and the magic that can happen when you dare to think outside the box. It’s a recipe that I’ve made countless times, and it never fails to impress.
So, what are you waiting for? Gather your ingredients, dust off your ice cream maker (or use the no-churn method!), and get ready to embark on a culinary adventure. I promise you won’t be disappointed.
And most importantly, I want to hear about your experience! Did you try a different type of olive oil? Did you add any fun toppings or mix-ins? Share your creations and your thoughts in the comments below. I’m always eager to learn from your culinary experiments and to see how you’ve made this recipe your own. Let’s create a community of olive oil ice cream enthusiasts! Happy churning!
Olive Oil Ice Cream: A Delicious & Healthy Dessert Recipe
Creamy homemade ice cream infused with fruity extra virgin olive oil. A sophisticated treat with a hint of sea salt and optional lemon zest.
Ingredients
- 1 ½ cups (360ml) heavy cream
- ¾ cup (180ml) whole milk
- ¾ cup (150g) granulated sugar
- Pinch of sea salt
- ½ cup (120ml) extra virgin olive oil, fruity and high-quality
- 2 large egg yolks
- Optional: Lemon zest (from ½ lemon)
- Optional: Flaky sea salt, for garnish
Instructions
- Combine Cream, Milk, Sugar, and Salt: In a medium saucepan, whisk together the heavy cream, whole milk, granulated sugar, and a pinch of sea salt.
- Heat the Mixture: Place the saucepan over medium heat. Stir constantly until the sugar is completely dissolved and the mixture is steaming gently. Do not boil.
- Temper the Egg Yolks: In a separate medium bowl, whisk the egg yolks until light and slightly pale. Slowly drizzle about ½ cup of the hot cream mixture into the egg yolks, whisking constantly and vigorously.
- Combine and Cook the Custard: Pour the tempered egg yolk mixture back into the saucepan with the remaining cream mixture. Reduce the heat to low. Cook, stirring constantly with a heat-resistant spatula or wooden spoon, until the custard thickens enough to coat the back of the spoon (5-8 minutes). Test for doneness by running your finger across the coated surface; the line should remain distinct. Do not overcook.
- Strain the Custard: Immediately remove the saucepan from the heat and pour the custard through a fine-mesh sieve into a clean bowl.
- Cool the Custard: Cover the bowl tightly with plastic wrap, pressing the plastic wrap directly onto the surface of the custard. Refrigerate for at least 4 hours, or preferably overnight.
- Whisk in the Olive Oil: Once the custard is thoroughly chilled, remove it from the refrigerator. Remove the plastic wrap. Gently whisk in the extra virgin olive oil until fully incorporated and smooth.
- Add Lemon Zest (Optional): If using, stir the lemon zest gently into the custard.
- Prepare the Ice Cream Maker: Follow the manufacturer’s instructions for your ice cream maker.
- Churn the Ice Cream: Pour the chilled custard mixture into the prepared ice cream maker. Churn according to the manufacturer’s instructions (usually 20-25 minutes), or until the ice cream reaches a soft-serve consistency.
- Transfer to a Freezer-Safe Container: Gently transfer the churned ice cream to a freezer-safe container.
- Freeze to Harden: Cover the container tightly and freeze for at least 2-3 hours, or preferably overnight, to allow the ice cream to harden completely.
- Scoop and Serve: When ready to serve, remove the ice cream from the freezer and let it sit at room temperature for a few minutes to soften slightly.
- Garnish (Optional): Scoop the ice cream into bowls or cones and garnish with a sprinkle of flaky sea salt, if desired.
Notes
- Use high-quality, fruity extra virgin olive oil for the best flavor.
- Don’t overcook the custard, as it can become grainy.
- Chill the custard thoroughly for proper freezing.
- Adjust sweetness to taste.
- Experiment with other flavors like rosemary, thyme, or orange zest.
- Serving Suggestions: Serve as a standalone dessert, pair with fresh fruit, drizzle with balsamic glaze, serve alongside olive oil cake, or use as a topping for grilled peaches.


Leave a Comment