
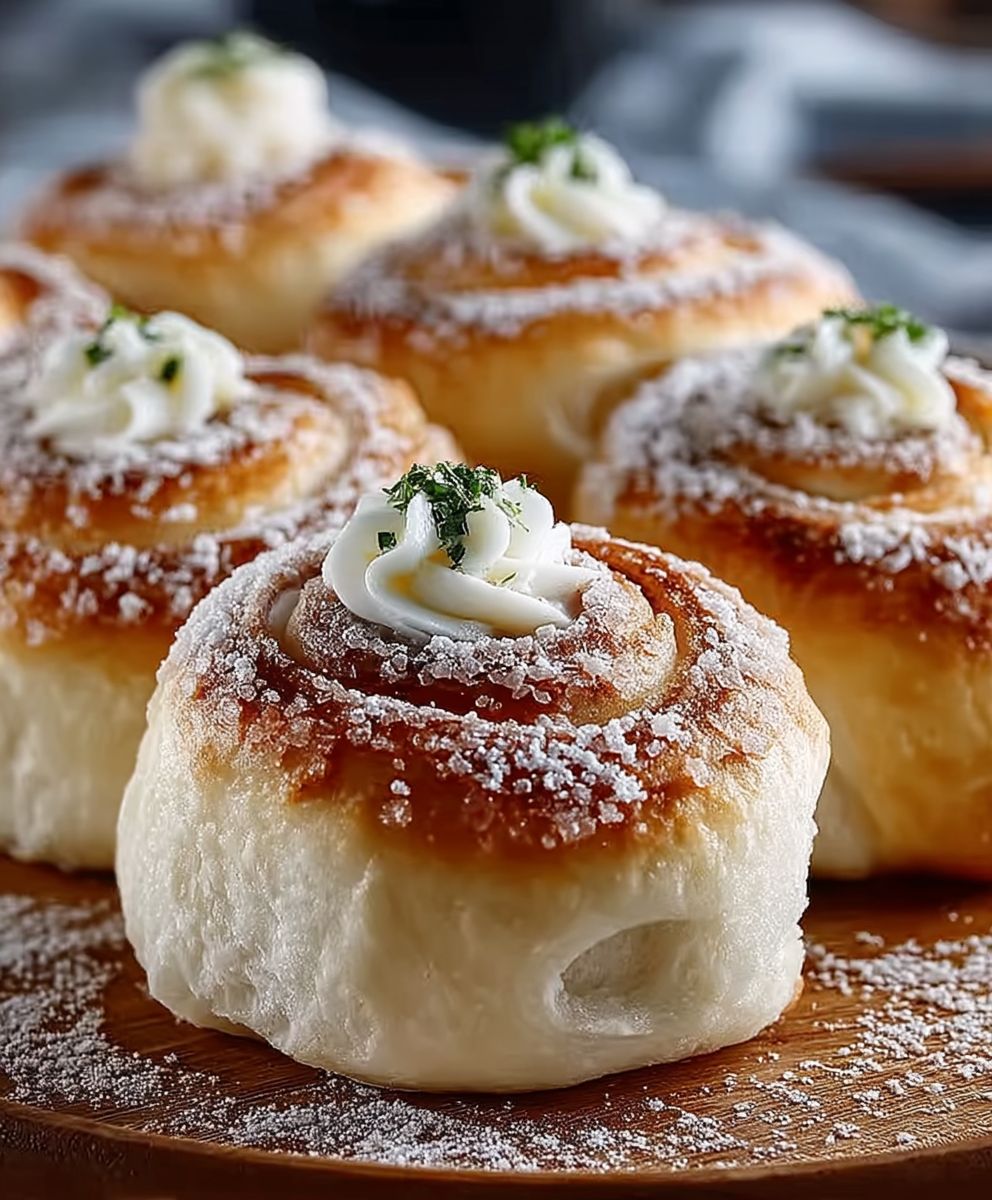
Vanilla Pan de Mallorca, a sweet and swirly pastry, is about to become your new favorite baking project! Imagine biting into a cloud of soft, slightly sweet dough, infused with the delicate aroma of vanilla and dusted with a generous coating of powdered sugar. This isn’t just bread; it’s an experience, a taste of sunshine, and a little piece of Mallorca right in your own kitchen.
Originating from the beautiful island of Mallorca, Spain, Pan de Mallorca, also known as Ensaimada, has a rich history dating back centuries. Some believe its spiral shape was inspired by the turbans worn by Moorish people who once inhabited the island. Over time, the recipe evolved, incorporating local ingredients and techniques, eventually becoming the beloved pastry we know today. While traditionally made with lard, this Vanilla Pan de Mallorca recipe offers a delicious twist with the addition of vanilla extract, enhancing the sweetness and aroma.
What makes this pastry so irresistible? It’s the perfect combination of textures a slightly crisp exterior giving way to a pillowy soft interior. The subtle sweetness makes it ideal for breakfast, brunch, or even a delightful afternoon treat paired with a cup of coffee. Plus, the simple elegance of its swirled shape and snowy dusting of powdered sugar makes it a showstopper. Get ready to impress your friends and family with this delightful and surprisingly easy-to-make pastry!

Ingredients:
- For the Starter (Preferment):
- 1 cup (120g) all-purpose flour
- ½ cup (120ml) lukewarm water
- ¼ teaspoon active dry yeast
- For the Dough:
- 4 cups (480g) all-purpose flour, plus more for dusting
- ½ cup (100g) granulated sugar
- 1 teaspoon salt
- ½ cup (120ml) lukewarm milk
- 2 large eggs, lightly beaten
- ½ cup (1 stick, 113g) unsalted butter, softened
- 2 tablespoons lard, softened (or more butter)
- 1 teaspoon vanilla extract
- Zest of 1 lemon
- For Brushing:
- 2 tablespoons unsalted butter, melted
- For Dusting:
- Powdered sugar, for dusting
Preparing the Starter (Preferment)
Okay, let’s get started with the preferment. This is a crucial step as it adds a depth of flavor and improves the texture of our Pan de Mallorca. Don’t skip it!
- Combine Ingredients: In a medium bowl, whisk together the all-purpose flour, lukewarm water, and active dry yeast. Make sure the water isn’t too hot, or it will kill the yeast. Lukewarm is the key!
- Mix Well: Stir until a shaggy dough forms. It doesn’t need to be perfectly smooth.
- First Rise: Cover the bowl with plastic wrap and let it sit at room temperature for at least 2 hours, or up to overnight. You’ll know it’s ready when it has doubled in size and is bubbly. The longer it sits, the more flavorful it will be! I usually aim for about 4 hours.
Making the Dough
Now that our starter is nice and bubbly, we can move on to the main dough. This is where the magic really happens!
- Combine Dry Ingredients: In a large bowl (or the bowl of your stand mixer), whisk together the all-purpose flour, granulated sugar, and salt. Make sure everything is evenly distributed.
- Add Wet Ingredients: In a separate bowl, whisk together the lukewarm milk, eggs, vanilla extract, and lemon zest.
- Combine Wet and Dry: Pour the wet ingredients into the dry ingredients. Add the starter (preferment) to the bowl as well.
- Mix Until Combined: If using a stand mixer, use the dough hook attachment and mix on low speed until a shaggy dough forms. If mixing by hand, use a wooden spoon or your hands to combine the ingredients.
- Add Butter and Lard: Add the softened butter and lard (or more butter) to the dough. Make sure the butter and lard are really soft, almost room temperature, so they incorporate easily.
- Knead the Dough: If using a stand mixer, knead the dough on medium speed for 8-10 minutes, until it becomes smooth and elastic. If kneading by hand, turn the dough out onto a lightly floured surface and knead for 10-12 minutes, until it becomes smooth and elastic. The dough will be slightly sticky, but resist the urge to add too much flour.
- First Rise: Place the dough in a lightly oiled bowl, turning to coat. Cover with plastic wrap and let it rise in a warm place for 1.5-2 hours, or until doubled in size. This is a crucial step for developing the flavor and texture of the bread.
Shaping the Pan de Mallorca
This is where things get fun! Shaping the Pan de Mallorca is a bit of an art, but don’t worry, I’ll guide you through it.
- Punch Down the Dough: Gently punch down the dough to release the air.
- Divide the Dough: Turn the dough out onto a lightly floured surface and divide it into 12 equal pieces. I like to use a kitchen scale to ensure they are all the same size, but you can eyeball it too.
- Roll into Ropes: Roll each piece of dough into a rope about 12-14 inches long.
- Coil the Ropes: Starting at one end, coil each rope into a spiral shape. Tuck the end of the rope underneath the coil to secure it.
- Place on Baking Sheet: Place the coiled dough rounds onto a baking sheet lined with parchment paper, leaving some space between each one.
- Flatten Slightly: Gently flatten each coil slightly with your hand. They should be about 3-4 inches in diameter.
- Second Rise: Cover the baking sheet with plastic wrap and let the shaped dough rise in a warm place for 45-60 minutes, or until puffy.
Baking the Pan de Mallorca
Almost there! Now it’s time to bake these beauties and fill your kitchen with the amazing aroma of freshly baked bread.
- Preheat Oven: Preheat your oven to 350°F (175°C).
- Brush with Butter: Gently brush the tops of the risen dough rounds with melted butter. This will give them a beautiful golden-brown color and a rich flavor.
- Bake: Bake for 18-22 minutes, or until the Pan de Mallorca are golden brown. Keep a close eye on them, as baking times can vary depending on your oven.
- Cool: Remove the baking sheet from the oven and let the Pan de Mallorca cool on the baking sheet for a few minutes before transferring them to a wire rack to cool completely.
Finishing Touches
The final step is to dust these delicious rolls with powdered sugar. This adds a touch of sweetness and makes them look absolutely irresistible.
- Dust with Powdered Sugar: Once the Pan de Mallorca are completely cool, dust them generously with powdered sugar. You can use a sifter or a small strainer to get an even coating.
Serving Suggestions:
Pan de Mallorca is best enjoyed fresh, but they can be stored in an airtight container at room temperature for up to 2 days. They are delicious on their own, or you can serve them with coffee, tea, or milk. They also make a great addition to brunch or breakfast. I love to split them open and spread them with butter or jam. Enjoy!
Tips and Tricks:
- Use high-quality ingredients: The better the ingredients, the better the final product will be.
- Don’t over-knead the dough: Over-kneading can result in a tough bread.
- Be patient: The dough needs time to rise properly, so don’t rush the process.
- Adjust baking time as needed: Baking times can vary depending on your oven, so keep a close eye on the bread and adjust the baking time as needed.
- Experiment with flavors: Feel free to add other flavorings to the dough, such as orange zest, almond extract, or cinnamon.
Troubleshooting:
- Dough not rising: Make sure your yeast is fresh and that the water or milk you are using is not too hot. Also, make sure the room is warm enough for the dough to rise properly.
- Bread is too dense: This could be due to over-kneading the dough or not letting it rise long enough.
- Bread is too dry: This could be due to over-baking the bread.
- Bread is burning: Lower the oven temperature and/or cover the bread with foil during the last few minutes of baking.
Conclusion:
And there you have it! This Vanilla Pan de Mallorca recipe is truly a must-try, and I’m not just saying that because I wrote it. The soft, pillowy texture, the subtle sweetness, and that unmistakable hint of vanilla all combine to create a bread that’s simply irresistible. It’s a taste of pure comfort, a little slice of sunshine on a plate, and a guaranteed crowd-pleaser. Seriously, who can resist a warm, freshly baked roll that practically melts in your mouth?
But beyond the incredible taste, this recipe is a winner because it’s surprisingly approachable. I’ve broken down each step to make it as clear and easy to follow as possible, even for novice bakers. While it does require a bit of patience (that dough needs time to rise!), the active time is minimal, leaving you free to tackle other tasks while the magic happens in your kitchen. And trust me, the aroma that will fill your home as these rolls bake is worth every second of waiting.
Now, let’s talk about serving suggestions. While these Vanilla Pan de Mallorca rolls are absolutely divine on their own, lightly dusted with powdered sugar, they’re also incredibly versatile. Imagine slicing one open and using it as the base for a mini breakfast sandwich with scrambled eggs and crispy bacon. Or, how about using them to make the most decadent French toast you’ve ever tasted? The possibilities are truly endless!
For a simple yet elegant dessert, try serving them warm with a scoop of vanilla ice cream and a drizzle of honey. You could also get creative with fillings. A smear of Nutella, a dollop of homemade jam, or even a savory filling like ham and cheese would be absolutely delicious.
And speaking of variations, feel free to experiment with different flavorings. A touch of almond extract instead of vanilla would add a lovely nutty note. Or, for a more citrusy twist, try adding some grated orange or lemon zest to the dough. You could even incorporate a handful of dried cranberries or raisins for a festive touch. Don’t be afraid to get creative and make this recipe your own!
I truly believe that this Vanilla Pan de Mallorca recipe will become a staple in your baking repertoire. It’s perfect for weekend brunches, holiday gatherings, or simply as a special treat for yourself. It’s a recipe that’s sure to impress your family and friends, and it’s a wonderful way to share a little bit of love and warmth from your kitchen.
So, what are you waiting for? Gather your ingredients, preheat your oven, and get ready to embark on a baking adventure. I’m confident that you’ll be thrilled with the results. And most importantly, don’t forget to have fun! Baking should be a joyful and relaxing experience, so put on some music, pour yourself a cup of coffee, and enjoy the process.
I’m so excited for you to try this recipe, and I can’t wait to hear about your experience. Please, please, please come back and leave a comment below to let me know how it turned out. Did you make any modifications? What were your favorite serving suggestions? I’m always eager to learn from my readers and to share in your baking successes. Share your photos on social media too and tag me! I love seeing your creations. Happy baking, and enjoy your delicious Vanilla Pan de Mallorca!
Vanilla Pan de Mallorca: A Sweet & Fluffy Delight
Sweet, fluffy Puerto Rican sweet rolls, dusted with powdered sugar. Perfect for breakfast, brunch, or a sweet treat!
Ingredients
- 1 cup (120g) all-purpose flour
- ½ cup (120ml) lukewarm water
- ¼ teaspoon active dry yeast
- 4 cups (480g) all-purpose flour, plus more for dusting
- ½ cup (100g) granulated sugar
- 1 teaspoon salt
- ½ cup (120ml) lukewarm milk
- 2 large eggs, lightly beaten
- ½ cup (1 stick, 113g) unsalted butter, softened
- 2 tablespoons lard, softened (or more butter)
- 1 teaspoon vanilla extract
- Zest of 1 lemon
- 2 tablespoons unsalted butter, melted
- Powdered sugar, for dusting
Instructions
- Combine Ingredients: In a medium bowl, whisk together the all-purpose flour, lukewarm water, and active dry yeast.
- Mix Well: Stir until a shaggy dough forms.
- First Rise: Cover the bowl with plastic wrap and let it sit at room temperature for at least 2 hours, or up to overnight. It should double in size and be bubbly.
- Combine Dry Ingredients: In a large bowl (or the bowl of your stand mixer), whisk together the all-purpose flour, granulated sugar, and salt.
- Add Wet Ingredients: In a separate bowl, whisk together the lukewarm milk, eggs, vanilla extract, and lemon zest.
- Combine Wet and Dry: Pour the wet ingredients into the dry ingredients. Add the starter (preferment) to the bowl as well.
- Mix Until Combined: If using a stand mixer, use the dough hook attachment and mix on low speed until a shaggy dough forms. If mixing by hand, use a wooden spoon or your hands to combine the ingredients.
- Add Butter and Lard: Add the softened butter and lard (or more butter) to the dough.
- Knead the Dough: If using a stand mixer, knead the dough on medium speed for 8-10 minutes, until it becomes smooth and elastic. If kneading by hand, turn the dough out onto a lightly floured surface and knead for 10-12 minutes, until it becomes smooth and elastic. The dough will be slightly sticky.
- First Rise: Place the dough in a lightly oiled bowl, turning to coat. Cover with plastic wrap and let it rise in a warm place for 1.5-2 hours, or until doubled in size.
- Punch Down the Dough: Gently punch down the dough to release the air.
- Divide the Dough: Turn the dough out onto a lightly floured surface and divide it into 12 equal pieces.
- Roll into Ropes: Roll each piece of dough into a rope about 12-14 inches long.
- Coil the Ropes: Starting at one end, coil each rope into a spiral shape. Tuck the end of the rope underneath the coil to secure it.
- Place on Baking Sheet: Place the coiled dough rounds onto a baking sheet lined with parchment paper, leaving some space between each one.
- Flatten Slightly: Gently flatten each coil slightly with your hand. They should be about 3-4 inches in diameter.
- Second Rise: Cover the baking sheet with plastic wrap and let the shaped dough rise in a warm place for 45-60 minutes, or until puffy.
- Preheat Oven: Preheat your oven to 350°F (175°C).
- Brush with Butter: Gently brush the tops of the risen dough rounds with melted butter.
- Bake: Bake for 18-22 minutes, or until the Pan de Mallorca are golden brown.
- Cool: Remove the baking sheet from the oven and let the Pan de Mallorca cool on the baking sheet for a few minutes before transferring them to a wire rack to cool completely.
- Dust with Powdered Sugar: Once the Pan de Mallorca are completely cool, dust them generously with powdered sugar.
Notes
- For the starter, make sure the water isn’t too hot, or it will kill the yeast. Lukewarm is the key!
- The longer the starter sits, the more flavorful it will be! I usually aim for about 4 hours.
- Make sure the butter and lard are really soft, almost room temperature, so they incorporate easily.
- The dough will be slightly sticky, but resist the urge to add too much flour.
- Use high-quality ingredients for the best results.
- Don’t over-knead the dough.
- Be patient and allow the dough to rise properly.
- Adjust baking time as needed, as ovens vary.
- Experiment with flavors by adding orange zest, almond extract, or cinnamon.

Leave a Comment