
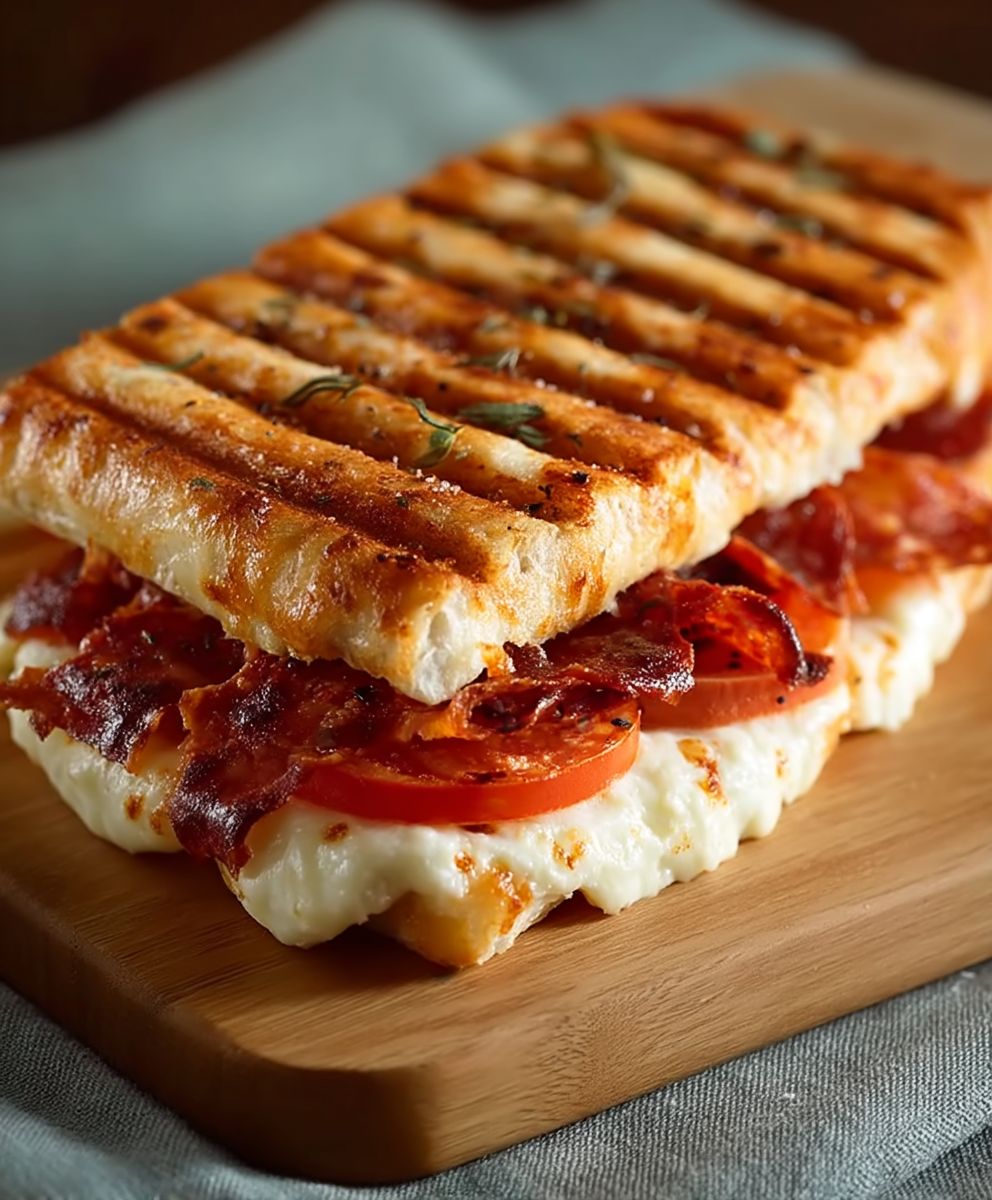
Pizza Panini: the ultimate mashup of two beloved comfort foods! Imagine the satisfying crunch of a perfectly grilled panini meeting the cheesy, saucy goodness of pizza. Are you ready to ditch the delivery menus and create a quick, easy, and incredibly delicious meal right in your own kitchen? I know I am!
While the exact origins of the Pizza Panini are shrouded in mystery (unlike its more established parent dishes), its popularity is a testament to our collective love for innovation in the culinary world. The panini, with its Italian roots as a simple grilled sandwich, has evolved into a canvas for endless flavor combinations. Pizza, a global phenomenon originating from humble beginnings in Naples, has captured hearts (and stomachs) worldwide with its customizable toppings and comforting appeal. Combining these two iconic dishes was simply a matter of time, and the result is pure genius.
What makes the Pizza Panini so irresistible? It’s the perfect balance of textures the crispy, golden-brown bread, the gooey melted cheese, and the savory fillings all come together in a symphony of deliciousness. Plus, it’s incredibly convenient! Whether you’re looking for a quick lunch, a satisfying snack, or a fun weeknight dinner, the Pizza Panini is a guaranteed crowd-pleaser. Its customizable nature also means you can cater to everyone’s tastes and dietary needs. So, let’s get started and create your own Pizza Panini masterpiece!

Ingredients:
- 4 slices of your favorite pizza (leftovers work great!)
- 4 slices of Italian bread, about ½ inch thick
- 2 tablespoons olive oil, divided
- ½ cup pizza sauce, divided
- ½ cup shredded mozzarella cheese, divided
- ¼ cup grated Parmesan cheese, divided
- Optional toppings: pepperoni slices, cooked sausage crumbles, sliced mushrooms, bell peppers, onions, olives (adjust amounts to your preference)
- Optional: Garlic powder, Italian seasoning
Preparing the Pizza Panini:
- Prepare your workspace: Lay out all your ingredients. This will make the assembly process much smoother. Make sure your pizza slices are easily accessible. If they are cold from the refrigerator, you might want to let them sit at room temperature for a few minutes to soften slightly. This will help them melt into the panini better.
- Prepare the bread: Lightly brush one side of each slice of Italian bread with olive oil (about ½ tablespoon per slice). This will help the bread get nice and golden brown and crispy when grilled. If you like, you can also sprinkle a little garlic powder or Italian seasoning onto the oiled side of the bread for extra flavor.
- Assemble the first layer: On the unoiled side of two slices of bread, spread ¼ cup of pizza sauce on each. Be generous, but not so much that it will squish out when you press the panini.
- Add the cheese: Sprinkle ¼ cup of mozzarella cheese and ? cup of Parmesan cheese over the pizza sauce on each slice of bread. This cheese layer will help to bind the pizza slices to the bread.
- Add the pizza: Place two slices of pizza on top of the cheese on each slice of bread. Try to arrange the pizza so that it covers the bread evenly. If your pizza slices are large, you may need to trim them to fit. Don’t worry about making it perfect; it will all melt together in the end!
- Optional toppings: If you’re adding any extra toppings, now is the time to do it! Sprinkle your desired toppings (pepperoni, sausage, mushrooms, peppers, onions, olives, etc.) over the pizza slices. Remember to not overfill the panini, or it will be difficult to close and grill.
- Add the final cheese layer: Sprinkle the remaining ¼ cup of mozzarella cheese and ? cup of Parmesan cheese over the pizza and toppings. This will help to hold everything together and create a gooey, cheesy panini.
- Top with the remaining bread: Place the remaining two slices of bread on top of the cheese, oiled-side up. This will ensure that both sides of the panini get nice and crispy.
Cooking the Pizza Panini:
- Preheat your panini press or grill pan: If you have a panini press, preheat it according to the manufacturer’s instructions. If you’re using a grill pan, heat it over medium heat. You can also use a regular skillet, but you’ll need to press down on the panini with a spatula or another heavy pan to get the same effect.
- Grill the panini: Carefully place the assembled panini in the preheated panini press or grill pan. If using a panini press, close the lid and press down gently. If using a grill pan or skillet, place another heavy pan on top of the panini to press it down.
- Cook until golden brown and the cheese is melted: Cook the panini for about 3-5 minutes per side, or until the bread is golden brown and crispy and the cheese is melted and gooey. The exact cooking time will depend on the heat of your panini press or grill pan and the thickness of your bread. Keep a close eye on it to prevent burning.
- Check for doneness: To check if the panini is done, carefully lift the lid of the panini press or use a spatula to lift the panini from the grill pan. The bread should be golden brown and crispy, and the cheese should be melted and bubbly. If the bread is not golden brown enough, or the cheese is not fully melted, continue cooking for another minute or two per side.
- Remove from heat: Once the panini is cooked to your liking, carefully remove it from the panini press or grill pan. Use a spatula to transfer it to a cutting board.
Serving the Pizza Panini:
- Let it cool slightly: Allow the panini to cool for a minute or two before cutting it. This will prevent the cheese from oozing out too much and making a mess.
- Cut in half: Use a sharp knife to cut the panini in half diagonally. This makes it easier to eat and also looks more appealing.
- Serve immediately: Serve the pizza panini immediately while it’s still warm and cheesy. It’s delicious on its own, or you can serve it with a side of marinara sauce for dipping.
- Enjoy! Savor the delicious combination of crispy bread, melted cheese, and your favorite pizza toppings. This pizza panini is a perfect quick and easy meal that’s sure to satisfy your cravings.
Tips and Variations:
- Use different types of bread: While Italian bread is a classic choice for panini, you can also use other types of bread, such as sourdough, ciabatta, or even focaccia.
- Experiment with different cheeses: In addition to mozzarella and Parmesan, you can also use other cheeses, such as provolone, cheddar, or Monterey Jack.
- Add different sauces: Instead of pizza sauce, you can use pesto, marinara sauce, or even a creamy Alfredo sauce.
- Make it vegetarian: Omit the pepperoni and sausage and add more vegetables, such as mushrooms, peppers, onions, olives, spinach, or artichoke hearts.
- Make it spicy: Add a pinch of red pepper flakes or a drizzle of hot sauce to the pizza sauce or toppings.
- Use a waffle iron: For a fun twist, you can cook the panini in a waffle iron. This will create a unique texture and shape.
- Make it ahead of time: You can assemble the panini ahead of time and store it in the refrigerator until you’re ready to cook it. Just be sure to wrap it tightly in plastic wrap to prevent the bread from drying out.
- Grill outdoors: If you have a grill, you can cook the panini outdoors for a smoky flavor. Just be sure to oil the grill grates to prevent the panini from sticking.
- Add fresh herbs: Sprinkle some fresh basil, oregano, or parsley over the panini before serving for a burst of flavor.
- Make it a dessert panini: Use sweet bread, such as brioche or challah, and fill it with Nutella, marshmallows, and chocolate chips for a decadent dessert panini.
Storage Instructions:
If you have any leftover pizza panini, you can store it in the refrigerator for up to 2 days. To reheat, you can microwave it, but the bread will not be as crispy. For best results, reheat it in a panini press or grill pan until the bread is crispy and the cheese is melted.
Nutritional Information (approximate):
The nutritional information for this recipe will vary depending on the specific ingredients you use. However, a typical pizza panini made with the ingredients listed above will contain approximately:
- Calories: 600-800
- Fat: 30-40 grams
- Saturated Fat: 15-20 grams
- Cholesterol: 80-100 mg
- Sodium: 1000-1500 mg
- Carbohydrates: 60-80 grams
- Fiber: 5-10 grams
- Sugar: 10-15 grams
- Protein: 30-40 grams
This is just an estimate, so be sure to calculate the nutritional information based on the specific ingredients you use.
Why this recipe works:
This pizza panini recipe is a winner for several reasons:
- It’s a great way to use up leftover pizza: Instead of letting those delicious pizza slices go to waste, you can transform them into a satisfying and flavorful panini.
- It’s quick and easy to make: With just a few simple ingredients and steps, you can have a delicious meal on the table in minutes.
- It’s customizable: You can easily adapt this recipe to your own tastes and preferences by using different types of bread, cheese, sauces, and toppings.
- It’s a crowd-pleaser: Everyone loves pizza, and this panini version is sure to be
Conclusion:
This Pizza Panini recipe is truly a game-changer, and I wholeheartedly believe it deserves a spot in your regular meal rotation. Why? Because it delivers the comforting, familiar flavors of pizza in a fun, portable, and incredibly quick format. We’re talking about a meal that satisfies those pizza cravings without the fuss of making dough or waiting for delivery. It’s the perfect solution for busy weeknights, impromptu lunches, or even a creative twist on a weekend brunch.
Think about it: the crispy, golden-brown bread, the gooey, melted cheese, the savory sauce, and your favorite pizza toppings all melded together in a warm, satisfying sandwich. It’s a symphony of textures and tastes that will leave you wanting more. And the best part? It’s endlessly customizable!
Beyond the basic recipe, the possibilities are truly endless. Feeling adventurous? Try swapping out the mozzarella for provolone or fontina for a richer, more complex flavor. Add some sliced pepperoni, cooked sausage, or crumbled bacon for a meaty indulgence. For the veggie lovers, consider adding roasted red peppers, sautéed mushrooms, spinach, or artichoke hearts. A drizzle of pesto after grilling adds a burst of fresh, herbaceous flavor.
Serving Suggestions and Variations:
* Dipping Sauces: Serve your Pizza Panini with a side of marinara sauce, ranch dressing, or even a spicy sriracha mayo for dipping.
* Side Dishes: Pair it with a simple green salad, some crispy potato wedges, or a bowl of tomato soup for a complete and satisfying meal.
* Breakfast Panini: Transform this recipe into a breakfast panini by adding scrambled eggs, ham, and cheddar cheese.
* Dessert Panini: Get creative and make a dessert panini with Nutella, sliced bananas, and strawberries.
* Grilled Cheese Upgrade: Even if you are not craving pizza, this method is a fantastic way to upgrade your standard grilled cheese sandwich.I’ve personally made this Pizza Panini countless times, and it’s always a hit with my family and friends. It’s a guaranteed crowd-pleaser that’s both easy to make and incredibly delicious. The simplicity of the recipe is what makes it so appealing. You likely already have most of the ingredients on hand, and the entire process takes less than 15 minutes from start to finish. It’s the ultimate quick and easy meal solution.
So, what are you waiting for? Gather your ingredients, fire up your panini press (or grill pan), and get ready to experience pizza in a whole new way. I’m confident that you’ll love this recipe as much as I do.
I truly encourage you to give this recipe a try. It’s a fun, flavorful, and incredibly satisfying way to enjoy the taste of pizza without all the fuss. And once you’ve made it, I’d love to hear about your experience! Share your photos, your variations, and your thoughts in the comments below. Let me know what toppings you used, what dipping sauces you tried, and how much you enjoyed your homemade Pizza Panini. I can’t wait to see what culinary creations you come up with! Happy cooking!
Pizza Panini: The Ultimate Guide to Making Delicious Paninis
Transform leftover pizza into a delicious and easy pizza panini! Crispy Italian bread, melted cheese, and your favorite pizza toppings combine for a satisfying and quick meal.
Ingredients
- 4 slices of your favorite pizza (leftovers work great!)
- 4 slices of Italian bread, about ½ inch thick
- 2 tablespoons olive oil, divided
- ½ cup pizza sauce, divided
- ½ cup shredded mozzarella cheese, divided
- ¼ cup grated Parmesan cheese, divided
- Optional toppings: pepperoni slices, cooked sausage crumbles, sliced mushrooms, bell peppers, onions, olives (adjust amounts to your preference)
- Optional: Garlic powder, Italian seasoning
Instructions
- Prepare your workspace: Lay out all your ingredients. Make sure your pizza slices are easily accessible. If they are cold from the refrigerator, you might want to let them sit at room temperature for a few minutes to soften slightly.
- Prepare the bread: Lightly brush one side of each slice of Italian bread with olive oil (about ½ tablespoon per slice). If you like, you can also sprinkle a little garlic powder or Italian seasoning onto the oiled side of the bread for extra flavor.
- Assemble the first layer: On the unoiled side of two slices of bread, spread ¼ cup of pizza sauce on each.
- Add the cheese: Sprinkle ¼ cup of mozzarella cheese and ? cup of Parmesan cheese over the pizza sauce on each slice of bread.
- Add the pizza: Place two slices of pizza on top of the cheese on each slice of bread. Try to arrange the pizza so that it covers the bread evenly. If your pizza slices are large, you may need to trim them to fit.
- Optional toppings: If you’re adding any extra toppings, now is the time to do it! Sprinkle your desired toppings (pepperoni, sausage, mushrooms, peppers, onions, olives, etc.) over the pizza slices.
- Add the final cheese layer: Sprinkle the remaining ¼ cup of mozzarella cheese and ? cup of Parmesan cheese over the pizza and toppings.
- Top with the remaining bread: Place the remaining two slices of bread on top of the cheese, oiled-side up.
- Preheat your panini press or grill pan: If you have a panini press, preheat it according to the manufacturer’s instructions. If you’re using a grill pan, heat it over medium heat. You can also use a regular skillet, but you’ll need to press down on the panini with a spatula or another heavy pan to get the same effect.
- Grill the panini: Carefully place the assembled panini in the preheated panini press or grill pan. If using a panini press, close the lid and press down gently. If using a grill pan or skillet, place another heavy pan on top of the panini to press it down.
- Cook until golden brown and the cheese is melted: Cook the panini for about 3-5 minutes per side, or until the bread is golden brown and crispy and the cheese is melted and gooey.
- Check for doneness: To check if the panini is done, carefully lift the lid of the panini press or use a spatula to lift the panini from the grill pan. The bread should be golden brown and crispy, and the cheese should be melted and bubbly. If the bread is not golden brown enough, or the cheese is not fully melted, continue cooking for another minute or two per side.
- Remove from heat: Once the panini is cooked to your liking, carefully remove it from the panini press or grill pan. Use a spatula to transfer it to a cutting board.
- Let it cool slightly: Allow the panini to cool for a minute or two before cutting it.
- Cut in half: Use a sharp knife to cut the panini in half diagonally.
- Serve immediately: Serve the pizza panini immediately while it’s still warm and cheesy. It’s delicious on its own, or you can serve it with a side of marinara sauce for dipping.
- Enjoy!
Notes
- Use different types of bread, such as sourdough, ciabatta, or focaccia.
- Experiment with different cheeses, such as provolone, cheddar, or Monterey Jack.
- Add different sauces, such as pesto, marinara sauce, or Alfredo sauce.
- Make it vegetarian by omitting meat and adding more vegetables.
- Make it spicy with red pepper flakes or hot sauce.
- Cook in a waffle iron for a unique texture.
- Assemble ahead of time and store in the refrigerator.
- Grill outdoors for a smoky flavor.
- Add fresh herbs before serving.
- Make a dessert panini with sweet bread, Nutella, marshmallows, and chocolate chips.
Leave a Comment