
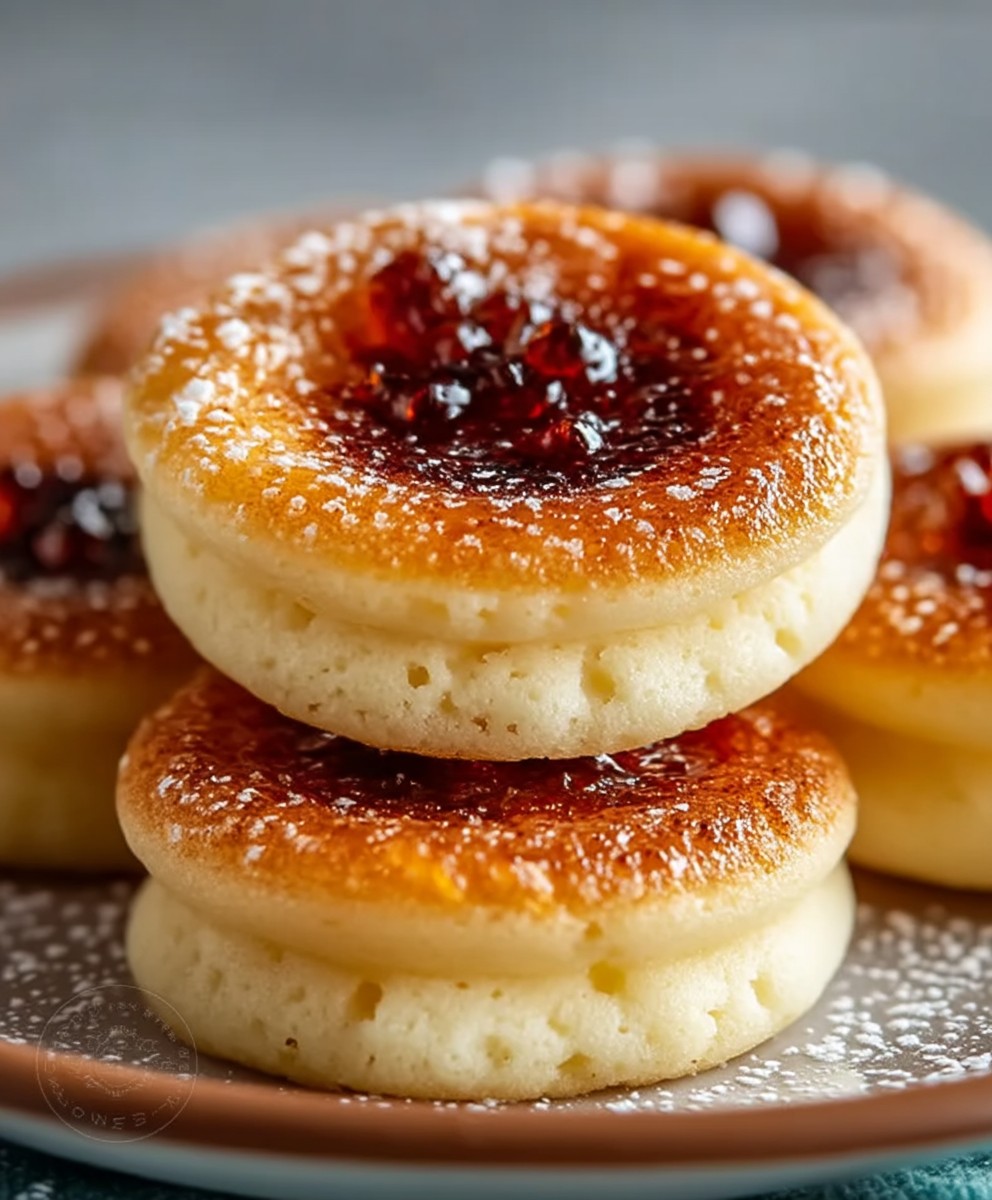
Creme brulee cookies: just the name alone conjures up images of crackling sugar and creamy custard, doesn’t it? Imagine taking that iconic dessert and shrinking it down into a delightful, bite-sized cookie. That’s exactly what we’ve done! These aren’t your average chocolate chip cookies; they’re a sophisticated treat that will impress your friends and family, and leave them begging for the recipe.
While the exact origins of creme brulee are debated (with both the French and English claiming its invention), its popularity is undeniable. The simple combination of rich custard and brittle caramelized sugar has captivated dessert lovers for centuries. We’ve taken that classic combination and reimagined it in cookie form, creating a unique and unforgettable experience.
People adore creme brulee for its textural contrast the smooth, velvety custard against the satisfying snap of the caramelized sugar. These creme brulee cookies capture that same magic. The buttery, slightly chewy cookie base is topped with a creamy, custard-flavored filling and a sprinkle of sugar that, when baked, creates that signature crackly top. They’re surprisingly easy to make, and the taste is simply divine. Get ready to experience a little bit of dessert heaven in every bite!

Ingredients:
- For the Cookie Dough:
- 1 cup (2 sticks) unsalted butter, softened
- ¾ cup granulated sugar
- ¾ cup packed light brown sugar
- 2 large eggs
- 1 teaspoon vanilla extract
- 2 ¼ cups all-purpose flour
- 1 teaspoon baking soda
- 1 teaspoon salt
- ½ teaspoon ground nutmeg (optional, but adds a lovely warmth)
- For the Crème Brûlée Filling:
- 1 cup heavy cream
- 4 large egg yolks
- ¼ cup granulated sugar
- 1 teaspoon vanilla extract
- Pinch of salt
- For the Brûlée Topping:
- ½ cup granulated sugar (for sprinkling)
Preparing the Crème Brûlée Filling:
This part needs to be done ahead of time, as the filling needs to chill completely. I usually make it the day before I plan to bake the cookies.
- Infuse the Cream: In a small saucepan, combine the heavy cream, ¼ cup of sugar, vanilla extract, and a pinch of salt. Heat over medium heat, stirring occasionally, until the mixture just begins to simmer. Do not boil! You want to see small bubbles forming around the edges. Remove from heat.
- Temper the Egg Yolks: In a separate medium bowl, whisk the egg yolks until they are slightly pale and thickened. This helps prevent them from scrambling when you add the hot cream.
- Combine and Cook: Slowly drizzle a small amount of the hot cream mixture into the egg yolks, whisking constantly. This is called tempering and it gradually raises the temperature of the yolks without cooking them. Continue adding the hot cream in a slow, steady stream, whisking continuously until all the cream is incorporated.
- Return to the Saucepan: Pour the mixture back into the saucepan. Cook over low heat, stirring constantly with a rubber spatula, until the mixture thickens enough to coat the back of the spatula. To test for doneness, dip the spatula into the mixture and run your finger across the back of the spatula. If the line you draw remains distinct and doesn’t immediately run back together, the custard is ready. Be careful not to overcook, or the custard will curdle. The ideal temperature is around 170-175°F (77-79°C).
- Strain and Chill: Immediately strain the custard through a fine-mesh sieve into a bowl. This will remove any lumps or cooked egg bits, resulting in a smooth and creamy filling. Cover the bowl with plastic wrap, pressing the plastic wrap directly onto the surface of the custard to prevent a skin from forming. Refrigerate for at least 4 hours, or preferably overnight, until completely chilled and set. The filling needs to be firm enough to scoop.
Making the Cookie Dough:
Now that the crème brûlée filling is chilling, let’s get started on the cookie dough. This is a pretty standard cookie dough recipe, but the nutmeg adds a special touch that complements the crème brûlée flavor.
- Cream Butter and Sugars: In a large bowl (or the bowl of a stand mixer), cream together the softened butter, granulated sugar, and brown sugar until light and fluffy. This usually takes about 3-5 minutes. Make sure the butter is truly softened, but not melted, for the best texture.
- Add Eggs and Vanilla: Beat in the eggs one at a time, mixing well after each addition. Then, stir in the vanilla extract.
- Combine Dry Ingredients: In a separate medium bowl, whisk together the flour, baking soda, salt, and nutmeg (if using).
- Gradually Add Dry Ingredients to Wet Ingredients: Gradually add the dry ingredients to the wet ingredients, mixing on low speed until just combined. Be careful not to overmix, as this can lead to tough cookies.
- Chill the Dough: Wrap the cookie dough in plastic wrap and chill in the refrigerator for at least 30 minutes. This will help prevent the cookies from spreading too much during baking. You can chill it for longer, even overnight, if needed.
Assembling and Baking the Cookies:
This is where the magic happens! We’re going to scoop out the cookie dough, create a well for the filling, and then bake these beauties to golden perfection.
- Preheat Oven and Prepare Baking Sheets: Preheat your oven to 375°F (190°C). Line baking sheets with parchment paper or silicone baking mats.
- Scoop Cookie Dough: Using a cookie scoop (about 1.5 tablespoons), scoop out balls of cookie dough and place them on the prepared baking sheets, leaving about 2 inches between each cookie.
- Create Wells for the Filling: Use your thumb or the back of a small spoon to create a well in the center of each cookie dough ball. Make sure the well is large enough to hold a generous amount of the crème brûlée filling.
- Fill the Cookies: Remove the chilled crème brûlée filling from the refrigerator. Using a small spoon or a piping bag, carefully fill each well with the chilled crème brûlée filling. Don’t overfill, or the filling will spill out during baking.
- Bake the Cookies: Bake for 10-12 minutes, or until the edges of the cookies are golden brown and the filling is set. The filling might still jiggle slightly, but it will firm up as it cools.
- Cool the Cookies: Let the cookies cool on the baking sheets for a few minutes before transferring them to a wire rack to cool completely.
The Brûlée Topping:
This is the final, and arguably the most important, step! The caramelized sugar topping is what truly makes these cookies taste like crème brûlée.
- Prepare for Brûléeing: Once the cookies are completely cooled, place them on a heat-resistant surface, such as a baking sheet lined with aluminum foil or a silicone baking mat.
- Sprinkle with Sugar: Generously sprinkle the top of each cookie with granulated sugar. You want a nice, even layer of sugar.
- Brûlée the Sugar: Using a kitchen torch, carefully brûlée the sugar until it is melted and caramelized to a golden brown color. Keep the torch moving to prevent the sugar from burning. If you don’t have a kitchen torch, you can broil the cookies in the oven for a very short time, but watch them very carefully to prevent burning.
- Let the Sugar Harden: Let the caramelized sugar cool and harden completely before serving. This usually takes a few minutes. The sugar will become crisp and crackly, just like the topping on a classic crème brûlée.
Tips for Success:
- Don’t Overmix the Dough: Overmixing the cookie dough can lead to tough cookies. Mix until just combined.
- Chill the Dough: Chilling the dough is crucial for preventing the cookies from spreading too much during baking.
- Use a Cookie Scoop: Using a cookie scoop will ensure that all the cookies are the same size and bake evenly.
- Don’t Overbake: Overbaked cookies will be dry and crumbly. Bake until the edges are golden brown and the filling is set.
- Brûlée Carefully: Be careful when using a kitchen torch. Keep the torch moving and don’t hold it in one spot for too long, or the sugar will burn.
- Storage: Store the cookies in an airtight container at room temperature for up to 3 days. The brûlée topping will soften over time, so they are best enjoyed fresh.
Variations:
- Add Flavors to the Filling: Experiment with adding different flavors to the crème brûlée filling, such as lemon zest, orange zest, or a splash of liqueur.
- Use Different Extracts: Try using different extracts in the cookie dough, such as almond extract or maple extract.
- Add Chocolate Chips: Add chocolate chips to the cookie dough for a chocolatey twist.
- Make Mini Cookies: Use a smaller cookie scoop to make mini crème brûlée cookies.
Conclusion:
And there you have it! These aren’t just cookies; they’re a mini-dessert experience, a delightful fusion of creamy custard and crunchy caramelized sugar, all wrapped up in a perfectly portable package. I truly believe these creme brulee cookies are a must-try for any baking enthusiast, or anyone who simply appreciates a truly exceptional treat. The unique texture, the sophisticated flavor profile, and the sheer novelty of it all make these cookies stand out from the crowd. They’re guaranteed to impress your friends, family, or even just yourself!
But why are these cookies so special? It’s the combination of textures and flavors that really sets them apart. The buttery, slightly chewy cookie base provides the perfect foundation for the creamy, custard-like filling. And then, of course, there’s the crackly, caramelized sugar topping that provides that signature creme brulee crunch. It’s a symphony of sensations in every bite!
Beyond the incredible taste, these cookies are also surprisingly versatile. While they’re fantastic on their own, they can also be elevated with a few simple serving suggestions. Imagine serving them alongside a scoop of vanilla bean ice cream for an extra decadent dessert. Or, pair them with a cup of strong coffee or tea for a delightful afternoon treat. For a truly special occasion, you could even arrange them on a dessert platter with other miniature sweets, creating a stunning and unforgettable presentation.
And don’t be afraid to experiment with variations! If you’re feeling adventurous, try adding a hint of citrus zest to the cookie dough for a bright, refreshing twist. Or, incorporate a sprinkle of cinnamon or nutmeg for a warm, cozy flavor. You could even try using different types of sugar for the caramelized topping, such as brown sugar or turbinado sugar, to create a slightly different flavor and texture. The possibilities are endless!
I’ve poured my heart and soul into perfecting this recipe, and I’m confident that you’ll love it as much as I do. But the real magic happens when you try it yourself and put your own personal touch on it. So, I urge you to gather your ingredients, preheat your oven, and embark on this delicious baking adventure. I promise, you won’t be disappointed.
Once you’ve had a chance to bake these incredible creme brulee cookies, I would absolutely love to hear about your experience! Did you make any modifications to the recipe? What did your friends and family think? Did you discover any new and exciting flavor combinations? Please, share your thoughts, photos, and stories in the comments below. Your feedback is invaluable, and it helps me to continue creating and sharing recipes that you’ll love. Happy baking, and I can’t wait to see what you create! Let’s spread the joy of these amazing cookies far and wide! Don’t forget to tag me in your social media posts so I can see your creations!
Creme Brulee Cookies: The Ultimate Guide to Baking Perfection
Buttery cookies with a creamy, chilled custard filling and a crisp, caramelized sugar shell. A delightful twist on classic crème brûlée.
Ingredients
- 1 cup (2 sticks) unsalted butter, softened
- ¾ cup granulated sugar
- ¾ cup packed light brown sugar
- 2 large eggs
- 1 teaspoon vanilla extract
- 2 ¼ cups all-purpose flour
- 1 teaspoon baking soda
- 1 teaspoon salt
- ½ teaspoon ground nutmeg (optional, but adds a lovely warmth)
- 1 cup heavy cream
- ¼ cup granulated sugar
- 4 large egg yolks
- 1 teaspoon vanilla extract
- Pinch of salt
- ½ cup granulated sugar (for sprinkling)
Instructions
- In a small saucepan, combine heavy cream, ¼ cup sugar, vanilla extract, and a pinch of salt. Heat over medium heat, stirring occasionally, until the mixture just begins to simmer (small bubbles around the edges). Do not boil. Remove from heat.
- In a separate medium bowl, whisk egg yolks until slightly pale and thickened.
- Slowly drizzle a small amount of the hot cream mixture into the egg yolks, whisking constantly to temper them. Continue adding the hot cream in a slow, steady stream, whisking continuously until all the cream is incorporated.
- Pour the mixture back into the saucepan. Cook over low heat, stirring constantly with a rubber spatula, until the mixture thickens enough to coat the back of the spatula. To test, dip the spatula into the mixture and run your finger across the back of the spatula. If the line you draw remains distinct, the custard is ready. Be careful not to overcook. The ideal temperature is around 170-175°F (77-79°C).
- Immediately strain the custard through a fine-mesh sieve into a bowl. Cover the bowl with plastic wrap, pressing the plastic wrap directly onto the surface of the custard. Refrigerate for at least 4 hours, or preferably overnight, until completely chilled and set.
- In a large bowl (or stand mixer), cream together softened butter, granulated sugar, and brown sugar until light and fluffy (3-5 minutes).
- Beat in the eggs one at a time, mixing well after each addition. Stir in the vanilla extract.
- In a separate medium bowl, whisk together flour, baking soda, salt, and nutmeg (if using).
- Gradually add the dry ingredients to the wet ingredients, mixing on low speed until just combined. Be careful not to overmix.
- Wrap the cookie dough in plastic wrap and chill in the refrigerator for at least 30 minutes (or longer, even overnight).
- Preheat oven to 375°F (190°C). Line baking sheets with parchment paper or silicone baking mats.
- Using a cookie scoop (about 1.5 tablespoons), scoop out balls of cookie dough and place them on the prepared baking sheets, leaving about 2 inches between each cookie.
- Use your thumb or the back of a small spoon to create a well in the center of each cookie dough ball.
- Remove the chilled crème brûlée filling from the refrigerator. Using a small spoon or a piping bag, carefully fill each well with the chilled crème brûlée filling. Don’t overfill.
- Bake for 10-12 minutes, or until the edges of the cookies are golden brown and the filling is set.
- Let the cookies cool on the baking sheets for a few minutes before transferring them to a wire rack to cool completely.
- Once the cookies are completely cooled, place them on a heat-resistant surface, such as a baking sheet lined with aluminum foil or a silicone baking mat.
- Generously sprinkle the top of each cookie with granulated sugar.
- Using a kitchen torch, carefully brûlée the sugar until it is melted and caramelized to a golden brown color. Keep the torch moving to prevent burning. If you don’t have a kitchen torch, you can broil the cookies in the oven for a very short time, but watch them very carefully to prevent burning.
- Let the caramelized sugar cool and harden completely before serving.
Notes
- Don’t Overmix the Dough: Overmixing the cookie dough can lead to tough cookies. Mix until just combined.
- Chill the Dough: Chilling the dough is crucial for preventing the cookies from spreading too much during baking.
- Use a Cookie Scoop: Using a cookie scoop will ensure that all the cookies are the same size and bake evenly.
- Don’t Overbake: Overbaked cookies will be dry and crumbly. Bake until the edges are golden brown and the filling is set.
- Brûlée Carefully: Be careful when using a kitchen torch. Keep the torch moving and don’t hold it in one spot for too long, or the sugar will burn.
- Storage: Store the cookies in an airtight container at room temperature for up to 3 days. The brûlée topping will soften over time, so they are best enjoyed fresh.
- Add Flavors to the Filling: Experiment with adding different flavors to the crème brûlée filling, such as lemon zest, orange zest, or a splash of liqueur.
- Use Different Extracts: Try using different extracts in the cookie dough, such as almond extract or maple extract.
- Add Chocolate Chips: Add chocolate chips to the cookie dough for a chocolatey twist.
- Make Mini Cookies: Use a smaller cookie scoop to make mini crème brûlée cookies.

Leave a Comment