
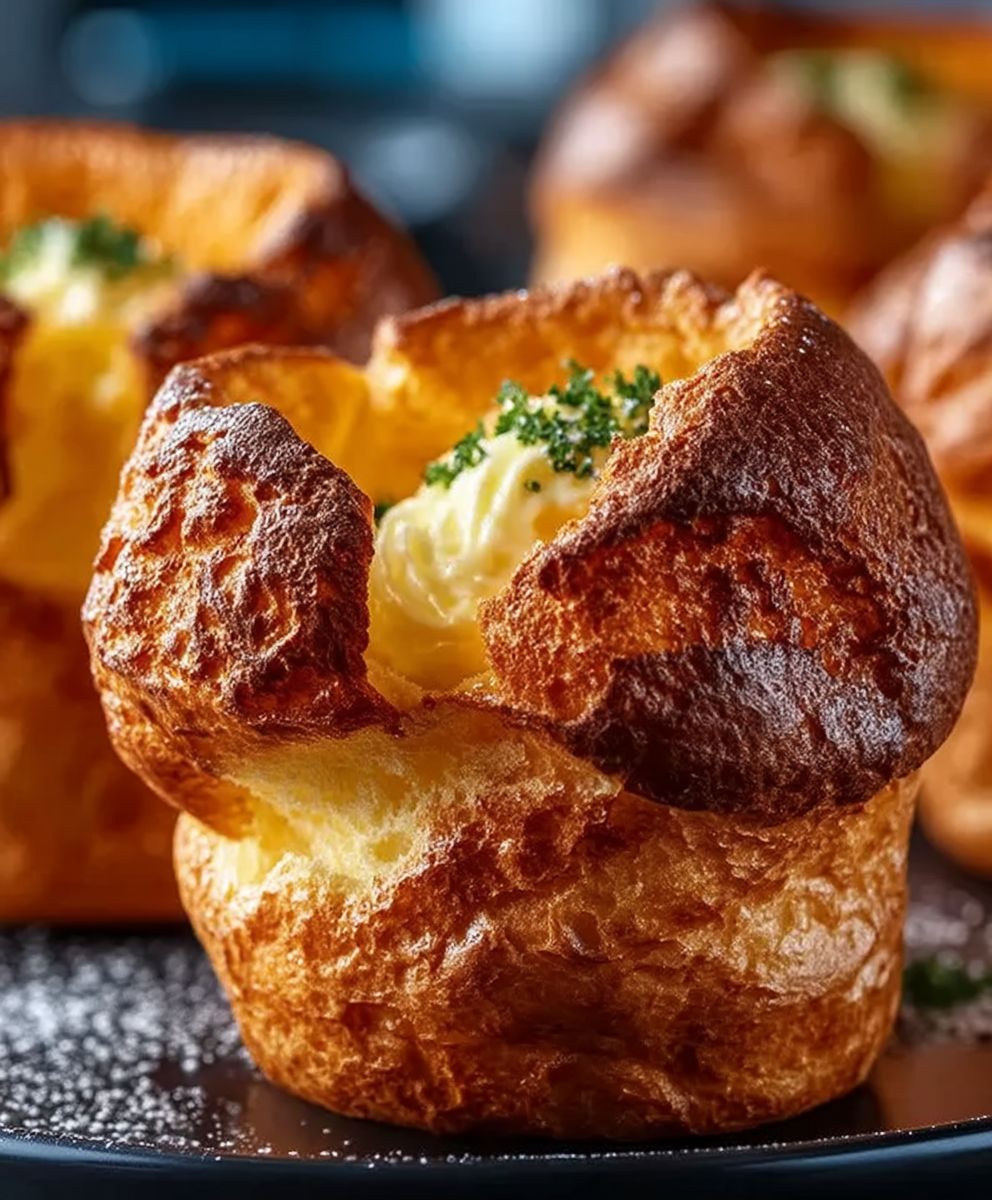
Classic Popovers: Those airy, golden puffs of deliciousness that seem to defy gravity and baking logic. Have you ever wondered how something so simple could be so incredibly impressive? I certainly have! For years, I was intimidated by the thought of making them, convinced they were some sort of culinary magic trick reserved for professional bakers. But I’m here to tell you, with a little know-how, you can easily create these delightful treats in your own kitchen.
Popovers, a close cousin to Yorkshire pudding, have a rich history rooted in English cuisine. They emerged as a way to utilize leftover batter from Sunday roasts, transforming simple ingredients into a satisfying side dish. Over time, they crossed the Atlantic and became a beloved staple in American homes, often enjoyed with butter, jam, or even savory fillings.
What’s the secret to their enduring appeal? It’s the irresistible combination of a crisp, golden-brown exterior and a light, airy, almost hollow interior. The contrast in textures is simply divine! Plus, classic popovers are incredibly versatile. They can be served alongside a hearty breakfast, as an elegant accompaniment to dinner, or even as a unique dessert. Their simple ingredients and relatively quick preparation make them a winner in my book, and I know they will be in yours too. So, let’s get baking and unlock the secrets to perfect popovers!

Ingredients:
- 1 cup all-purpose flour
- 1/2 teaspoon salt
- 1 cup milk, lukewarm
- 2 large eggs, lightly beaten
- 2 tablespoons unsalted butter, melted, plus extra for greasing the muffin tin
Preparing the Batter:
- Preheat your oven to 450°F (232°C). This high temperature is crucial for creating the steam that makes popovers rise. Make sure your oven is fully preheated before you even think about putting the batter in!
- Prepare your popover pan or muffin tin. Generously grease each cup with melted butter. Don’t skimp on the butter here! This helps the popovers release easily and also contributes to their crispy edges. You can also use a non-stick cooking spray, but I find butter gives the best flavor and texture. If you’re using a regular muffin tin, use every other cup to give the popovers room to expand.
- In a large bowl, whisk together the flour and salt. This ensures the salt is evenly distributed throughout the batter. Nobody wants a salty bite in their popover!
- In a separate bowl, whisk together the lukewarm milk and lightly beaten eggs. The lukewarm milk helps to create a smoother batter and prevents the flour from clumping. The eggs provide structure and richness.
- Gradually add the wet ingredients to the dry ingredients, whisking constantly until just combined. Be careful not to overmix! Overmixing develops the gluten in the flour, which can result in tough popovers. A few small lumps are okay. The batter should be thin and pourable, similar to pancake batter.
- Stir in the melted butter. The melted butter adds richness and flavor to the popovers. Make sure the butter isn’t too hot, or it could cook the eggs.
- Let the batter rest for at least 15 minutes, or even up to an hour, at room temperature. This allows the gluten to relax, resulting in more tender popovers. This is a crucial step, so don’t skip it! While the batter rests, the flour will fully absorb the liquid, creating a more stable batter.
Cooking Process:
- Once the oven is preheated and the batter has rested, carefully pour the batter into the prepared muffin tin, filling each cup about two-thirds full. Don’t overfill the cups, as the popovers will rise significantly.
- Place the muffin tin in the preheated oven. Immediately reduce the oven temperature to 350°F (175°C). This initial burst of high heat is what causes the popovers to puff up dramatically. Reducing the temperature then allows them to cook through without burning.
- Bake for 35-40 minutes, or until the popovers are golden brown and puffed up. Do not open the oven door during the first 30 minutes of baking! This is the most important rule for making successful popovers. Opening the oven door will release the steam, causing the popovers to collapse.
- After 30 minutes, you can peek through the oven door to check on the popovers. If they are browning too quickly, you can loosely tent them with foil.
- Once the popovers are golden brown and puffed up, remove them from the oven.
- Immediately poke a small hole in the side of each popover with a toothpick or skewer. This allows the steam to escape, preventing them from becoming soggy.
Serving:
- Serve the popovers immediately. They are best enjoyed warm, straight from the oven. They will deflate slightly as they cool, but they will still be delicious.
- Popovers can be served with a variety of accompaniments. They are delicious with butter, jam, honey, or even savory fillings like cheese or herbs.
- For a savory option, try adding a tablespoon of grated Parmesan cheese or chopped fresh herbs (such as rosemary or thyme) to the batter before baking.
- Leftover popovers can be stored in an airtight container at room temperature for up to 24 hours. To reheat, place them in a preheated 350°F (175°C) oven for a few minutes until warmed through. They won’t be as puffy as when they were freshly baked, but they will still be tasty.
Tips for Perfect Popovers:
- Use lukewarm milk. Cold milk can inhibit the rising process.
- Don’t overmix the batter. Overmixing develops the gluten, resulting in tough popovers.
- Let the batter rest. This allows the gluten to relax and the flour to fully absorb the liquid.
- Use a hot oven. The high initial temperature is crucial for creating the steam that makes popovers rise.
- Don’t open the oven door during the first 30 minutes of baking. This will release the steam and cause the popovers to collapse.
- Grease the muffin tin generously. This helps the popovers release easily.
- Poke a hole in the side of each popover after baking. This allows the steam to escape and prevents them from becoming soggy.
Troubleshooting:
- Popovers didn’t rise: Make sure your oven is hot enough, and don’t open the oven door during the first 30 minutes of baking. Also, ensure your batter isn’t too thick.
- Popovers are tough: You may have overmixed the batter. Be careful not to overmix when combining the wet and dry ingredients.
- Popovers are soggy: Make sure to poke a hole in the side of each popover after baking to allow the steam to escape.
- Popovers are burning: Reduce the oven temperature slightly or tent the popovers with foil.
Variations:
- Cheese Popovers: Add 1/2 cup of shredded cheddar cheese or Gruyere cheese to the batter.
- Herb Popovers: Add 1 tablespoon of chopped fresh herbs, such as rosemary, thyme, or chives, to the batter.
- Sweet Popovers: Add 1 tablespoon of sugar and 1/2 teaspoon of vanilla extract to the batter. Serve with whipped cream and berries.
This recipe is a classic for a reason. With a few simple ingredients and these helpful tips, you’ll be enjoying perfectly puffed popovers in no time! Enjoy!
Conclusion:
And there you have it! These Classic Popovers are more than just a side dish; they’re a delightful experience waiting to happen. I truly believe this recipe is a must-try for anyone who appreciates simple elegance and the satisfaction of creating something truly special in their own kitchen. From the dramatic rise in the oven to the airy, custardy interior, every step is a joy.
But why should you try *this* popover recipe? Because it’s foolproof! I’ve spent years perfecting it, tweaking the ratios and temperatures to ensure consistent, impressive results every single time. No more flat, sad popovers! This recipe delivers golden, towering beauties that will wow your family and friends. Plus, the ingredients are pantry staples, so you can whip these up on a whim whenever the craving strikes.
Beyond their inherent deliciousness, the versatility of these popovers is what truly sets them apart. They’re the perfect accompaniment to a hearty roast chicken or beef stew, soaking up all those flavorful juices. Imagine serving them alongside a vibrant salad for a light and satisfying lunch. Or, for a truly decadent treat, try filling them with whipped cream and fresh berries for a delightful dessert.
Here are a few serving suggestions and variations to get your creative juices flowing:
Serving Suggestions:
- Savory: Serve warm with butter, jam, or honey. They are also fantastic with a sprinkle of herbs like rosemary or thyme.
- Sweet: Dust with powdered sugar and serve with fresh fruit and whipped cream.
- As a Side: Pair them with soups, stews, or roasted meats.
Variations:
- Cheese Popovers: Add 1/2 cup of shredded cheddar or Gruyere cheese to the batter before baking.
- Herb Popovers: Mix in 1 tablespoon of chopped fresh herbs, such as chives, parsley, or dill.
- Sweet Popovers: Add 1 tablespoon of sugar and 1/2 teaspoon of vanilla extract to the batter.
- Garlic Popovers: Add 1 teaspoon of garlic powder to the batter.
Don’t be intimidated by the seemingly simple nature of this recipe. The magic lies in the technique, and I’ve broken it down into easy-to-follow steps. Just remember to preheat your oven properly, use a hot popover pan, and resist the urge to open the oven door while they’re baking! Trust me, the anticipation is worth it.
I’m so confident that you’ll love these Classic Popovers that I urge you to give them a try. They are a guaranteed crowd-pleaser and a wonderful way to elevate any meal. Once you master this recipe, you’ll find yourself making them again and again.
And now, the most important part: I want to hear about your experience! Did you try the recipe? What variations did you create? What did you serve them with? Share your photos and stories in the comments below. I can’t wait to see your popover creations and hear how much you enjoyed them. Happy baking! Let me know if you have any questions, and I’ll do my best to help. I hope you enjoy making these as much as I do!
Classic Popovers: The Ultimate Guide to Baking Perfect Popovers
Light, airy, and golden brown popovers, perfect for breakfast, brunch, or as a side dish. These simple treats are surprisingly easy to make with just a few ingredients.
Ingredients
- 1 cup all-purpose flour
- 1/2 teaspoon salt
- 1 cup milk, lukewarm
- 2 large eggs, lightly beaten
- 2 tablespoons unsalted butter, melted, plus extra for greasing the muffin tin
Instructions
- Preheat your oven to 450°F (232°C). Generously grease a popover pan or muffin tin with melted butter. If using a muffin tin, use every other cup.
- In a large bowl, whisk together the flour and salt.
- In a separate bowl, whisk together the lukewarm milk and lightly beaten eggs.
- Gradually add the wet ingredients to the dry ingredients, whisking constantly until just combined. Be careful not to overmix.
- Stir in the melted butter.
- Let the batter rest for at least 15 minutes, or up to an hour, at room temperature.
- Carefully pour the batter into the prepared muffin tin, filling each cup about two-thirds full.
- Place the muffin tin in the preheated oven. Immediately reduce the oven temperature to 350°F (175°C).
- Bake for 35-40 minutes, or until the popovers are golden brown and puffed up. Do not open the oven door during the first 30 minutes of baking.
- Once the popovers are golden brown and puffed up, remove them from the oven.
- Immediately poke a small hole in the side of each popover with a toothpick or skewer.
- Serve immediately with butter, jam, honey, or savory fillings.
Notes
- Use lukewarm milk for best results.
- Don’t overmix the batter to avoid tough popovers.
- Letting the batter rest is crucial for tender popovers.
- A hot oven is essential for the popovers to rise properly.
- Do not open the oven door during the first 30 minutes of baking.
- Grease the muffin tin generously for easy release.
- Poke a hole in the side of each popover after baking to prevent sogginess.
- For cheese popovers, add 1/2 cup of shredded cheddar or Gruyere to the batter.
- For herb popovers, add 1 tablespoon of chopped fresh herbs to the batter.
- For sweet popovers, add 1 tablespoon of sugar and 1/2 teaspoon of vanilla extract to the batter.


Leave a Comment