
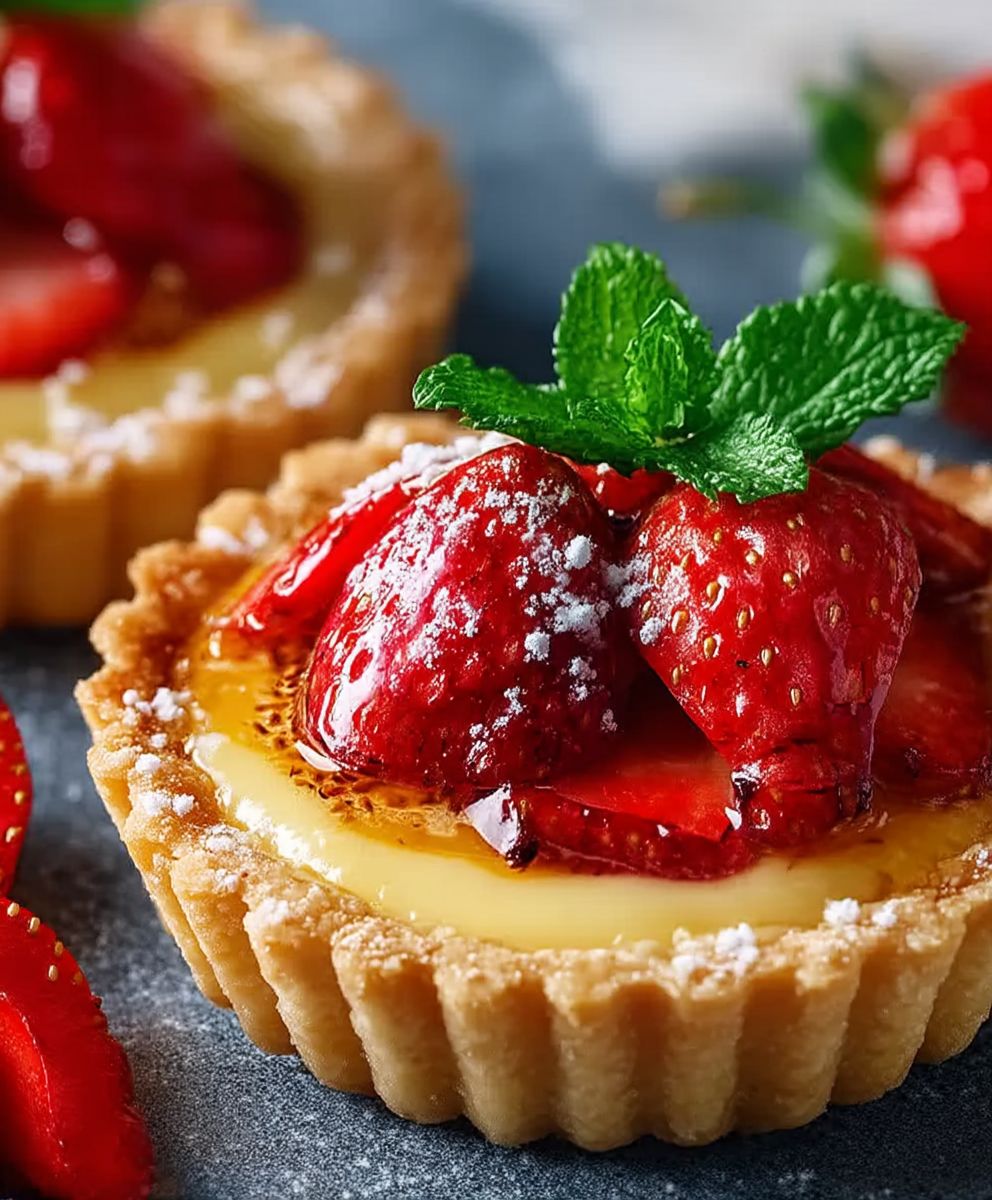
Strawberry Honey Custard Tarts: Prepare to be transported to a sun-drenched afternoon in a quaint European bakery with each delectable bite! Imagine a buttery, flaky crust cradling a silky-smooth custard infused with the delicate sweetness of honey, all topped with vibrant, juicy strawberries. These aren’t just tarts; they’re edible jewels that promise to brighten any day.
Custard tarts, in their various forms, have graced tables for centuries, with roots tracing back to medieval Europe. The addition of honey, a natural sweetener revered since ancient times, elevates this classic dessert to new heights. And strawberries? Well, their bright color and refreshing flavor perfectly complement the richness of the custard, creating a symphony of flavors that dance on your palate.
What makes these Strawberry Honey Custard Tarts so irresistible? It’s the perfect balance of textures the crispness of the pastry, the creaminess of the custard, and the slight tang of the strawberries. They’re also surprisingly easy to make, making them ideal for both seasoned bakers and those just starting their culinary journey. Plus, the use of honey adds a touch of natural goodness, making them a slightly healthier indulgence. Get ready to impress your friends and family with these stunning and utterly delicious tarts!

Ingredients:
- For the Sweet Pastry Crust:
- 2 1/2 cups (300g) all-purpose flour, plus more for dusting
- 1 cup (226g) cold unsalted butter, cut into 1/2-inch cubes
- 1/2 cup (100g) granulated sugar
- 1/4 teaspoon salt
- 1 large egg
- 1/4 cup (60ml) ice water
- For the Honey Custard Filling:
- 1 1/2 cups (360ml) heavy cream
- 1 cup (240ml) whole milk
- 1/2 cup (120ml) honey, preferably local
- 6 large egg yolks
- 1/4 teaspoon salt
- 1 teaspoon vanilla extract
- For the Strawberry Topping:
- 1 pound (450g) fresh strawberries, hulled and sliced
- 2 tablespoons honey, for drizzling (optional)
- Fresh mint leaves, for garnish (optional)
Preparing the Sweet Pastry Crust:
- Combine Dry Ingredients: In a large bowl, whisk together the flour, sugar, and salt. This ensures the salt and sugar are evenly distributed throughout the flour, which is crucial for a consistent crust.
- Cut in the Butter: Add the cold, cubed butter to the flour mixture. Using a pastry blender or your fingertips, cut the butter into the flour until the mixture resembles coarse crumbs. The key here is to work quickly so the butter stays cold. Small pieces of butter create flaky layers in the crust. If using your fingertips, rub the butter between your thumb and fingers, lifting the mixture as you go to incorporate air.
- Add the Egg and Water: In a small bowl, whisk together the egg and ice water. Pour this mixture into the flour and butter mixture.
- Combine the Dough: Using a fork or your hands, gently mix the ingredients until the dough just comes together. Be careful not to overmix, as this will develop the gluten in the flour and result in a tough crust. The dough should be slightly shaggy but hold together when pressed.
- Form the Dough into a Disc: Turn the dough out onto a lightly floured surface. Gently form it into a disc about 1 inch thick.
- Chill the Dough: Wrap the dough tightly in plastic wrap and refrigerate for at least 1 hour, or preferably 2 hours. This allows the gluten to relax, making the dough easier to roll out and preventing it from shrinking during baking. Chilling also helps the butter solidify, which contributes to a flakier crust.
- Roll Out the Dough: On a lightly floured surface, roll out the chilled dough to about 1/8 inch thickness. Rotate the dough as you roll to ensure even thickness and prevent sticking. If the dough becomes too warm and sticky, return it to the refrigerator for a few minutes to chill.
- Cut Out the Tart Shells: Using a cookie cutter or a sharp knife, cut out circles of dough slightly larger than the tart pans you’ll be using. I like to use a 4-inch cutter for individual tarts.
- Fit the Dough into the Tart Pans: Gently press the dough circles into the tart pans, making sure the dough is snug against the bottom and sides. Trim any excess dough from the edges using a sharp knife. You can also use a fork to crimp the edges for a decorative touch.
- Chill the Tart Shells: Place the tart shells in the refrigerator for another 30 minutes. This helps prevent them from shrinking during baking.
- Pre-bake the Tart Shells (Blind Baking): Preheat your oven to 375°F (190°C). Line the tart shells with parchment paper and fill with pie weights or dried beans. This prevents the crust from puffing up during baking.
- Bake the Tart Shells: Bake for 15-20 minutes, or until the edges are lightly golden brown. Remove the parchment paper and pie weights and bake for another 5-10 minutes, or until the bottom of the crust is golden brown.
- Cool the Tart Shells: Let the tart shells cool completely in the pans before filling.
Preparing the Honey Custard Filling:
- Heat the Cream and Milk: In a medium saucepan, combine the heavy cream, whole milk, and honey. Heat over medium heat, stirring occasionally, until the mixture is just simmering. Be careful not to boil. The honey needs to dissolve completely into the cream and milk.
- Whisk the Egg Yolks: In a separate bowl, whisk together the egg yolks and salt until light and slightly thickened. This helps to prevent the yolks from scrambling when you add the hot cream mixture.
- Temper the Egg Yolks: Slowly drizzle a small amount of the hot cream mixture into the egg yolks, whisking constantly. This process, called tempering, gradually raises the temperature of the egg yolks and prevents them from cooking too quickly and curdling.
- Combine the Mixtures: Pour the tempered egg yolk mixture back into the saucepan with the remaining cream mixture.
- Cook the Custard: Cook over low heat, stirring constantly with a wooden spoon, until the custard thickens enough to coat the back of the spoon. This usually takes about 5-7 minutes. Be patient and keep stirring to prevent the custard from scorching. The custard is ready when you can run your finger across the back of the spoon and the line remains distinct.
- Strain the Custard: Remove the custard from the heat and strain it through a fine-mesh sieve into a clean bowl. This removes any lumps and ensures a smooth, creamy texture.
- Add Vanilla Extract: Stir in the vanilla extract.
- Cool the Custard: Cover the custard with plastic wrap, pressing the plastic wrap directly onto the surface of the custard to prevent a skin from forming. Refrigerate for at least 2 hours, or until completely chilled.
Assembling the Strawberry Honey Custard Tarts:
- Fill the Tart Shells: Once the custard is chilled and the tart shells are cooled, spoon the custard into the tart shells, filling them to the top.
- Arrange the Strawberries: Arrange the sliced strawberries on top of the custard in a decorative pattern. You can create concentric circles, rows, or any design you like.
- Drizzle with Honey (Optional): If desired, drizzle the strawberries with a little extra honey for added sweetness and flavor.
- Garnish (Optional): Garnish with fresh mint leaves for a pop of color and freshness.
- Chill Before Serving: Refrigerate the tarts for at least 30 minutes before serving to allow the flavors to meld together. This also helps the custard set up a bit more.
- Serve and Enjoy: Serve the Strawberry Honey Custard Tarts chilled and enjoy! These tarts are best enjoyed within a day or two of assembling, as the crust can become soggy over time.
Conclusion:
And there you have it! These Strawberry Honey Custard Tarts are more than just a dessert; they’re a little slice of sunshine on a plate. I truly believe this recipe is a must-try for so many reasons. First, the combination of the sweet, juicy strawberries with the delicate honey-infused custard is simply divine. It’s a flavor profile that’s both comforting and sophisticated, perfect for impressing guests or simply treating yourself after a long day. Second, the recipe is surprisingly straightforward. While it might look fancy, it’s actually quite manageable, even for beginner bakers. I’ve broken down each step to ensure success, and I’m confident you’ll be delighted with the results. Finally, and perhaps most importantly, these tarts are incredibly versatile.
Serving Suggestions and Variations
Think of these tarts as a blank canvas for your culinary creativity! While they’re absolutely delicious as is, there are countless ways to customize them to your liking. For a more decadent experience, try adding a dollop of freshly whipped cream or a scoop of vanilla bean ice cream on top. A sprinkle of chopped pistachios or toasted almonds would also add a delightful textural contrast.
If you’re feeling adventurous, you could experiment with different types of berries. Raspberries, blueberries, or even blackberries would all work beautifully in place of the strawberries. You could also try using different types of honey to subtly alter the flavor profile. A darker, more robust honey like buckwheat honey would add a deeper, more complex flavor, while a lighter honey like clover honey would keep the flavor bright and delicate.
For a vegan version, you can easily substitute the dairy milk and cream with plant-based alternatives like almond milk and coconut cream. Just be sure to use a high-quality vegan butter for the crust to ensure it’s flaky and tender. You can also replace the honey with agave nectar or maple syrup, although the flavor will be slightly different.
Another fun variation is to add a touch of citrus zest to the custard. A little lemon or orange zest would brighten up the flavors and add a refreshing twist. You could also add a splash of vanilla extract or almond extract to enhance the overall flavor.
These tarts are perfect for any occasion, from a casual brunch to a formal dinner party. They’re also a great option for potlucks and picnics, as they’re easy to transport and always a crowd-pleaser. I’ve even made mini versions of these tarts for parties, and they were a huge hit!
Don’t be intimidated by the idea of making tarts from scratch. With a little patience and attention to detail, you’ll be amazed at what you can create. The satisfaction of biting into a homemade tart, filled with creamy custard and sweet strawberries, is truly unparalleled.
So, what are you waiting for? Gather your ingredients, preheat your oven, and get ready to embark on a delicious baking adventure. I promise you won’t regret it! This Strawberry Honey Custard Tart recipe is a guaranteed winner.
I’m so excited for you to try this recipe and experience the joy of making these delightful tarts for yourself. Once you’ve made them, I’d absolutely love to hear about your experience! Share your photos and comments on social media using [Your Hashtag] or tag me [Your Social Media Handle]. Let me know what variations you tried and how they turned out. I’m always looking for new and creative ways to improve my recipes, and your feedback is invaluable. Happy baking!
Strawberry Honey Custard Tarts: A Delicious & Easy Recipe
Delicate sweet pastry tarts filled with a creamy honey custard and topped with fresh strawberries. A perfect dessert for any occasion!
Ingredients
- 2 1/2 cups (300g) all-purpose flour, plus more for dusting
- 1 cup (226g) cold unsalted butter, cut into 1/2-inch cubes
- 1/2 cup (100g) granulated sugar
- 1/4 teaspoon salt
- 1 large egg
- 1/4 cup (60ml) ice water
- 1 1/2 cups (360ml) heavy cream
- 1 cup (240ml) whole milk
- 1/2 cup (120ml) honey, preferably local
- 6 large egg yolks
- 1/4 teaspoon salt
- 1 teaspoon vanilla extract
- 1 pound (450g) fresh strawberries, hulled and sliced
- 2 tablespoons honey, for drizzling (optional)
- Fresh mint leaves, for garnish (optional)
Instructions
- Combine Dry Ingredients: In a large bowl, whisk together the flour, sugar, and salt.
- Cut in the Butter: Add the cold, cubed butter to the flour mixture. Using a pastry blender or your fingertips, cut the butter into the flour until the mixture resembles coarse crumbs. Work quickly to keep the butter cold.
- Add the Egg and Water: In a small bowl, whisk together the egg and ice water. Pour this mixture into the flour and butter mixture.
- Combine the Dough: Using a fork or your hands, gently mix the ingredients until the dough just comes together. Be careful not to overmix.
- Form the Dough into a Disc: Turn the dough out onto a lightly floured surface. Gently form it into a disc about 1 inch thick.
- Chill the Dough: Wrap the dough tightly in plastic wrap and refrigerate for at least 1 hour, or preferably 2 hours.
- Roll Out the Dough: On a lightly floured surface, roll out the chilled dough to about 1/8 inch thickness. Rotate the dough as you roll to ensure even thickness and prevent sticking.
- Cut Out the Tart Shells: Using a cookie cutter or a sharp knife, cut out circles of dough slightly larger than the tart pans you’ll be using.
- Fit the Dough into the Tart Pans: Gently press the dough circles into the tart pans, making sure the dough is snug against the bottom and sides. Trim any excess dough from the edges using a sharp knife. You can also use a fork to crimp the edges for a decorative touch.
- Chill the Tart Shells: Place the tart shells in the refrigerator for another 30 minutes.
- Pre-bake the Tart Shells (Blind Baking): Preheat your oven to 375°F (190°C). Line the tart shells with parchment paper and fill with pie weights or dried beans.
- Bake the Tart Shells: Bake for 15-20 minutes, or until the edges are lightly golden brown. Remove the parchment paper and pie weights and bake for another 5-10 minutes, or until the bottom of the crust is golden brown.
- Cool the Tart Shells: Let the tart shells cool completely in the pans before filling.
- Heat the Cream and Milk: In a medium saucepan, combine the heavy cream, whole milk, and honey. Heat over medium heat, stirring occasionally, until the mixture is just simmering. Be careful not to boil.
- Whisk the Egg Yolks: In a separate bowl, whisk together the egg yolks and salt until light and slightly thickened.
- Temper the Egg Yolks: Slowly drizzle a small amount of the hot cream mixture into the egg yolks, whisking constantly.
- Combine the Mixtures: Pour the tempered egg yolk mixture back into the saucepan with the remaining cream mixture.
- Cook the Custard: Cook over low heat, stirring constantly with a wooden spoon, until the custard thickens enough to coat the back of the spoon. This usually takes about 5-7 minutes.
- Strain the Custard: Remove the custard from the heat and strain it through a fine-mesh sieve into a clean bowl.
- Add Vanilla Extract: Stir in the vanilla extract.
- Cool the Custard: Cover the custard with plastic wrap, pressing the plastic wrap directly onto the surface of the custard to prevent a skin from forming. Refrigerate for at least 2 hours, or until completely chilled.
- Fill the Tart Shells: Once the custard is chilled and the tart shells are cooled, spoon the custard into the tart shells, filling them to the top.
- Arrange the Strawberries: Arrange the sliced strawberries on top of the custard in a decorative pattern.
- Drizzle with Honey (Optional): If desired, drizzle the strawberries with a little extra honey for added sweetness and flavor.
- Garnish (Optional): Garnish with fresh mint leaves for a pop of color and freshness.
- Chill Before Serving: Refrigerate the tarts for at least 30 minutes before serving to allow the flavors to meld together.
- Serve and Enjoy: Serve the Strawberry Honey Custard Tarts chilled and enjoy! These tarts are best enjoyed within a day or two of assembling, as the crust can become soggy over time.
Notes
- Using cold butter is crucial for a flaky crust.
- Don’t overmix the dough for the crust, as this will result in a tough crust.
- Chilling the dough and tart shells helps prevent shrinking during baking.
- Tempering the egg yolks prevents them from scrambling when you add the hot cream mixture.
- Straining the custard ensures a smooth, creamy texture.
- These tarts are best enjoyed within a day or two of assembling.

Leave a Comment