
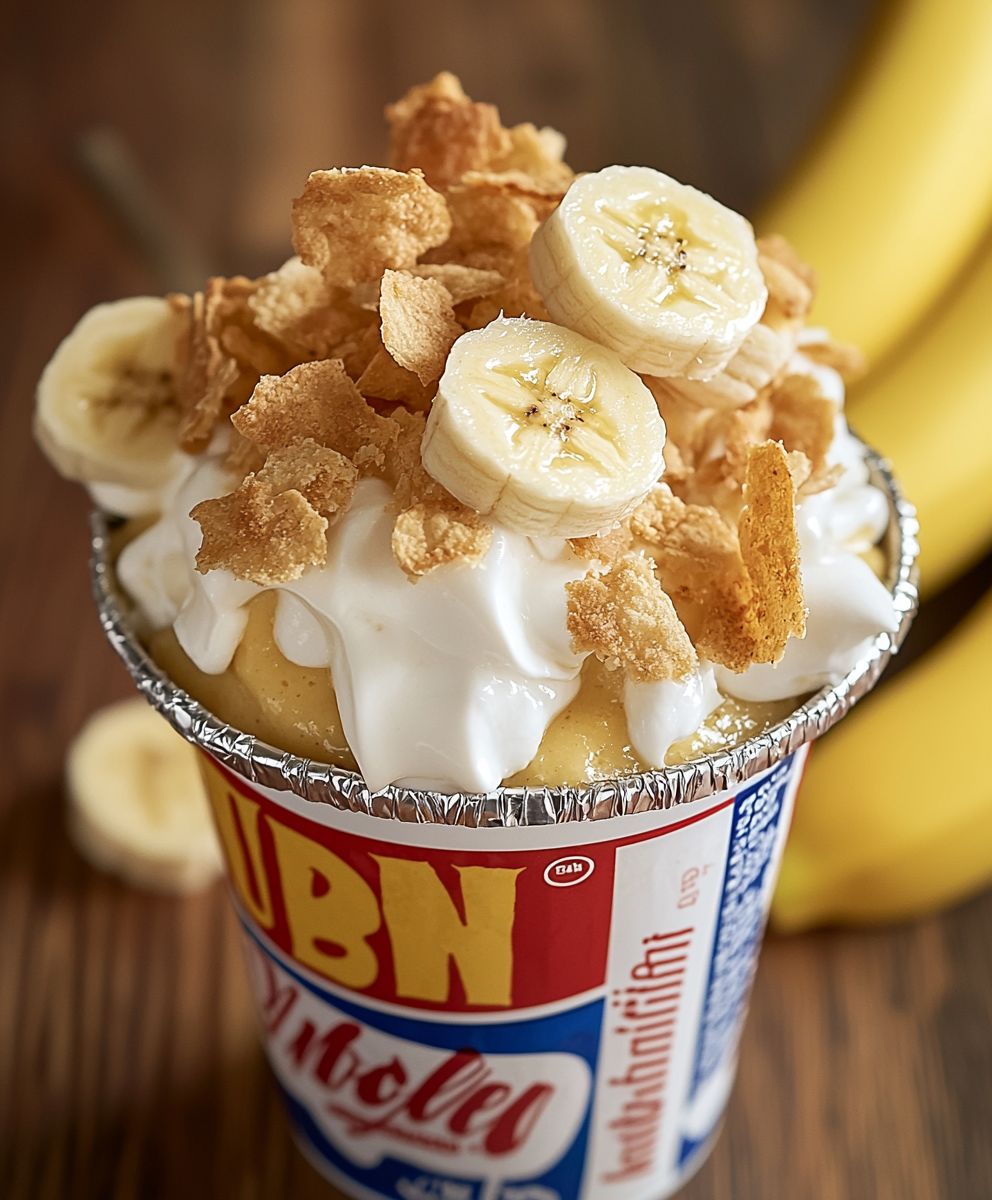
Walking Banana Pudding: the nostalgic, no-bake dessert that’s about to become your new favorite party trick! Forget fussy plating and complicated recipes. We’re taking this classic Southern comfort food on the go, transforming it into individual servings that are as fun to eat as they are delicious.
Banana pudding, in its traditional form, has deep roots in American Southern cuisine, evolving from earlier English trifles and puddings. It gained popularity in the late 19th and early 20th centuries, becoming a staple at family gatherings and church potlucks. But who says tradition can’t be updated? This Walking Banana Pudding recipe takes all the beloved flavors of the original creamy vanilla pudding, sweet bananas, and crunchy vanilla wafers and reimagines them in a convenient, portable package.
What’s not to love? The creamy, dreamy texture of the pudding perfectly complements the soft, sweet bananas and the satisfying crunch of the wafers. It’s a symphony of flavors and textures that’s simply irresistible. Plus, these individual pudding cups are incredibly easy to make, requiring no baking and minimal prep time. Whether you’re hosting a backyard barbecue, packing a picnic lunch, or simply craving a sweet treat, this Walking Banana Pudding is guaranteed to be a crowd-pleaser. Get ready to experience banana pudding in a whole new way!

Ingredients:
- 1 (14 ounce) can sweetened condensed milk
- 1 (8 ounce) package cream cheese, softened
- 3 cups milk
- 1 (3.4 ounce) package instant vanilla pudding mix
- 1 (12 ounce) container frozen whipped topping, thawed
- Approximately 30 vanilla wafers
- 4-5 ripe bananas, sliced
- 1 (1 pound) box of Nilla Wafers, crushed (for topping, optional)
Preparing the Pudding Base:
- In a large bowl, thoroughly combine the sweetened condensed milk and softened cream cheese. I like to use an electric mixer for this step to ensure there are no lumps and the mixture is perfectly smooth. If you don’t have an electric mixer, a whisk and some elbow grease will work just fine! Just make sure the cream cheese is really soft before you start.
- Gradually whisk in the milk until the mixture is smooth and creamy. Adding the milk slowly helps prevent lumps from forming. I usually add it in about half a cup at a time, whisking continuously.
- Add the instant vanilla pudding mix to the milk mixture and whisk for 2 minutes, or until the pudding starts to thicken. Don’t over-whisk, but make sure the pudding mix is fully incorporated. You’ll notice the mixture getting thicker pretty quickly.
- Gently fold in the thawed whipped topping. Be careful not to overmix, as this can deflate the whipped topping. You want to keep the mixture light and airy. I use a rubber spatula for this step, folding from the bottom up.
- Cover the bowl with plastic wrap and refrigerate for at least 2 hours, or preferably overnight. This allows the pudding to fully set and the flavors to meld together beautifully. The longer it chills, the better it tastes!
Assembling the Walking Banana Pudding:
Now comes the fun part assembling our individual banana pudding cups! This is where the “walking” aspect comes in, as we’ll be layering everything in individual snack-sized bags.
- Prepare your individual snack bags. You’ll need one bag for each serving. I usually use resealable sandwich bags, but you can also use small clear plastic cups if you prefer. The bags are just more portable!
- Crush a few vanilla wafers in the bottom of each bag. This creates a delicious base layer. You can crush them by hand, or use a rolling pin or food processor for a finer crumb. I like to leave some slightly larger pieces for texture.
- Add a layer of sliced bananas on top of the crushed vanilla wafers. Try to use bananas that are ripe but still firm, so they don’t get too mushy. I usually slice them about ¼ inch thick.
- Spoon a generous amount of the pudding mixture over the bananas. You want to make sure the bananas are well covered with the creamy pudding.
- Repeat the layers of crushed vanilla wafers, sliced bananas, and pudding mixture until the bag is almost full. I usually do about 2-3 layers of each.
- Top each bag with a final layer of crushed Nilla Wafers (optional). This adds a nice crunch and visual appeal. If you’re not a fan of crushed wafers, you can skip this step.
- Seal the bags tightly and refrigerate for at least 30 minutes before serving. This allows the flavors to meld together even further.
- When ready to serve, give each bag a gentle shake to distribute the ingredients. This ensures that each bite is a perfect combination of vanilla wafers, bananas, and pudding.
- Grab a spoon and enjoy your Walking Banana Pudding! It’s the perfect portable treat for picnics, parties, or just a quick snack on the go.
Tips and Variations:
This recipe is incredibly versatile, and there are so many ways to customize it to your liking. Here are a few ideas to get you started:
- Add-ins: Feel free to add other ingredients to your banana pudding, such as chopped nuts (pecans or walnuts are great), chocolate chips, shredded coconut, or even a drizzle of caramel sauce.
- Different Flavors: Experiment with different flavors of pudding mix. Banana cream pudding would be a natural choice, but you could also try butterscotch, cheesecake, or even chocolate.
- Fruit Variations: While bananas are the star of the show, you can also add other fruits, such as strawberries, blueberries, or raspberries. Just make sure to use fruits that won’t get too mushy.
- Boozy Banana Pudding: For an adult twist, add a splash of rum or banana liqueur to the pudding mixture.
- Make it Healthier: Use sugar-free pudding mix, fat-free cream cheese, and light whipped topping to reduce the calories and fat in this dessert.
- Individual Cups: If you prefer, you can assemble the banana pudding in individual cups instead of bags. This is a great option for a more formal presentation.
- Make it Ahead: This dessert is perfect for making ahead of time. In fact, it tastes even better after it’s had a chance to chill in the refrigerator for a few hours. You can assemble the bags or cups up to 24 hours in advance.
Troubleshooting:
Sometimes things don’t go exactly as planned in the kitchen. Here are a few common problems you might encounter when making banana pudding, and how to fix them:
- Lumpy Pudding: If your pudding is lumpy, it’s likely because the pudding mix wasn’t fully incorporated. Try whisking the mixture vigorously for a few minutes to break up the lumps. You can also try using an immersion blender to smooth it out.
- Runny Pudding: If your pudding is too runny, it could be because you didn’t use enough pudding mix, or because you didn’t let it chill long enough. Try adding a little more pudding mix and refrigerating it for a longer period of time.
- Mushy Bananas: To prevent the bananas from getting mushy, use bananas that are ripe but still firm. You can also toss the banana slices with a little lemon juice to help prevent browning.
- Soggy Vanilla Wafers: To prevent the vanilla wafers from getting soggy, add them just before serving. You can also try using a layer of melted chocolate between the wafers and the pudding to create a moisture barrier.
Storage Instructions:
Leftover Walking Banana Pudding can be stored in the refrigerator for up to 3 days. However, the bananas may start to brown and the vanilla wafers may become soggy over time. For best results, consume within 24 hours. Make sure to store the pudding in an airtight container or resealable bags to prevent it from drying out.
Nutritional Information (Approximate):
Please note that the nutritional information is an estimate and may vary depending on the specific ingredients you use.
- Calories: Approximately 350-400 per serving
- Fat: 15-20 grams
- Saturated Fat: 10-12 grams
- Cholesterol: 50-60 mg
- Sodium: 200-250 mg
- Carbohydrates: 50-60 grams
- Sugar: 30-40 grams
- Protein: 5-7 grams
Enjoy your delicious and portable Walking Banana Pudding! I hope you and your family and friends love it as much as I do!
Conclusion:
This Walking Banana Pudding isn’t just a dessert; it’s a nostalgic trip down memory lane with a modern, convenient twist. It’s the perfect solution for potlucks, picnics, or even a simple weeknight treat when you crave something sweet and comforting without the fuss of baking. The creamy, dreamy layers of vanilla pudding, the sweet slices of ripe banana, the satisfying crunch of vanilla wafers, and the unexpected burst of flavor from the Nilla Wafers all come together in a symphony of textures and tastes that will leave you wanting more.
Why is this a must-try? Because it’s incredibly easy to make, requires minimal ingredients, and is guaranteed to be a crowd-pleaser. Forget spending hours in the kitchen; this recipe is all about quick assembly and maximum enjoyment. Plus, the individual servings make it ideal for portion control and easy transport. It’s a win-win!
But the beauty of this Walking Banana Pudding lies in its versatility. Feel free to experiment and make it your own!
Serving Suggestions & Variations:
* Elevate the Pudding: While vanilla pudding is classic, consider using banana cream pudding for an extra layer of banana flavor. Or, for a richer experience, try using a homemade custard base.
* Cookie Crumbles: Instead of vanilla wafers, try using crushed graham crackers, shortbread cookies, or even chocolate chip cookies for a different textural and flavor profile.
* Fruity Fun: Add other fruits like sliced strawberries, blueberries, or even a layer of diced pineapple for a tropical twist.
* Nutty Delight: Sprinkle chopped pecans, walnuts, or almonds between the layers for added crunch and nutty flavor.
* Chocolate Indulgence: Drizzle chocolate syrup or add chocolate shavings for a decadent chocolate banana pudding experience.
* Boozy Banana: For an adult version, add a splash of rum or banana liqueur to the pudding mixture.
* Make it Vegan: Use plant-based pudding, vegan cookies, and dairy-free whipped topping to create a delicious vegan version of this classic treat.
* Presentation Matters: While the “walking” aspect is part of the charm, you can also assemble this pudding in individual glass jars or a trifle bowl for a more elegant presentation.
I truly believe that this recipe for Walking Banana Pudding will become a staple in your dessert repertoire. It’s simple, satisfying, and endlessly customizable. I’ve made it countless times for family gatherings, potlucks, and even just for myself when I needed a little pick-me-up. Each time, it’s been a resounding success.
So, what are you waiting for? Gather your ingredients, grab your snack bags, and get ready to create a dessert that’s both fun and delicious. I’m confident that you’ll love this recipe as much as I do.
I’m so excited for you to try this recipe! Once you’ve had a chance to whip up your own batch of Walking Banana Pudding, I’d love to hear about your experience. Did you try any of the variations I suggested? Did you add your own unique twist? Share your photos and stories in the comments below! Let’s spread the joy of this easy and delicious dessert together. Happy pudding-making!
Walking Banana Pudding: A Delicious Dessert Recipe
A fun and portable twist on classic banana pudding! Layers of vanilla wafers, sliced bananas, and creamy pudding are assembled in individual snack bags for a delicious treat on the go.
Ingredients
- 1 (14 ounce) can sweetened condensed milk
- 1 (8 ounce) package cream cheese, softened
- 3 cups milk
- 1 (3.4 ounce) package instant vanilla pudding mix
- 1 (12 ounce) container frozen whipped topping, thawed
- Approximately 30 vanilla wafers
- 4-5 ripe bananas, sliced
- 1 (1 pound) box of Nilla Wafers, crushed (for topping, optional)
Instructions
- In a large bowl, thoroughly combine the sweetened condensed milk and softened cream cheese. Use an electric mixer for a smooth mixture.
- Gradually whisk in the milk until the mixture is smooth and creamy.
- Add the instant vanilla pudding mix to the milk mixture and whisk for 2 minutes, or until the pudding starts to thicken.
- Gently fold in the thawed whipped topping. Be careful not to overmix.
- Cover the bowl with plastic wrap and refrigerate for at least 2 hours, or preferably overnight.
- Prepare individual snack bags.
- Crush a few vanilla wafers in the bottom of each bag.
- Add a layer of sliced bananas on top of the crushed vanilla wafers.
- Spoon a generous amount of the pudding mixture over the bananas.
- Repeat the layers of crushed vanilla wafers, sliced bananas, and pudding mixture until the bag is almost full.
- Top each bag with a final layer of crushed Nilla Wafers (optional).
- Seal the bags tightly and refrigerate for at least 30 minutes before serving.
- When ready to serve, give each bag a gentle shake to distribute the ingredients.
- Grab a spoon and enjoy!
Notes
- Add-ins: Feel free to add other ingredients to your banana pudding, such as chopped nuts (pecans or walnuts are great), chocolate chips, shredded coconut, or even a drizzle of caramel sauce.
- Different Flavors: Experiment with different flavors of pudding mix. Banana cream pudding would be a natural choice, but you could also try butterscotch, cheesecake, or even chocolate.
- Fruit Variations: While bananas are the star of the show, you can also add other fruits, such as strawberries, blueberries, or raspberries. Just make sure to use fruits that won’t get too mushy.
- Boozy Banana Pudding: For an adult twist, add a splash of rum or banana liqueur to the pudding mixture.
- Make it Healthier: Use sugar-free pudding mix, fat-free cream cheese, and light whipped topping to reduce the calories and fat in this dessert.
- Individual Cups: If you prefer, you can assemble the banana pudding in individual cups instead of bags. This is a great option for a more formal presentation.
- Make it Ahead: This dessert is perfect for making ahead of time. In fact, it tastes even better after it’s had a chance to chill in the refrigerator for a few hours. You can assemble the bags or cups up to 24 hours in advance.

Leave a Comment