
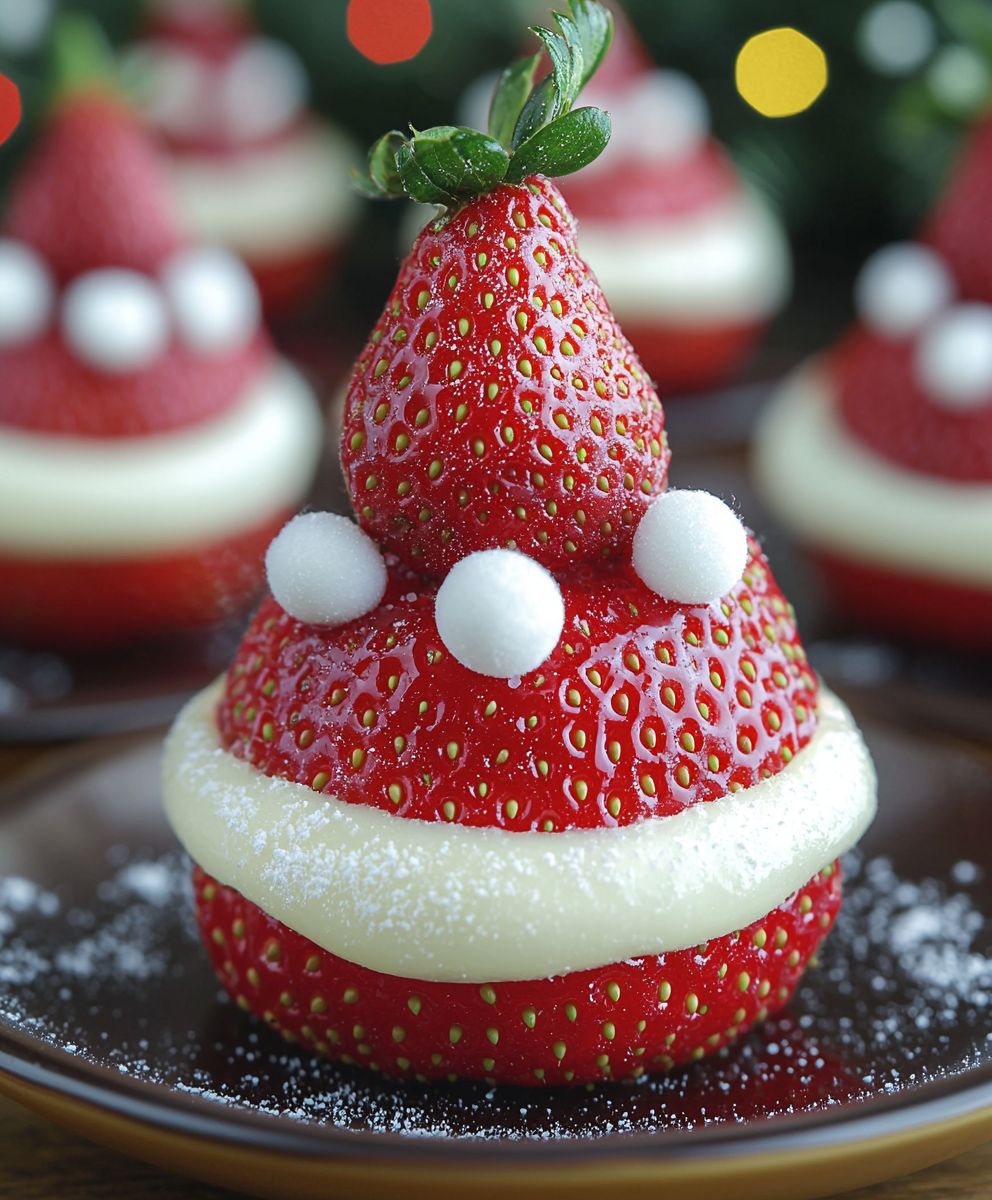
Strawberry Santas are not just a dessert; they’re a miniature masterpiece of festive cheer! Imagine the delight on your guests’ faces when you present these adorable, bite-sized treats. They’re almost too cute to eat… almost! But trust me, once you take a bite, you won’t be able to resist their sweet and creamy goodness.
While the exact origins of Strawberry Santas are shrouded in a bit of mystery, their popularity has exploded in recent years, becoming a staple at holiday gatherings worldwide. They perfectly embody the spirit of Christmas: simple ingredients transformed into something magical and delightful. Think of them as a modern twist on classic holiday treats, offering a lighter and fresher alternative to heavy cakes and cookies.
What makes these little Santas so irresistible? It’s the perfect combination of flavors and textures. The juicy sweetness of the fresh strawberries, the creamy richness of the whipped cream (or mascarpone, if you’re feeling fancy!), and the playful presentation all contribute to their widespread appeal. Plus, they’re incredibly easy and quick to make, making them a perfect last-minute addition to your holiday dessert table. So, gather your ingredients, and let’s create some edible holiday magic with these charming Strawberry Santas!

Ingredients:
- 1 pint fresh strawberries, washed and hulled
- 1 (8 ounce) package cream cheese, softened
- 1/4 cup powdered sugar
- 1/2 teaspoon vanilla extract
- Chocolate sprinkles or mini chocolate chips, for decoration
- Optional: Small pretzel sticks, for arms
Preparing the Cream Cheese Filling:
Before we get started on the strawberries, let’s whip up that delicious cream cheese filling. This is what gives our Strawberry Santas their fluffy, white beards and bellies!
- In a medium-sized bowl, add the softened cream cheese. It’s crucial that the cream cheese is properly softened, otherwise you’ll end up with a lumpy filling. If you forgot to take it out of the fridge ahead of time, you can microwave it in 10-second intervals, checking and stirring each time, until it’s nice and soft. Be careful not to melt it!
- Add the powdered sugar to the bowl with the cream cheese. I recommend sifting the powdered sugar first to avoid any clumps. This will ensure a smooth and creamy filling.
- Pour in the vanilla extract. The vanilla adds a lovely warmth and enhances the overall flavor of the filling.
- Using an electric mixer (either a hand mixer or a stand mixer), beat the cream cheese, powdered sugar, and vanilla extract together until smooth and creamy. Start on low speed to prevent the powdered sugar from flying everywhere, then gradually increase the speed to medium. Beat for about 2-3 minutes, or until the mixture is light and fluffy.
- Taste the filling and adjust the sweetness if needed. If you prefer a sweeter filling, add a little more powdered sugar, a tablespoon at a time, until you reach your desired sweetness.
- Once the filling is ready, transfer it to a piping bag fitted with a large round tip. If you don’t have a piping bag, you can use a zip-top bag and snip off a corner. Just make sure the opening is large enough to pipe the filling easily. If you don’t have a piping bag, you can also use a spoon to fill the strawberries, but it might be a little messier.
- Set the filled piping bag aside in the refrigerator while you prepare the strawberries. This will help the filling stay firm and make it easier to work with.
Preparing the Strawberries:
Now, let’s get those strawberries ready to become adorable little Santas! This part is all about careful cutting and creating the perfect shape.
- Wash the strawberries thoroughly under cold running water. Gently rub them to remove any dirt or debris.
- Pat the strawberries dry with a paper towel. It’s important to dry them well, as any excess moisture can prevent the cream cheese filling from sticking properly.
- Hull the strawberries. This means removing the green leafy tops. You can use a small paring knife or a strawberry huller to do this. Be careful not to cut too much of the strawberry flesh.
- Cut the tip off each strawberry to create a flat base. This will allow the Santa to stand upright. Make sure the cut is even so that the Santa doesn’t wobble.
- Cut off the top third of each strawberry to create the Santa’s hat. This cut should be clean and even. Set the “hats” aside.
Assembling the Strawberry Santas:
This is the fun part! We’re finally going to bring our Strawberry Santas to life. Get ready to pipe, decorate, and enjoy the festive magic!
- Take the strawberry bases (the larger portion of the strawberry) and pipe a generous swirl of cream cheese filling onto the flat cut surface. This will be the Santa’s beard and belly. Make sure the filling is thick enough to support the “hat.”
- Place the strawberry “hat” on top of the cream cheese filling. Gently press it down to secure it in place.
- Pipe a small dollop of cream cheese filling onto the tip of the strawberry “hat” to create the Santa’s pom-pom.
- Now, for the eyes! Use chocolate sprinkles or mini chocolate chips to create the Santa’s eyes. Gently press them into the cream cheese filling on the strawberry base. You can use a toothpick to help position them precisely.
- Optional: If you want to add arms to your Strawberry Santas, insert small pretzel sticks into the sides of the strawberry base, just below the cream cheese filling.
- Repeat steps 1-5 for all the remaining strawberries.
- Once all the Strawberry Santas are assembled, place them on a serving platter or tray.
- Refrigerate the Strawberry Santas for at least 30 minutes before serving. This will allow the cream cheese filling to firm up and prevent the Santas from toppling over.
Tips and Variations:
- For a richer filling: Use mascarpone cheese instead of cream cheese, or combine both for a decadent flavor.
- Add flavor to the filling: Mix in a pinch of cinnamon, nutmeg, or almond extract to the cream cheese filling for a festive twist.
- Use different decorations: Get creative with your decorations! Use colored sprinkles, edible glitter, or even small candies to personalize your Strawberry Santas.
- Make it dairy-free: Use a dairy-free cream cheese alternative and powdered sugar to make this recipe suitable for those with dairy sensitivities.
- Add a chocolate drizzle: Drizzle melted chocolate over the assembled Strawberry Santas for an extra touch of indulgence.
- Make mini Santas: Use smaller strawberries to create bite-sized Strawberry Santas.
- Presenting your Santas: Arrange the Strawberry Santas on a festive platter lined with parchment paper. You can also add some fresh mint leaves or cranberries for a pop of color.
Serving Suggestions:
These Strawberry Santas are perfect for:
- Christmas parties
- Holiday gatherings
- Dessert tables
- Edible gifts
- A fun activity with kids
Storage Instructions:
Store leftover Strawberry Santas in an airtight container in the refrigerator for up to 2 days. The strawberries may become slightly soft over time, but they will still taste delicious.
Troubleshooting:
- Filling is too runny: If your cream cheese filling is too runny, add a little more powdered sugar, a tablespoon at a time, until it reaches the desired consistency.
- Strawberries are wobbly: Make sure you cut the base of the strawberries evenly so that they stand upright. If they are still wobbly, you can trim the base slightly until they are stable.
- Filling is not sticking: Ensure the strawberries are completely dry before piping the filling. You can also chill the strawberries in the refrigerator for a few minutes before assembling to help the filling adhere better.
Enjoy!
I hope you enjoy making and eating these adorable Strawberry Santas! They’re a fun and festive treat that’s sure to bring a smile to everyone’s face. Happy holidays!
Conclusion:
Okay, friends, let’s be honest: these Strawberry Santas are more than just a cute dessert; they’re a guaranteed holiday hit! From the moment you set them on the table, you’ll be met with smiles and gasps of delight. The combination of fresh, juicy strawberries, creamy filling, and adorable Santa hats is simply irresistible. They’re festive, fun, and surprisingly easy to make, making them the perfect addition to any Christmas gathering, potluck, or even just a cozy night in.
But the real reason these little guys are a must-try is because they bring joy. They’re a conversation starter, a memory maker, and a delicious way to spread holiday cheer. Forget complicated desserts that take hours to prepare; these Strawberry Santas are all about simplicity and maximum impact. Plus, they’re a relatively healthy treat compared to many other holiday sweets, so you can indulge without feeling too guilty!
Serving Suggestions and Variations:
While the recipe as written is fantastic, feel free to get creative! Here are a few ideas to spark your imagination:
- Dipping Sauces: Serve these Strawberry Santas with a side of melted dark chocolate, white chocolate, or even a tangy raspberry sauce for dipping.
- Filling Variations: Experiment with different fillings! Try a lemon cream cheese filling for a zesty twist, or add a touch of peppermint extract to the whipped cream for an extra festive flavor. You could even use a mascarpone cheese filling for a richer, more decadent treat.
- Santa’s Belt: Add a tiny belt to your Santa using a thin strip of black licorice or a line of melted chocolate. Secure it with a tiny dot of frosting.
- Santa’s Beard: For a fluffier beard, use shredded coconut instead of whipped cream.
- Presentation is Key: Arrange your Strawberry Santas on a festive platter, perhaps with a dusting of powdered sugar to resemble snow. You could also place them on individual dessert plates with a sprig of mint for a touch of elegance.
- Kid-Friendly Fun: Get the kids involved in making these! They’ll love assembling the Santas and adding their own creative touches. Just be prepared for a little mess!
I truly believe that these Strawberry Santas will become a new holiday tradition in your home. They’re the perfect blend of deliciousness, simplicity, and festive fun. They are also a great way to get kids involved in the kitchen, teaching them basic cooking skills while creating something adorable and tasty. Imagine the smiles on their faces as they carefully place the Santa hats on each strawberry!
So, what are you waiting for? Gather your ingredients, put on some holiday music, and get ready to create some magic in the kitchen. I’m confident that you’ll love these little guys as much as I do. And more importantly, I’m sure your family and friends will be absolutely delighted by them.
I can’t wait to hear about your experience making these Strawberry Santas! Please, please, please come back and leave a comment below, sharing your photos, variations, and any tips or tricks you discovered along the way. Did you try a different filling? Did you add a special touch? I’m eager to learn from your creativity and see how you made this recipe your own. Happy baking, and happy holidays!
Strawberry Santas: The Cutest & Easiest Holiday Treat!
Festive Strawberry Santas! Fresh strawberries filled with sweet cream cheese, decorated like Santa. A fun, easy holiday treat!
Ingredients
- 1 pint fresh strawberries, washed and hulled
- 1 (8 ounce) package cream cheese, softened
- 1/4 cup powdered sugar
- 1/2 teaspoon vanilla extract
- Chocolate sprinkles or mini chocolate chips, for decoration
- Optional: Small pretzel sticks, for arms
Instructions
- Prepare the Cream Cheese Filling: In a medium bowl, beat softened cream cheese, powdered sugar (sifted), and vanilla extract until smooth and creamy (2-3 minutes). Taste and adjust sweetness if needed. Transfer to a piping bag with a large round tip (or zip-top bag with a corner snipped). Refrigerate while preparing strawberries.
- Prepare the Strawberries: Wash and dry strawberries thoroughly. Hull them. Cut the tip off each strawberry to create a flat base. Cut off the top third of each strawberry to create the Santa’s hat. Set the “hats” aside.
- Assemble the Strawberry Santas:
- Take the strawberry bases (the larger portion of the strawberry) and pipe a generous swirl of cream cheese filling onto the flat cut surface.
- Place the strawberry “hat” on top of the cream cheese filling. Gently press it down to secure it in place.
- Pipe a small dollop of cream cheese filling onto the tip of the strawberry “hat” to create the Santa’s pom-pom.
- Use chocolate sprinkles or mini chocolate chips to create the Santa’s eyes. Gently press them into the cream cheese filling on the strawberry base.
- Optional: If you want to add arms to your Strawberry Santas, insert small pretzel sticks into the sides of the strawberry base, just below the cream cheese filling.
- Repeat steps 1-5 for all the remaining strawberries.
- Refrigerate the Strawberry Santas for at least 30 minutes before serving.
Notes
- For a richer filling, use mascarpone cheese or combine it with cream cheese.
- Add flavor to the filling with cinnamon, nutmeg, or almond extract.
- Get creative with decorations: colored sprinkles, edible glitter, or small candies.
- Make it dairy-free with dairy-free cream cheese alternative and powdered sugar.
- Drizzle melted chocolate over the assembled Strawberry Santas.
- Use smaller strawberries to create bite-sized Strawberry Santas.
Leave a Comment