
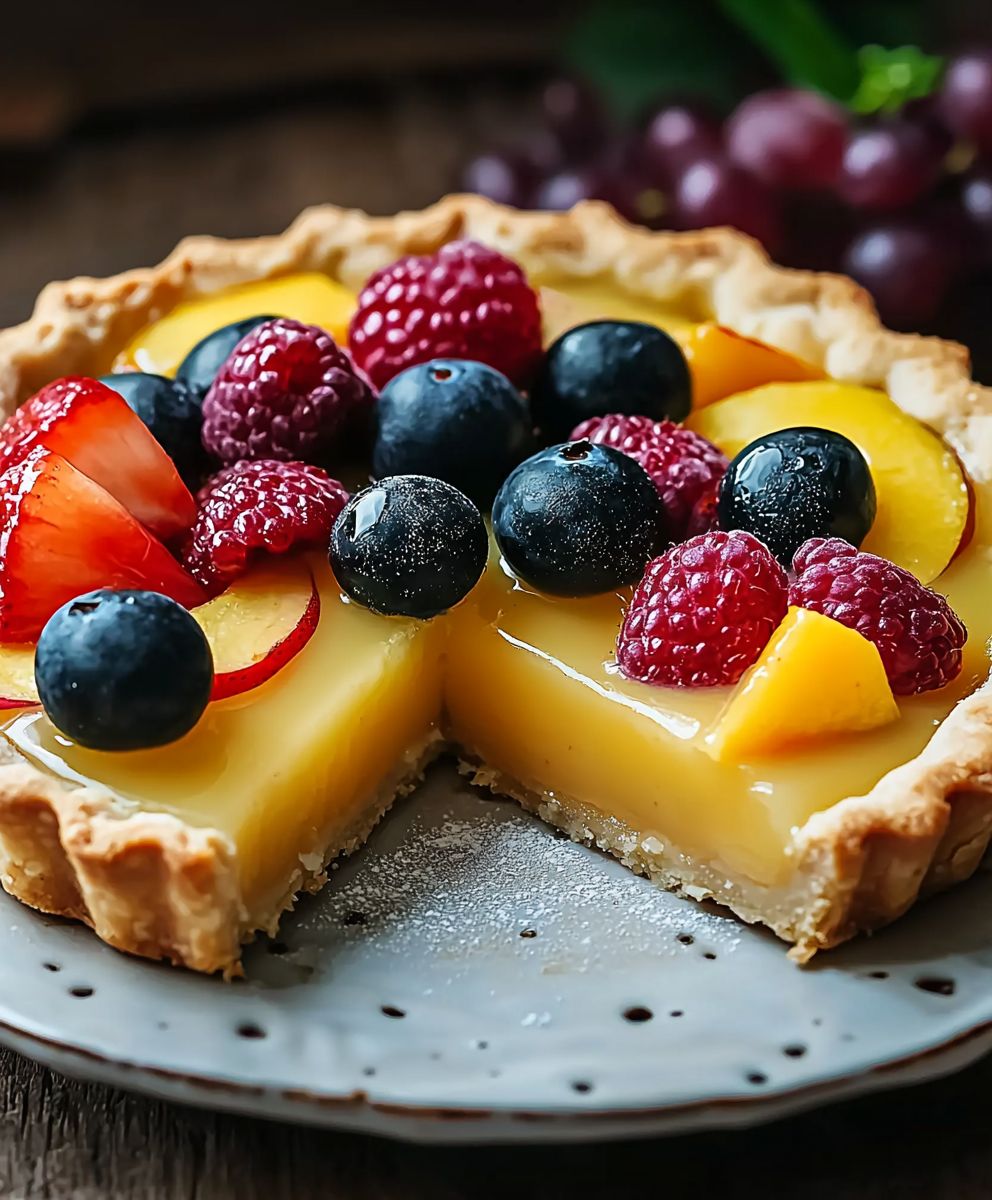
Fruit Tart: Is there anything more visually stunning and utterly delicious than a perfectly crafted fruit tart? I think not! Imagine a buttery, crumbly crust filled with a creamy, dreamy custard, all topped with a vibrant mosaic of fresh, seasonal fruits. It’s a dessert that’s as much a feast for the eyes as it is for the palate.
The history of the fruit tart stretches back centuries, with variations appearing in different cultures across Europe. From humble beginnings as simple pastries filled with whatever fruits were available, they’ve evolved into the elegant and sophisticated desserts we know and love today. In France, the “tarte aux fruits” is a staple in patisseries, showcasing the country’s dedication to culinary artistry.
But what is it about a fruit tart that makes it so universally appealing? For me, it’s the delightful combination of textures and flavors. The crispness of the crust, the smoothness of the custard, and the juicy sweetness of the fruit create a symphony in every bite. Plus, it’s a dessert that feels both indulgent and refreshing, making it perfect for any occasion, from a casual afternoon tea to a celebratory dinner party. And let’s be honest, who can resist that beautiful presentation? It’s a guaranteed showstopper!

Ingredients:
- For the Crust:
- 1 1/4 cups all-purpose flour
- 1/2 cup (1 stick) unsalted butter, cold and cubed
- 1/4 cup powdered sugar
- 1/4 teaspoon salt
- 1 large egg yolk
- 2-4 tablespoons ice water
- For the Pastry Cream (Crème Pâtissière):
- 2 cups whole milk
- 1/2 cup granulated sugar
- 1/4 cup cornstarch
- 1/4 teaspoon salt
- 4 large egg yolks
- 2 tablespoons unsalted butter
- 1 teaspoon vanilla extract
- For the Glaze:
- 1/2 cup apricot jam
- 1 tablespoon water
- For the Fruit Topping:
- 1 pint fresh strawberries, hulled and sliced
- 1 pint fresh blueberries
- 1 pint fresh raspberries
- 2 kiwi fruits, peeled and sliced
- 1 mango, peeled and diced
- Other fruits of your choice (peaches, grapes, etc.)
Preparing the Sweet Tart Crust
Okay, let’s start with the crust. This is the foundation of our beautiful fruit tart, so we want to get it just right. Don’t be intimidated; it’s easier than you think!
- Combine Dry Ingredients: In a large bowl, whisk together the flour, powdered sugar, and salt. This ensures everything is evenly distributed before we add the butter.
- Cut in the Butter: Add the cold, cubed butter to the flour mixture. Using a pastry blender (or your fingertips, working quickly!), cut the butter into the flour until the mixture resembles coarse crumbs. You should still see small pieces of butter that’s what creates the flaky texture. The key here is to keep the butter cold! If it gets too warm, the crust will be tough.
- Add the Egg Yolk: In a small bowl, lightly beat the egg yolk. Add it to the flour mixture.
- Add Ice Water: Gradually add the ice water, one tablespoon at a time, mixing after each addition. You only want to add enough water to bring the dough together. Be careful not to overmix! Overmixing develops the gluten in the flour, resulting in a tough crust. The dough should be slightly shaggy but hold together when pressed.
- Form the Dough: Turn the dough out onto a lightly floured surface. Gently gather it into a disc. Wrap the disc tightly in plastic wrap and refrigerate for at least 30 minutes, or up to 2 hours. This chilling time is crucial; it allows the gluten to relax and the butter to firm up, preventing the crust from shrinking during baking.
- Roll Out the Dough: After chilling, remove the dough from the refrigerator and let it sit for a few minutes to soften slightly. On a lightly floured surface, roll out the dough into a circle about 12 inches in diameter. It should be thin, but not so thin that it tears easily.
- Transfer to Tart Pan: Carefully transfer the rolled-out dough to a 9-inch tart pan with a removable bottom. Gently press the dough into the bottom and up the sides of the pan.
- Trim and Dock the Dough: Trim any excess dough from the edges of the pan. You can do this by rolling a rolling pin over the top of the pan or by using a sharp knife. Then, using a fork, prick the bottom of the crust all over. This is called “docking,” and it prevents the crust from puffing up during baking.
- Chill Again: Place the tart pan in the freezer for another 15-20 minutes. This helps the crust hold its shape during baking and prevents it from shrinking.
- Bake Blind: Preheat your oven to 375°F (190°C). Line the chilled tart crust with parchment paper and fill it with pie weights (or dried beans or rice). This will weigh down the crust and prevent it from puffing up. Bake for 20 minutes.
- Remove Weights and Bake Further: Remove the parchment paper and pie weights. Return the crust to the oven and bake for another 10-15 minutes, or until it’s golden brown. Watch it carefully to prevent burning!
- Cool Completely: Let the baked tart crust cool completely in the pan before filling.
Making the Pastry Cream (Crème Pâtissière)
Now, let’s move on to the pastry cream. This is the creamy, dreamy filling that makes our fruit tart so irresistible. It might seem a little intimidating, but I promise it’s not too difficult. Just follow the steps carefully, and you’ll be rewarded with a luscious, vanilla-infused cream.
- Heat the Milk: In a medium saucepan, heat the milk over medium heat until it’s just about to simmer. You’ll see small bubbles forming around the edges. Don’t let it boil!
- Whisk Sugar, Cornstarch, Salt, and Egg Yolks: In a separate bowl, whisk together the granulated sugar, cornstarch, and salt. Add the egg yolks and whisk until the mixture is pale yellow and smooth. This is important because the cornstarch needs to be fully incorporated to prevent lumps in the pastry cream.
- Temper the Egg Yolks: Slowly pour about 1/2 cup of the hot milk into the egg yolk mixture, whisking constantly. This is called “tempering,” and it gradually raises the temperature of the egg yolks, preventing them from scrambling when you add them to the hot milk.
- Combine and Cook: Pour the tempered egg yolk mixture into the saucepan with the remaining hot milk. Cook over medium heat, whisking constantly, until the mixture thickens and comes to a boil. Continue to cook, whisking constantly, for 1-2 minutes more. The pastry cream should be very thick and smooth. Don’t stop whisking, or it will burn on the bottom!
- Remove from Heat and Add Butter and Vanilla: Remove the saucepan from the heat and stir in the butter and vanilla extract until the butter is melted and the pastry cream is smooth and glossy.
- Cool and Chill: Pour the pastry cream into a clean bowl. Press a piece of plastic wrap directly onto the surface of the pastry cream to prevent a skin from forming. Refrigerate for at least 2 hours, or preferably overnight, to allow the pastry cream to cool completely and thicken further.
Assembling the Fruit Tart
Alright, we’ve got our crust and our pastry cream. Now comes the fun part: assembling the fruit tart! This is where you can really get creative and let your artistic side shine.
- Fill the Tart Crust: Remove the cooled pastry cream from the refrigerator and give it a good whisk to loosen it up. Spoon the pastry cream into the cooled tart crust, spreading it evenly.
- Arrange the Fruit: Now comes the artistic part! Arrange the fresh fruit on top of the pastry cream in a decorative pattern. You can create concentric circles, rows, or any design you like. Use a variety of colors and textures to make your tart visually appealing. I like to start with the larger fruits, like strawberries and kiwi, and then fill in the gaps with smaller fruits, like blueberries and raspberries.
- Prepare the Glaze: In a small saucepan, combine the apricot jam and water. Heat over low heat, stirring constantly, until the jam is melted and smooth.
- Glaze the Fruit: Brush the melted apricot jam glaze over the fruit. This will give the fruit a beautiful shine and help to preserve it.
- Chill (Optional): Refrigerate the assembled fruit tart for at least 30 minutes before serving. This will allow the pastry cream to set up even more and the flavors to meld together. However, it’s also delicious served immediately!
Tips for Success
- Use Cold Butter: This is crucial for a flaky crust.
- Don’t Overmix the Dough: Overmixing develops the gluten in the flour, resulting in a tough crust.
- Chill the Dough: Chilling the dough allows the gluten to relax and the butter to firm up, preventing the crust from shrinking during baking.
- Dock the Crust: Docking the crust prevents it from puffing up during baking.
- Bake Blind: Baking blind prevents the crust from becoming soggy.
- Whisk Constantly: When making the pastry cream, whisk constantly to prevent lumps from forming and
Conclusion:
This isn’t just another dessert recipe; it’s an invitation to create something truly special. This Fruit Tart is a symphony of textures and flavors, from the crisp, buttery crust to the creamy, dreamy filling and the vibrant burst of fresh fruit. It’s a showstopper that’s surprisingly easy to make, and trust me, the “oohs” and “aahs” you’ll receive will be well worth the effort.
Why is this a must-try? Because it’s the perfect balance of indulgence and freshness. It’s elegant enough for a dinner party, yet simple enough for a weekend treat. It’s a blank canvas for your creativity, allowing you to customize the fruit arrangement to your liking and showcase the season’s best offerings. And most importantly, it tastes absolutely divine!
Imagine serving this beautiful tart at your next gathering. Picture the delighted faces as your guests take their first bite, their eyes widening with pleasure. This isn’t just about providing a dessert; it’s about creating a memorable experience, a moment of shared joy and appreciation for good food.
But the beauty of this recipe lies not only in its deliciousness but also in its versatility. Feel free to experiment with different crusts. A graham cracker crust would add a delightful twist, or you could try a chocolate crust for an extra layer of decadence. As for the filling, consider adding a hint of citrus zest or a splash of vanilla extract to enhance the flavor.
And let’s talk about the fruit! While the recipe provides a suggestion, don’t be afraid to get creative. Berries are always a classic choice, but you could also use sliced peaches, kiwi, mango, or even star fruit for a more exotic touch. Arrange the fruit in a simple, elegant pattern, or go wild with a colorful, abstract design. The possibilities are endless!
For serving suggestions, a dollop of whipped cream or a scoop of vanilla ice cream would be the perfect accompaniment. You could also drizzle a little honey or maple syrup over the top for added sweetness. And if you’re feeling particularly fancy, a sprinkle of chopped nuts or a dusting of powdered sugar would add a touch of elegance.
I truly believe that this Fruit Tart recipe is a winner. It’s a crowd-pleaser, a conversation starter, and a guaranteed way to impress your friends and family. Its a dessert that looks as good as it tastes, and it’s surprisingly simple to make.
So, what are you waiting for? Gather your ingredients, preheat your oven, and get ready to create a masterpiece. I promise you won’t be disappointed.
And once you’ve made it, I’d love to hear about your experience! Share your photos and stories on social media using [Your Hashtag Here]. Let me know what variations you tried, what fruits you used, and how your guests reacted. I’m always eager to see your creations and learn from your experiences. Happy baking! I cant wait to see your beautiful fruit tarts!
Fruit Tart: A Delicious & Easy Recipe You'll Love
Sweet, buttery tart crust filled with creamy vanilla pastry cream and topped with a colorful array of fresh, glazed seasonal fruits.
Ingredients
- 1 1/4 cups all-purpose flour
- 1/2 cup (1 stick) unsalted butter, cold and cubed
- 1/4 cup powdered sugar
- 1/4 teaspoon salt
- 1 large egg yolk
- 2-4 tablespoons ice water
- 2 cups whole milk
- 1/2 cup granulated sugar
- 1/4 cup cornstarch
- 1/4 teaspoon salt
- 4 large egg yolks
- 2 tablespoons unsalted butter
- 1 teaspoon vanilla extract
- 1/2 cup apricot jam
- 1 tablespoon water
- 1 pint fresh strawberries, hulled and sliced
- 1 pint fresh blueberries
- 1 pint fresh raspberries
- 2 kiwi fruits, peeled and sliced
- 1 mango, peeled and diced
- Other fruits of your choice (peaches, grapes, etc.)
Instructions
- In a large bowl, whisk together the flour, powdered sugar, and salt.
- Add the cold, cubed butter to the flour mixture. Using a pastry blender (or your fingertips, working quickly!), cut the butter into the flour until the mixture resembles coarse crumbs.
- In a small bowl, lightly beat the egg yolk. Add it to the flour mixture.
- Gradually add the ice water, one tablespoon at a time, mixing after each addition. You only want to add enough water to bring the dough together. Be careful not to overmix! The dough should be slightly shaggy but hold together when pressed.
- Turn the dough out onto a lightly floured surface. Gently gather it into a disc. Wrap the disc tightly in plastic wrap and refrigerate for at least 30 minutes, or up to 2 hours.
- After chilling, remove the dough from the refrigerator and let it sit for a few minutes to soften slightly. On a lightly floured surface, roll out the dough into a circle about 12 inches in diameter.
- Carefully transfer the rolled-out dough to a 9-inch tart pan with a removable bottom. Gently press the dough into the bottom and up the sides of the pan.
- Trim any excess dough from the edges of the pan. Then, using a fork, prick the bottom of the crust all over.
- Place the tart pan in the freezer for another 15-20 minutes.
- Preheat your oven to 375°F (190°C). Line the chilled tart crust with parchment paper and fill it with pie weights (or dried beans or rice). Bake for 20 minutes.
- Remove the parchment paper and pie weights. Return the crust to the oven and bake for another 10-15 minutes, or until it’s golden brown.
- Let the baked tart crust cool completely in the pan before filling.
- In a medium saucepan, heat the milk over medium heat until it’s just about to simmer.
- In a separate bowl, whisk together the granulated sugar, cornstarch, and salt. Add the egg yolks and whisk until the mixture is pale yellow and smooth.
- Slowly pour about 1/2 cup of the hot milk into the egg yolk mixture, whisking constantly.
- Pour the tempered egg yolk mixture into the saucepan with the remaining hot milk. Cook over medium heat, whisking constantly, until the mixture thickens and comes to a boil. Continue to cook, whisking constantly, for 1-2 minutes more. The pastry cream should be very thick and smooth.
- Remove the saucepan from the heat and stir in the butter and vanilla extract until the butter is melted and the pastry cream is smooth and glossy.
- Pour the pastry cream into a clean bowl. Press a piece of plastic wrap directly onto the surface of the pastry cream to prevent a skin from forming. Refrigerate for at least 2 hours, or preferably overnight, to allow the pastry cream to cool completely and thicken further.
- Remove the cooled pastry cream from the refrigerator and give it a good whisk to loosen it up. Spoon the pastry cream into the cooled tart crust, spreading it evenly.
- Arrange the fresh fruit on top of the pastry cream in a decorative pattern.
- In a small saucepan, combine the apricot jam and water. Heat over low heat, stirring constantly, until the jam is melted and smooth.
- Brush the melted apricot jam glaze over the fruit.
- Refrigerate the assembled fruit tart for at least 30 minutes before serving.
Notes
- Use Cold Butter: This is crucial for a flaky crust.
- Don’t Overmix the Dough: Overmixing develops the gluten in the flour, resulting in a tough crust.
- Chill the Dough: Chilling the dough allows the gluten to relax and the butter to firm up, preventing the crust from shrinking during baking.
- Dock the Crust: Docking the crust prevents it from puffing up during baking.
- Bake Blind: Baking blind prevents the crust from becoming soggy.
- When making the pastry cream, whisk constantly to prevent lumps from forming.

Leave a Comment