
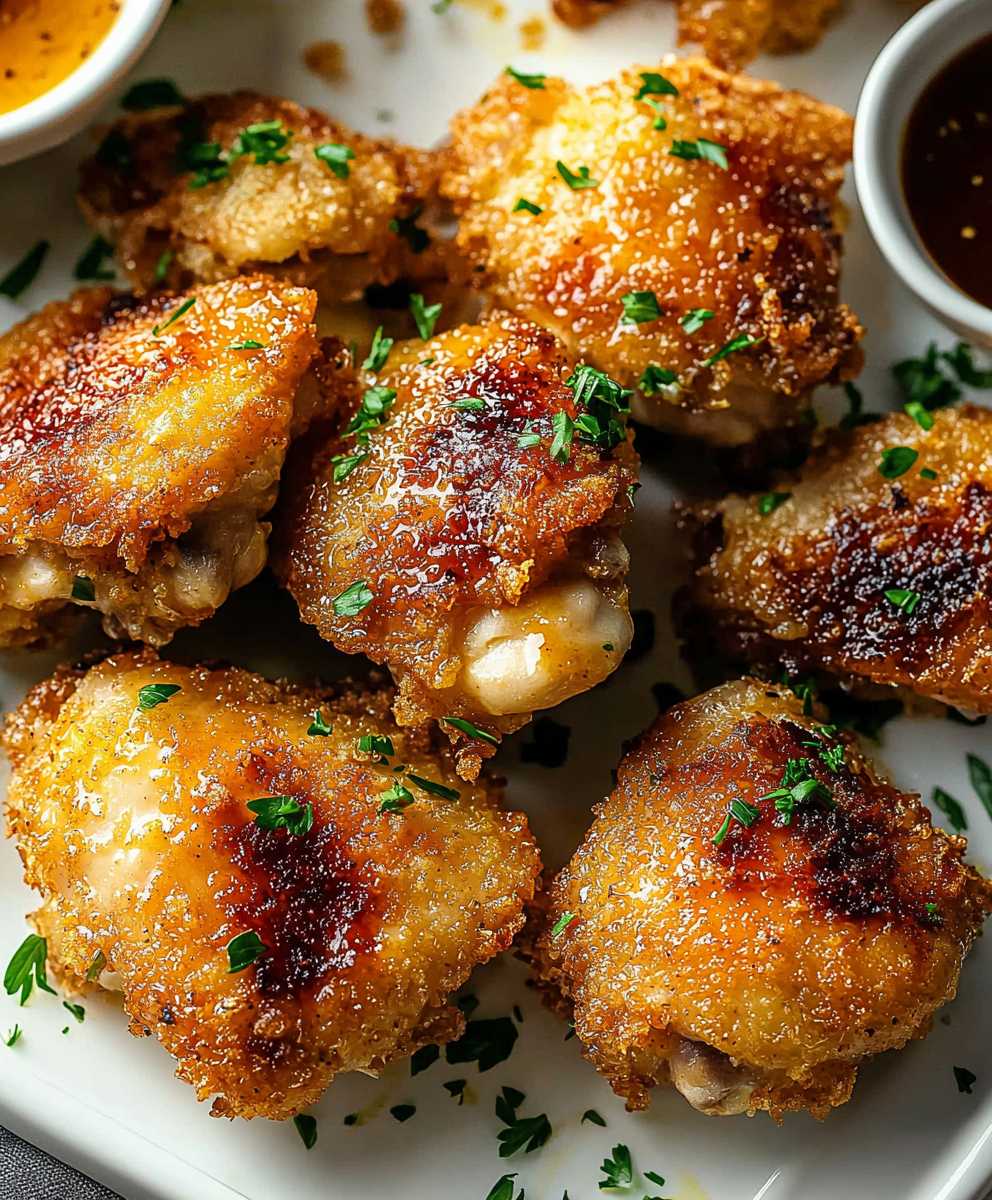
Oven Fried Chicken Thighs: Crispy, juicy, and unbelievably delicious, this recipe will revolutionize your weeknight dinners! Forget the mess and fuss of deep frying; we’re bringing all the flavor of classic fried chicken straight to your oven. Imagine sinking your teeth into perfectly seasoned, golden-brown chicken with a satisfying crunch that gives way to tender, succulent meat.
Fried chicken, in its various forms, has a rich history, particularly in the Southern United States. It evolved from Scottish and West African culinary traditions, becoming a staple of American cuisine and a symbol of comfort food. While traditionally deep-fried, this oven fried chicken thighs recipe offers a healthier and more convenient alternative without sacrificing any of the taste or texture you crave.
What makes this dish so irresistible? It’s the perfect combination of crispy skin and juicy meat, achieved through a simple yet effective baking method. People adore this recipe because it delivers the satisfying crunch of fried chicken without the added oil and cleanup. Plus, it’s incredibly versatile serve it with your favorite sides like mashed potatoes, coleslaw, or corn on the cob for a complete and satisfying meal. Get ready to experience the best of both worlds: the incredible flavor of fried chicken with the ease and health benefits of oven baking!

Ingredients:
- 8 bone-in, skin-on chicken thighs
- 1 cup all-purpose flour
- 1/2 cup cornstarch
- 2 teaspoons paprika
- 1 teaspoon garlic powder
- 1 teaspoon onion powder
- 1 teaspoon dried thyme
- 1/2 teaspoon dried oregano
- 1/2 teaspoon cayenne pepper (optional, for heat)
- 1 teaspoon salt
- 1/2 teaspoon black pepper
- 1 cup buttermilk
- 1 large egg
- 1/4 cup hot sauce (optional, for flavor)
- 1/2 cup vegetable oil
- Cooking spray
Preparing the Chicken and Coating:
- Prepare the Chicken: Pat the chicken thighs dry with paper towels. This is crucial for getting crispy skin. Excess moisture will steam the chicken instead of allowing it to brown properly.
- Make the Buttermilk Mixture: In a medium bowl, whisk together the buttermilk, egg, and hot sauce (if using). The hot sauce adds a subtle kick and depth of flavor, but it’s perfectly fine to omit it if you prefer a milder taste.
- Combine the Dry Ingredients: In a separate large bowl, whisk together the flour, cornstarch, paprika, garlic powder, onion powder, thyme, oregano, cayenne pepper (if using), salt, and pepper. The cornstarch helps create a lighter, crispier coating. Make sure all the spices are evenly distributed throughout the flour mixture.
- First Dip: Dip each chicken thigh into the buttermilk mixture, ensuring it’s fully coated. Let the excess buttermilk drip off before moving to the next step.
- Second Dip: Dredge each buttermilk-soaked chicken thigh in the flour mixture, pressing firmly to ensure the coating adheres well. Make sure every nook and cranny is covered. This is where you build up that delicious, crispy crust.
- Double Dip (Optional, for Extra Crispiness): For an even thicker and crispier coating, you can repeat the dipping process. Dip the flour-coated chicken back into the buttermilk mixture, then back into the flour mixture. This will create a truly substantial crust.
- Rest the Chicken: Place the coated chicken thighs on a wire rack lined baking sheet. Let them rest for at least 15-20 minutes. This allows the coating to adhere better and prevents it from falling off during baking. While the chicken rests, preheat your oven.
Baking the Chicken:
- Preheat the Oven: Preheat your oven to 400°F (200°C). Make sure your oven is fully preheated before you put the chicken in.
- Prepare the Baking Sheet: Line a large baking sheet with parchment paper for easy cleanup. Place a wire rack on top of the baking sheet. This allows air to circulate around the chicken, promoting even cooking and crisping.
- Add Oil to the Chicken: Lightly brush or spray the tops of the coated chicken thighs with vegetable oil. This helps them brown and crisp up in the oven. Don’t skip this step!
- Bake the Chicken: Place the prepared baking sheet with the chicken in the preheated oven. Bake for 30 minutes.
- Flip and Continue Baking: After 30 minutes, carefully flip the chicken thighs. Brush or spray the other side with vegetable oil.
- Continue Baking: Continue baking for another 20-30 minutes, or until the internal temperature of the chicken reaches 165°F (74°C) and the juices run clear when pierced with a fork. The exact baking time will depend on the size of your chicken thighs and your oven.
- Broil for Extra Crispiness (Optional): For extra crispy skin, you can broil the chicken for the last 2-3 minutes of baking. Keep a close eye on it to prevent burning!
Resting and Serving:
- Rest the Chicken: Once the chicken is cooked through, remove it from the oven and let it rest for 5-10 minutes before serving. This allows the juices to redistribute, resulting in more tender and flavorful chicken.
- Serve: Serve the oven-fried chicken thighs hot. They’re delicious with classic sides like mashed potatoes, coleslaw, corn on the cob, or green beans.
Tips and Variations:
- Spice it Up: Adjust the amount of cayenne pepper to your liking, or add other spices like smoked paprika, chili powder, or cumin for a different flavor profile.
- Use Different Cuts of Chicken: While this recipe is specifically for chicken thighs, you can also use other bone-in, skin-on chicken pieces like drumsticks or wings. Adjust the baking time accordingly.
- Add Cheese: Sprinkle grated Parmesan cheese over the chicken during the last 5 minutes of baking for a cheesy twist.
- Make it Gluten-Free: Use a gluten-free all-purpose flour blend instead of regular flour.
- Air Fryer Option: You can also cook these chicken thighs in an air fryer. Preheat your air fryer to 375°F (190°C). Place the chicken thighs in the air fryer basket in a single layer, being careful not to overcrowd. Cook for 20-25 minutes, flipping halfway through, or until the chicken is cooked through and the skin is crispy.
- Don’t Overcrowd the Pan: Make sure to leave enough space between the chicken thighs on the baking sheet. Overcrowding will steam the chicken instead of allowing it to brown properly. If necessary, bake in batches.
- Use a Meat Thermometer: The best way to ensure that your chicken is cooked through is to use a meat thermometer. Insert the thermometer into the thickest part of the thigh, avoiding the bone. The internal temperature should reach 165°F (74°C).
- Make Ahead: You can prepare the chicken up to the point of baking and store it in the refrigerator for up to 24 hours. This is a great way to save time on busy weeknights. Just be sure to bring the chicken to room temperature for about 30 minutes before baking.
- Reheating: Leftover oven-fried chicken can be reheated in the oven at 350°F (175°C) for 10-15 minutes, or until heated through. You can also reheat it in the air fryer for a few minutes to crisp up the skin.
Why This Recipe Works:
The Importance of Dry Chicken:
Patting the chicken dry is paramount. Excess moisture hinders browning and results in soggy skin. Think of it like this: water needs to evaporate before browning can occur. By starting with dry chicken, you’re giving the browning process a head start.
The Magic of Cornstarch:
Cornstarch is the secret weapon for achieving that extra crispy coating. It absorbs moisture and creates a light, airy texture that crisps up beautifully in the oven. It also helps the coating adhere better to the chicken.
The Benefits of Resting:
Resting the coated chicken before baking allows the flour mixture to fully adhere to the chicken. This prevents the coating from falling off during baking and ensures a more even and consistent crust.
The Role of the Wire Rack:
Using a wire rack on top of the baking sheet is crucial for even cooking and crisping. It allows air to circulate around the chicken, preventing the bottom from becoming soggy. This ensures that the chicken is crispy on all sides.
The Importance of Oil:
Brushing or spraying the chicken with oil helps it brown and crisp up in the oven. The oil acts as a conductor of heat, promoting even browning and a crispy texture. Don’t be afraid to use a generous amount of oil, but be sure to distribute it evenly.
Temperature Control:
Baking the chicken at 400°F (200°C) is the sweet spot for achieving crispy skin and juicy meat. This temperature is high enough to promote browning but not so high that it burns the chicken before it’s cooked through.
The Value of a Meat Thermometer:
Using a meat thermometer is the most reliable way to ensure that your chicken is cooked through. The internal temperature should reach 165°F (74°C) to kill any harmful bacteria. Don’t rely solely on visual cues, as they can be misleading.
Conclusion:
And there you have it! These Oven Fried Chicken Thighs are truly a game-changer. Forget the mess and extra calories of traditional frying; this recipe delivers all the crispy, juicy goodness you crave, but with a fraction of the guilt. I know, I know, it sounds too good to be true, but trust me, one bite and you’ll be hooked.
Why is this a must-try? Well, beyond the health benefits, it’s incredibly easy. The prep time is minimal, and the oven does most of the work. Plus, the flavor is outstanding! The combination of the perfectly seasoned breading and the naturally juicy chicken thighs creates a symphony of textures and tastes that will tantalize your taste buds. It’s the kind of meal that satisfies your comfort food cravings without leaving you feeling sluggish afterward.
But the best part? It’s versatile! These Oven Fried Chicken Thighs are fantastic on their own, but they also pair beautifully with a variety of sides. For a classic Southern meal, serve them with creamy mashed potatoes and some collard greens. If you’re looking for something lighter, try a fresh garden salad or some roasted vegetables. And for a fun twist, shred the chicken and use it in tacos or wraps.
Speaking of variations, don’t be afraid to experiment with the seasonings! If you like a little heat, add a pinch of cayenne pepper to the breading. For a more savory flavor, try using garlic powder or onion powder. And if you’re feeling adventurous, you can even try using different types of breadcrumbs, such as panko or Italian-style breadcrumbs.
Here are a few serving suggestions to get you started:
* Classic Comfort: Serve with mashed potatoes, gravy, and green beans.
* Light and Fresh: Pair with a vibrant salad and a lemon vinaigrette.
* Spicy Kick: Add a dash of hot sauce or cayenne pepper to the breading and serve with coleslaw.
* Taco Tuesday: Shred the chicken and use it as a filling for tacos, topped with your favorite salsa and toppings.
* Sandwich Sensation: Create a delicious chicken sandwich with lettuce, tomato, and your favorite sauce on a toasted bun.
I’m so confident that you’ll love this recipe that I urge you to try it out as soon as possible. It’s perfect for a weeknight dinner, a weekend gathering, or any time you’re craving some delicious, crispy chicken.
And once you’ve made it, I’d love to hear about your experience! Did you make any modifications to the recipe? What sides did you serve it with? What did your family and friends think? Share your thoughts and photos in the comments below. Your feedback is invaluable and helps me continue to create recipes that you’ll love.
So go ahead, preheat your oven, gather your ingredients, and get ready to enjoy the best Oven Fried Chicken Thighs you’ve ever tasted! I promise, you won’t be disappointed. Happy cooking! I can’t wait to hear what you think! Let me know if you have any questions, and I’ll do my best to answer them. Enjoy!
Oven Fried Chicken Thighs: Crispy, Juicy, and Easy Recipe
Crispy, flavorful oven-baked fried chicken thighs with seasoned coating. A healthier, delicious alternative to traditional fried chicken!
Ingredients
- 8 bone-in, skin-on chicken thighs
- 1 cup all-purpose flour
- 1/2 cup cornstarch
- 2 teaspoons paprika
- 1 teaspoon garlic powder
- 1 teaspoon onion powder
- 1 teaspoon dried thyme
- 1/2 teaspoon dried oregano
- 1/2 teaspoon cayenne pepper (optional, for heat)
- 1 teaspoon salt
- 1/2 teaspoon black pepper
- 1 cup buttermilk
- 1 large egg
- 1/4 cup hot sauce (optional, for flavor)
- 1/2 cup vegetable oil
- Cooking spray
Instructions
- Prepare the Chicken: Pat the chicken thighs dry with paper towels.
- Make the Buttermilk Mixture: In a medium bowl, whisk together the buttermilk, egg, and hot sauce (if using).
- Combine the Dry Ingredients: In a separate large bowl, whisk together the flour, cornstarch, paprika, garlic powder, onion powder, thyme, oregano, cayenne pepper (if using), salt, and pepper.
- First Dip: Dip each chicken thigh into the buttermilk mixture, ensuring it’s fully coated. Let the excess buttermilk drip off.
- Second Dip: Dredge each buttermilk-soaked chicken thigh in the flour mixture, pressing firmly to ensure the coating adheres well.
- Double Dip (Optional): For extra crispiness, repeat the dipping process. Dip the flour-coated chicken back into the buttermilk mixture, then back into the flour mixture.
- Rest the Chicken: Place the coated chicken thighs on a wire rack lined baking sheet. Let them rest for at least 15-20 minutes.
- Preheat the Oven: Preheat your oven to 400°F (200°C).
- Prepare the Baking Sheet: Line a large baking sheet with parchment paper. Place a wire rack on top of the baking sheet.
- Add Oil to the Chicken: Lightly brush or spray the tops of the coated chicken thighs with vegetable oil.
- Bake the Chicken: Place the prepared baking sheet with the chicken in the preheated oven. Bake for 30 minutes.
- Flip and Continue Baking: After 30 minutes, carefully flip the chicken thighs. Brush or spray the other side with vegetable oil.
- Continue Baking: Continue baking for another 20-30 minutes, or until the internal temperature of the chicken reaches 165°F (74°C) and the juices run clear when pierced with a fork.
- Broil for Extra Crispiness (Optional): For extra crispy skin, you can broil the chicken for the last 2-3 minutes of baking. Keep a close eye on it to prevent burning!
- Rest the Chicken: Once the chicken is cooked through, remove it from the oven and let it rest for 5-10 minutes before serving.
- Serve: Serve the oven-fried chicken thighs hot.
Notes
- Adjust the amount of cayenne pepper to your liking.
- Use a meat thermometer to ensure the chicken reaches an internal temperature of 165°F (74°C).
- Don’t overcrowd the baking sheet; bake in batches if necessary.
- For a gluten-free version, use a gluten-free all-purpose flour blend.
- You can prepare the chicken up to the point of baking and store it in the refrigerator for up to 24 hours.
- Air Fryer Option: Preheat your air fryer to 375°F (190°C). Place the chicken thighs in the air fryer basket in a single layer, being careful not to overcrowd. Cook for 20-25 minutes, flipping halfway through, or until the chicken is cooked through and the skin is crispy.
Leave a Comment