
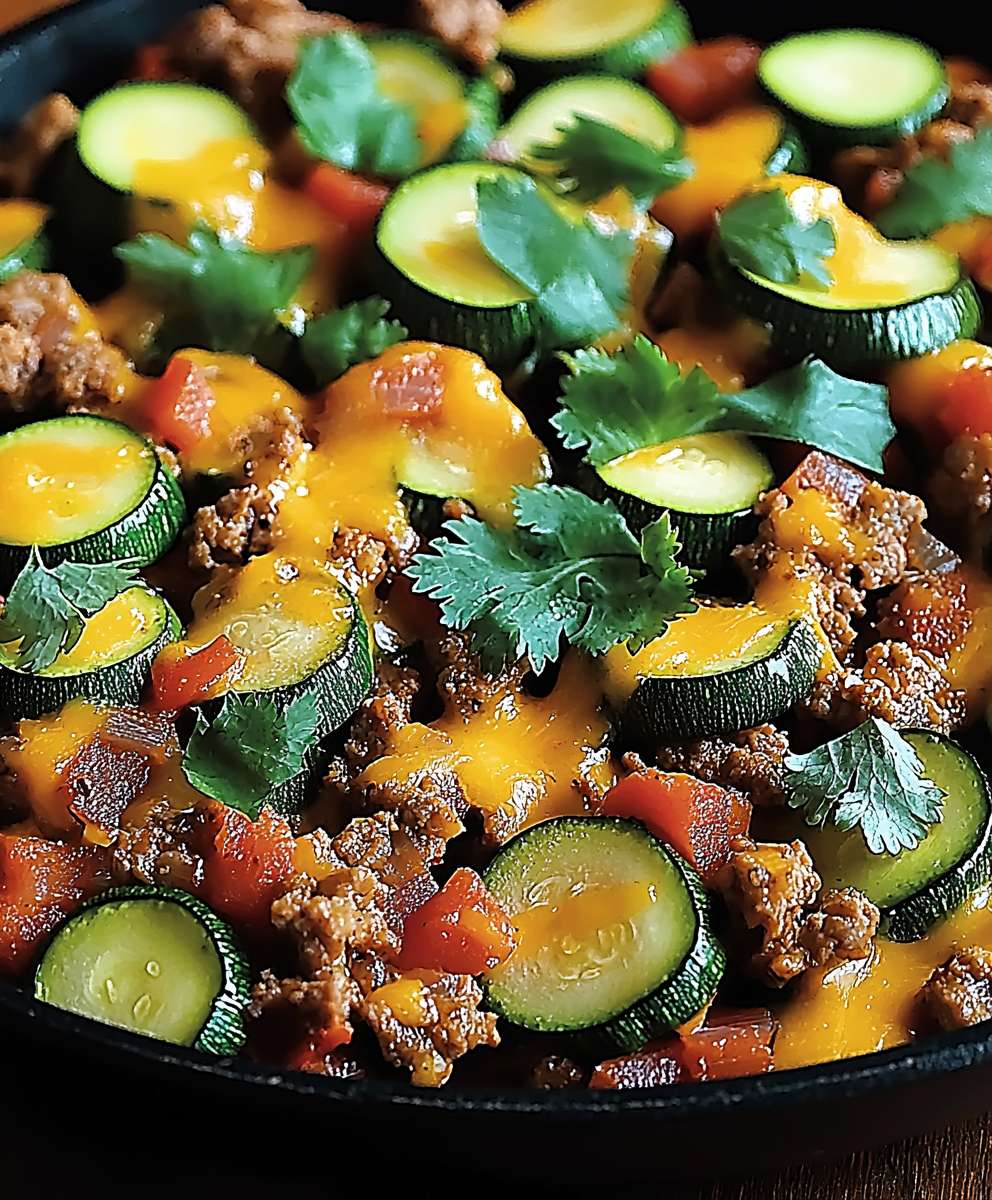
Taco Zucchini Skillet: Craving a quick, healthy, and incredibly flavorful weeknight meal? Look no further! Imagine sinking your fork into a vibrant dish bursting with the savory goodness of seasoned ground meat, tender zucchini, and all your favorite taco toppings. This isn’t just dinner; it’s a fiesta in a skillet, ready in under 30 minutes!
While the exact origins of combining zucchini with taco flavors are a modern culinary innovation, the spirit of this dish draws heavily from the rich traditions of Mexican cuisine. Tacos, a cornerstone of Mexican food culture, have evolved over centuries, blending indigenous ingredients with influences from around the world. This Taco Zucchini Skillet cleverly adapts those beloved taco flavors to create a lighter, vegetable-forward meal.
People adore this dish for its simplicity and versatility. The combination of savory meat, slightly sweet zucchini, and the customizable toppings creates a symphony of flavors and textures that tantalizes the taste buds. It’s also incredibly convenient perfect for busy weeknights when you need a satisfying meal without spending hours in the kitchen. Plus, it’s a fantastic way to sneak in extra vegetables, making it a win-win for both flavor and nutrition. Get ready to experience a new family favorite!

Ingredients:
- 1 tablespoon olive oil
- 1 pound ground beef (or ground turkey)
- 1 medium yellow onion, chopped
- 2 cloves garlic, minced
- 1 red bell pepper, chopped
- 2 medium zucchini, chopped
- 1 (15 ounce) can black beans, rinsed and drained
- 1 (15 ounce) can corn, drained
- 1 (10 ounce) can diced tomatoes and green chilies (like Rotel), undrained
- 1 packet (1 ounce) taco seasoning
- 1/2 cup water
- 1 cup shredded cheddar cheese (or your favorite cheese)
- Optional toppings: sour cream, avocado, salsa, cilantro, green onions
Preparing the Meat and Vegetables:
- First, grab a large skillet (at least 12 inches) and place it over medium-high heat. Add the olive oil. Once the oil is shimmering, add the ground beef (or turkey).
- Brown the meat thoroughly. Use a spatula to break it up into smaller pieces as it cooks. This usually takes about 5-7 minutes. You want to make sure there are no pink spots left.
- Once the meat is browned, drain off any excess grease. This step is crucial to prevent the skillet from becoming too oily. Nobody wants a greasy taco skillet!
- Now, add the chopped onion and minced garlic to the skillet with the browned meat. Cook for about 3-5 minutes, or until the onion becomes translucent and fragrant. Stir occasionally to prevent burning. The aroma of the garlic and onion will fill your kitchen it’s a wonderful sign!
- Next, add the chopped red bell pepper and zucchini to the skillet. Cook for another 5-7 minutes, or until the vegetables are slightly softened. Stir occasionally to ensure even cooking. Don’t overcook them; you want them to retain a little bit of their texture.
Adding the Beans, Corn, and Seasoning:
- Now it’s time to add the black beans, corn, and diced tomatoes and green chilies (Rotel) to the skillet. Make sure the beans and corn are drained before adding them. The Rotel should be added undrained the liquid adds flavor and moisture to the dish.
- Sprinkle the taco seasoning over the mixture in the skillet. Use a spatula to stir everything together well, ensuring that the seasoning is evenly distributed.
- Add the water to the skillet. Stir again to combine all the ingredients. The water helps to create a slightly saucy consistency.
- Bring the mixture to a simmer. Reduce the heat to low, cover the skillet, and let it simmer for about 10-15 minutes. This allows the flavors to meld together beautifully. Stir occasionally to prevent sticking.
Melting the Cheese and Serving:
- Remove the lid from the skillet. Sprinkle the shredded cheddar cheese (or your favorite cheese) evenly over the top of the mixture.
- Cover the skillet again and let it cook for another 2-3 minutes, or until the cheese is melted and bubbly. Keep a close eye on it to prevent burning.
- Once the cheese is melted, remove the skillet from the heat.
- Now it’s time to serve! You can serve the taco zucchini skillet as is, or you can add your favorite toppings. Some popular options include sour cream, avocado, salsa, cilantro, and green onions.
- Enjoy your delicious and easy taco zucchini skillet! It’s perfect for a quick weeknight meal.
Tips and Variations:
- Spice it up: If you like a little extra heat, add a pinch of cayenne pepper or a dash of hot sauce to the skillet.
- Add more vegetables: Feel free to add other vegetables to the skillet, such as mushrooms, jalapenos, or spinach.
- Use different beans: You can substitute the black beans with pinto beans or kidney beans.
- Make it vegetarian: Omit the ground beef and add more beans or vegetables to make it a vegetarian dish. You can also use a plant-based ground meat substitute.
- Serve it with rice: Serve the taco zucchini skillet over rice for a more complete meal.
- Make it ahead of time: You can prepare the taco zucchini skillet ahead of time and store it in the refrigerator for up to 3 days. Reheat it in the microwave or on the stovetop before serving.
- Freezing Instructions: Let the skillet cool completely. Transfer to a freezer-safe container and freeze for up to 3 months. Thaw overnight in the refrigerator before reheating.
- Low-Carb Option: Skip the corn and serve over cauliflower rice or with lettuce wraps for a low-carb version.
- Cheese Variations: Monterey Jack, Pepper Jack, or a Mexican blend cheese would also work great in this recipe.
- Serving Suggestions: Serve with tortilla chips for dipping, or use as a filling for tacos or burritos.
Detailed Cooking Notes:
Browning the Meat: The key to a flavorful skillet is properly browning the meat. Don’t overcrowd the pan, as this will steam the meat instead of browning it. If necessary, brown the meat in batches. Also, don’t be afraid to let the meat develop a nice crust on the bottom of the pan before breaking it up. This adds a lot of flavor.
Vegetable Prep: Make sure to chop the vegetables into roughly the same size pieces so they cook evenly. If you’re using vegetables that take longer to cook, like carrots, add them to the skillet before the zucchini and bell pepper.
Taco Seasoning: You can use store-bought taco seasoning or make your own. To make your own, combine chili powder, cumin, paprika, oregano, garlic powder, onion powder, salt, and pepper. Adjust the amounts to your liking.
Simmering: Simmering the skillet allows the flavors to meld together and the sauce to thicken slightly. Don’t skip this step! If the sauce becomes too thick, add a little more water.
Cheese Melting: To ensure the cheese melts evenly, make sure the skillet is covered tightly. If the cheese isn’t melting properly, you can place the skillet under the broiler for a minute or two, but watch it carefully to prevent burning.
Topping Ideas: The possibilities are endless when it comes to toppings! Some other ideas include guacamole, pico de gallo, pickled onions, and shredded lettuce.
Skillet Size: A 12-inch skillet is ideal for this recipe, but you can use a smaller skillet if needed. Just be sure to adjust the cooking time accordingly.
Meat Alternatives: If you’re not a fan of ground beef or turkey, you can use ground chicken, sausage, or even shredded chicken. Just be sure to adjust the cooking time accordingly.
Leftovers: Leftovers can be stored in the refrigerator for up to 3 days. Reheat in the microwave or on the stovetop. The flavors actually get better as the skillet sits, so leftovers are always a treat!
Serving a Crowd: This recipe is easily doubled or tripled to serve a crowd. Just be sure to use a larger skillet or cook in batches.
Adjusting the Salt: Taste the skillet before adding the cheese and adjust the salt as needed. The taco seasoning and diced tomatoes and green chilies already contain salt, so you may not need to add much more.
Don’t Overcook the Zucchini: Zucchini can become mushy if overcooked. Add it to the skillet towards the end of the cooking process and cook until it’s just tender-crisp.
Using Fresh Tomatoes: If you prefer to use fresh tomatoes instead of canned, you can use about 2 cups of chopped tomatoes. Add them to the skillet along with the other vegetables.
Adding Lime Juice: A squeeze of fresh lime juice at the end adds a bright, zesty flavor to the skillet.
Making it Vegan: To make this recipe vegan, use a plant-based ground meat substitute, omit the cheese, and use vegan sour cream for topping.
Using Different Peppers: Feel free to experiment with different types of peppers, such as poblano peppers or Anaheim peppers. Just be sure to adjust the cooking time accordingly.
Adding Rice Directly: For a one-pot meal, you can add cooked rice directly to the skillet after simmering. Stir to combine and heat through.
Conclusion:
This Taco Zucchini Skillet is truly a game-changer, and I wholeheartedly believe it deserves a permanent spot in your regular recipe rotation. Why? Because it effortlessly combines delicious, comforting flavors with a healthy dose of vegetables, all while being incredibly quick and easy to prepare. We’re talking weeknight dinner champion material here! The savory taco-seasoned ground meat, the slightly sweet and tender zucchini, the creamy cheese it all comes together in a symphony of textures and tastes that will leave you completely satisfied. Forget boring, bland zucchini dishes; this skillet is a flavor explosion that even the pickiest eaters will enjoy.
But the best part? It’s incredibly versatile! While I’ve presented my favorite version, the possibilities for customization are endless. Feeling adventurous? Try adding a can of black beans or corn for extra heartiness and a touch of sweetness. Want to kick up the heat? A pinch of cayenne pepper or a drizzle of your favorite hot sauce will do the trick. For a vegetarian option, simply swap the ground meat for crumbled tofu or lentils it works beautifully!
Beyond the core ingredients, think about how you want to serve it. Straight from the skillet is perfectly acceptable (and encouraged!), but you can also get creative. Spoon it into warm tortillas for delicious tacos, pile it on top of crispy tortilla chips for a quick and easy nacho topping, or serve it over a bed of fluffy rice or quinoa for a more substantial meal. A dollop of sour cream or Greek yogurt, a sprinkle of fresh cilantro, and a squeeze of lime juice are the perfect finishing touches.
And don’t forget about breakfast! Leftover Taco Zucchini Skillet makes a fantastic filling for omelets or breakfast burritos. Just imagine waking up to that savory, cheesy goodness it’s the perfect way to start your day!
I’ve poured my heart into perfecting this recipe, and I’m so excited for you to try it. I truly believe you’ll love it as much as I do. It’s the perfect solution for busy weeknights, a crowd-pleasing dish for potlucks, and a healthy and delicious way to incorporate more vegetables into your diet.
So, what are you waiting for? Gather your ingredients, fire up your skillet, and get ready to experience the magic of this Taco Zucchini Skillet. I promise you won’t be disappointed.
Once you’ve given it a try, I would absolutely love to hear about your experience! Did you make any modifications? What did you serve it with? What did your family think? Share your photos and comments with me I’m always eager to see your culinary creations and learn from your experiences. Happy cooking! Let me know what you think of this recipe, and if you have any questions, don’t hesitate to ask. I’m here to help you create delicious and memorable meals. Enjoy!
Taco Zucchini Skillet: A Delicious and Healthy One-Pan Meal
A quick and easy taco zucchini skillet packed with ground beef, veggies, beans, corn, and cheesy goodness! Perfect for a weeknight meal.
Ingredients
- 1 tablespoon olive oil
- 1 pound ground beef (or ground turkey)
- 1 medium yellow onion, chopped
- 2 cloves garlic, minced
- 1 red bell pepper, chopped
- 2 medium zucchini, chopped
- 1 (15 ounce) can black beans, rinsed and drained
- 1 (15 ounce) can corn, drained
- 1 (10 ounce) can diced tomatoes and green chilies (like Rotel), undrained
- 1 packet (1 ounce) taco seasoning
- 1/2 cup water
- 1 cup shredded cheddar cheese (or your favorite cheese)
- Optional toppings: sour cream, avocado, salsa, cilantro, green onions
Instructions
- Heat olive oil in a large skillet (12-inch) over medium-high heat. Add ground beef (or turkey) and brown thoroughly, breaking it up with a spatula (5-7 minutes). Drain off any excess grease.
- Add chopped onion and minced garlic to the skillet. Cook for 3-5 minutes, or until the onion becomes translucent and fragrant, stirring occasionally.
- Add chopped red bell pepper and zucchini. Cook for another 5-7 minutes, or until the vegetables are slightly softened, stirring occasionally.
- Add drained black beans, drained corn, and undrained diced tomatoes and green chilies (Rotel) to the skillet.
- Sprinkle taco seasoning over the mixture and stir well to combine.
- Add water and stir again.
- Bring the mixture to a simmer. Reduce heat to low, cover, and simmer for 10-15 minutes, stirring occasionally.
- Remove the lid and sprinkle shredded cheddar cheese (or your favorite cheese) evenly over the top.
- Cover again and cook for 2-3 minutes, or until the cheese is melted and bubbly.
- Remove from heat and serve with your favorite toppings (sour cream, avocado, salsa, cilantro, green onions).
Notes
- Spice it up: Add cayenne pepper or hot sauce for extra heat.
- Vegetable Variations: Add mushrooms, jalapenos, or spinach.
- Bean Variations: Substitute black beans with pinto or kidney beans.
- Vegetarian Option: Omit ground beef and add more beans/vegetables or plant-based ground meat substitute.
- Serving Suggestions: Serve over rice, with tortilla chips, or as a filling for tacos/burritos.
- Make Ahead: Prepare ahead of time and store in the refrigerator for up to 3 days. Reheat in the microwave or on the stovetop before serving.
- Freezing Instructions: Let the skillet cool completely. Transfer to a freezer-safe container and freeze for up to 3 months. Thaw overnight in the refrigerator before reheating.
- Low-Carb Option: Skip the corn and serve over cauliflower rice or with lettuce wraps.
- Cheese Variations: Monterey Jack, Pepper Jack, or a Mexican blend cheese would also work great in this recipe.
Leave a Comment