
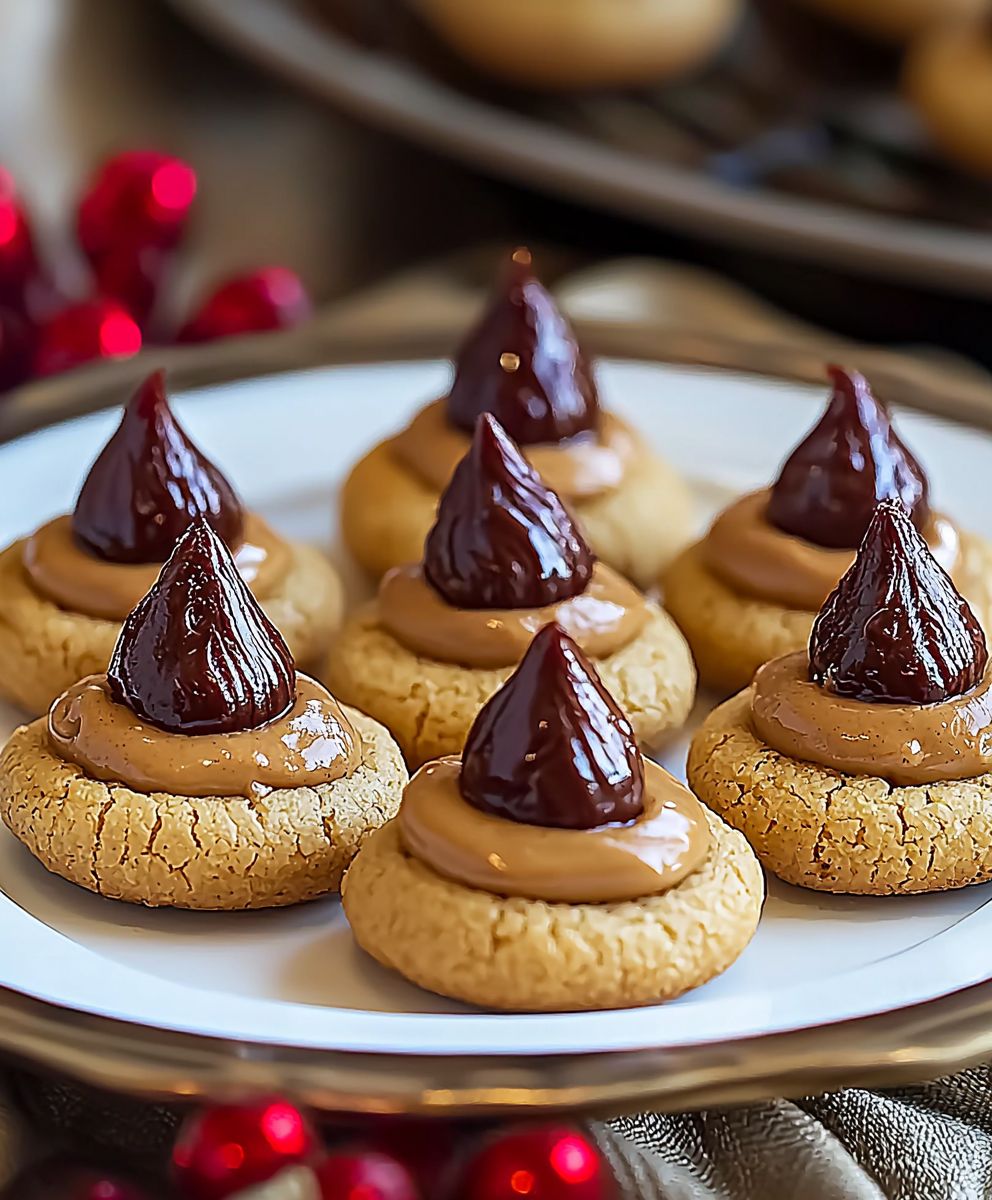
Peanut Butter Blossom Cookies: Is there anything that screams “holiday cheer” quite like these iconic treats? I think not! The combination of a soft, melt-in-your-mouth peanut butter cookie topped with a chocolate kiss is simply irresistible. These cookies aren’t just delicious; they’re a nostalgic trip down memory lane for many of us.
While the exact origins are debated, the Peanut Butter Blossom Cookie gained widespread popularity in the 1950s, thanks to a clever entry in the Pillsbury Bake-Off. Since then, they’ve become a staple at holiday gatherings, bake sales, and cookie exchanges across the country. Their enduring appeal lies in their perfect balance of flavors and textures. The nutty, slightly salty peanut butter cookie provides a delightful contrast to the sweet, creamy chocolate kiss. Plus, let’s be honest, they’re incredibly fun to make, especially with kids!
But beyond their taste and ease of preparation, Peanut Butter Blossom Cookies hold a special place in our hearts because they represent warmth, family, and the joy of sharing. They’re the kind of cookie that brings people together, sparking conversations and creating lasting memories. So, whether you’re a seasoned baker or a novice in the kitchen, I encourage you to give this recipe a try. You’ll be amazed at how easily you can create these little bites of happiness!

Ingredients:
- 1 ½ cups all-purpose flour
- 1 teaspoon baking soda
- ½ teaspoon baking powder
- ½ cup (1 stick) unsalted butter, softened
- ¾ cup creamy peanut butter
- ¾ cup granulated sugar
- ¾ cup packed brown sugar
- 1 large egg
- 2 tablespoons milk
- 1 teaspoon vanilla extract
- Granulated sugar, for rolling
- Approximately 48 milk chocolate Hershey’s Kisses, unwrapped
Preparing the Dough:
- Combine the dry ingredients: In a medium bowl, whisk together the flour, baking soda, and baking powder. Make sure to get rid of any lumps in the flour for a smoother cookie dough. Set this aside for later.
- Cream together the butter and peanut butter: In a large bowl (or the bowl of your stand mixer), cream together the softened butter and peanut butter until light and fluffy. This usually takes about 2-3 minutes on medium speed. Scrape down the sides of the bowl occasionally to ensure everything is evenly mixed. The mixture should be smooth and well combined.
- Add the sugars: Gradually add the granulated sugar and brown sugar to the butter and peanut butter mixture. Beat until well combined and fluffy. Again, scrape down the sides of the bowl as needed. The mixture will become lighter in color and more voluminous.
- Incorporate the egg, milk, and vanilla: Beat in the egg until fully incorporated. Then, add the milk and vanilla extract and mix until just combined. Be careful not to overmix at this stage. Overmixing can lead to tough cookies.
- Gradually add the dry ingredients to the wet ingredients: Slowly add the dry ingredients to the wet ingredients, mixing on low speed until just combined. Be careful not to overmix. Overmixing develops the gluten in the flour, resulting in tough cookies. Mix until the flour is just incorporated, and no streaks of flour remain.
- Chill the dough: Cover the bowl with plastic wrap and chill the dough in the refrigerator for at least 30 minutes. This chilling time is crucial because it allows the gluten to relax, preventing the cookies from spreading too much during baking. It also makes the dough easier to handle. You can chill the dough for up to 2 hours. If chilling for longer than 2 hours, you may need to let the dough sit at room temperature for a few minutes before scooping.
Shaping and Baking the Cookies:
- Preheat the oven: Preheat your oven to 375°F (190°C). Line baking sheets with parchment paper or silicone baking mats. Parchment paper helps prevent the cookies from sticking and makes cleanup easier.
- Shape the dough into balls: Remove the chilled dough from the refrigerator. Roll the dough into 1-inch balls. A cookie scoop can help ensure uniform size.
- Roll in sugar: Roll each ball in granulated sugar, coating it evenly. The sugar coating adds a delightful sweetness and a slightly crunchy texture to the cookies.
- Place on baking sheets: Place the sugared dough balls onto the prepared baking sheets, spacing them about 2 inches apart. This allows for even baking and prevents the cookies from sticking together as they spread.
- Bake the cookies: Bake for 8-10 minutes, or until the edges are lightly golden brown. The centers of the cookies will still appear slightly soft. Be careful not to overbake the cookies, as they will become dry and crumbly.
- Add the Hershey’s Kisses: Remove the baking sheets from the oven. Immediately press a Hershey’s Kiss into the center of each cookie. Press firmly but gently, being careful not to crack the cookies. The heat from the cookies will slightly melt the chocolate, helping it adhere to the cookie.
- Cool the cookies: Let the cookies cool on the baking sheets for a few minutes before transferring them to a wire rack to cool completely. This allows the cookies to firm up slightly and prevents them from breaking.
Tips and Tricks for Perfect Peanut Butter Blossoms:
- Use softened butter: Make sure your butter is properly softened before creaming it with the peanut butter. Softened butter will cream more easily and create a lighter, fluffier cookie. If you forget to take the butter out ahead of time, you can microwave it in short bursts (5-10 seconds) until softened, but be careful not to melt it.
- Don’t overmix the dough: Overmixing the dough will develop the gluten in the flour, resulting in tough cookies. Mix until the ingredients are just combined.
- Chill the dough: Chilling the dough is essential for preventing the cookies from spreading too much during baking. It also makes the dough easier to handle.
- Use parchment paper or silicone baking mats: These will prevent the cookies from sticking to the baking sheets and make cleanup easier.
- Don’t overbake the cookies: Overbaked cookies will be dry and crumbly. Bake until the edges are lightly golden brown and the centers are still slightly soft.
- Press the Hershey’s Kisses in immediately: Press the Hershey’s Kisses into the cookies immediately after removing them from the oven. The heat from the cookies will slightly melt the chocolate, helping it adhere to the cookie.
- Variations: Get creative with your Peanut Butter Blossoms! Try using different types of Hershey’s Kisses, such as dark chocolate, caramel-filled, or peppermint bark. You can also add chopped nuts or sprinkles to the dough or roll the cookies in different types of sugar, such as turbinado sugar or powdered sugar.
- Storage: Store the cooled cookies in an airtight container at room temperature for up to 3 days. You can also freeze the cookies for longer storage. To freeze, place the cooled cookies in a single layer on a baking sheet and freeze until solid. Then, transfer the frozen cookies to an airtight container or freezer bag. The cookies can be frozen for up to 2 months. Thaw the cookies at room temperature before serving.
- Peanut Butter Alternatives: If you have peanut allergies, you can substitute the peanut butter with other nut butters like almond butter, cashew butter, or sunflower seed butter (sunbutter). Keep in mind that the flavor and texture of the cookies may vary slightly depending on the nut butter you use.
- Gluten-Free Option: To make these cookies gluten-free, substitute the all-purpose flour with a gluten-free all-purpose flour blend. Make sure the blend contains xanthan gum, which helps to bind the ingredients together.
Troubleshooting:
- Cookies are spreading too much: This is usually caused by not chilling the dough long enough or using too much butter. Make sure to chill the dough for at least 30 minutes and use the correct amount of butter.
- Cookies are dry and crumbly: This is usually caused by overbaking the cookies. Bake until the edges are lightly golden brown and the centers are still slightly soft.
- Hershey’s Kisses are falling off: Make sure to press the Hershey’s Kisses into the cookies immediately after removing them from the oven. The heat from the cookies will slightly melt the chocolate, helping it adhere to the cookie.
- Dough is too dry: If your dough seems too dry and crumbly, add a tablespoon of milk at a time until the dough comes together. The amount of liquid needed can vary depending on the humidity and the type of flour used.
- Dough is too sticky: If your dough is too sticky to handle, add a tablespoon of flour at a time until the dough is easier to work with. Again, the amount of flour needed can vary.
Conclusion:
And there you have it! These Peanut Butter Blossom Cookies are more than just a sweet treat; they’re a nostalgic trip down memory lane, a guaranteed crowd-pleaser, and surprisingly simple to make. I truly believe this recipe deserves a spot in your baking repertoire. The perfect balance of salty peanut butter and sweet chocolate, combined with that soft, chewy texture, makes them utterly irresistible.
Why is this recipe a must-try? Because it delivers on all fronts. It’s quick enough for a weeknight baking session, impressive enough for a holiday gathering, and delicious enough to satisfy any sweet tooth. Plus, the fun of pressing in those Hershey’s Kisses is something everyone, young and old, can enjoy. Forget store-bought cookies these homemade blossoms are in a league of their own.
But the best part? You can easily customize them to your liking!
Serving Suggestions and Variations:
* Classic Presentation: Serve these cookies warm, straight from the oven, with a tall glass of milk. The contrast between the warm cookie and cold milk is simply divine.
* Elevated Dessert: Crumble a Peanut Butter Blossom Cookie over vanilla ice cream for an instant upgrade. Add a drizzle of chocolate syrup for extra indulgence.
* Party Platter Perfection: Arrange the cookies on a festive platter alongside other holiday treats. Their classic look and delicious flavor make them a welcome addition to any spread.
* Peanut Butter Cup Variation: Instead of Hershey’s Kisses, try using miniature peanut butter cups. The extra peanut butter flavor is a dream come true for peanut butter lovers.
* Different Chocolate: Experiment with different types of chocolate! Milk chocolate is classic, but dark chocolate offers a richer, more sophisticated flavor. White chocolate is another fun option, especially during the holidays.
* Sprinkle Magic: Before baking, roll the dough balls in festive sprinkles for a pop of color and added texture. This is a great way to personalize the cookies for different occasions.
* Gluten-Free Option: Substitute the all-purpose flour with a gluten-free blend for a delicious treat that everyone can enjoy. Just be sure to use a blend that’s designed for baking.
* Add Some Spice: A pinch of cinnamon or nutmeg to the dough can add a warm, comforting flavor that complements the peanut butter and chocolate perfectly.
* Make them Vegan: Substitute the butter with a vegan butter alternative and use a plant-based milk. Ensure your chocolate kisses are also vegan-friendly.
I’m so excited for you to try this recipe and experience the joy of baking these delightful cookies. I know you’ll love them as much as I do.
So, go ahead, preheat your oven, gather your ingredients, and get ready to bake some magic! Don’t be afraid to experiment with the variations and make them your own.
And most importantly, please share your experience! I’d love to hear how your Peanut Butter Blossom Cookies turned out. Did you try any of the variations? What did your family and friends think? Leave a comment below and let me know! Happy baking! I can’t wait to see your creations!
Peanut Butter Blossom Cookies: The Ultimate Recipe & Baking Guide
Soft peanut butter cookies topped with a milk chocolate Hershey's Kiss. Perfect for holidays or any time!
Ingredients
- 1 ½ cups all-purpose flour
- 1 teaspoon baking soda
- ½ teaspoon baking powder
- ½ cup (1 stick) unsalted butter, softened
- ¾ cup creamy peanut butter
- ¾ cup granulated sugar
- ¾ cup packed brown sugar
- 1 large egg
- 2 tablespoons milk
- 1 teaspoon vanilla extract
- Granulated sugar, for rolling
- Approximately 48 milk chocolate Hershey’s Kisses, unwrapped
Instructions
- Combine dry ingredients: In a medium bowl, whisk together the flour, baking soda, and baking powder. Set aside.
- Cream butter and peanut butter: In a large bowl (or stand mixer), cream together the softened butter and peanut butter until light and fluffy (2-3 minutes on medium speed). Scrape down the sides of the bowl.
- Add sugars: Gradually add the granulated sugar and brown sugar to the butter mixture. Beat until well combined and fluffy. Scrape down the sides of the bowl.
- Incorporate egg, milk, and vanilla: Beat in the egg until fully incorporated. Then, add the milk and vanilla extract and mix until just combined. Do not overmix.
- Gradually add dry ingredients: Slowly add the dry ingredients to the wet ingredients, mixing on low speed until just combined. Do not overmix. Mix until the flour is just incorporated, and no streaks of flour remain.
- Chill the dough: Cover the bowl with plastic wrap and chill the dough in the refrigerator for at least 30 minutes (up to 2 hours).
- Preheat oven: Preheat your oven to 375°F (190°C). Line baking sheets with parchment paper or silicone baking mats.
- Shape dough into balls: Remove the chilled dough from the refrigerator. Roll the dough into 1-inch balls.
- Roll in sugar: Roll each ball in granulated sugar, coating it evenly.
- Place on baking sheets: Place the sugared dough balls onto the prepared baking sheets, spacing them about 2 inches apart.
- Bake the cookies: Bake for 8-10 minutes, or until the edges are lightly golden brown. The centers of the cookies will still appear slightly soft.
- Add Hershey’s Kisses: Remove the baking sheets from the oven. Immediately press a Hershey’s Kiss into the center of each cookie.
- Cool the cookies: Let the cookies cool on the baking sheets for a few minutes before transferring them to a wire rack to cool completely.
Notes
- Use softened butter for best results.
- Don’t overmix the dough.
- Chilling the dough is essential.
- Use parchment paper or silicone baking mats.
- Don’t overbake the cookies.
- Press the Hershey’s Kisses in immediately after baking.
- Variations: Try different types of Hershey’s Kisses or add chopped nuts/sprinkles.
- Storage: Store in an airtight container at room temperature for up to 3 days or freeze for up to 2 months.
- Peanut Butter Alternatives: Use almond butter, cashew butter, or sunflower seed butter.
- Gluten-Free Option: Substitute with a gluten-free all-purpose flour blend containing xanthan gum.
- Troubleshooting: Refer to the troubleshooting section in the original text for solutions to common problems.


Leave a Comment